We're making it easier to get around Constant Contact with a brand new left navigation. Not all accounts have that change yet, so if your navigation looks different from our articles, that's why–but everything from the top can now be found on the left!

Email and Digital Marketing
How can we help you?
Search our help articles, video tutorials, and quickstart guides

You've got this. You've got us. Search our Knowledge Base to quickly find answers to your questions.

Create your own custom path in the Automation Path Builder

Article: 000046724
Updated: May 9, 2025

Start with a blank slate, select a trigger, and then add rules and actions to build your custom automation path without the confines of a pre-designed template

Email Plus IconReview your plan: You can always build out a custom path, but if you're not able to activate it, check your email plan. Upgrading your email plan and adding SMS marketing gives you full access to all the features available in the Automation Path Builder. For more information about what's available in your current email plan, please see the Plans & Pricing page in your account.


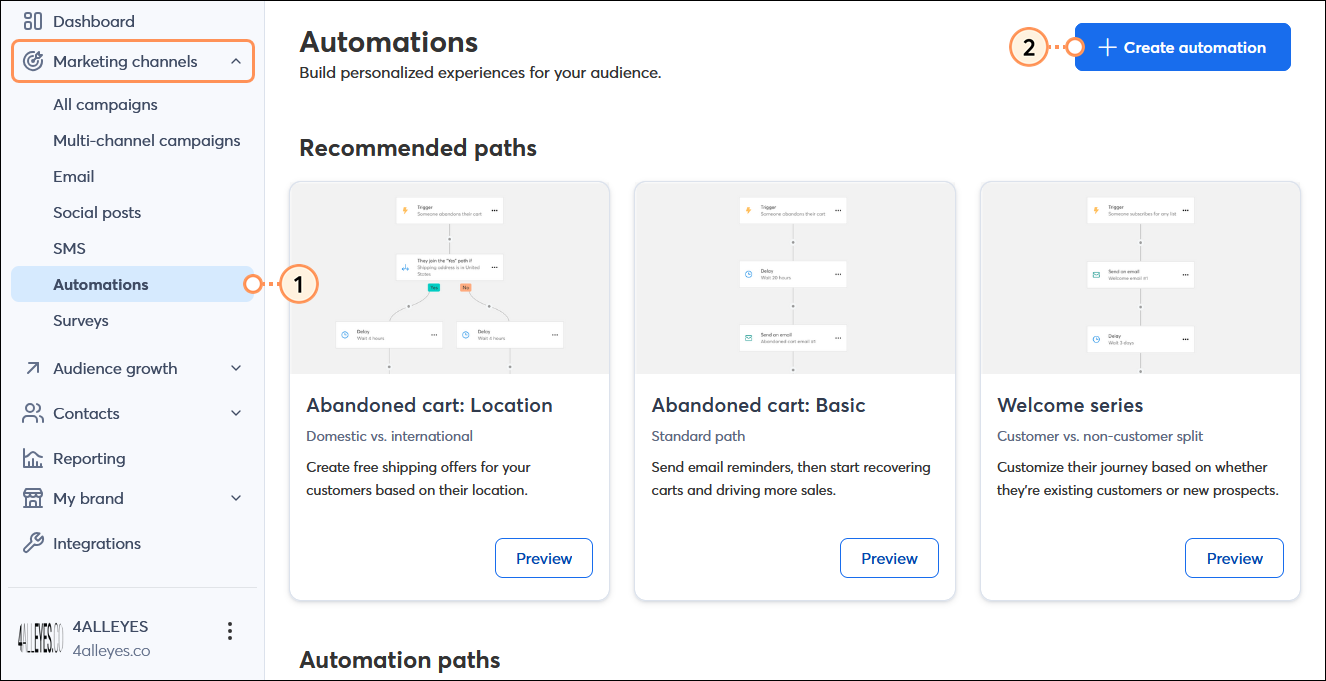
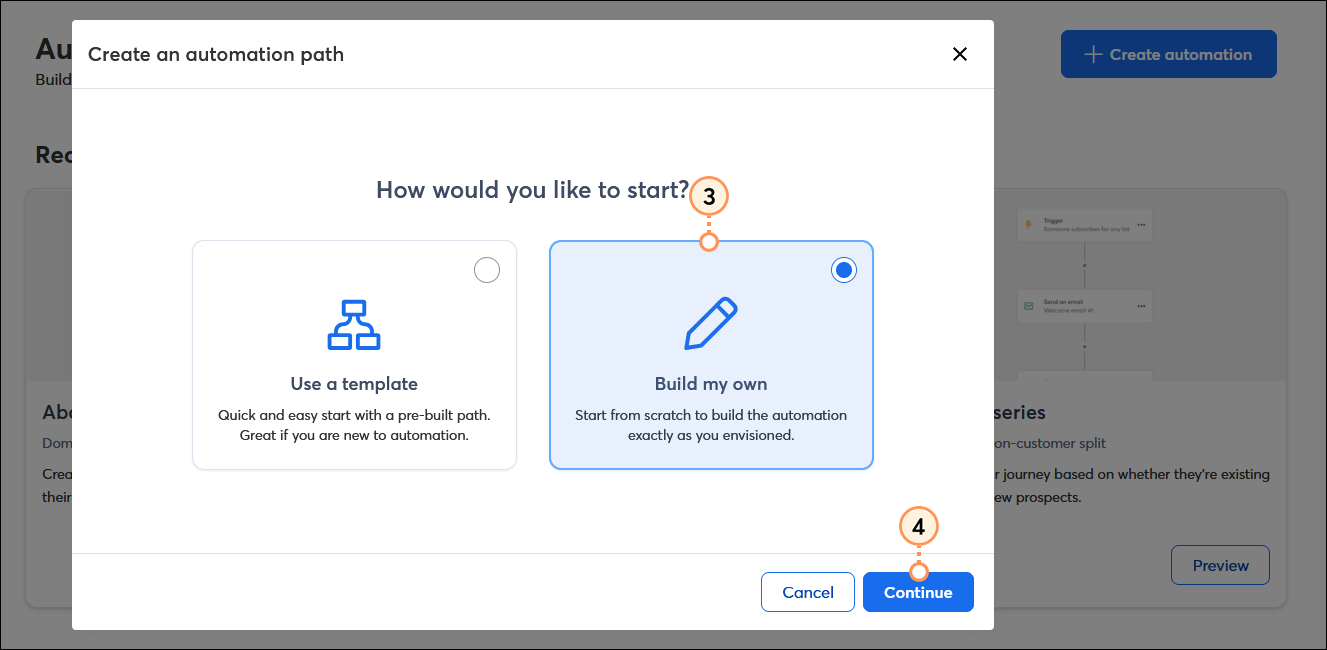
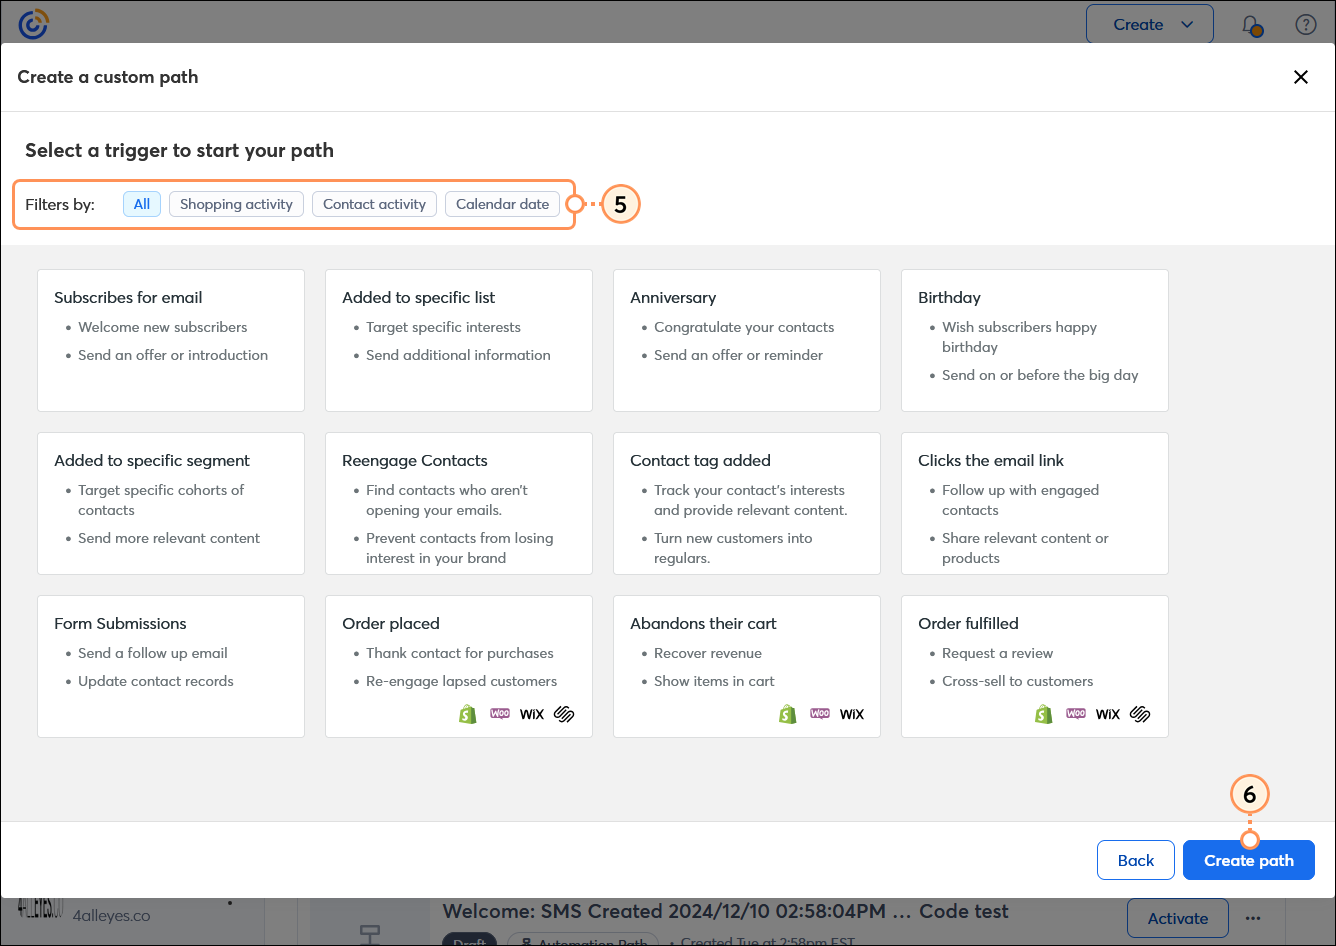
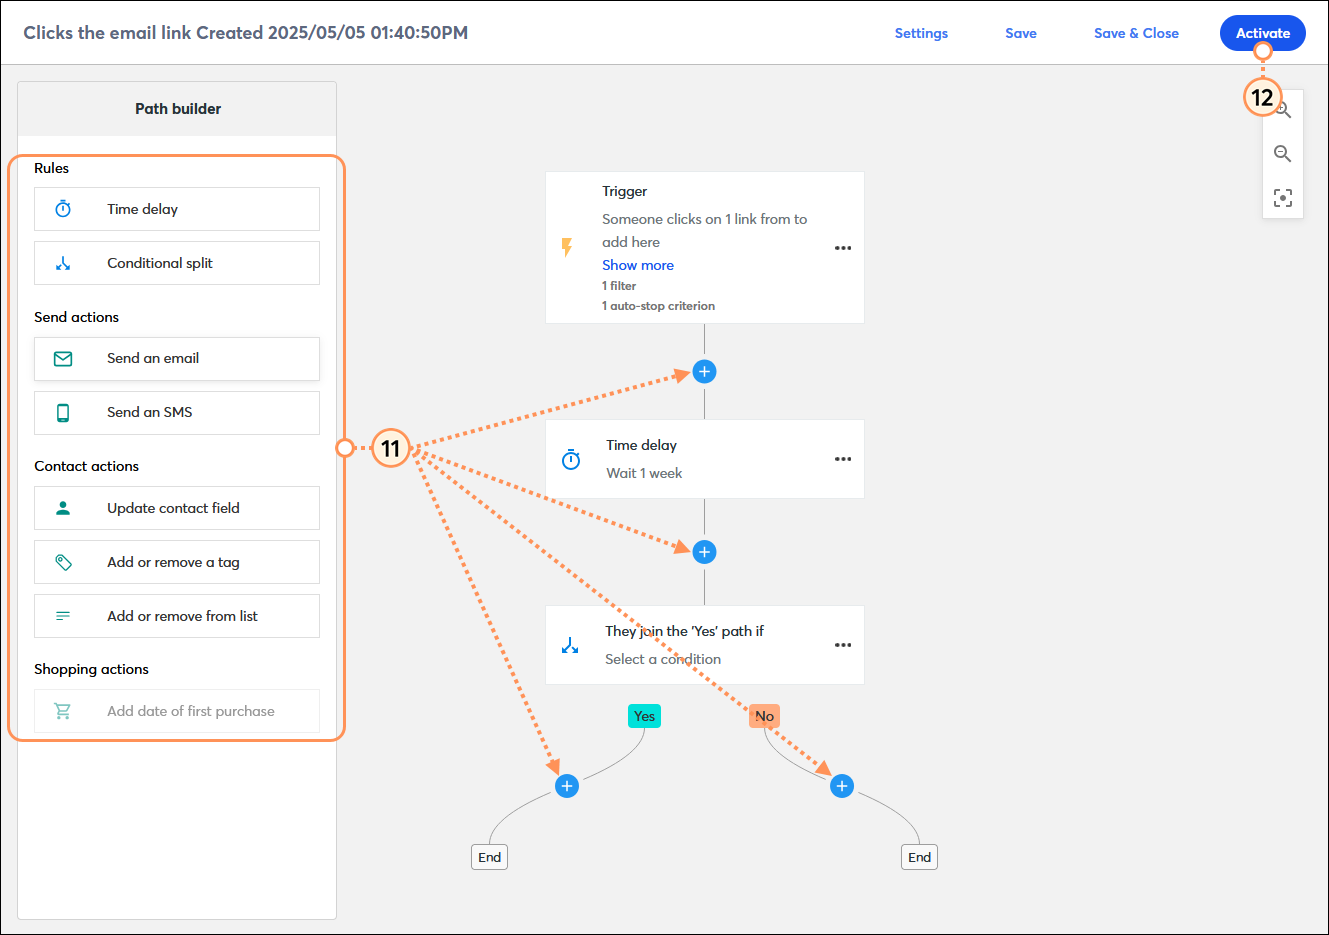
We offer a variety of templates for our Automation Path Builder to get you started quickly, but when your unique need doesn't fit into a pre-built template, the custom template gives you the flexibility to create paths from scratch. Use it to create something simple to send a single message, or design something more sophisticated to send a series of emails or SMS messages. You can have a maximum of 50 steps in an automation path.

  1. Click Marketing channels > Automations.
  2. Click the + Create automation button.

    Marketing menu expanded and Automations option selected, and Automations dashboard with + Create an automation path button

  3. Select the Customize a path option.
  4. Click the Continue button.

    Create and automation path overlay with choose a path options and Customize a path option selected, and Start button
     
  5. Choose the trigger that starts your customer on their path. You can further narrow the options based on date, contact activity, or ecommerce activity:
  • Abandons their cart - Use this trigger to start your automation path when someone adds items to their shopping cart but doesn't purchase them. (Compatible with Shopify, Wix, and WooCommerce stores.)
  • Added to specific list - Use this trigger to start your automation path when you manually add a contact to a contact list.
    Note: Adding existing contacts to a different list doesn't increase your active contacts and doesn't impact your billing.
  • Added to specific segment - Use this trigger to start your automation path when a contact automatically meets the criteria for a specific segment. You can select an existing segment or create a new segment, and you can even make edits to a segment to add or remove criteria.
  • Anniversary - Use this trigger to start your automation path on or before the anniversary date on file for your contact. Only contacts with the Anniversary contact field are compatible with this trigger. Anniversary dates added as custom fields aren't compatible. You can enable your sign-up form to include an anniversary date, or you can manually update your contacts by editing their contact record to include the anniversary date or by importing a file of contacts with an Anniversary column included.
  • Birthday - Use this trigger to start your automation path on or before the birth date on file for your contact. Birthdays added as custom fields aren't compatible. Only contacts with the Anniversary contact field are compatible with this trigger. Anniversary dates added as custom fields aren't compatible. You can enable your sign-up form to include a birthdate, or you can manually update your contacts by editing their contact record to include the birthdate or by importing a file of contacts with a Birthday column included.
  • Clicks the email link - Use this trigger to start your automation path when a contact clicks any link or a specific link in an email of your choosing.
  • Contact tag added - Use this trigger to start your automation path when a specific tag is added to a contact. You can either manually add the tag by importing a spreadsheet with a Tags column included, or add a tag automatically using the Automation Path Builder.
  • Form submissions - Use this trigger to start your automation path when a contact completes and submits a Sign-up Landing Page.
  • Order fulfilled - Use this trigger to start your automation path when an order is marked as fulfilled or complete in your online store. (Compatible with Shopify, Squarespace, Wix, and WooCommerce stores.)
  • Order placed - Use this trigger to start your automation path when a customer completes a purchase. (Compatible with Shopify, Squarespace, Wix, and WooCommerce stores.)
  • Reengage contacts - Use this trigger to start your automation path when a contact's engagement status drops from engaged to somewhat engaged or from engaged or somewhat engaged to least engaged.
  • Subscribes for email -  Use this trigger to start your automation path when a new contact joins your list through any of our sign-up tools.
  1. Click the Create path button.

    Create a custom path overlay with All filter selected and trigger options, and Create path button
     
  2. Customize your trigger details.
    Note: The triggers are unique to the option you selected in step 6. In this example, the selected trigger is "clicks an email link," and the trigger details include selecting an email and the link in the email. If you start building your path and don't think you selected the right trigger, you can change it by clicking the "Change trigger" link.
  3. (Optional) Create a contact filter so that a contact must satisfy both the trigger and the criteria you select before they can start your automation path.
  4. (Optional) Set an auto-stop to remove contacts from a path when they meet specific criteria.
  5. Click the Save button.

    Automation Path Builder with Trigger details overlay for the Clicks an email link trigger, Trigger details section with email and specific link selected, Contact filter section with list membership filter example, and Auto-stop settings section with Shopping activity criterion, and Save button

  6. Use the path builder to drag steps into your path:
  • Rules give you the flexibility to set the time delay between steps and set the criteria your customers need to meet to follow the "Yes" or "No" path offered through a conditional split:
  • Time delay - Choose a period of time between the end of one action and the start of another action.
    Note: Your time delay options are based on the type of email plan you have.
  • Conditional split - Create a "Yes" and "No" path for an action. Your contacts need to meet criteria to follow the "Yes" path, and if they don't, they follow the "No" path. Both the "Yes" and "No" paths can include additional actions and rules.
  • Send actions let you choose the type of communication you want to send to your contacts:
  • Contact actions let you add or delete a tag from your contacts when they reach a specific step in your path:
  • Update contact field - Choose a contact field or custom field to add to your contacts when they reach this step in your path.
  • Add or remove a tag - Choose an existing tag to either add or remove from your contacts when they reach the step in your path.
  • Add or remove from list - Choose a list to either add a contact to or remove a contact from when they reach the step in your path.
  • Shopping actions are only available when you're using an ecommerce-specific trigger or if you have a conditional split in your path with an ecommerce condition.
  • Add date of first purchase - Choose to add the date a customer made their first purchase as an anniversary date or turn it into a custom field when a contact reaches this step in your path.
  1. When you're ready, click the Activate button in the upper right-hand corner of the screen.

    Automation Path Builder with Rules, Contact actions, and Shopping actions and drag-and-drop locations within the path, and Activate button

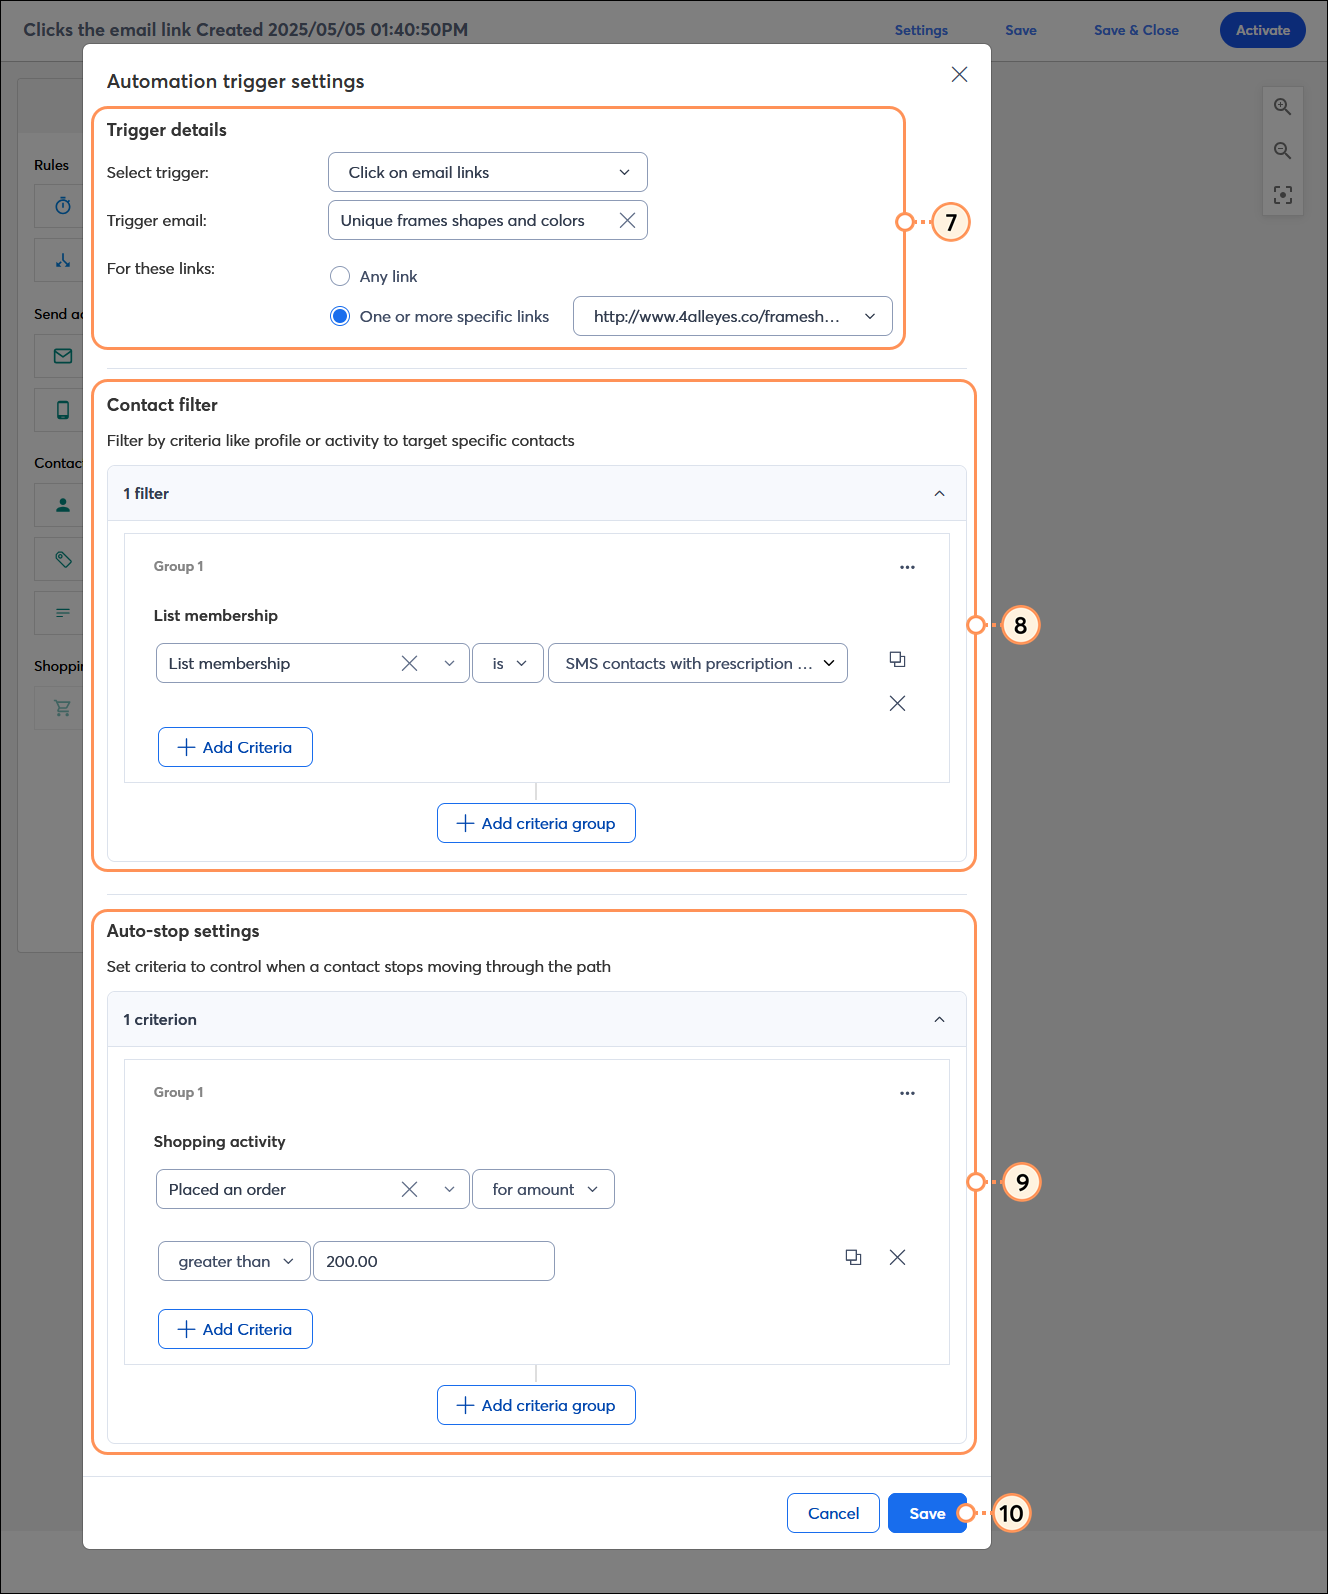
Once your automation path is activated, you’re brought to the details page where you can review your performance and reporting information. After your path is activated, you can go back and make edits at any time. Keep in mind that contacts who are already on your path won't see changes that happen to steps that they've already reached. If new steps are added to the end of a path, contacts that have already completed the path are not added to the new step.


Light Bulb IconDesign tip: Starting a path from scratch isn't for everybody! We also offer several pre-built templates to get you started more quickly, and they can either be used as-is or further customized!


Questions?

Ask the Community

Did this article answer your question?


Constant Contact Logo

Copyright © 2025 · All Rights Reserved · Constant Contact · Privacy Center