We're making it easier to get around Constant Contact with a brand new left navigation. Not all accounts have that change yet, so if your navigation looks different from our articles, that's why–but everything from the top can now be found on the left!

Email and Digital Marketing
How can we help you?
Search our help articles, video tutorials, and quickstart guides

You've got this. You've got us. Search our Knowledge Base to quickly find answers to your questions.

Add, edit, or remove a conditional split rule using the Automated Path Builder

Article: 000045848
Updated: November 22, 2024

Add "Yes" and "No" branches to a path in an Automated Communication to send more targeted messaging to the contacts who follow each branch of the path

Conditional splits put your contacts on a divergent path based on whether they meet specific criteria. If they meet the criteria, they move down the "Yes" path, and if they don't, they move down the "No" path. Your split can be based on how your contacts interact with your email or SMS messages, their shopping activity, or how you organize your contacts with segments, lists, and tags. You're also able to customize the experience of both paths so nobody is left hanging.


Add a conditional split to a path

Conditional splits let you create divergent "Yes" and "No" paths for your contacts and customers. Multiple splits can be added to your path, and you can mix and match category types to suit your needs. A conditional split can even follow another conditional split, giving you the ability to create complex paths.

  1. From the Rules section of the Path builder, drag a Conditional split into your path.
  2. Drop the Conditional split anywhere in the path where there is a plus sign. A conditional split rule must fall below the trigger in a path.

    Automation Path Builder with Conditional split Rule drag-and-dropped-into path-with-blue-plus-sign-indicator

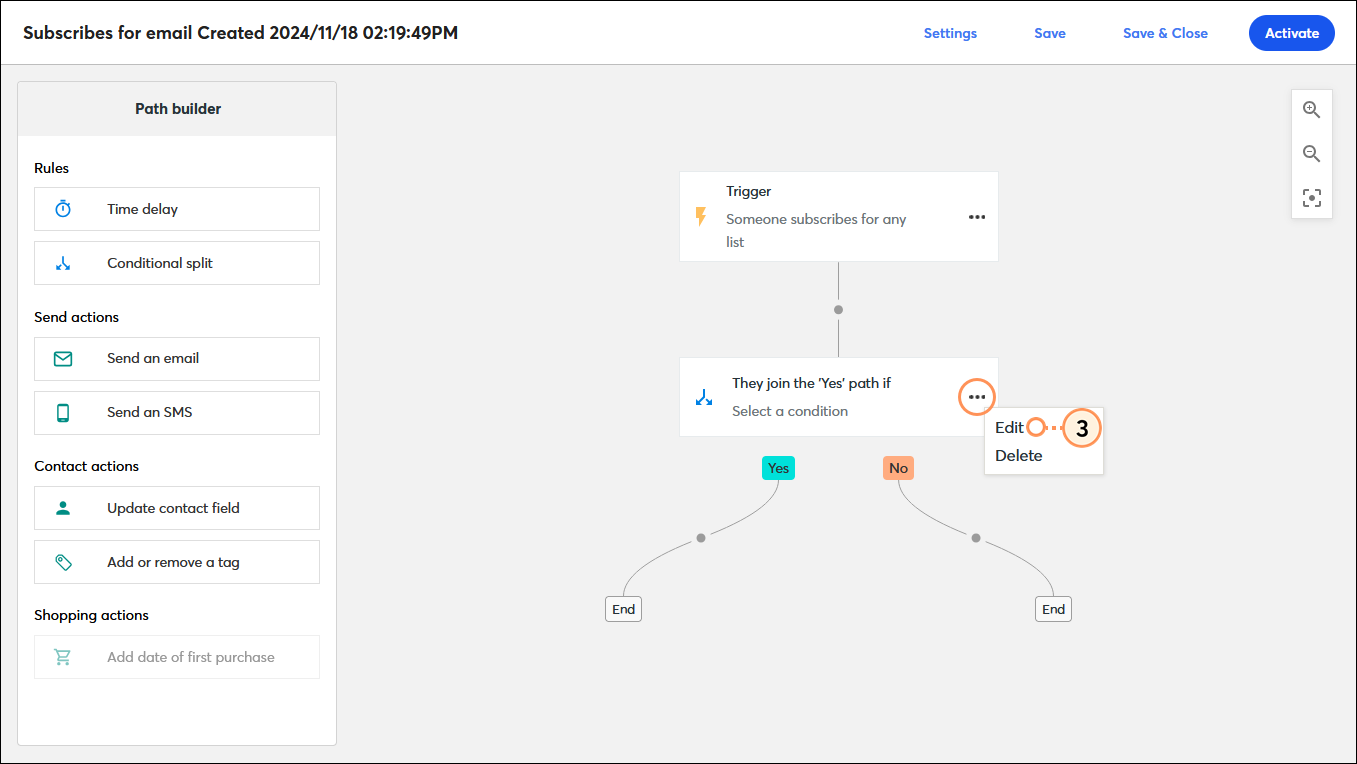
  3. On the conditional split step, click . . .  > Edit to customize the split based on contact email or SMS engagement, shopping activity, or contact membership in segments, lists, or tags.

    Automation Path Builder with Conditional split step, step menu, expanded, and Edit option selected

It's that easy! Repeat the steps for each conditional split you want to add to your path.


Edit a condition based on contact activity

Once you have a conditional split in your path, you can choose the condition, criteria, and value that moves your contact down the "Yes" path based on how your contacts engage with your email and SMS messages. Anyone who doesn't meet the criteria follows the "No" path.

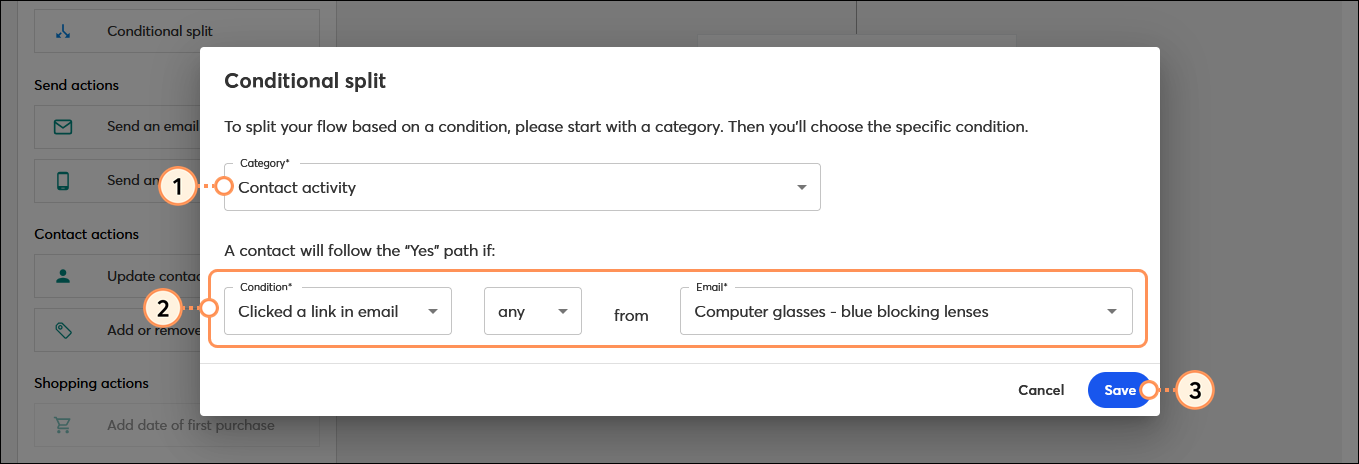
  1. From the Category menu, select "Contact detail."
  2. Select the Condition, Criteria, Value, and Trigger Link for the conditional split:

    ConditionCriteriaValueTrigger Link
    Clicked a link in an email
    • Any
    Start typing the name of the email or choose from a list of:
    • Emails from your automation paths
    • Draft emails from your account
    N/A
    • Specific
    Select a link from within the selected email.
    Clicked a link in an SMS
    • Any
    Start typing the name of the SMS message or choose from a list of:
    • SMS messages  from your automation paths
    • Draft SMS messages from your account
    N/A
    SMS status

    is 

    SubscribedN/A

     
  3. Click Save to return to the path builder.

    Conditional split overlay with Contact activity Category selected, Clicked a link in email Condition selected, email selected, and Save button

Repeat the steps for each conditional split in your path that you want to be base on contact activity.


Edit a condition based on contact memberships

Once you have a conditional split in your path, you can choose the condition, criteria, and value that moves your contact down the "Yes" path based on their membership in your lists, segments, or tags. Anyone who doesn't meet the criteria follows the "No" path.

  1. From the Category menu, select "Contact detail."
  2. Select the Condition, Criteria, and Value for the conditional split:
     
    ConditionCriteriaValue
    List membership
    • Specific
    Select a list from the drop-down menu
    Segment membership
    • Specific
    Select a segment from the drop-down menu
    • Any
    N/A
    Tag membership
    • Specific
    Select a tag from the drop-down menu
    • Any
    N/A

     
  3. Click Save to return to the path builder.

    Conditional split overlay with Contact activity Category selected, Clicked a link in email Condition selected, email selected, and Save button

Repeat the steps for each conditional split in your path that you want to be base on a contact membership.


Edit the condition based on shopping activity

Once you have a conditional split in your path, you can choose the condition, criteria, and value that moves your contact down the "Yes" path based on ecommerce activity from Shopify, Squarespace, Wix, or WooCommerce. Anyone who doesn't meet the criteria follows the "No" path.

  1. From the Category menu, select "Shopping activity."
  2. Select the Condition, Criteria, and Value for the conditional split:
     
    ConditionCriteriaValue
    Order value
    • is less than
    • is greater than
    • equals
    Enter whole dollar value
    Shipping countryisSelect country from drop-down menu
    Number of orders
    • is less than
    • is greater than
    • equals
    Enter whole dollar value
    Total spent to date
    • is less than
    • is greater than
    • equals
    Enter whole dollar value
    Placed an orderin the last
    • 7 days
    • 14 days
    • 30 days
    • 60 days
    • 3 months
    • 6 months
    • 1 year

     
  3. Click Save to return to the path builder.

    Conditional split overlay with Shopping activity Category selected, Total spent to date Condition selected, is greater than Criteria selected, Value field, and Save button

Repeat the steps for each conditional split in your path that you want to base on shopping activity.


Remove a conditional split from a path

When you want to get rid of a conditional split, you can delete the whole thing, or you're able to choose which path you want to keep so you don't have to spend time rebuilding it.
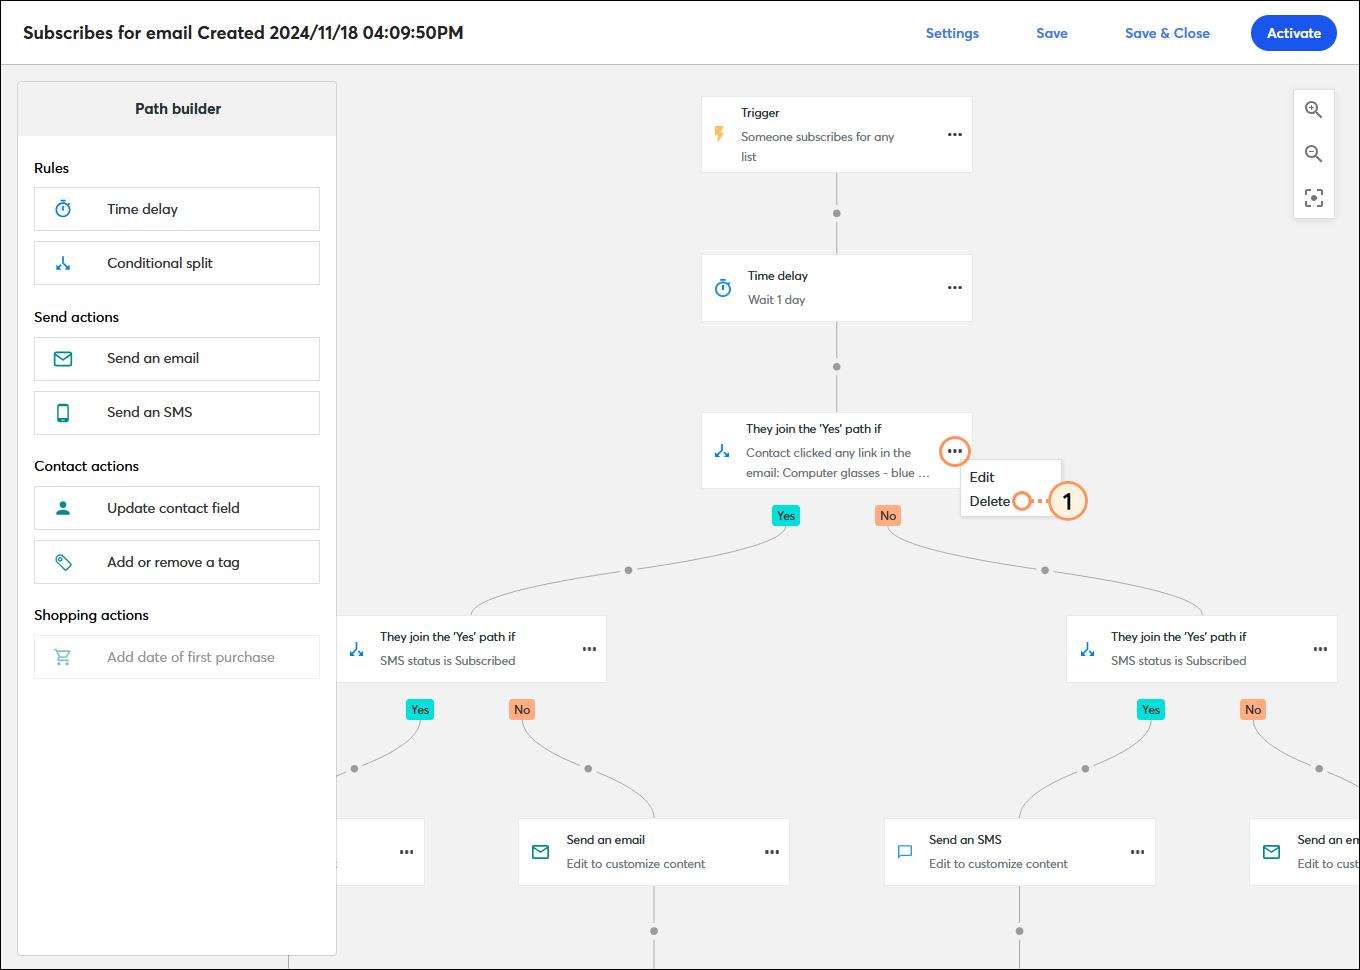
  1. Click the three dots (. . .) on the conditional split step in your path, and select "Remove."

    Automation Path Builder with They join the Yes path if step menu expanded and Remove option selected

  2. If there aren't any steps that follow the conditional split, or only one of the "Yes" or "No" paths has steps in it, the steps are kept when you delete the conditional split. Otherwise, if you have both paths built out, you can choose which portion of the path to keep before you delete it:
  • Keep the "Yes" path - This deletes all steps in the "No" path and turns the "Yes" path into the main path. Any further conditional splits in the "Yes" path are left alone and can be updated accordingly.
  • Keep the "No" path - This deletes all steps in the "Yes" path and turns the "No" path into the main path. Any further conditional splits in the "No" path are left alone.
  • Delete both paths - This option removes both the "Yes" and "No" paths and all the steps in them. Any further conditional splits that fall later in the steps of the "Yes" or "No" path are removed.
  1. Click Delete.

    Delete a conditional split overlay with Keep the Yes path, Keep the No path, and Delete both paths options, and Delete button

When you delete a conditional split rule it can't be undone, but it's easy to add another in if you need it.


Questions?

Ask the Community

Did this article answer your question?


Constant Contact Logo

Copyright © 2025 · All Rights Reserved · Constant Contact · Privacy Center