This article will detail how to save and schedule reports.
Article Contents
Users:
| Administrators | ✓ | |
| Company Managers | | |
| Marketing Managers | | |
| Sales Managers | | |
| Salespersons | | |
| Jr. Salespersons | | |
 | Tip: Are you looking for information about Constant Contact’s Email and Digital Marketing product? This article is for Constant Contact’s Lead Gen & CRM product. Head on over to the Email and Digital Marketing articles by clicking here. Not sure what the difference is? Read this article. |
Saving Email Reports
To save an email report, do the following:
- Click Analytics > Email Reports in the left toolbar.
- Build your email report.
- Open the email report.
- Adjust the date range.
- Click Save Report.
- Name the report.
- Click Save.
 Note:
Note: To save reports for recurring date ranges, select a specific time range value from the
Date Ranges drop-down menu. Manually selecting dates in the calendar will not result in recurring date ranges.
Saving Web Insights Reports
To save a web insights report, do the following:
- Click Analytics > Web Insights in the left toolbar.
- Adjust the date range.
- Click
 Options > Save Report.
 - Name the report.
- Click Save Report.
 Note:
Note: To save reports for recurring date ranges, select a specific time range value from the
Date Ranges drop-down menu. Manually selecting dates in the calendar will not result in recurring date ranges.
Saving Traffic Source Reports
To save a Traffic Source report, do the following:
- Click Analytics > Traffic Sources in the left toolbar.
- Adjust the date range.
- Select the specific website under the All Sites drop-down menu.
- Select the traffic type under the All Traffic drop-down menu.
- Select the source type under the All Sources drop-down menu.
- Click Options > Save Report.
- Enter a name for the report.
- Click OK.
 Note:
Note: To save reports for recurring date ranges, select a specific time range value from the
Date Ranges drop-down menu. Manually selecting dates in the calendar will not result in recurring date ranges.
Saving Pipeline Value Reports
To save a pipeline report, do the following:
- Click Analytics > Pipeline Value in the left toolbar.
- Sales Reports Overview.
- Adjust the date range.
- Apply changes as needed.
- Click Options > Save Report.
- Name the report.
- Click Save Report.
 Note:
Note: To save reports for recurring date ranges, select a specific time range value from the
Date Ranges drop-down menu. Manually selecting dates in the calendar will not result in recurring date ranges.
Saving Sales Optimizer Tasks Reports
To save configured Sales Optimizer Tasks reports, do the following:
- Click Analytics > Sales Optimizer Report in the left toolbar.
- Configure any desired report filters.
- Click
 Options > Save Report.
 - Enter a title for the report in the modal window that appears.
- Click OK.
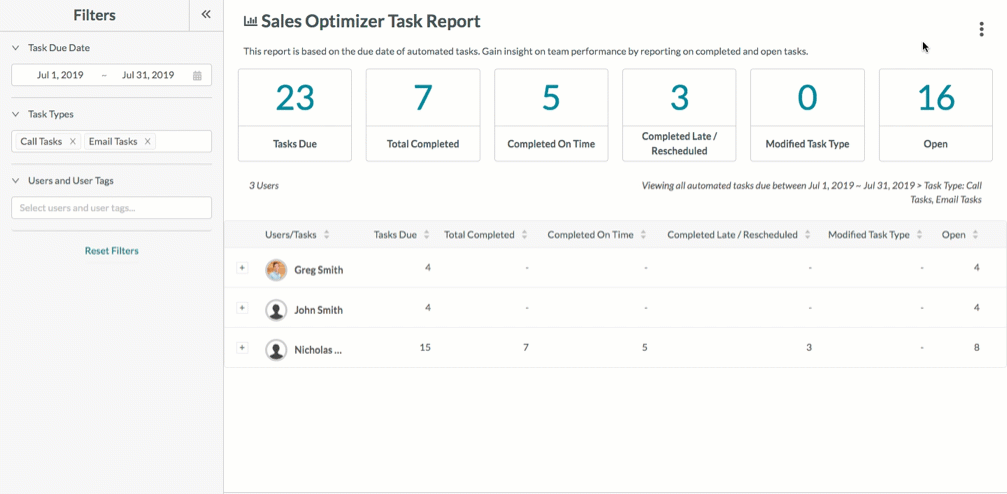 Note
Note: Sales Optimizer Task Report is available on Ultimate plans.
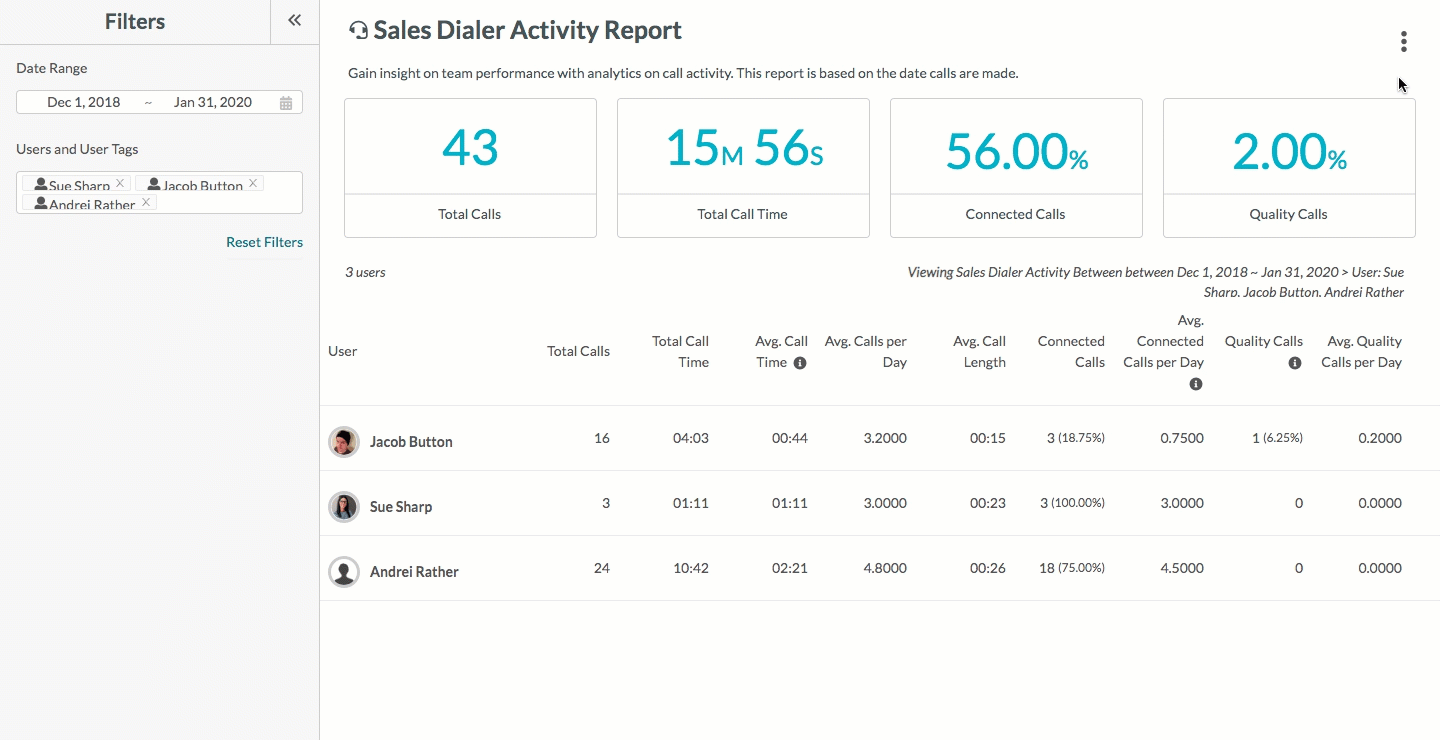
Saving Sales Dialer Activity Reports
To save configured Sales Dialer Activity reports, do the following:
- Click Sales Dialer > Sales Dialer Activity in the left toolbar.
- Configure any desired report filters.
- Click Options > Save Report.
- Enter a title for the report in the modal window that appears.
- Click OK.
Locating Saved or Scheduled Reports
Once you navigate away from the report page, the report and its associated parameters will be reset to their default states. To locate and access previously saved or scheduled reports, do the following:
- Click Analytics in the left toolbar.
- Click Saved and Scheduled Reports.
- Select one of the following tabs:
- Optionally, enter a report name, subject, keyword, or other applicable search filters in the
 search bar.
 - Click the name of the desired report.
Scheduling Saved Reports
To schedule a saved report, do the following:
- Click
 User Menu > Settings in the top toolbar.
 - Click Saved and Scheduled Reports, located under Features in the left panel.
- Click Saved tab.
- Locate the desired report and click Options > Schedule.
- Make sure the correct report shows in the Select a report to send field.
- Select one of the following options in the Select a time to schedule the report section:
- As soon as possible forces the email to send as soon as the scheduling is complete.
- Schedule for later uses a calendar to select a desired date and time to schedule reports.
- Select the frequency you would like the report to be sent in the drop-down.
- Select from the drop-down the number of times you would like the report to be sent before it stops.
- Enter the names of desired users or tagged groups in the To: text field.
- Enter a subject line for the scheduled email in the Subject text field.
- Enter the message that will be displayed in the email's body in the Email Message text field.
- Click Schedule.