Lead Gen & CRM
How can we help you?
Search our help articles, video tutorials, and quickstart guides

You've got this. You've got us. Search our Knowledge Base to quickly find answers to your questions.

Creating Confirmed Opt-In Processes

Article: 000050565
Updated: July 16, 2024

Maintaining a quality email list is vital to the success of your marketing campaigns. Confirming that a lead is opted in to receive your content is ideal, since a lead signs up on your page and then confirms their interest in your company by responding to an email.

This does not end once you import contacts. You will need to constantly maintain lists of contacts who have opted in and ensure that those who sends. 

This article will detail how to create processes for maintaining confirmed opt-in statuses.


Article Contents


Users:
Administrators 
Company Managers 
Marketing Managers 
Sales Managers  
Salespersons  
Jr. Salespersons  


Creating Custom Opt-In Content

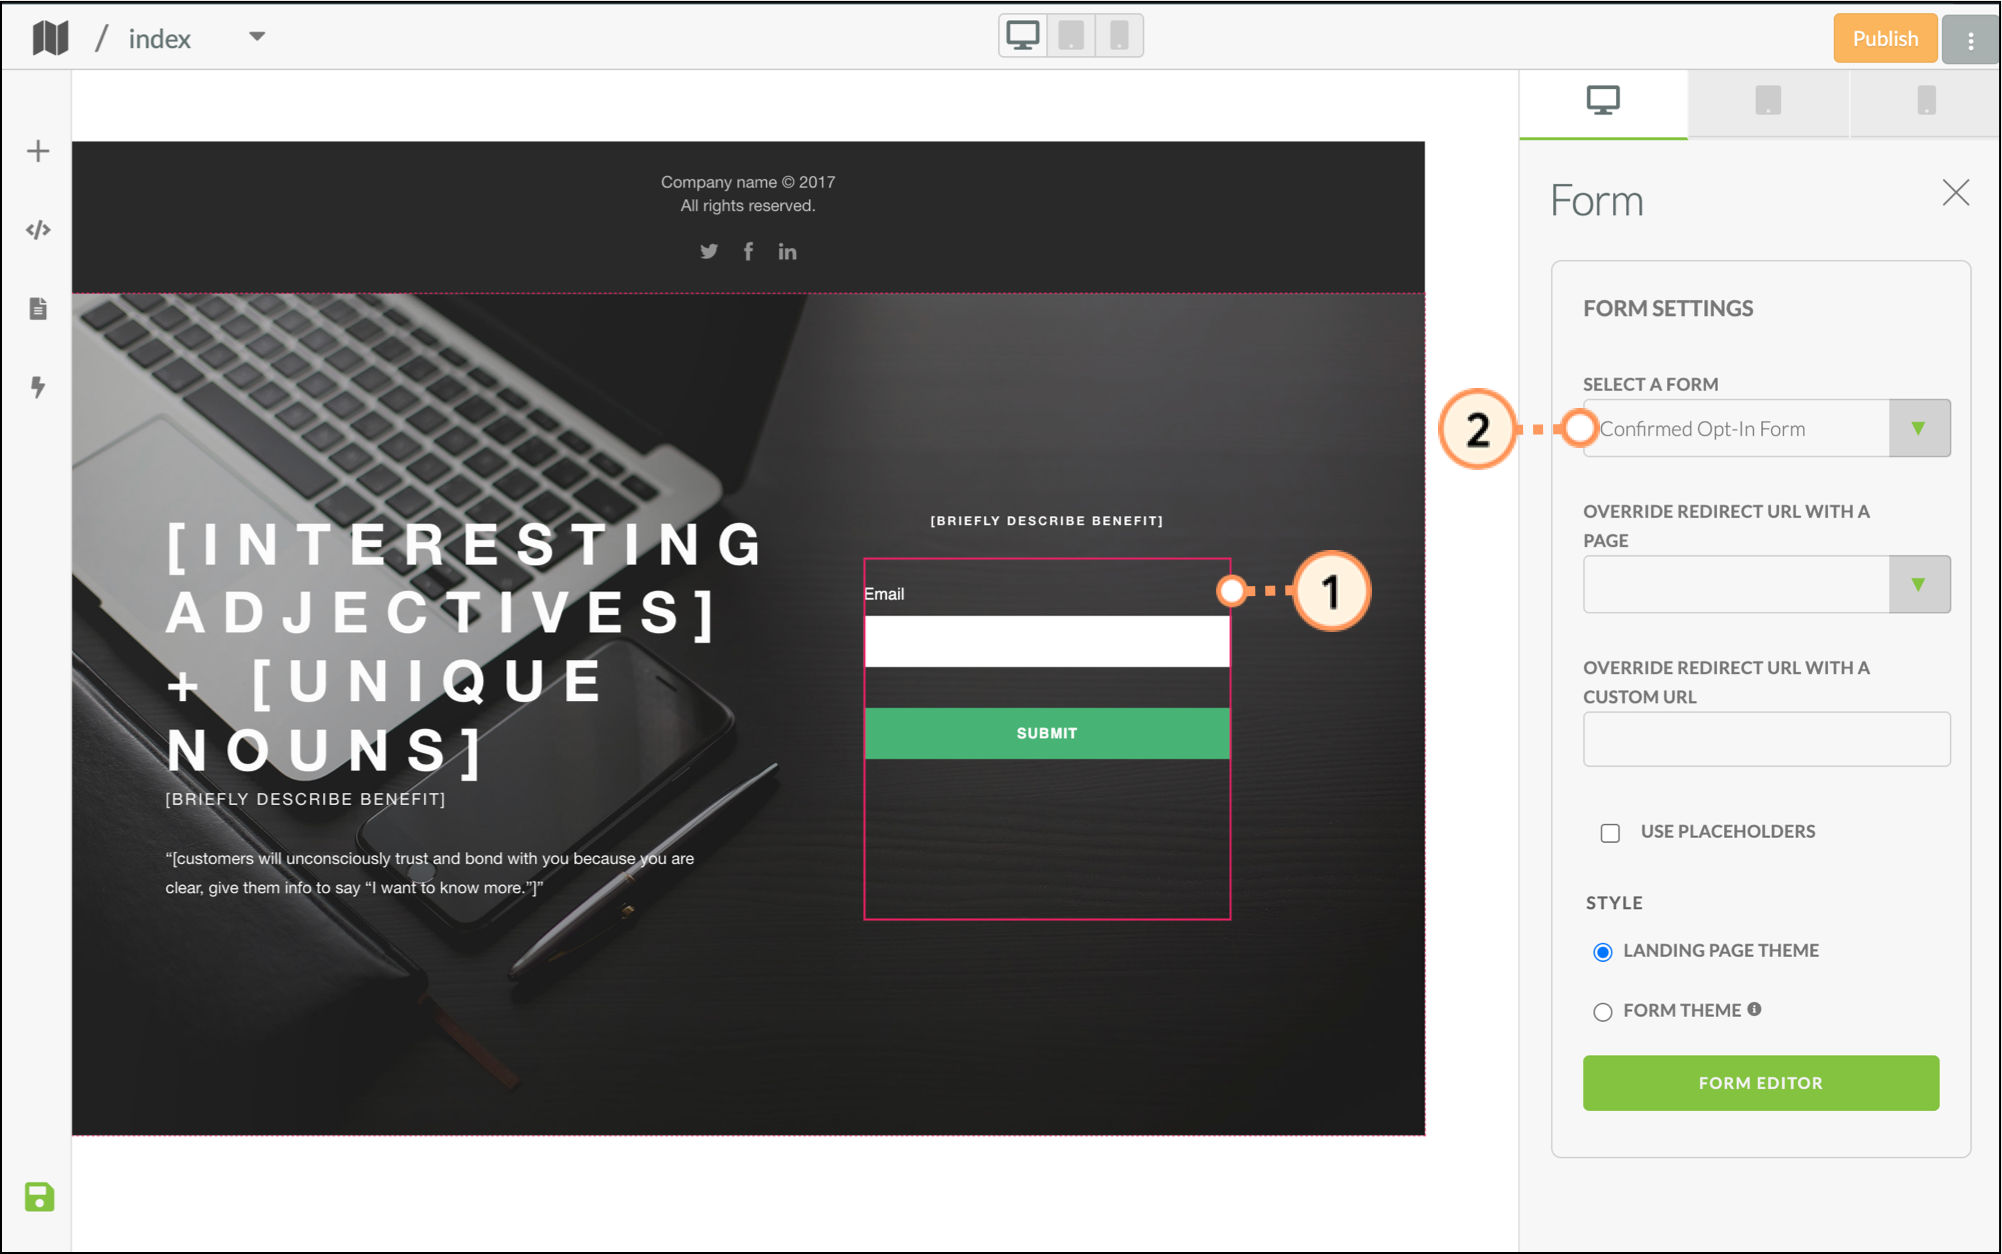
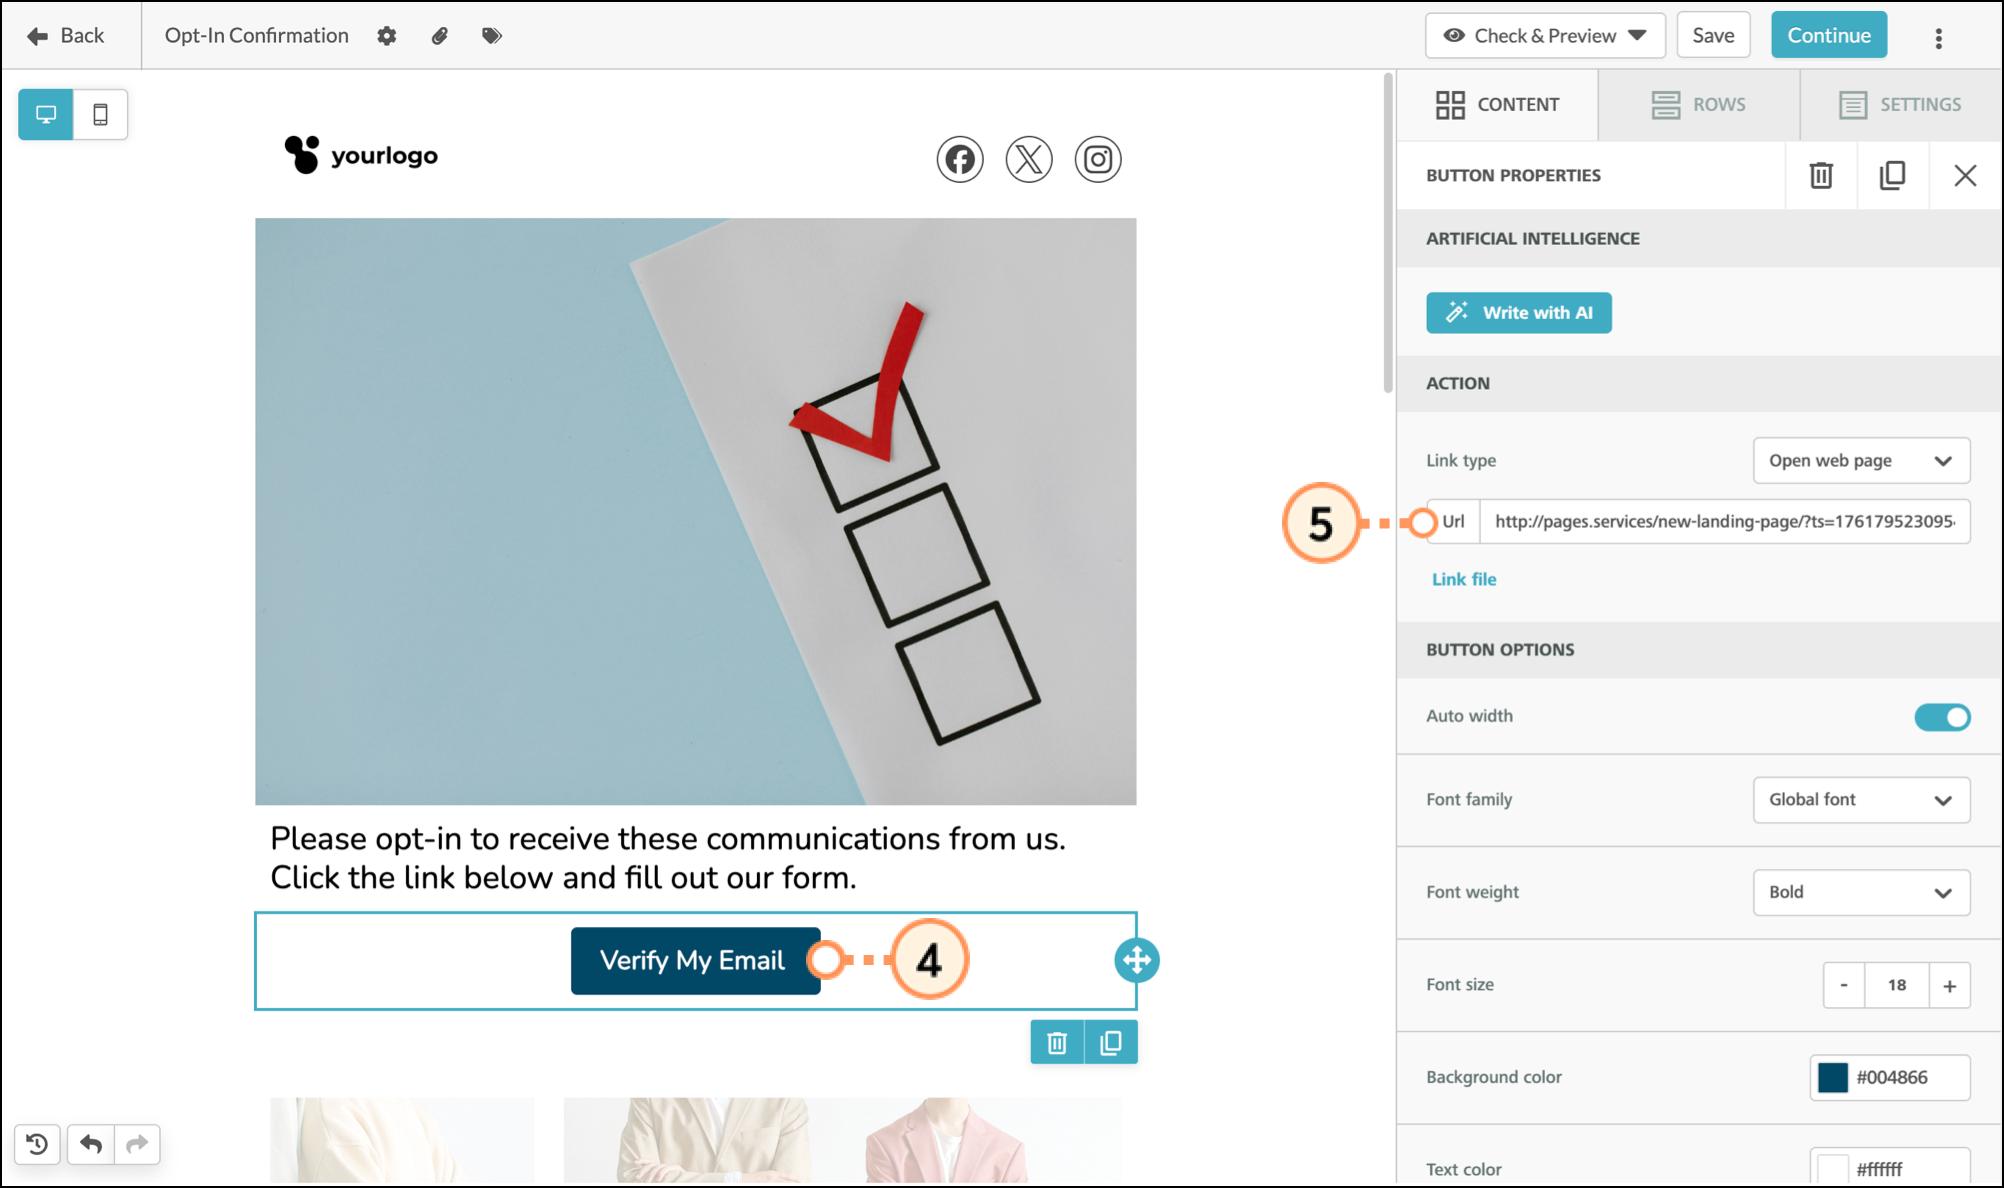
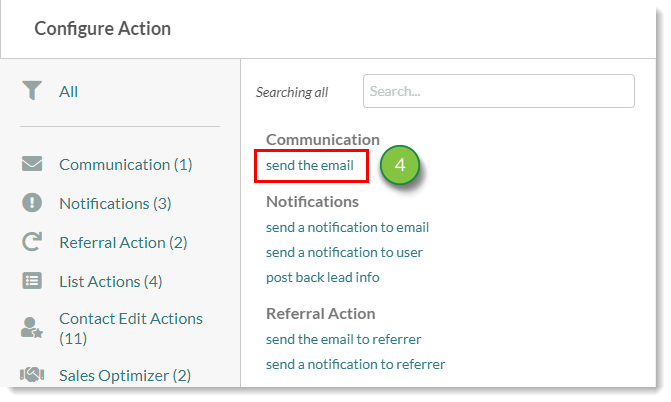
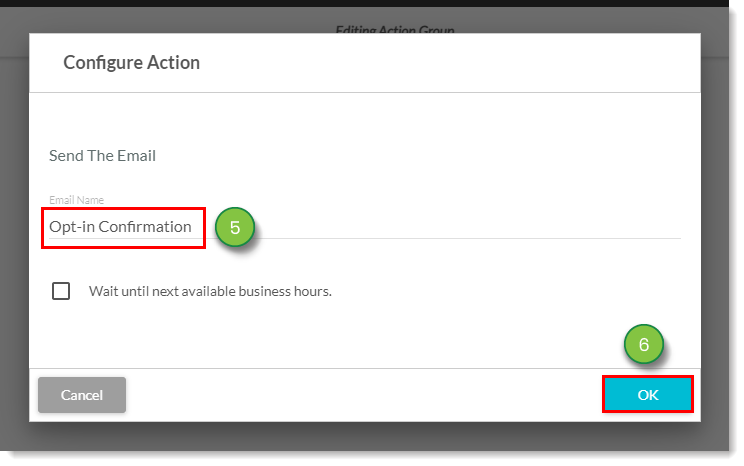
To create a custom opt-in process, you will first need to create an opt-in email. Using opt-in processes validates the email address a lead has provided, in addition to verifying that they would in fact like to receive further communications. This process is useful in requesting that a lead join a mailing list.

To create custom opt-in content, do the following:

  1. Create a form or a native/third-party form.
  2. Place your form on either a landing page or website.

    Add the form to a landing page 
  3. Create an email to verify the lead's email address and/or interest in receiving communication.
  4. Insert a link or button into the email that asks the lead to confirm or verify they want to receive emails.
  5. Modify the link or button settings to redirect to the landing page or website.

    Add a link to the email


Creating Opt-In Lists

Creating a Manual List

You should always be reviewing your lists of leads to ensure that you are remaining compliant with Lead Gen & CRM's email-sending standards. Manually reviewing your leads lets you keep those who have not opted in or unsubscribed from receiving unwanted emails.

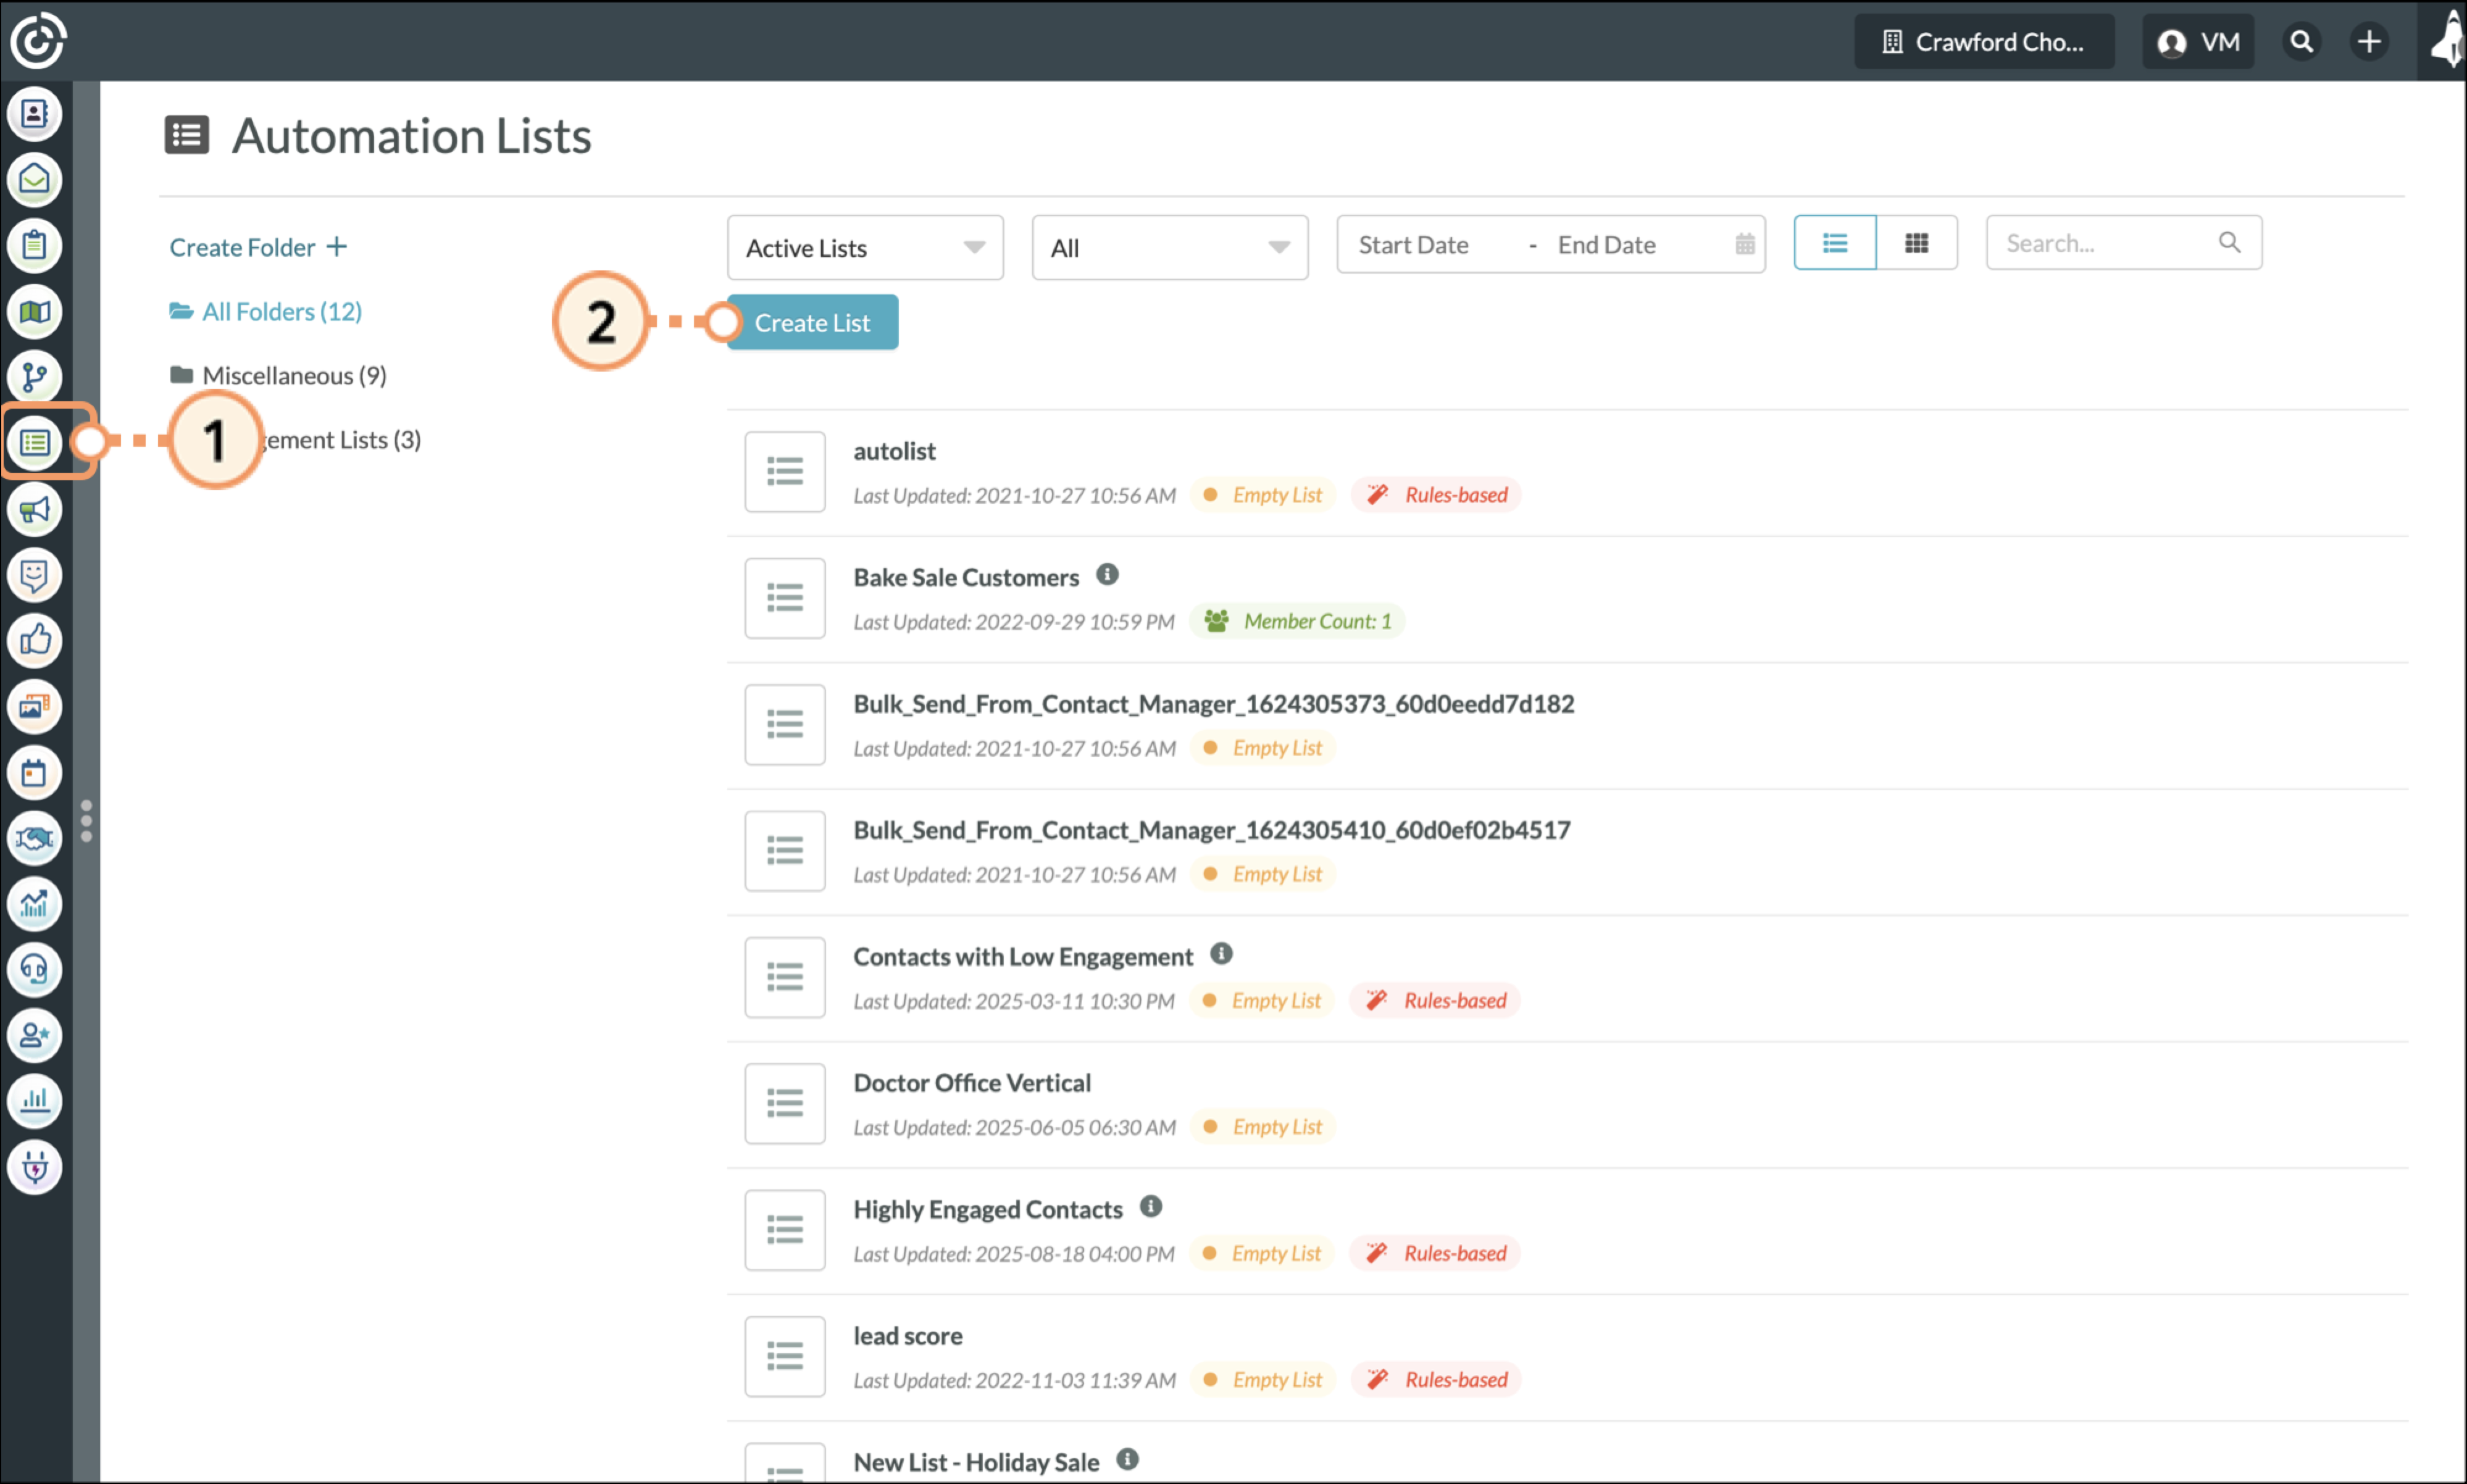
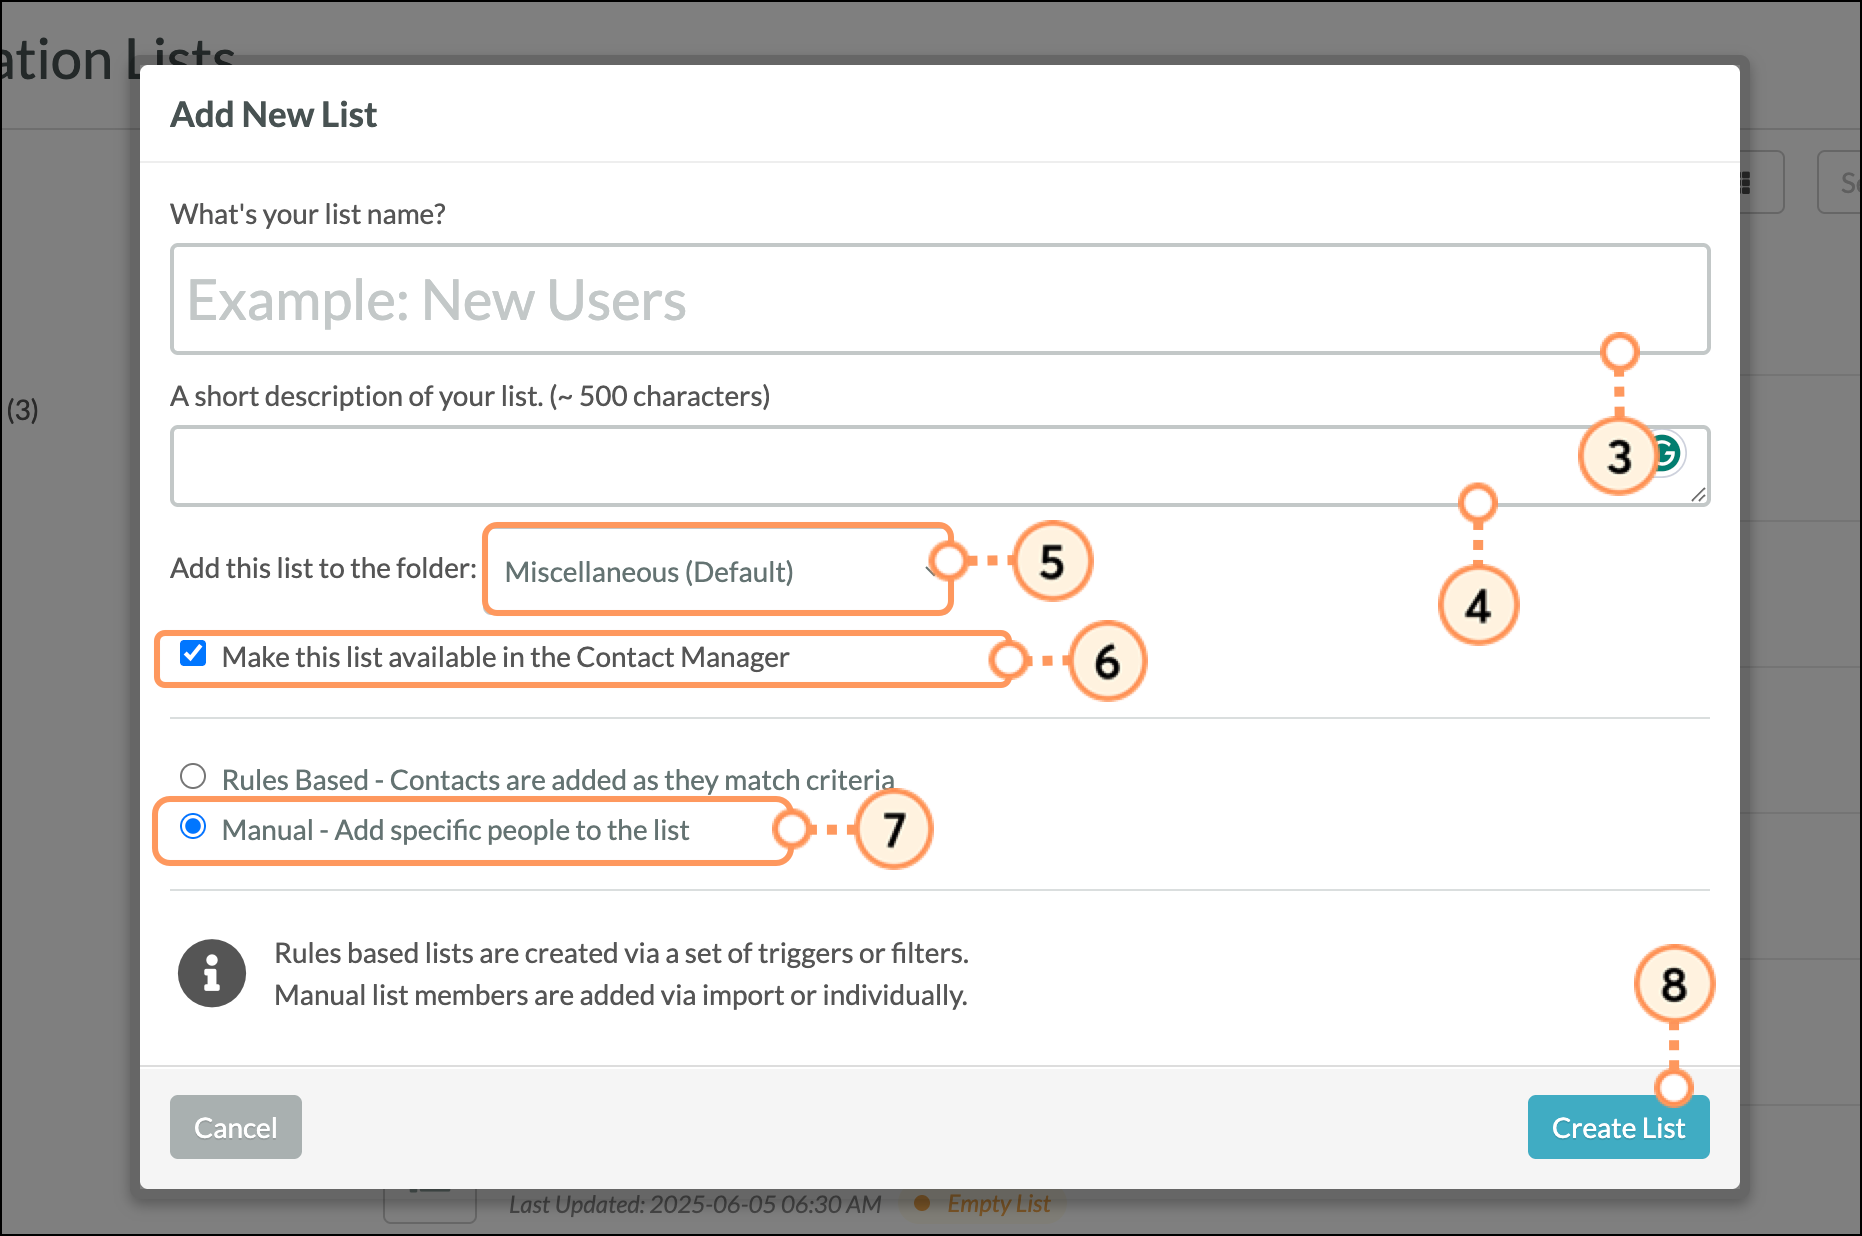
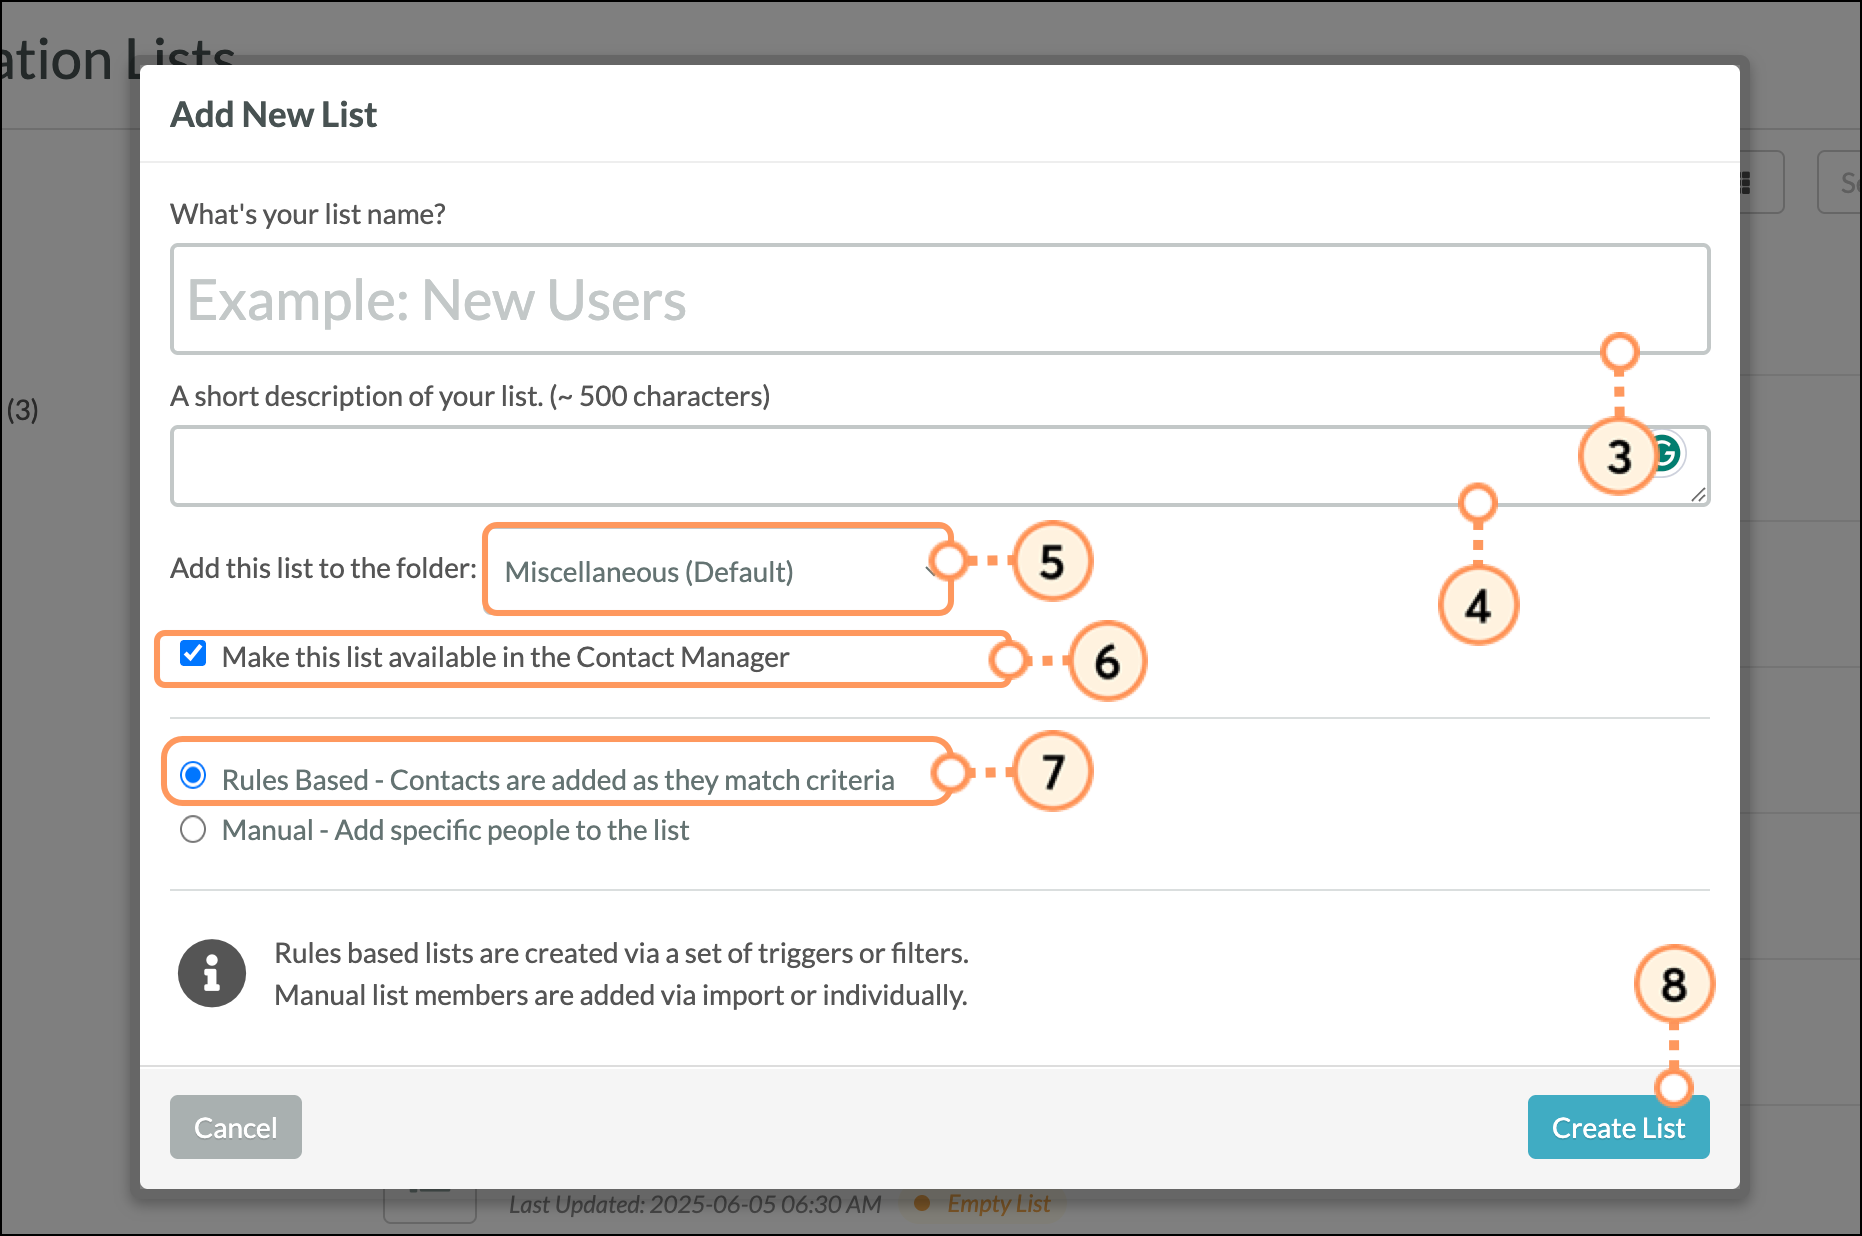
Manual lists are important to the overall opt-in process. They house those leads that do not satisfy the opt-in status and let you confirm lead statuses as a whole.

To create an opt-in manual list, do the following:

  1. Click Lists in the left toolbar.
  2. Click  12cog.png  Options > New List.

    Confirmed Opt In Process


  3. Enter a name for the list.
    • Note: For list management purposes, consider naming this list as something similar to Need to Confirm Opt-In Status.
  4. Select the folder to add the list to from the Add this list to the folder drop-down menu.
  5. Click the Make this list available in the Contact Manager checkbox.
  6. Select the Manual list option.
  7. Click Create List.

    Manual List options

Ideally, you should review this list on a regular basis. That way, you can account for the leads that are on the list. You cannot send emails to these leads without risking your sending reputation or otherwise being non-compliant with best-sending practices. 


Creating a Rules-Based List

Rules-based lists will dynamically remove a member when the lead no longer meets any lead action rules. These lists can be configured to remove those leads who have not opted in to receive your emails.

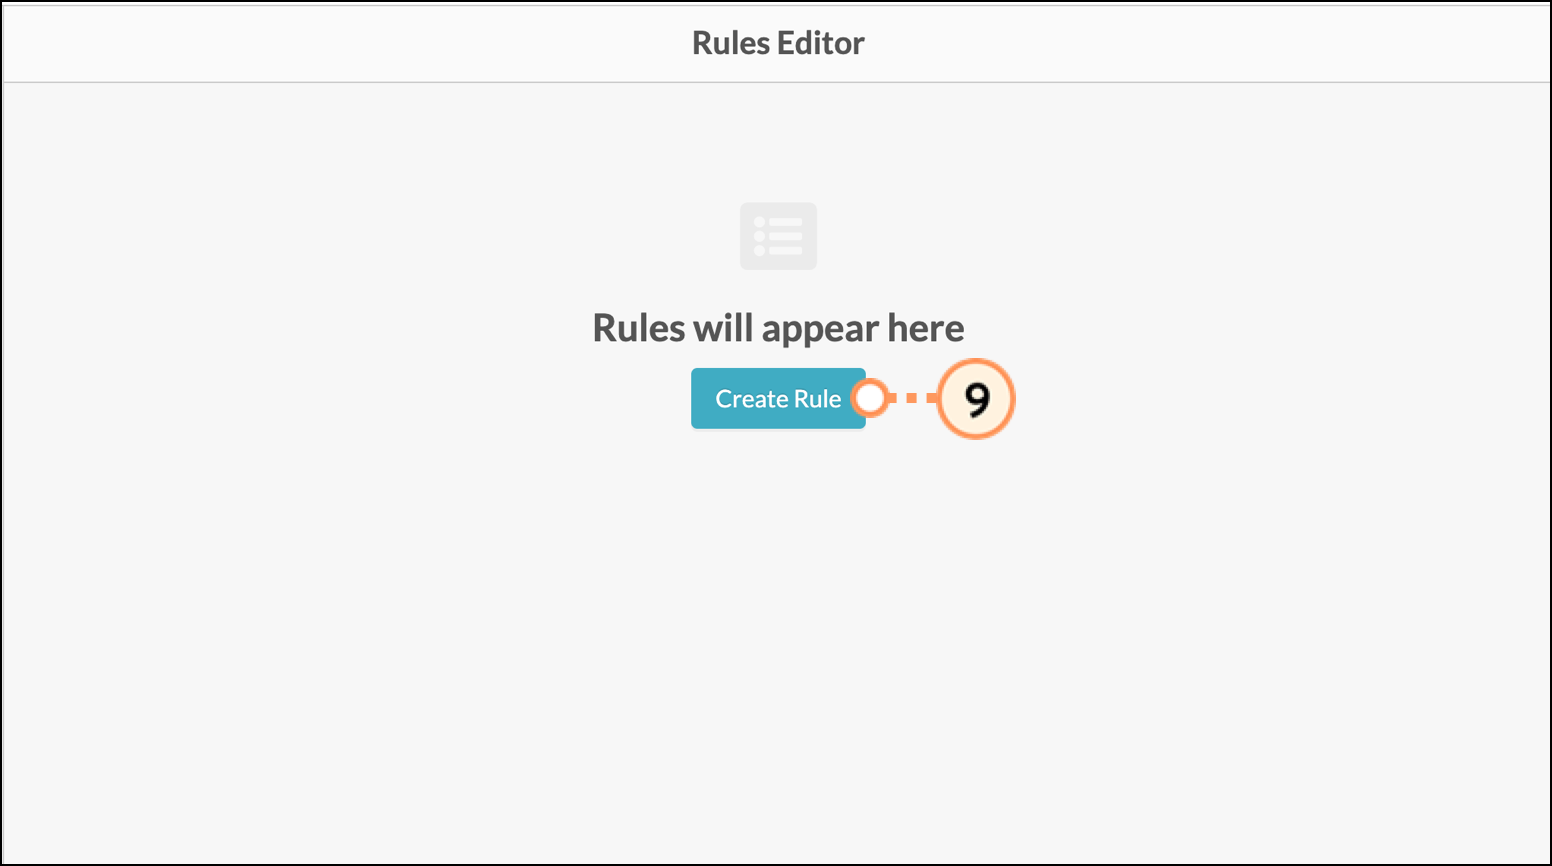
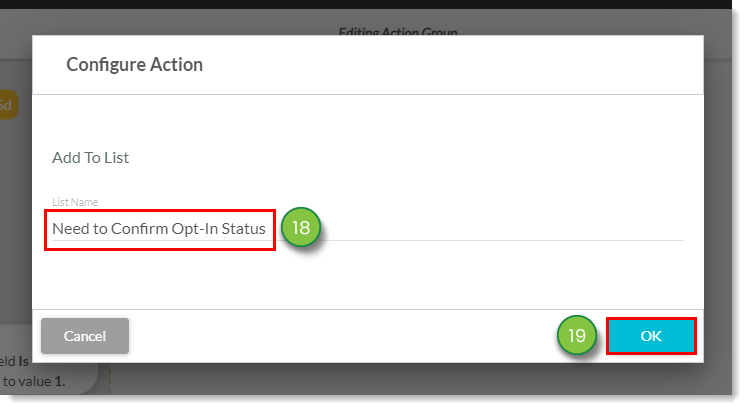
To create a rules-based list that focuses on leads who have opted in to receive your content, do the following:

  1. Click Lists in the left toolbar.
  2. Click  12cog.png  Options > New List.

    Opt In Process


  3. Enter a name for the list.
    • Note: For list management purposes, consider naming this list as something similar to Confirmed Double Opt-In.
  4. Select the folder to add the list to from the Add this list to the folder drop-down menu.
  5. Select the Rules-Based list option.
  6. Click Create List.

    Rules-Based List settings 
  7. Click Create Rule.

    Click Create Rule 
  8. Select is explicitly opted in to receive email, located under Lead.

    Opt-in Rule option 
  9. Check all of the opt-in reason checkboxes.
  10. Click Save.

    All options selected 

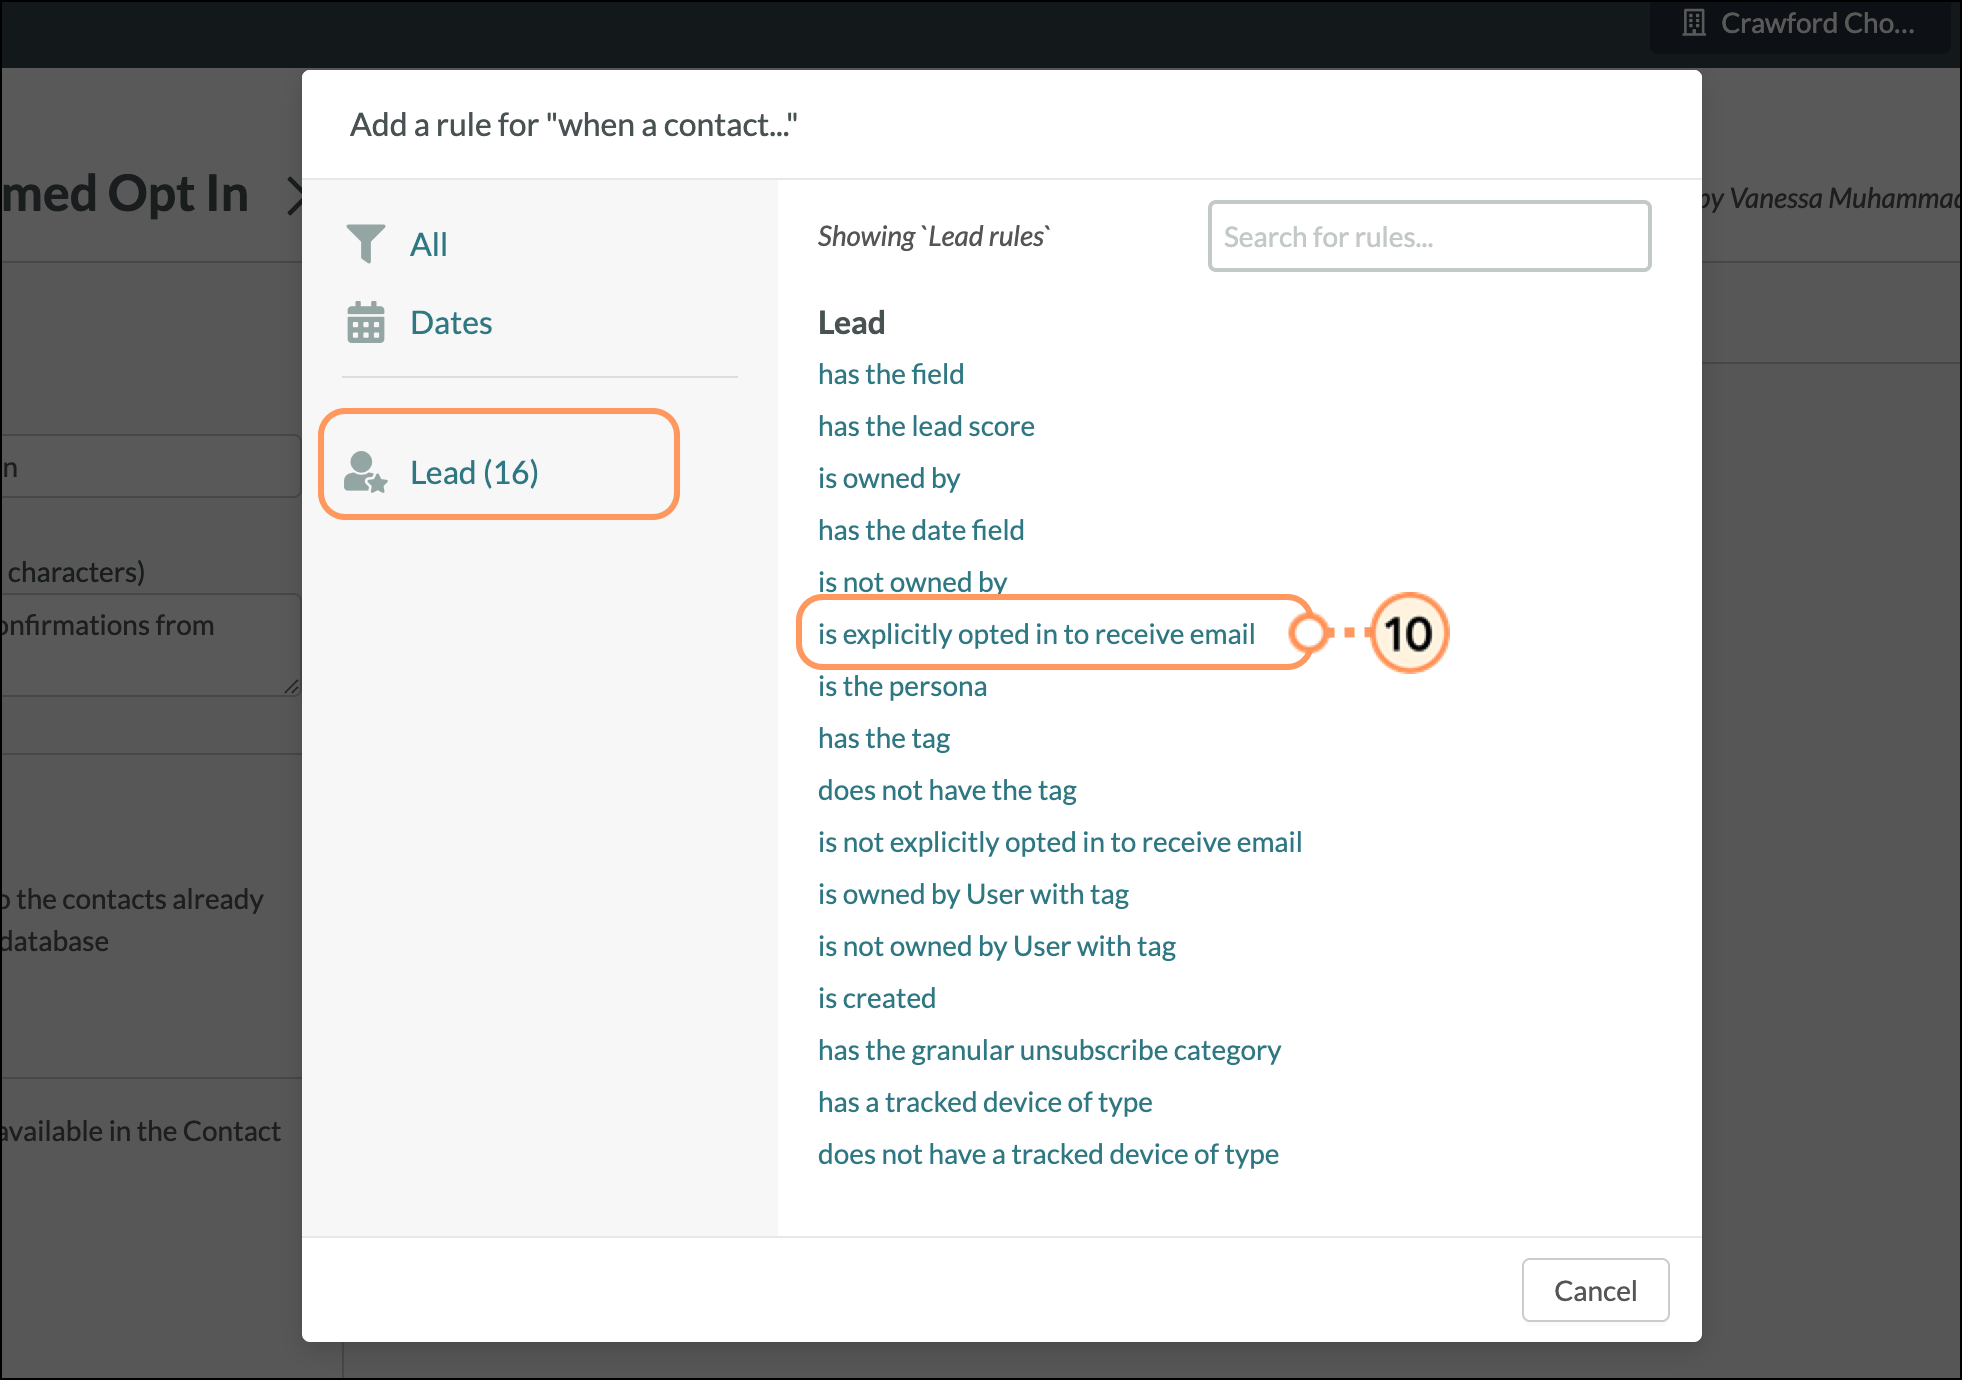
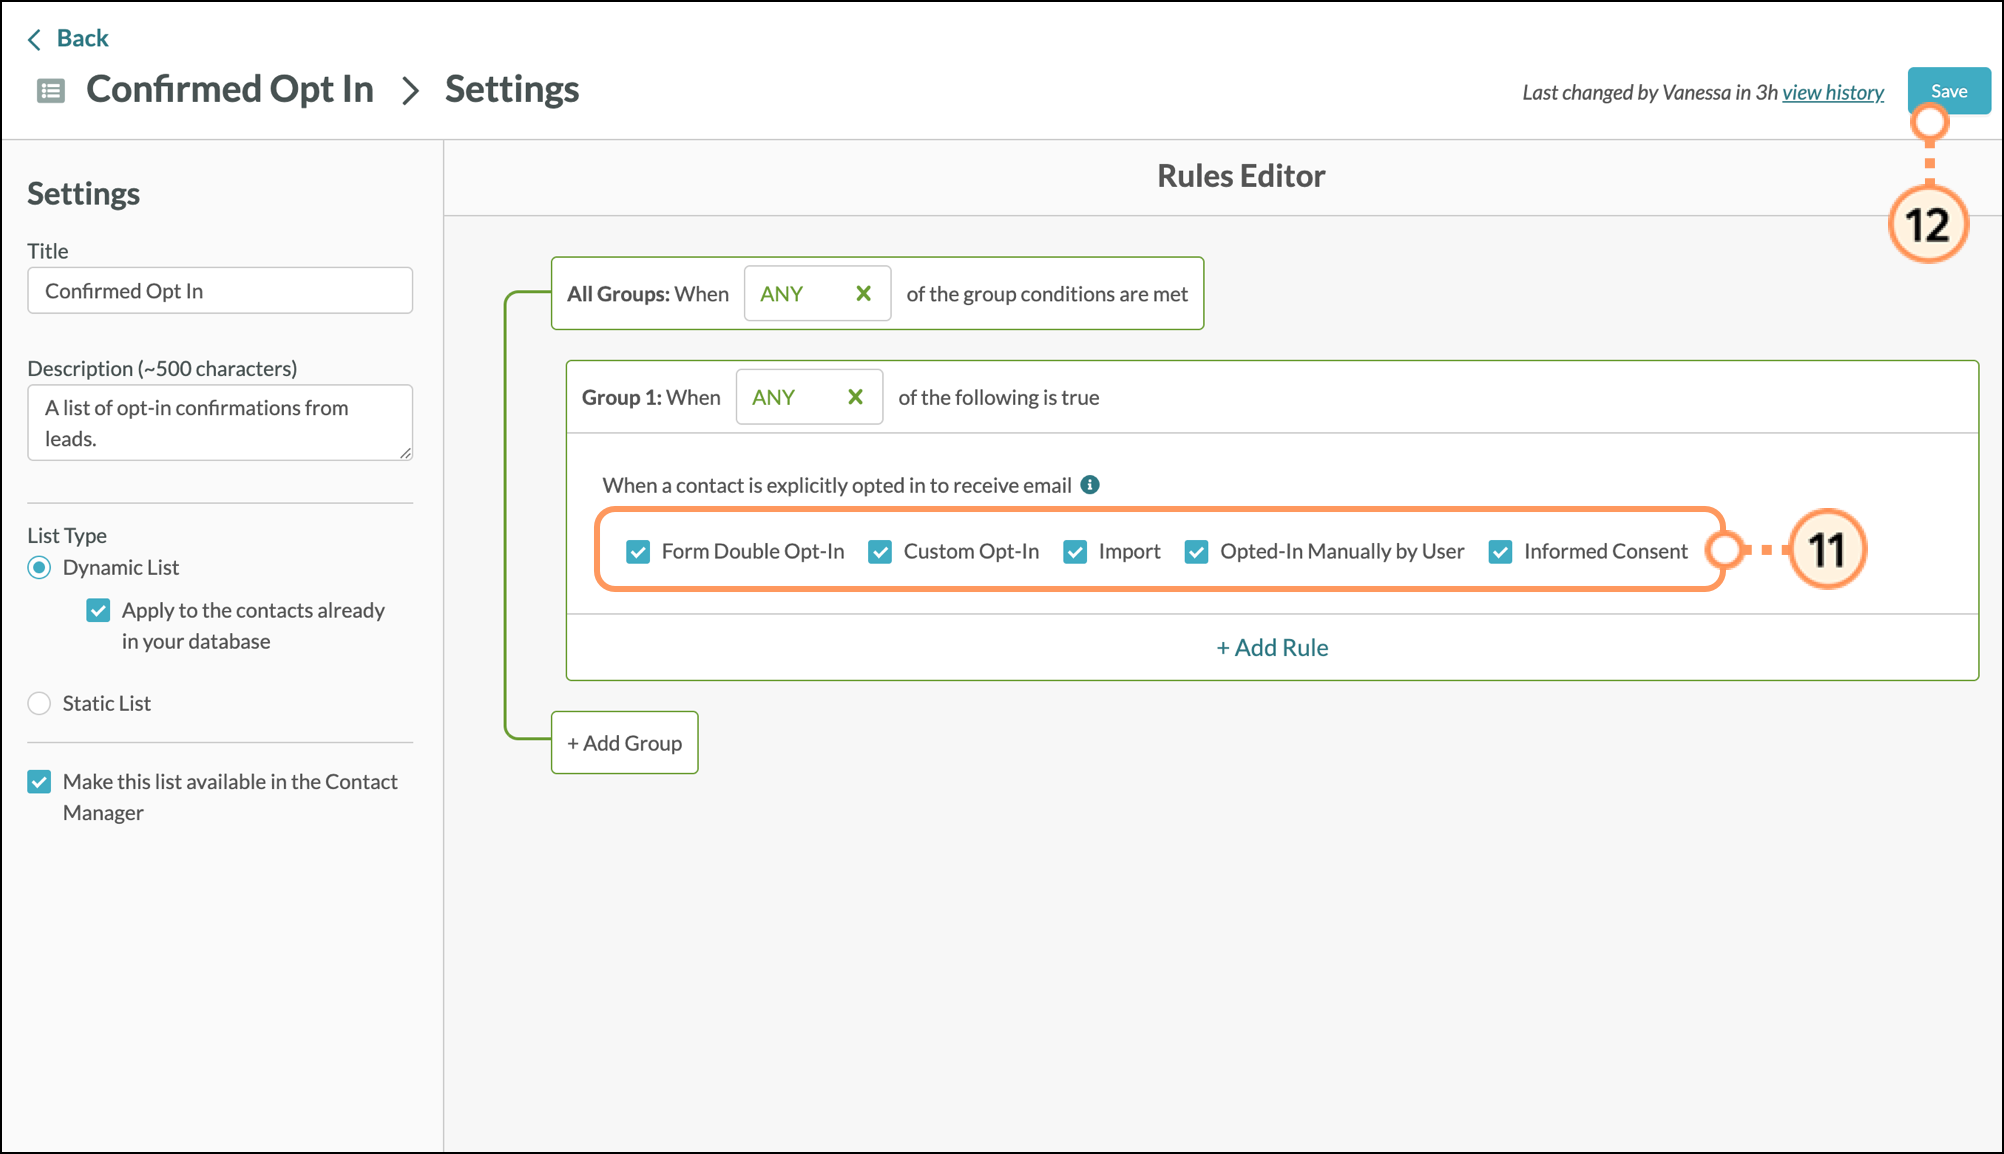
Once created, this list will contain any and all leads that are confirmed to be opted in. These are leads that have shown explicit consent in that they want to continue receiving your emails.

You should be confident that these leads want your content. These leads will be more likely to engage with your content. This means that whenever you send emails, you should send emails to those leads that are on this list.


Creating Action Groups

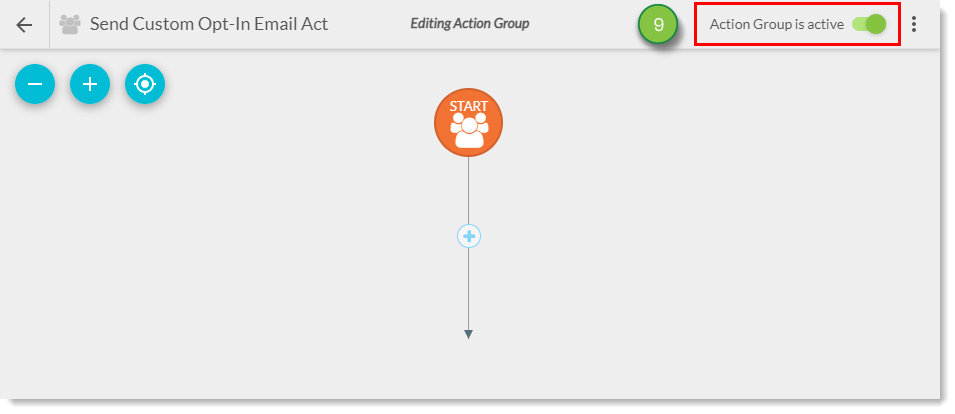
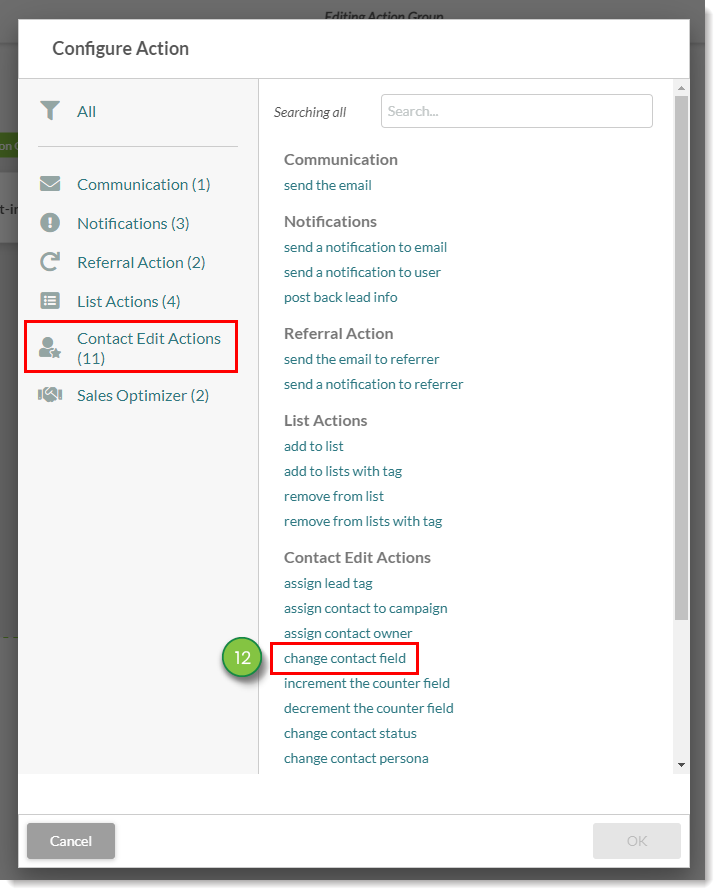
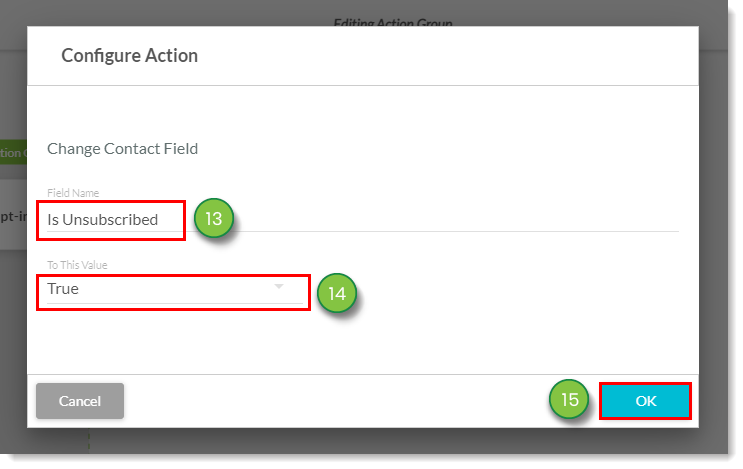
Once you have created your lists, you can create the heart of your opt-in automation: a branching action group. When created and activated, this action group will send unsubscribed leads to your manual list, and those leads who have opted in to your rules-based list. 

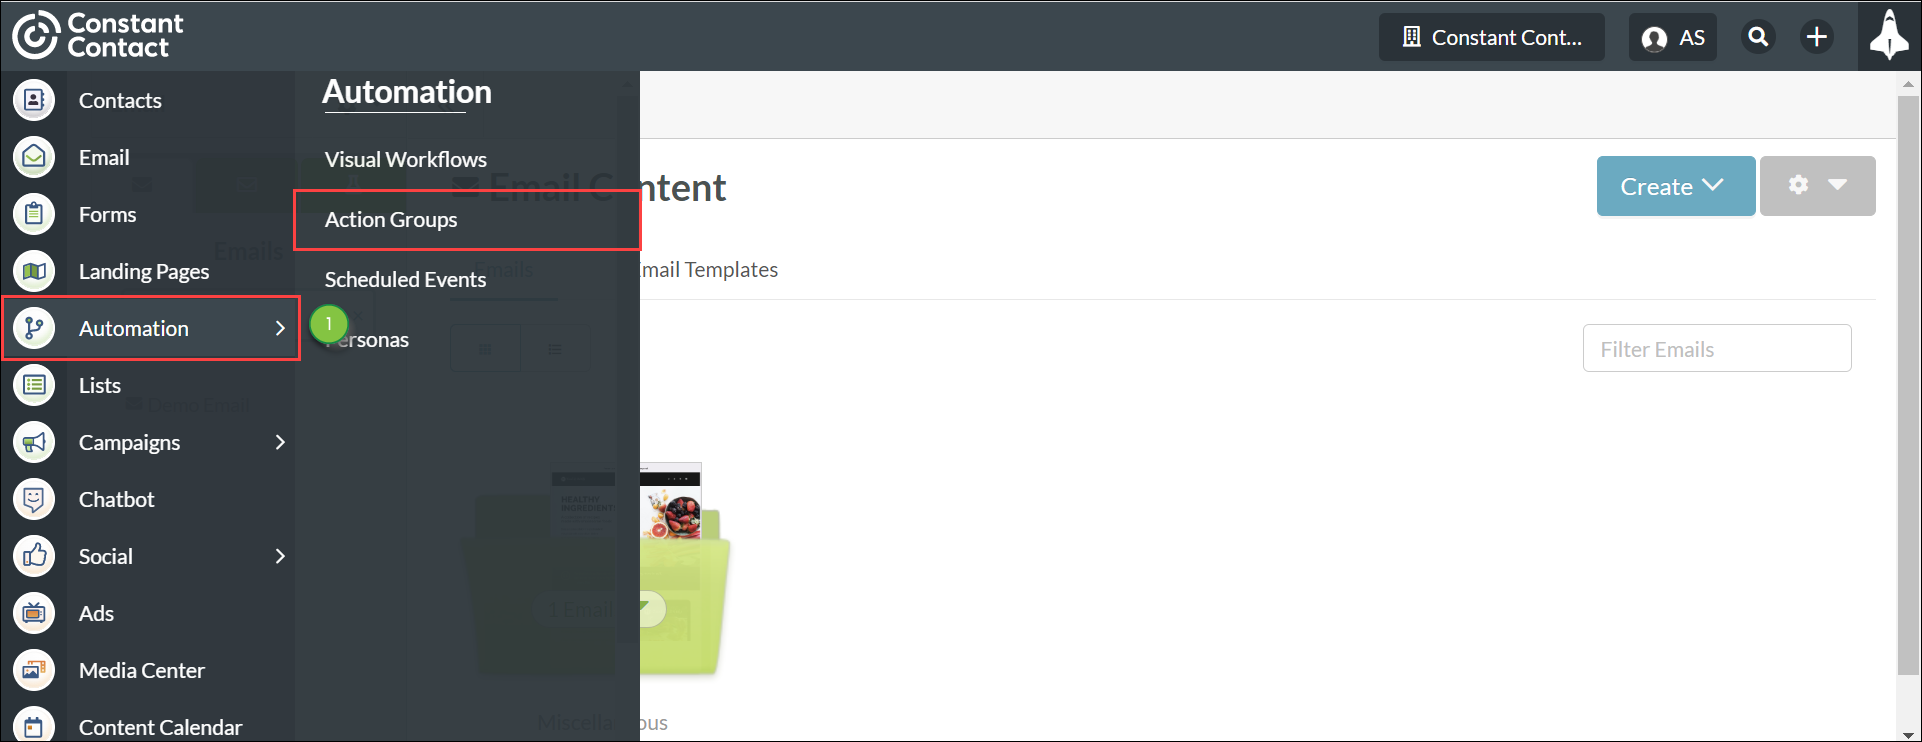
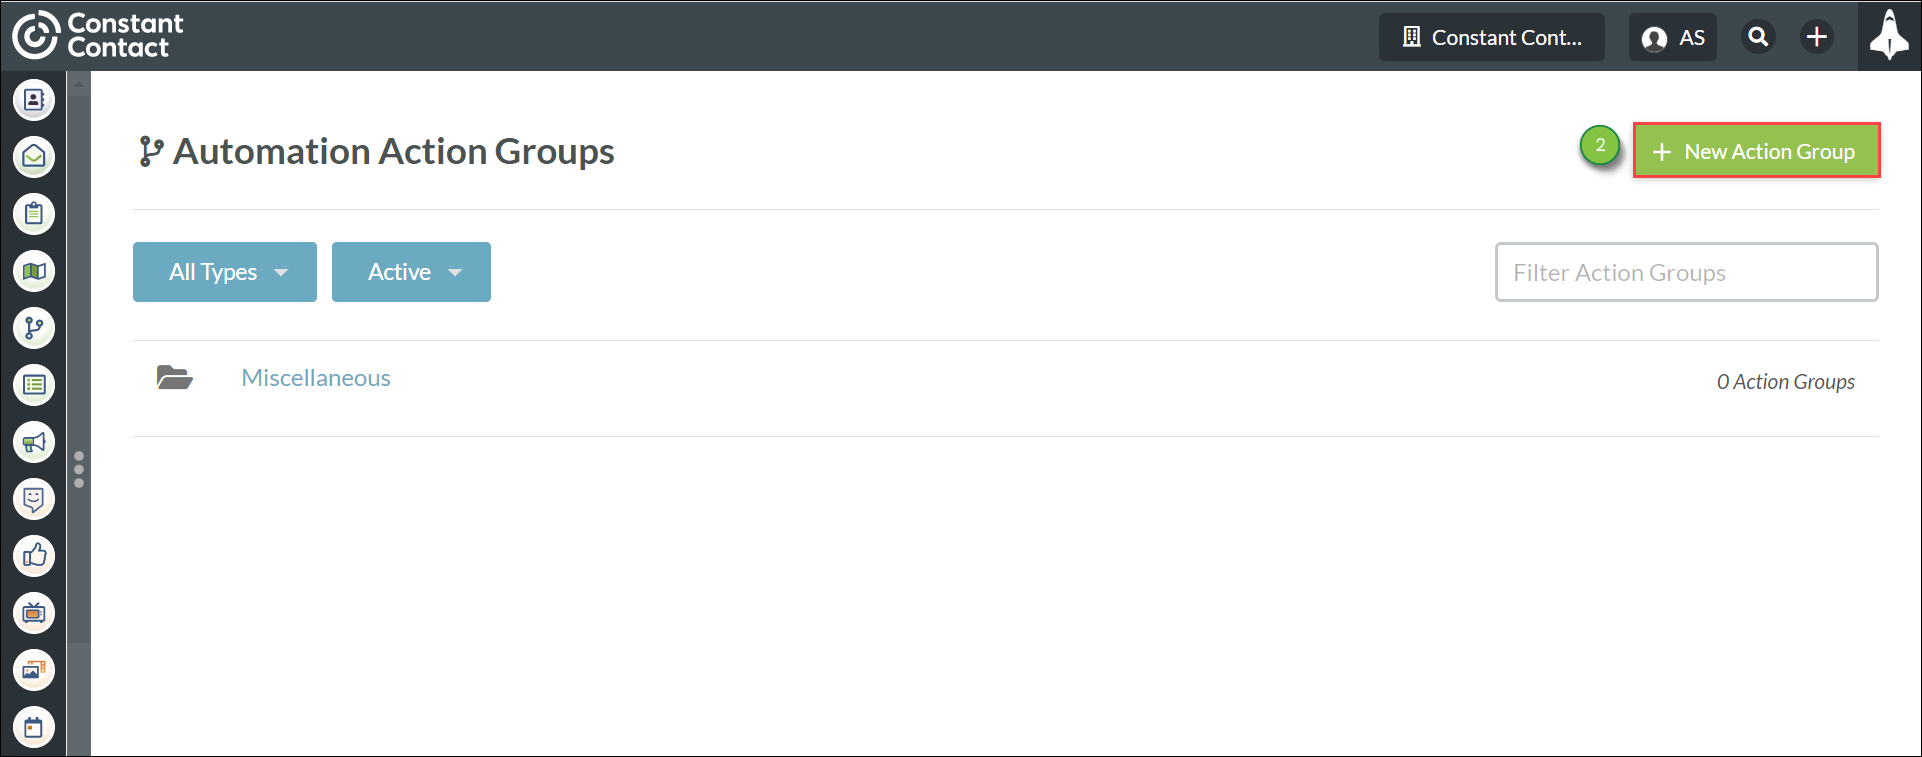
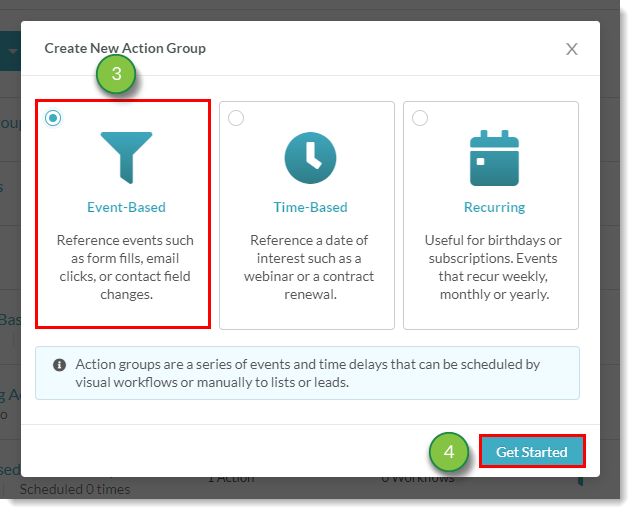
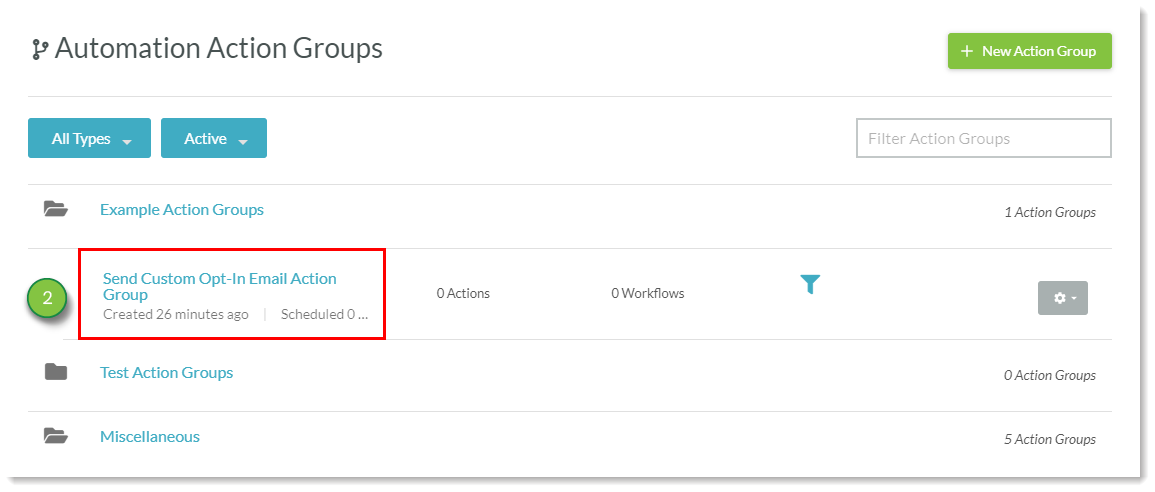
To create the action group that contains opt-in rules, do the following:

  1. Click Automation > Action Groups in the left toolbar.

    Confirmed opt In process


  2. Click New Action Group.

    Confirmed Opt In Process


  3. Select Event-Based.
  4. Click Get Started.

    Select Event-Based
     
  5. Enter a name for the action group.
    • Note: For action group management purposes, consider naming this action group as something similar to Send Custom Opt-In Email.
  6. Select the folder to add the action group to to from the Add this action group to the folder drop-down menu.
  7. Click the Make this action group available in the Contact Manager checkbox.
  8. Click Save.

    Confirmed Opt In Process


  9. Ensure the Action Group is toggle is set to Active

    Active Toggle

Adding the First Branch: Email Action and Time Delay

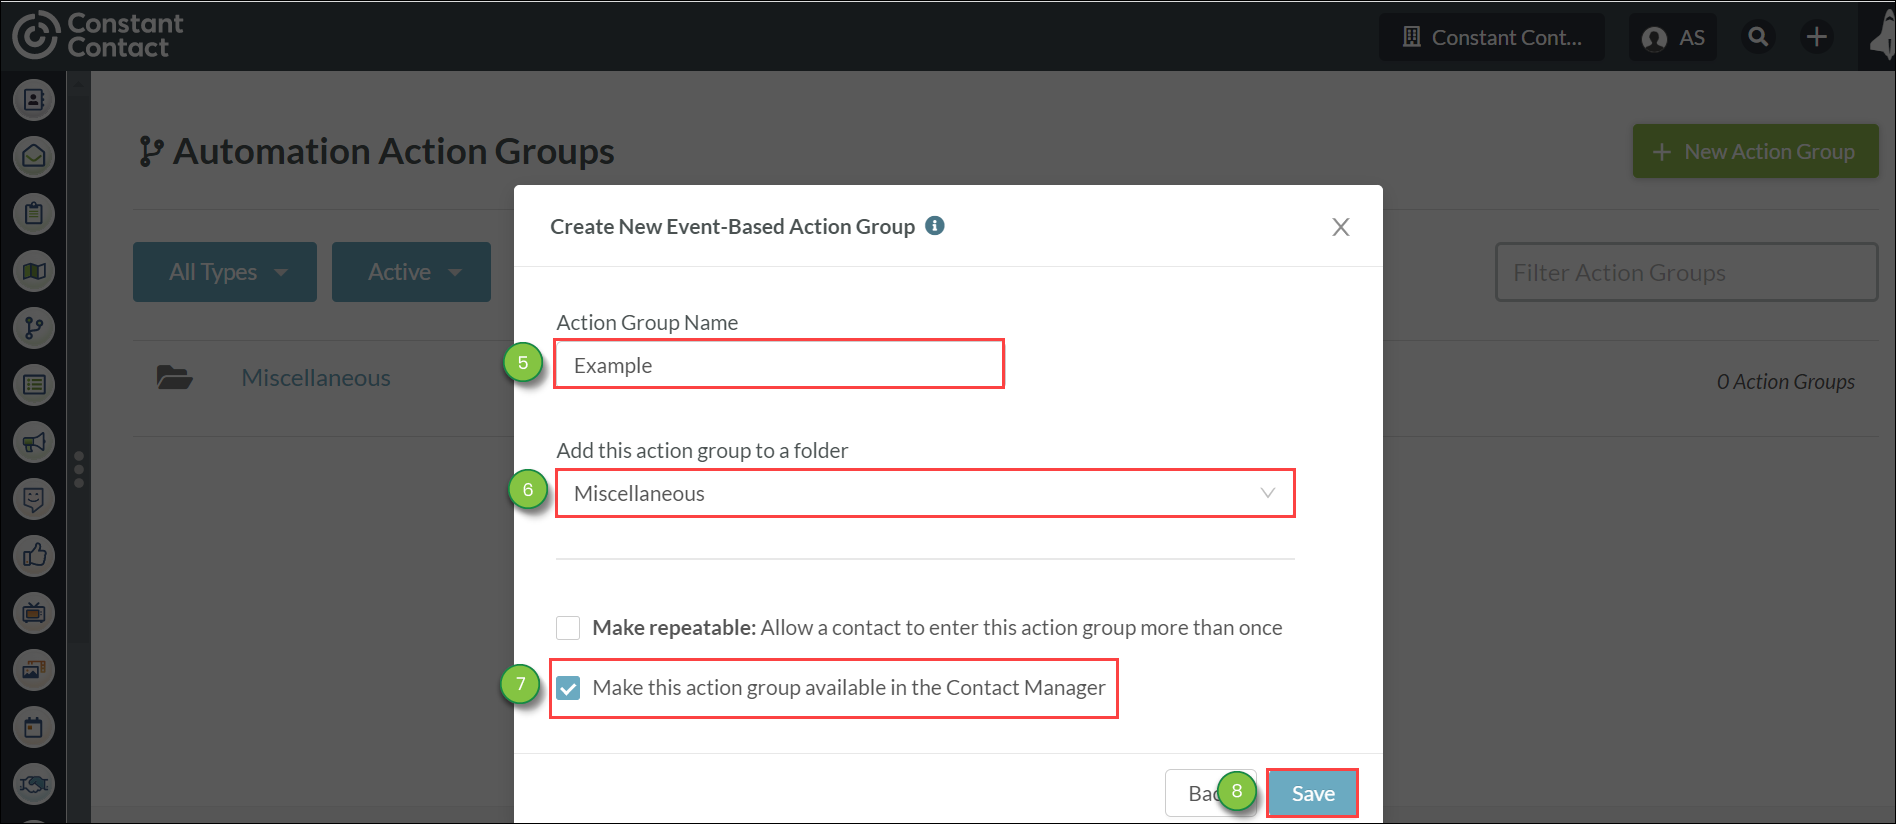
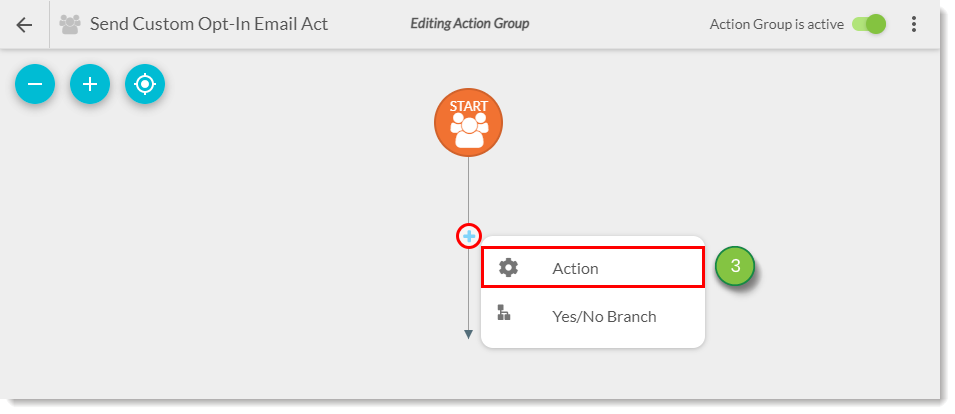
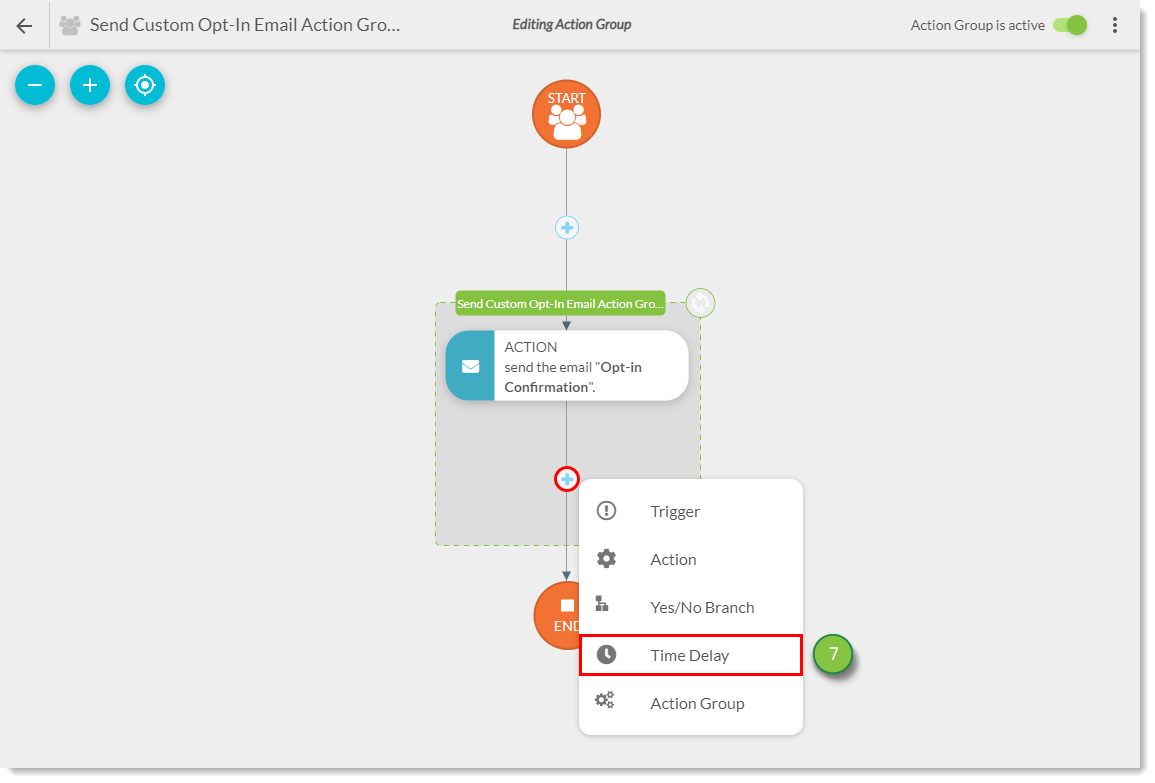
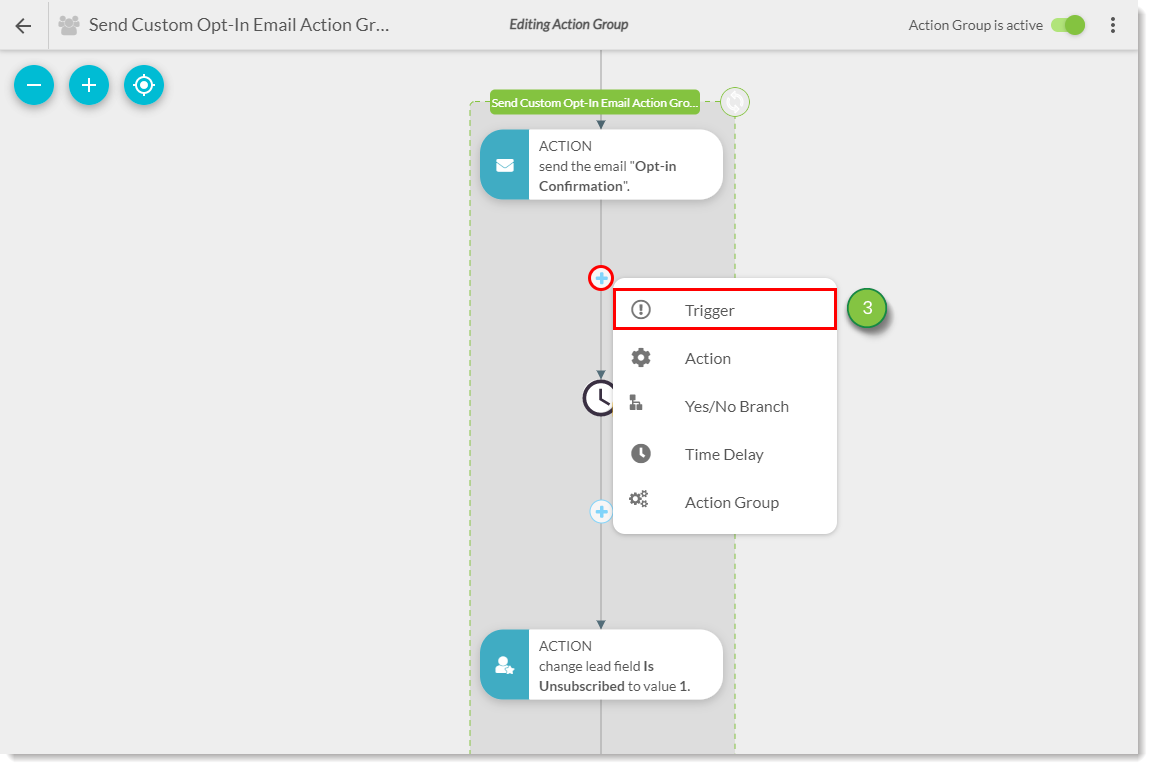
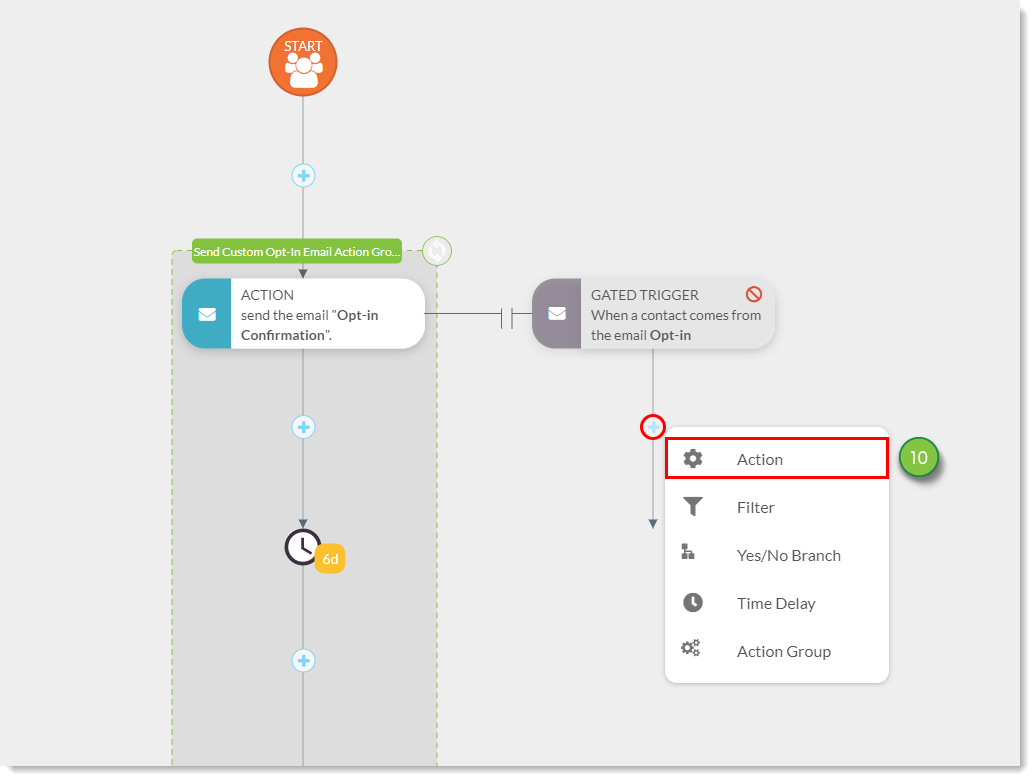
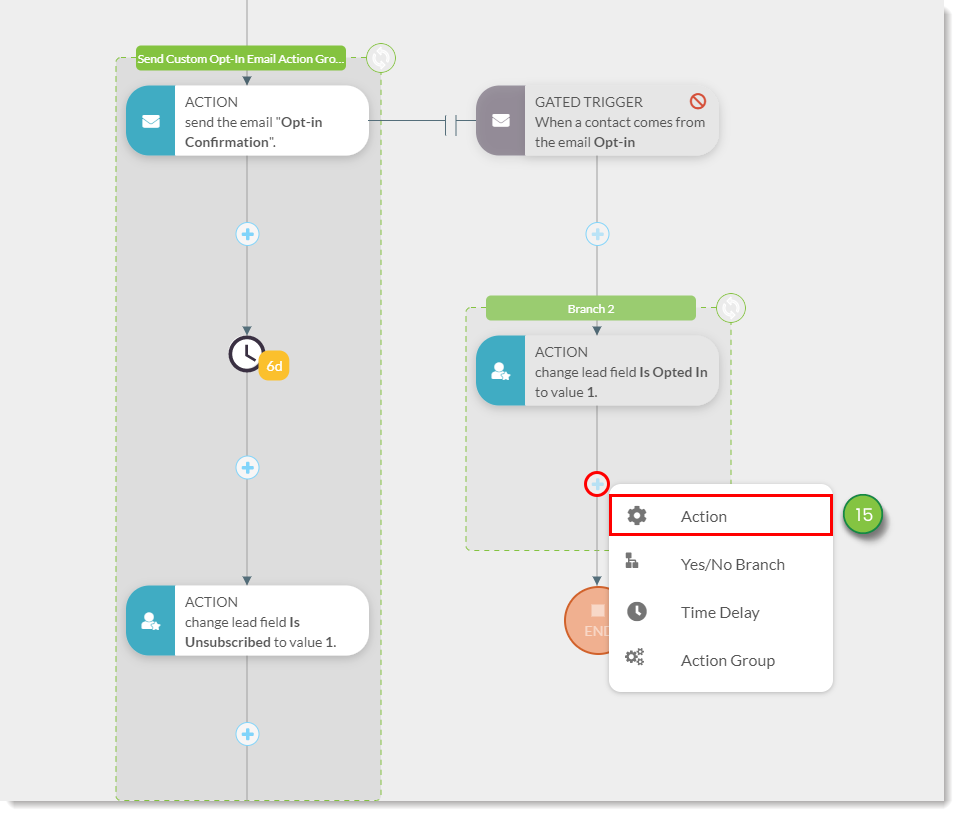
Once you have created the action group, it will be empty. You will need to add the automation branches and filtering logic. As this action group will be doing two separate things at once, it will need two distinct automation branches. 

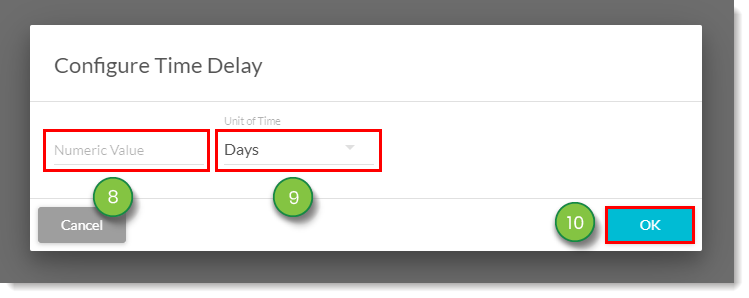
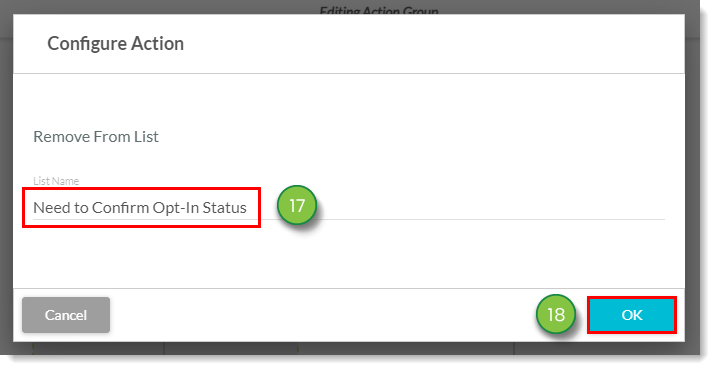
The initial part of the first automation branch will be based on leads responding within a set amount of time to your created opt-in email, then add the contacts who have not opted in to your manual list.

To create the first branch of the action group, do the following:

  1. Click Automation > Action Groups in the left toolbar.

    Confirmed Opt In


  2. Select the previously created action group.

    Select action group
     
  3. Click + Add > Action.

    Add an action
     
  4. Select send the email, located under Communication.

    Send the email action
     
  5. Enter the name of your created opt-in email.
  6. Click OK.

    email options
     
  7. Click + Add > Time Delay under the created email action.
    • Note: Consider setting the time delay to be something close to a week. This will give your leads an appropriate length of time to see your email and respond to it. If a lead does not respond to an email within a week, they are not likely to at all.
      Add a time delay
       
  8. Enter the desired number in the Numeric Value field.
  9. Select the desired measurement of time from the Unit of Time drop-down menu.
  10. Click OK.

    Time delay settings.
     
  11. Click + Add > Action under the created time delay.

    Add an action 
     
  12. Select change contact field, located under Contact Edit Actions.

    Select change contact field 
  13. Type Is Unsubscribed in the Field Name field.
  14. Select True from the To This Value drop-down menu.
  15. Click OK.

    Change field values
     
  16. Click + Add > Action under the created unsubscribe field action.

    Add an Action 
     
  17. Select add to list, which is located under List Actions.

    Add to list action
     
  18. Enter the name of your previously created manual list.
  19. Click OK

    List settings


Adding the Second Branch: Gated Email Trigger 

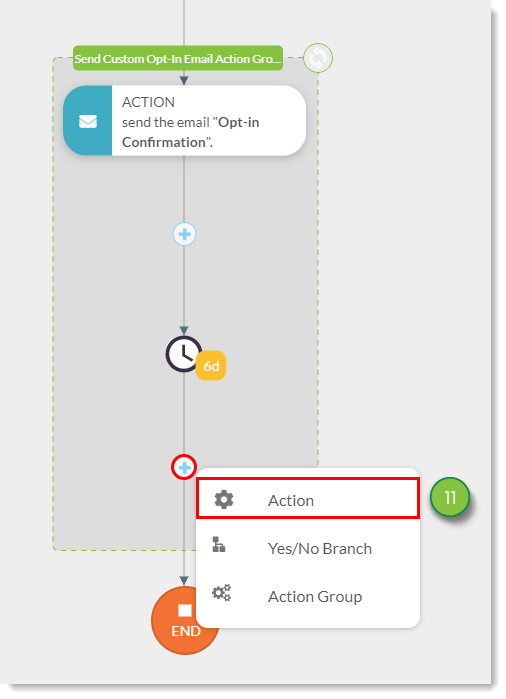
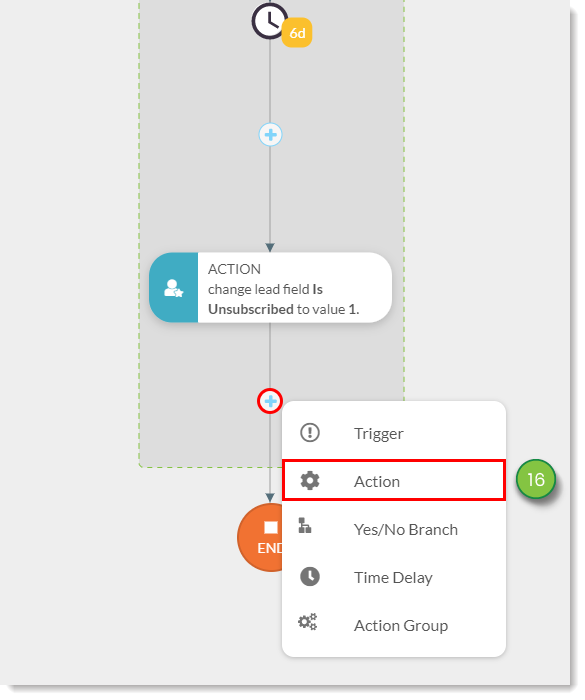
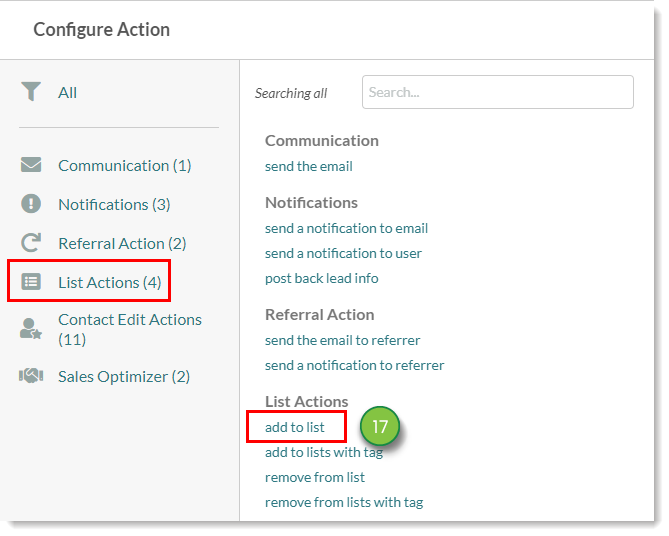
To complete this action group, you will need to add a second branch. This branch will send all leads that have opted in to your rules-based list.

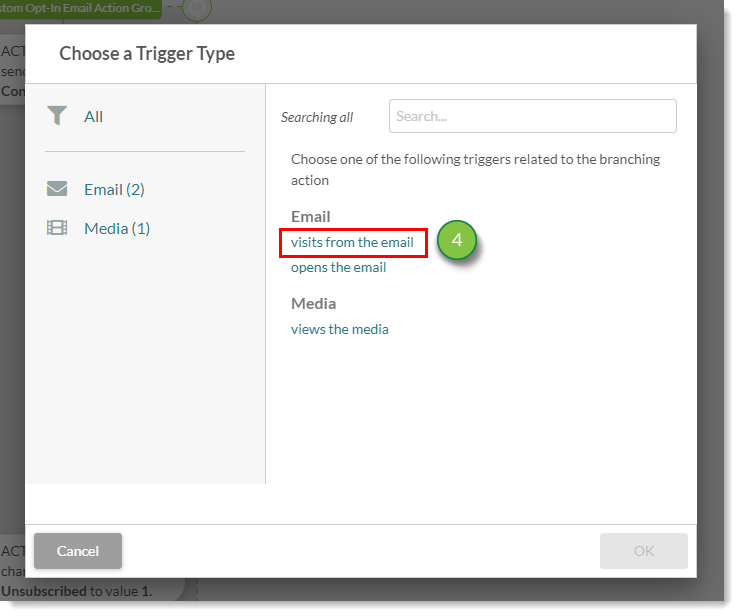
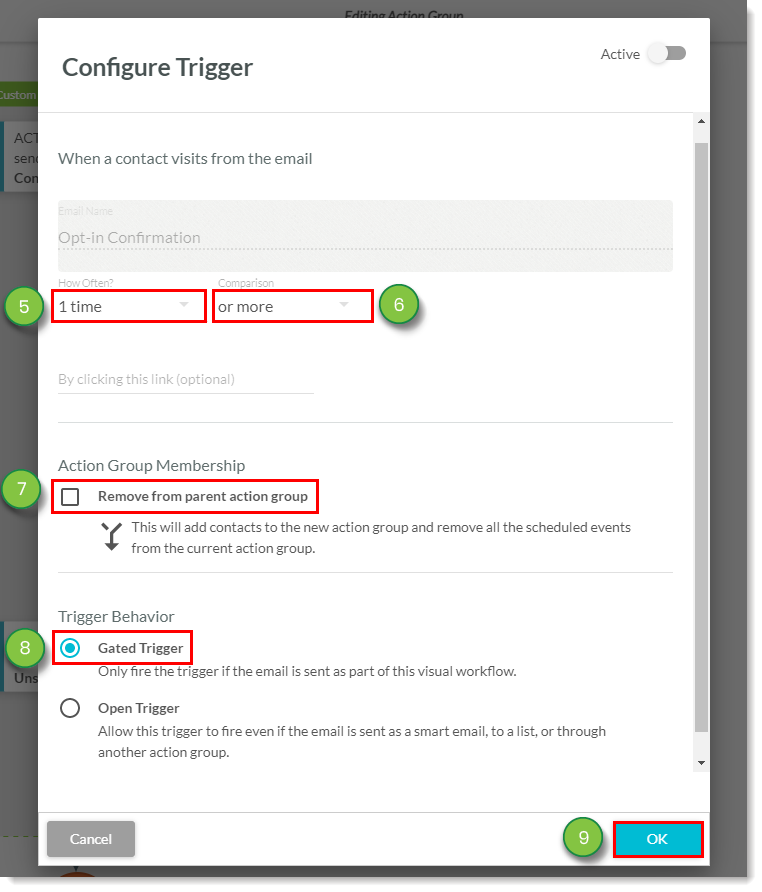
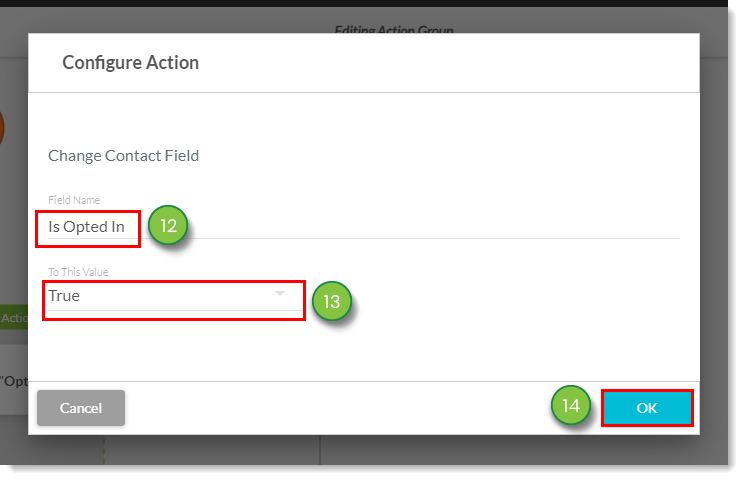
This branch is separated from the first branch by a gated trigger. Gated triggers only activate if the trigger's condition is satisfied by the contact already being part of the parent workflow. This will keep those contacts who have opted in to receive your content from your manual list, and add them to your rules-based list.

To add this branch, do the following:

  1. Click Automation > Action Groups in the left toolbar.

    Confirmed Opt In


  2. Select the previously created action group with an email and contact actions.

    Select the actiong group 
  3. Click + Add > Trigger under the created email action.

    Add a trigger 
  4. Select visits from the email, located under Email.

    Visits from the email option
     
  5. Select 1 time from the How Often drop-down menu.
  6. Select or more from the Comparison drop-down menu.
    • Important: If you select exactly in the Comparison drop-down menu, the action group will not function as intended. This is because if a lead has satisfied the action group's logic once before, this counts as exactly once. This means the lead will not go through the trigger and will be automatically unsubscribed.
  7. Click the Remove from parent action group checkbox.
  8. Select the Gated Trigger option.
  9. Click OK.

    Action options 
  10. Click + Add > Action under the created gated trigger.

    Add an action 
  11. Select change contact field, located under Contact Edit Actions.

    Change contact field action 
  12. Type Is Opted In in the Field Name field.
  13. Select True from the To This Value drop-down menu.
  14. Click OK.

    Contact field action options
     
  15. Click + Add > Action under the created opt-in field action.

    Add an action 
  16. Select remove from list, located under List Actions.

    Remove from list action
     
  17. Enter the name of your previously created manual list.
  18. Click OK.

    Action settings


Creating an Opt-In Workflow

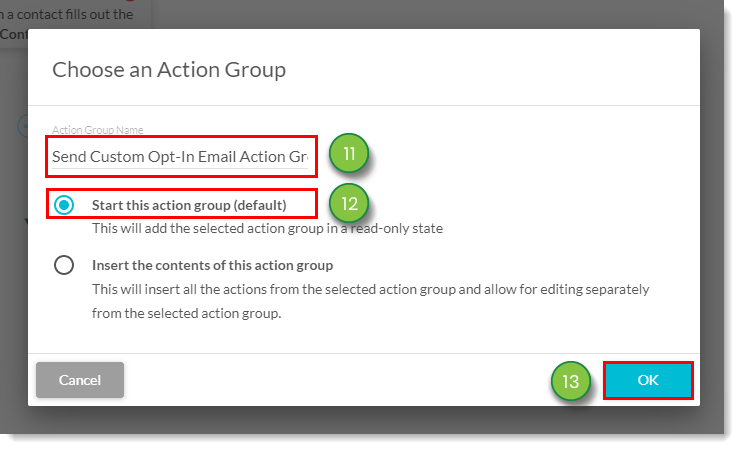
Once you have created your action group, you can add it to workflows. The workflows will operate based on the trigger that starts the automation.

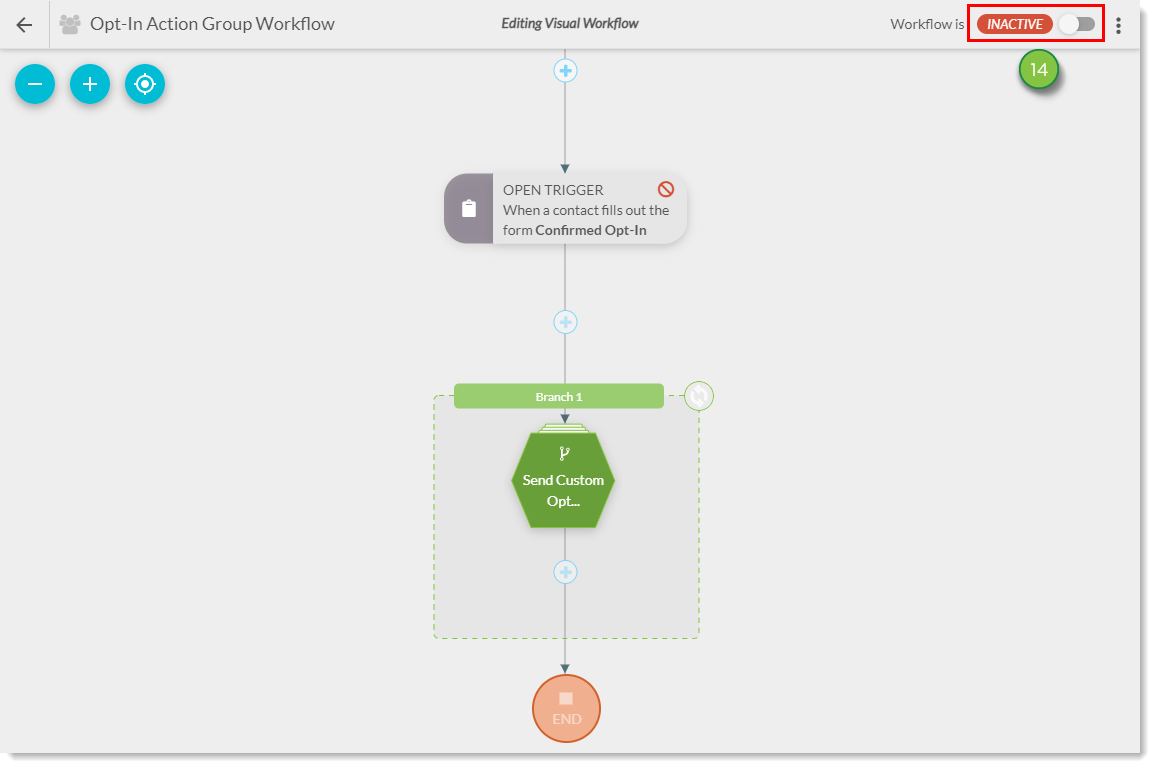
The action group will then automatically activate, requesting that the lead that triggered the automation confirm that they are opting in to receive your future communications.

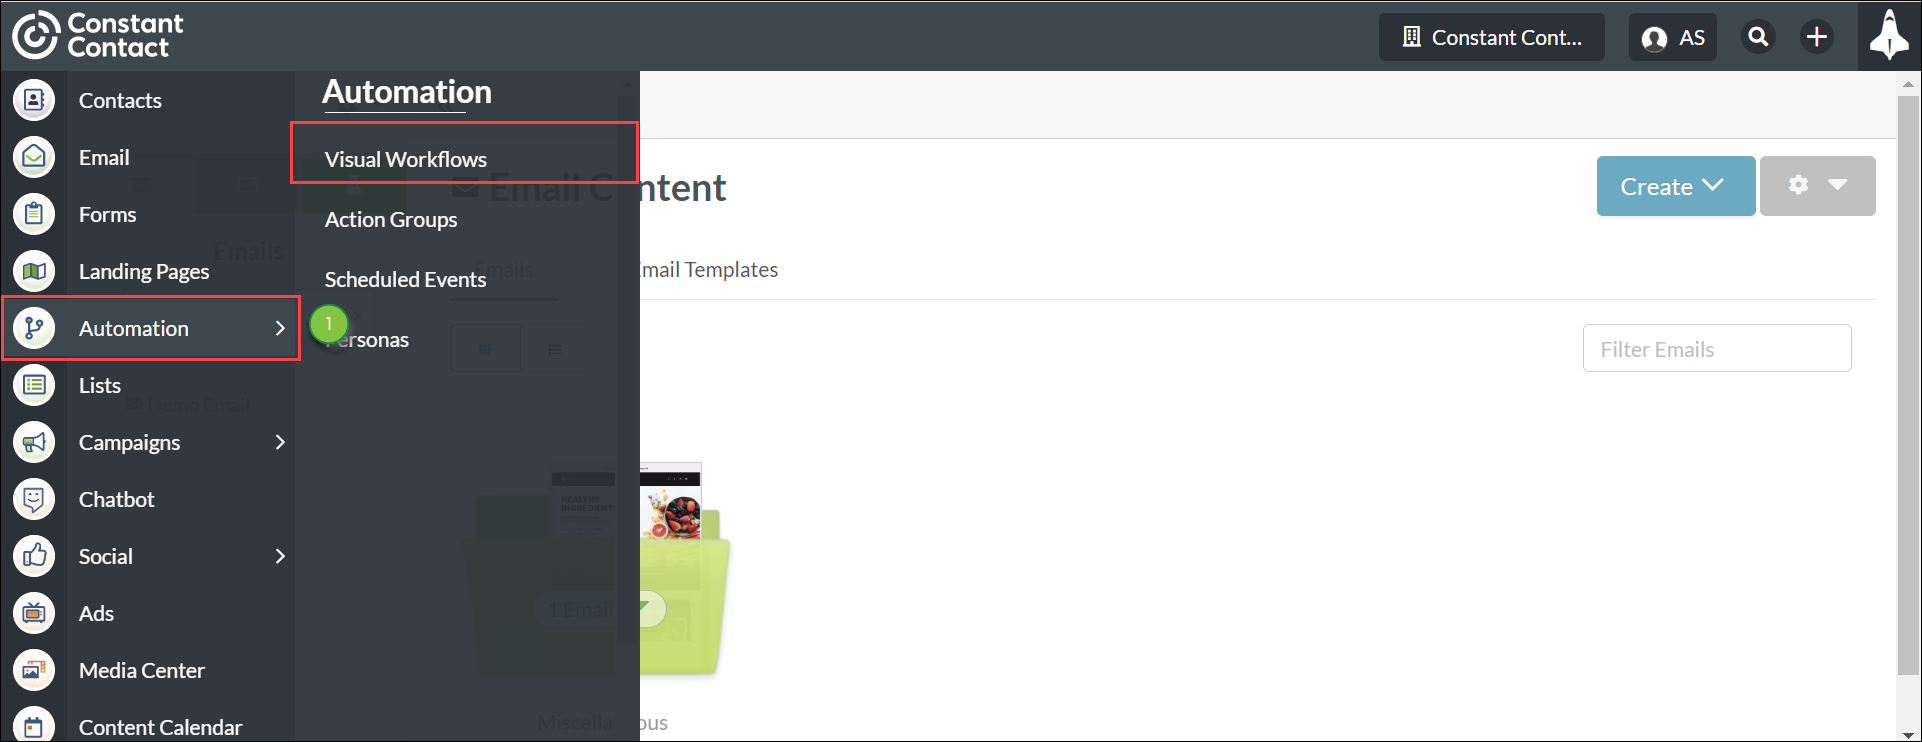
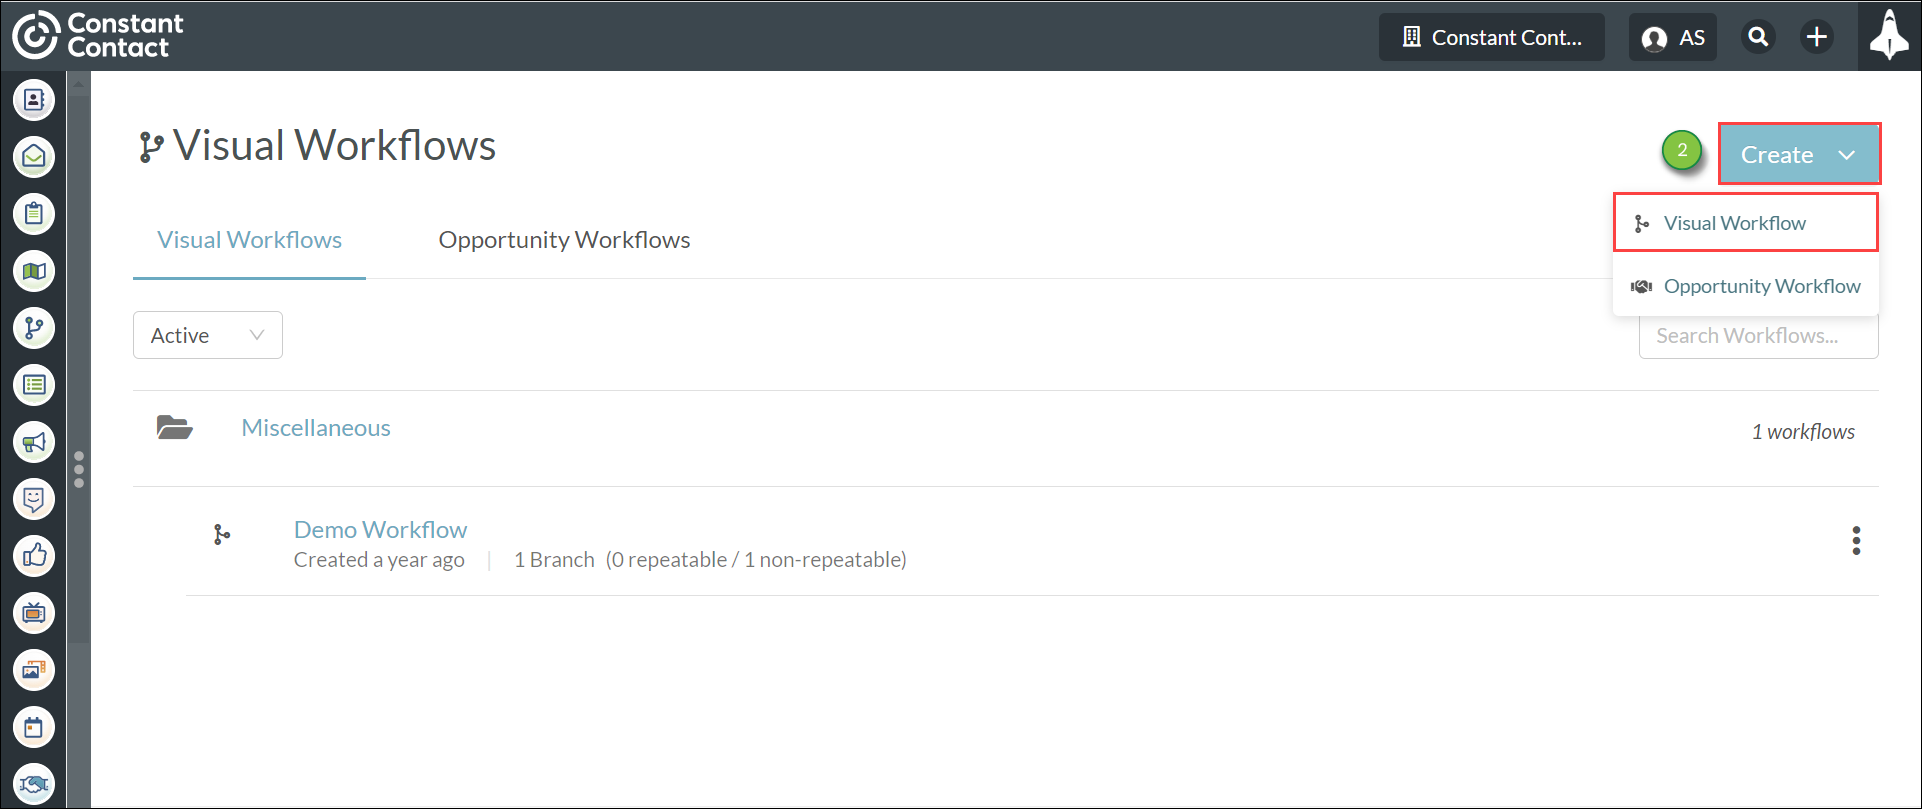
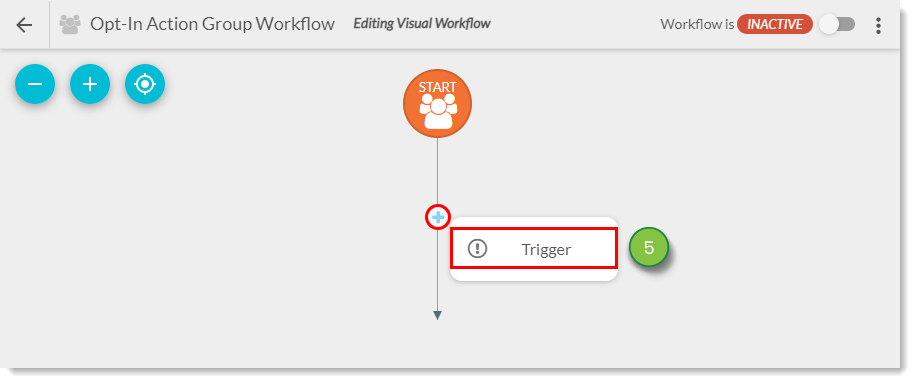
To create a workflow for confirming opt-in statuses, do the following:

  1. Click Automation > Visual Workflows in the left toolbar.

    ALTTEXT


  2. Click Create > Visual Workflow.

    ALTTEXT


  3. Enter a name for the workflow.
    • Note: For workflow management purposes, consider naming this workflow as something similar to Opt-In Action Group Workflow.
  4. Click OK.

    Name the workflow
     
  5. Click + Add > Trigger.

    Add a trigger
     
  6. Select fills out the form, located under Form.

    Fills out the form action 
  7. Enter the name of your previously created opt-in form.
  8. Select at any time from the When drop-down menu.
  9. Click OK.

    Action settings
     
  10. Click + Add > Action Group under the created trigger.

    Add an action group
     
  11. Enter the name of your created opt-in action group.
  12. Select the Start this action group option.
  13. Click OK.

    Action group settings
     
  14. Set the workflow's activity toggle to Active.
    • Note: If your action group is inactive, it will not be able to be selected.
      Activate the automation 

Regarding Multiple Initial Triggers and Different Workflows

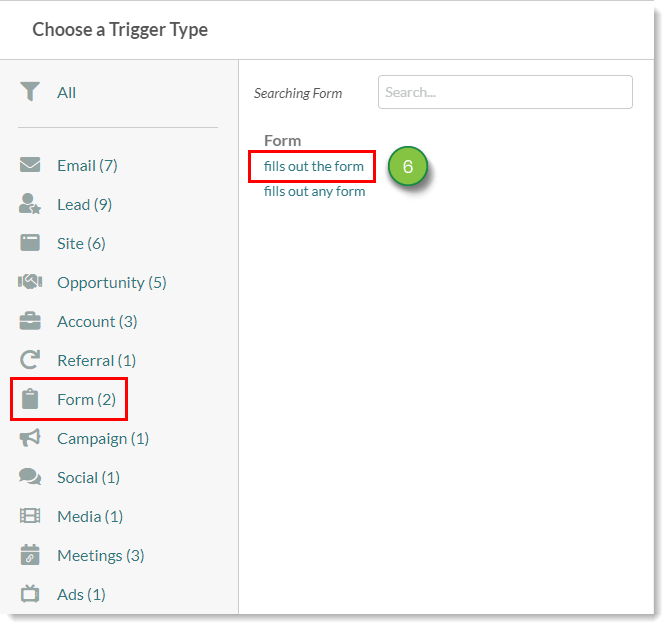
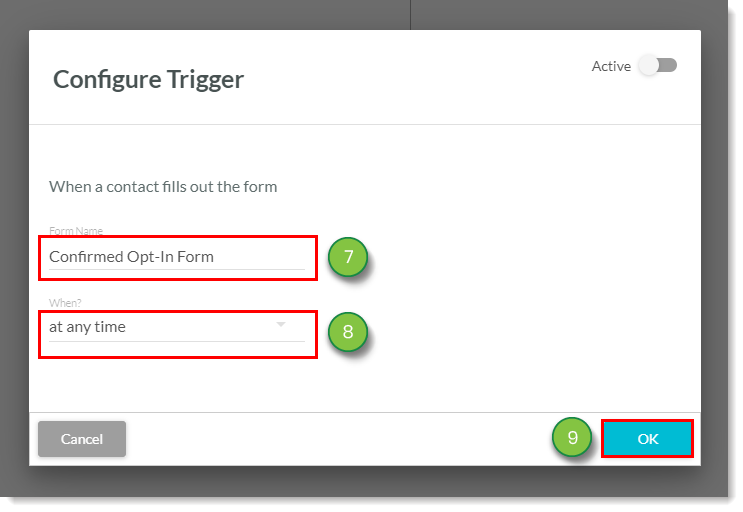
The fills out the form trigger represents the most common way people can request your content. This is because users have to interact with this form and purposefully fill it out in order to request your content. This does not mean that you cannot use other triggers to create opt-in workflows or otherwise filter leads into specific lists. 

You can use any relevant trigger to start this workflow, such as when users visit a specific landing page or when they view a certain email. You could, in turn, use any combination of those triggers in the same workflow to start the action group. Lead Gen & CRM recommends using the action group in different workflows, however. This is because you can see which leads were filtered by the individual workflows. 


Did this article answer your question?


Constant Contact Logo

Copyright © 2025 · All Rights Reserved · Constant Contact · Privacy Center