Lead Gen & CRM enables you to create multiple types of forms. These forms can be added to your website or landing page by embedding the form's code into the HTML. However, to display forms properly, you need to ensure your embedded code is placed correctly.
This article provides information on how to place your form on a website or landing page in Lead Gen & CRM.
| Tip: Are you looking for information about Constant Contact’s Email and Digital Marketing product? This article is for Constant Contact’s Lead Gen & CRM product. Head on over to the Email and Digital Marketing articles by clicking here. Not sure what the difference is? Read this article. |
| Administrators | ✓ | |
| Company Managers | ✓ | |
| Marketing Managers | ✓ | |
| Sales Managers | ||
| Salespersons | ||
| Jr. Salespersons |
Lead Gen & CRM supports three types of forms: Constant Contact forms, third-party forms, and native forms.
Native forms and third-party forms both rely on field mapping within Lead Gen & CRM, but only native and Constant Contact forms require a script tag embed. It is important that the code does not get altered after it is placed in the location where you want the form. Any alteration will prevent the form from rendering or tracking properly.
Currently, native forms can only track one form per page. If you have more than one form per page, you must provide an ID for the form so it can be tracked.
Additionally, CSS related to Lead Gen & CRM forms must follow or overwrite the standard set of CSS.
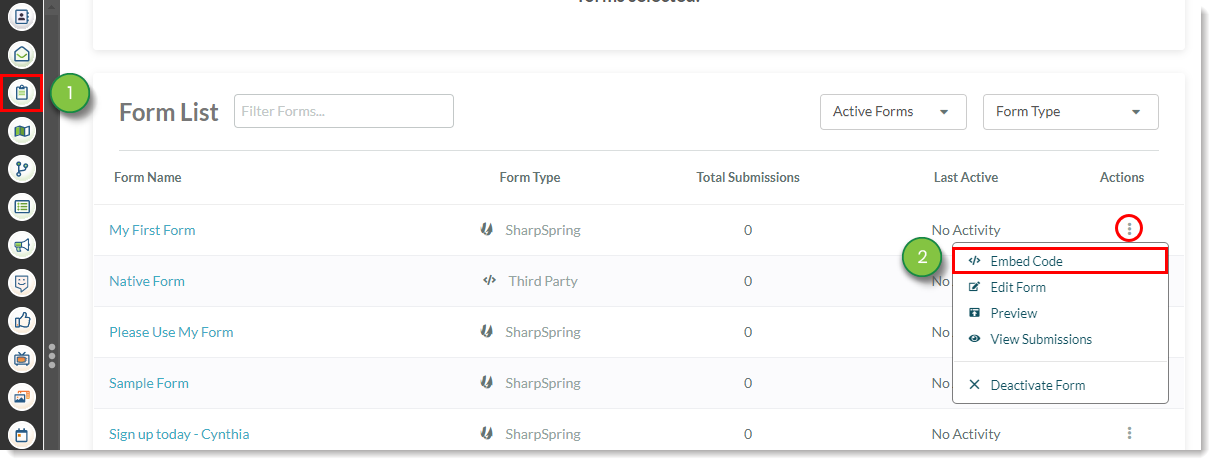
To locate and use a form's embed code:
Note: Constant Contact offers Professional Services to assist with custom coding.
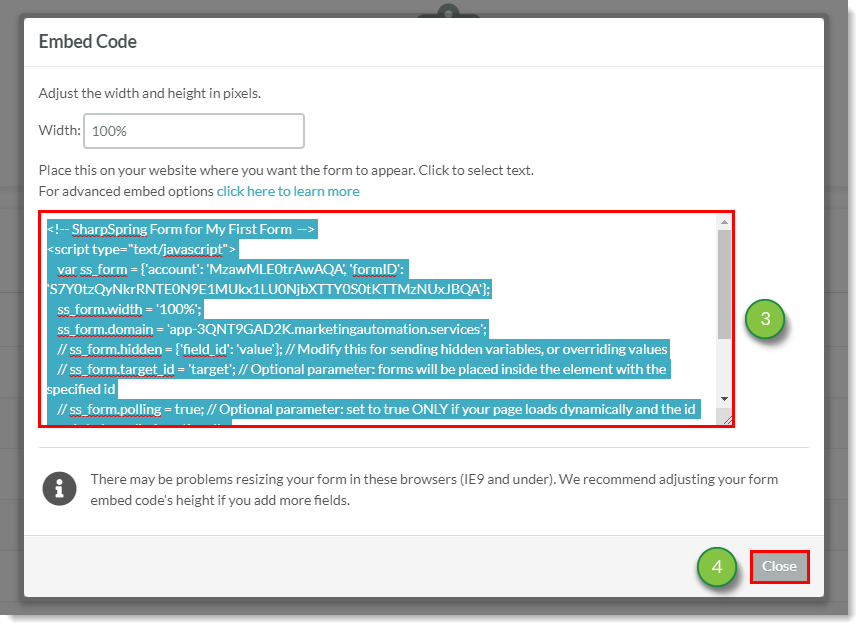
When embedding form code into your site, be aware of the following:
Lead Gen & CRM embed codes appear like the following example code, though the account, formID, and domain values will vary from your values, as they are different for your company and form:
<!-- Lead Gen & CRM Form for (your form's name here) -->
<script type="text/javascript">
 var ss_form = {'account': 'yyyyyyyyyyyyyyy', 'formID': 'xxxxxxxxxxxxxxxxxxxxxxxxxxxxxxxxxx'};
 ss_form.width = '100%';
 ss_form.domain = 'app-zzzzzzzzzz.marketingautomation.services';
 // ss_form.hidden = {'field_id': 'value'}; // Modify this for sending hidden variables, or overriding values
 // ss_form.target_id = 'target'; // Optional parameter: forms will be placed inside the element with the specified id
 // ss_form.polling = true; // Optional parameter: set to true ONLY if your page loads dynamically and the id needs to be polled continually.
</script>
<script type="text/javascript" src="https://koi-zzzzzzzzzz.marketingautomation.services/client/form.js?ver=2.0.1"></script>
You can use hidden fields in forms to pass instructions to the Lead Gen & CRM form when rendering. The following is default hidden field code: ss_form.hidden = {'Company': 'Anon'};
Any fields on the form can be given a value to overwrite any user provided value. Therefore, they will also be hidden from showing up on the form.
As an example, consider the following: ss_form.hidden = {'Company': 'Acme Co.'};
This will ensure that the Company field will be set to Acme Co. when the form is submitted. The visitor filling out the form will not even be able to see the field, let alone enter text into the field. This is useful for preventing bots from submitting data on a form.
Placeholder text is grayed out text that will appear on a field in a form. It will give the individual filling out the form instructions about the expected action in the field. For example, a name field may have placeholder text that reads Enter your name here.
You can enable placeholder text over fields by setting the _usePlaceholders parameter to true. As an example, consider the following:ss_form.hidden = {'Company': 'Acme Co.', '_usePlaceholders': true};
This setting also needs to be coupled with changes in your .CSS file to prevent the labels from showing up twice. Set labels to display: none; for text input fields.
Native form embed codes will appear similar to the following example code, though the baseURI, endpoint, and src values will vary from your values, as they are different for your company and form:
<script type="text/javascript">

   var __ss_noform = __ss_noform || ;

   __ss_noform.push(['baseURI', 'http://app.constantcontact.com/webforms/receivePostback/MwYA/']);

   __ss_noform.push(['endpoint', '70bbd19b-4f2c-45af-a25f-0a6aa2b55a19']);

</script>

<script type="text/javascript" src="http://app.constantcontact.com/client/noform.js?ver=1.0" ></script>
Some forms will need special parameters added to the embed code to work properly. By default, native form embeds will grab the first form on the page that uses POST to submit data.
When adding special parameters, do the following:
formID is the ID property on the form tag. Add this immediately after the endpoint is defined: __ss_noform.push(['form', 'formID']); __ss_noform.push(['validate', validateThis]);Copyright © 2026 · All Rights Reserved · Constant Contact · Privacy Center