Lead Gen & CRM
How can we help you?
Search our help articles, video tutorials, and quickstart guides

You've got this. You've got us. Search our Knowledge Base to quickly find answers to your questions.

Sales Pipeline Overview

Article: 000050441
Updated: October 6, 2023

Learn how the sales pipeline works, how to create your own sales pipelines, and how to use sales pipelines to create effective opportunities and improve sales operations.

The Sales Pipeline provides a comprehensive set of features that facilitate, track, and otherwise allow you to oversee the various steps in securing sales. This article will provide an overview of the Pipeline feature and its interactivity with the other parts of the Lead Gen & CRM application.


Article Contents

 
Users:
Administrators 
Company Managers 
Marketing Managers  
Sales Managers 
Salespersons 
Jr. Salespersons 


Understanding the Sales Pipeline

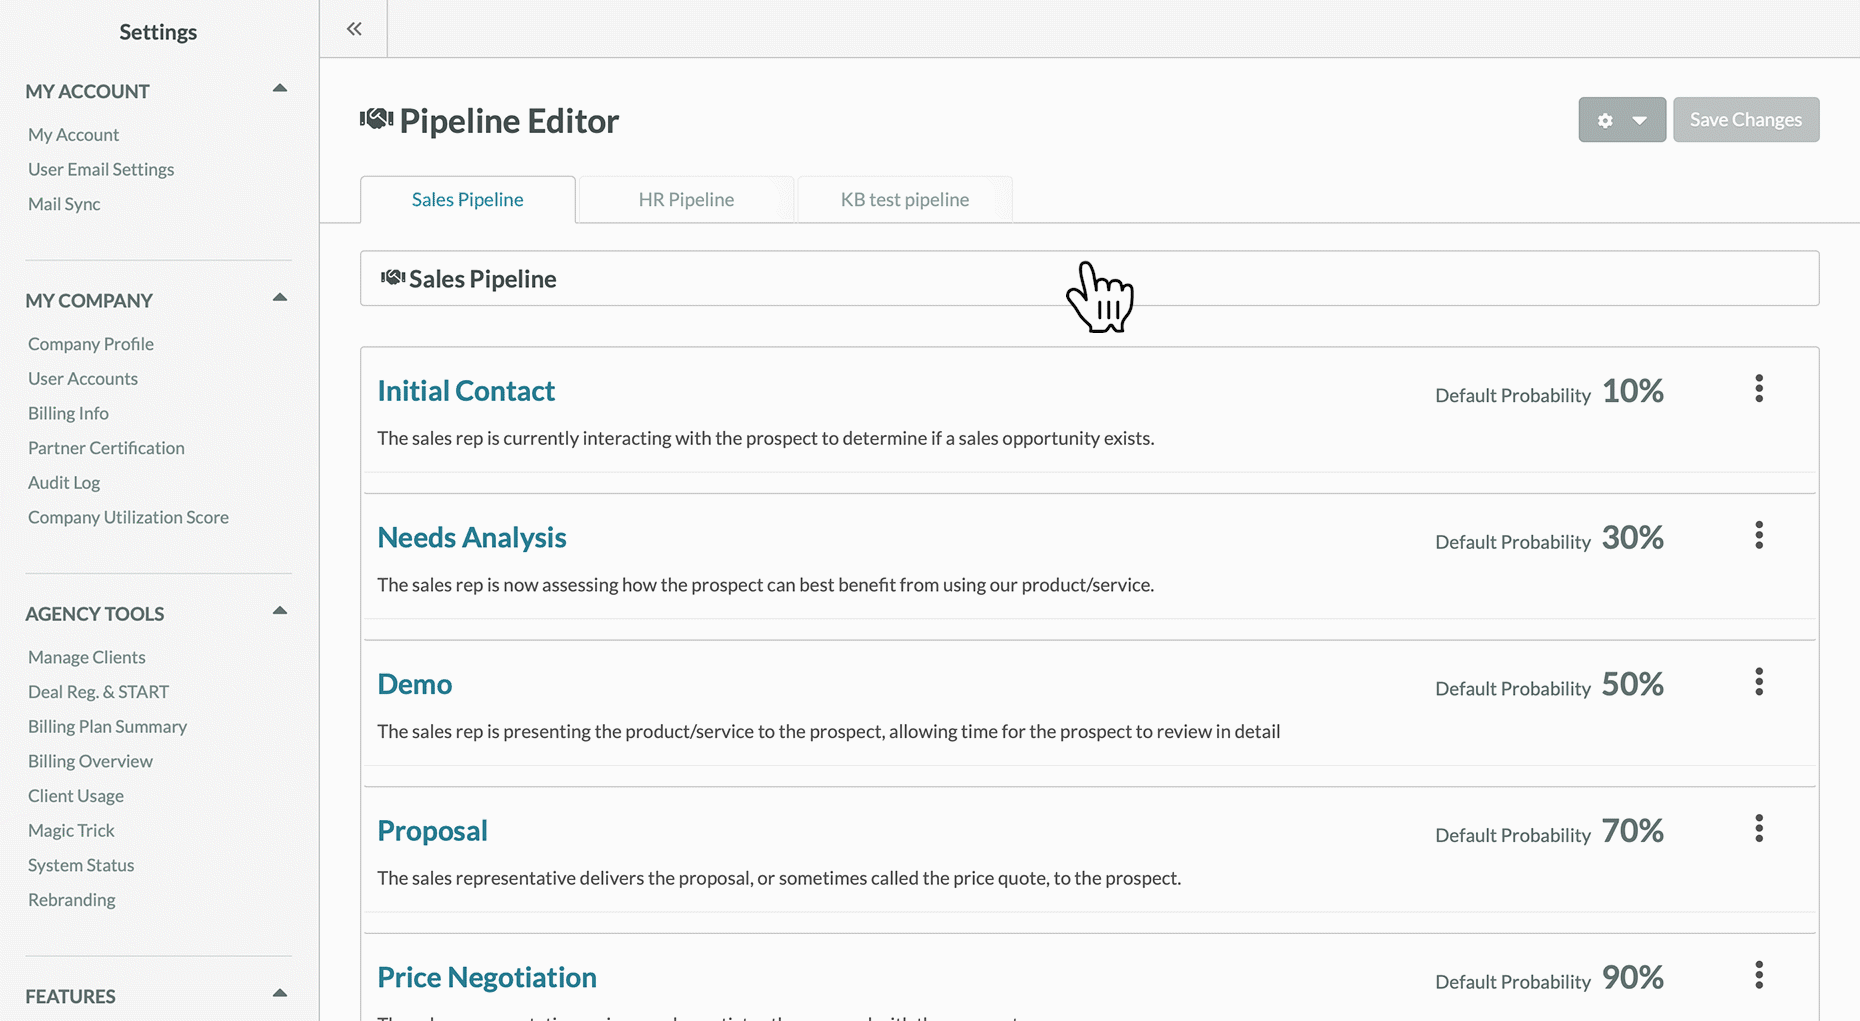
In Lead Gen & CRM, a pipeline is a complete sales cycle. Pipelines contain various stages that an opportunity will pass through. Pipelines can be customized via the Opportunity Stages dashboard.

Pipeline stages are individual, customizable steps used to track the progress of an opportunity from the beginning to the end of the sales cycle.

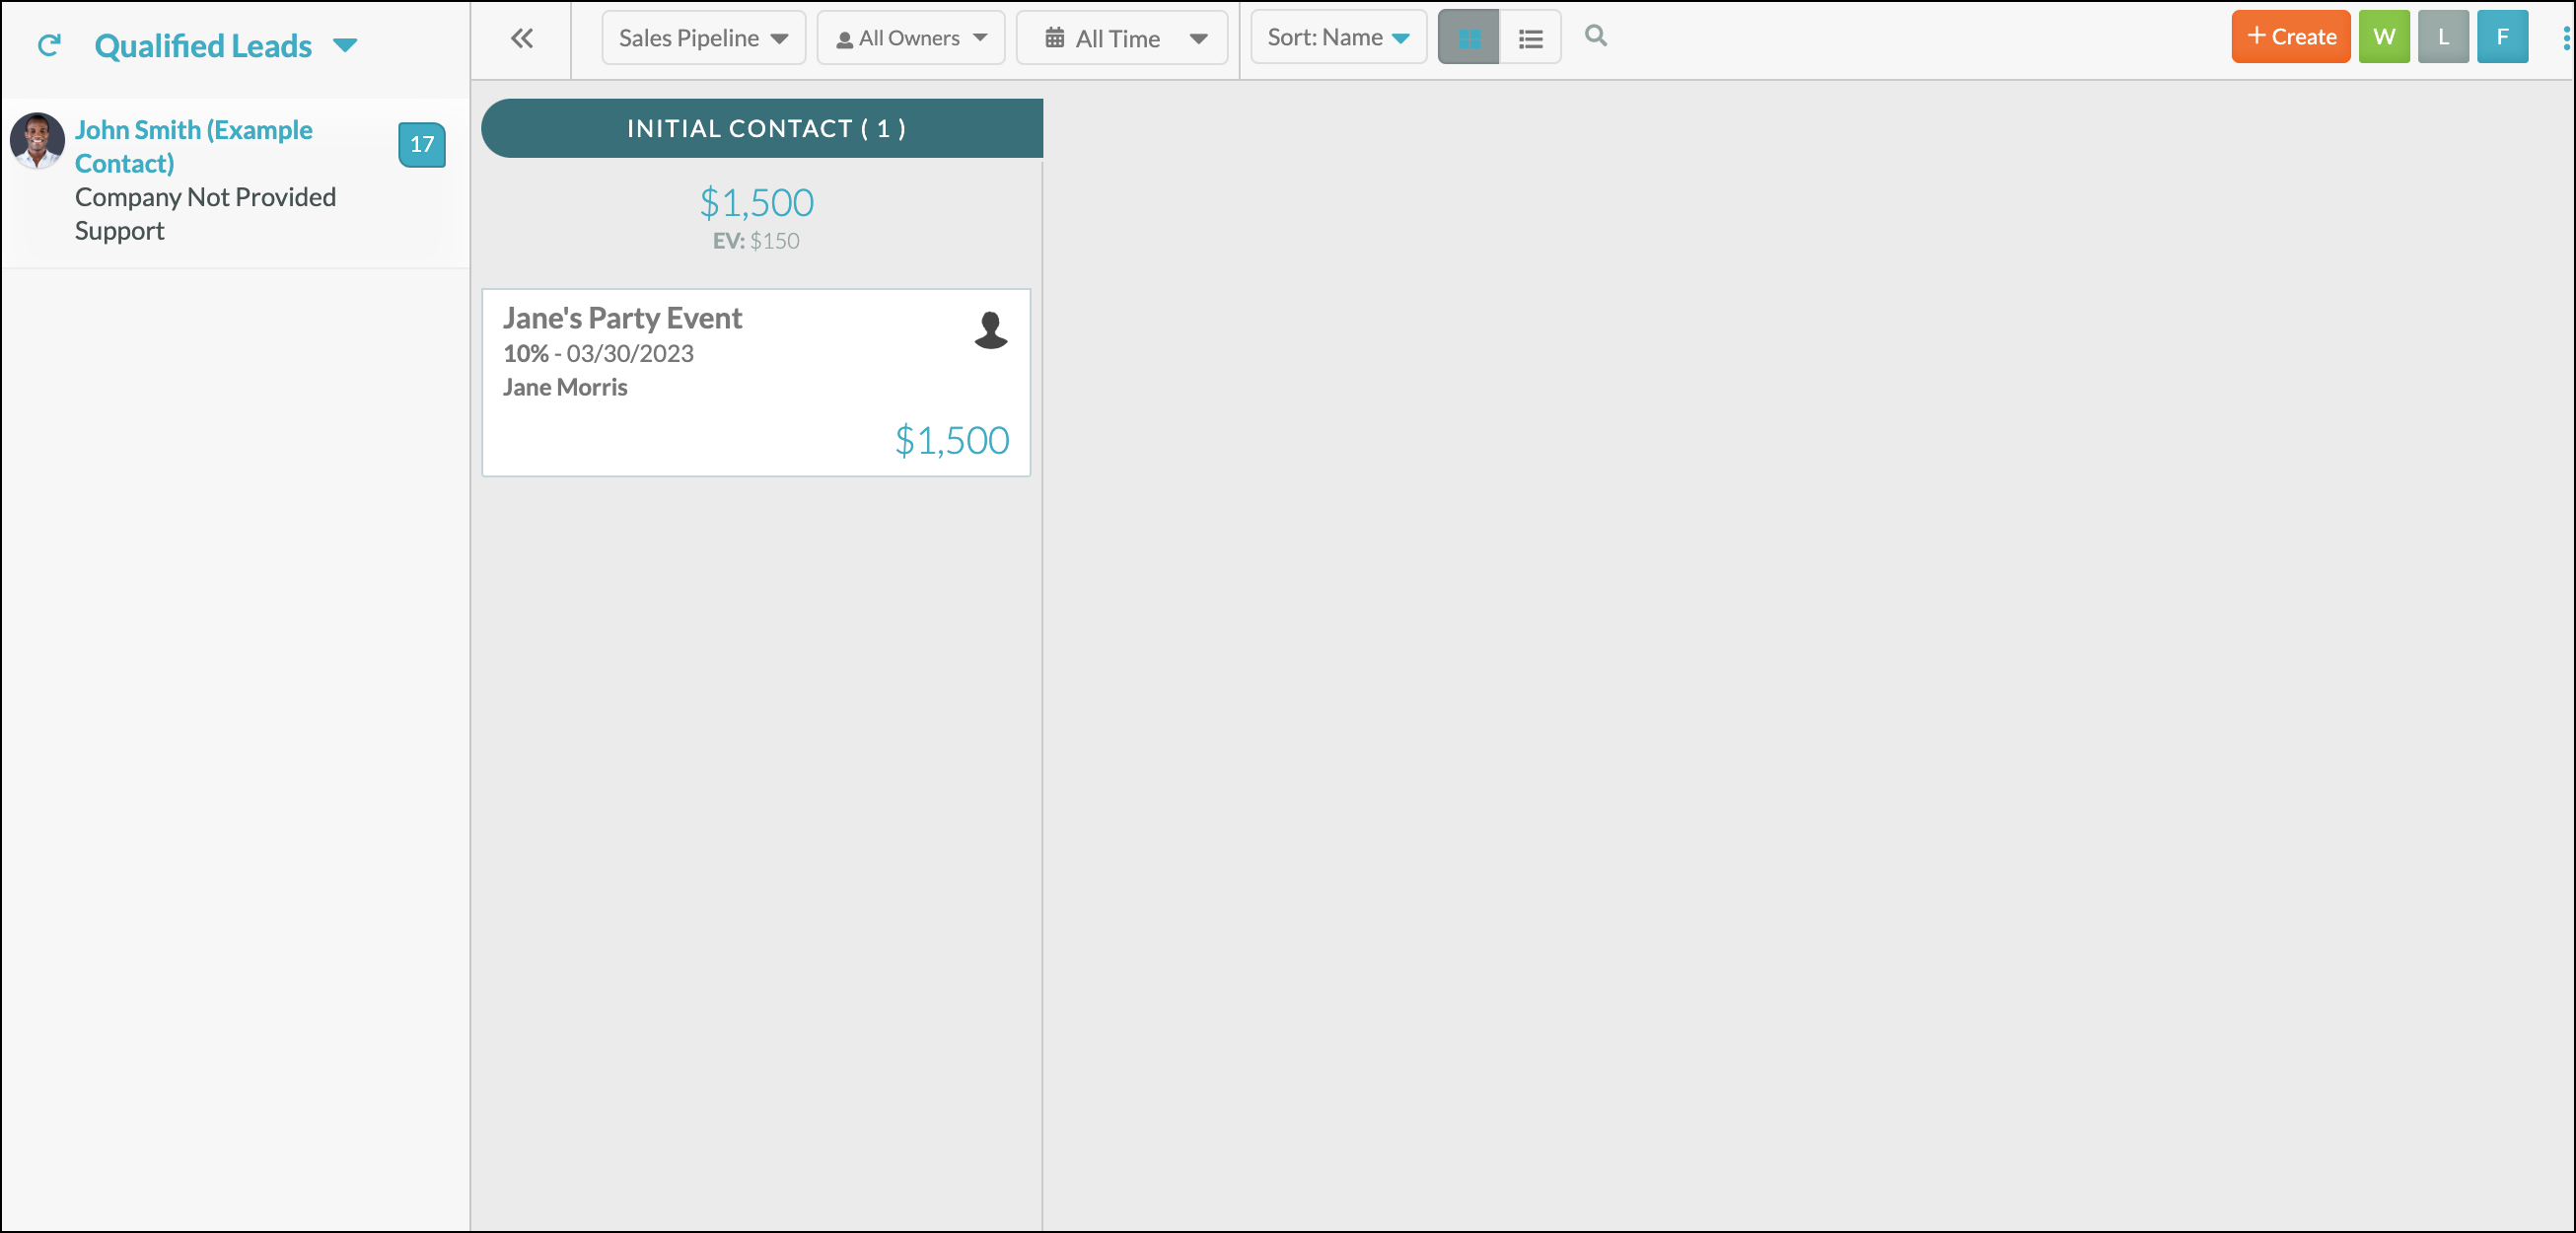
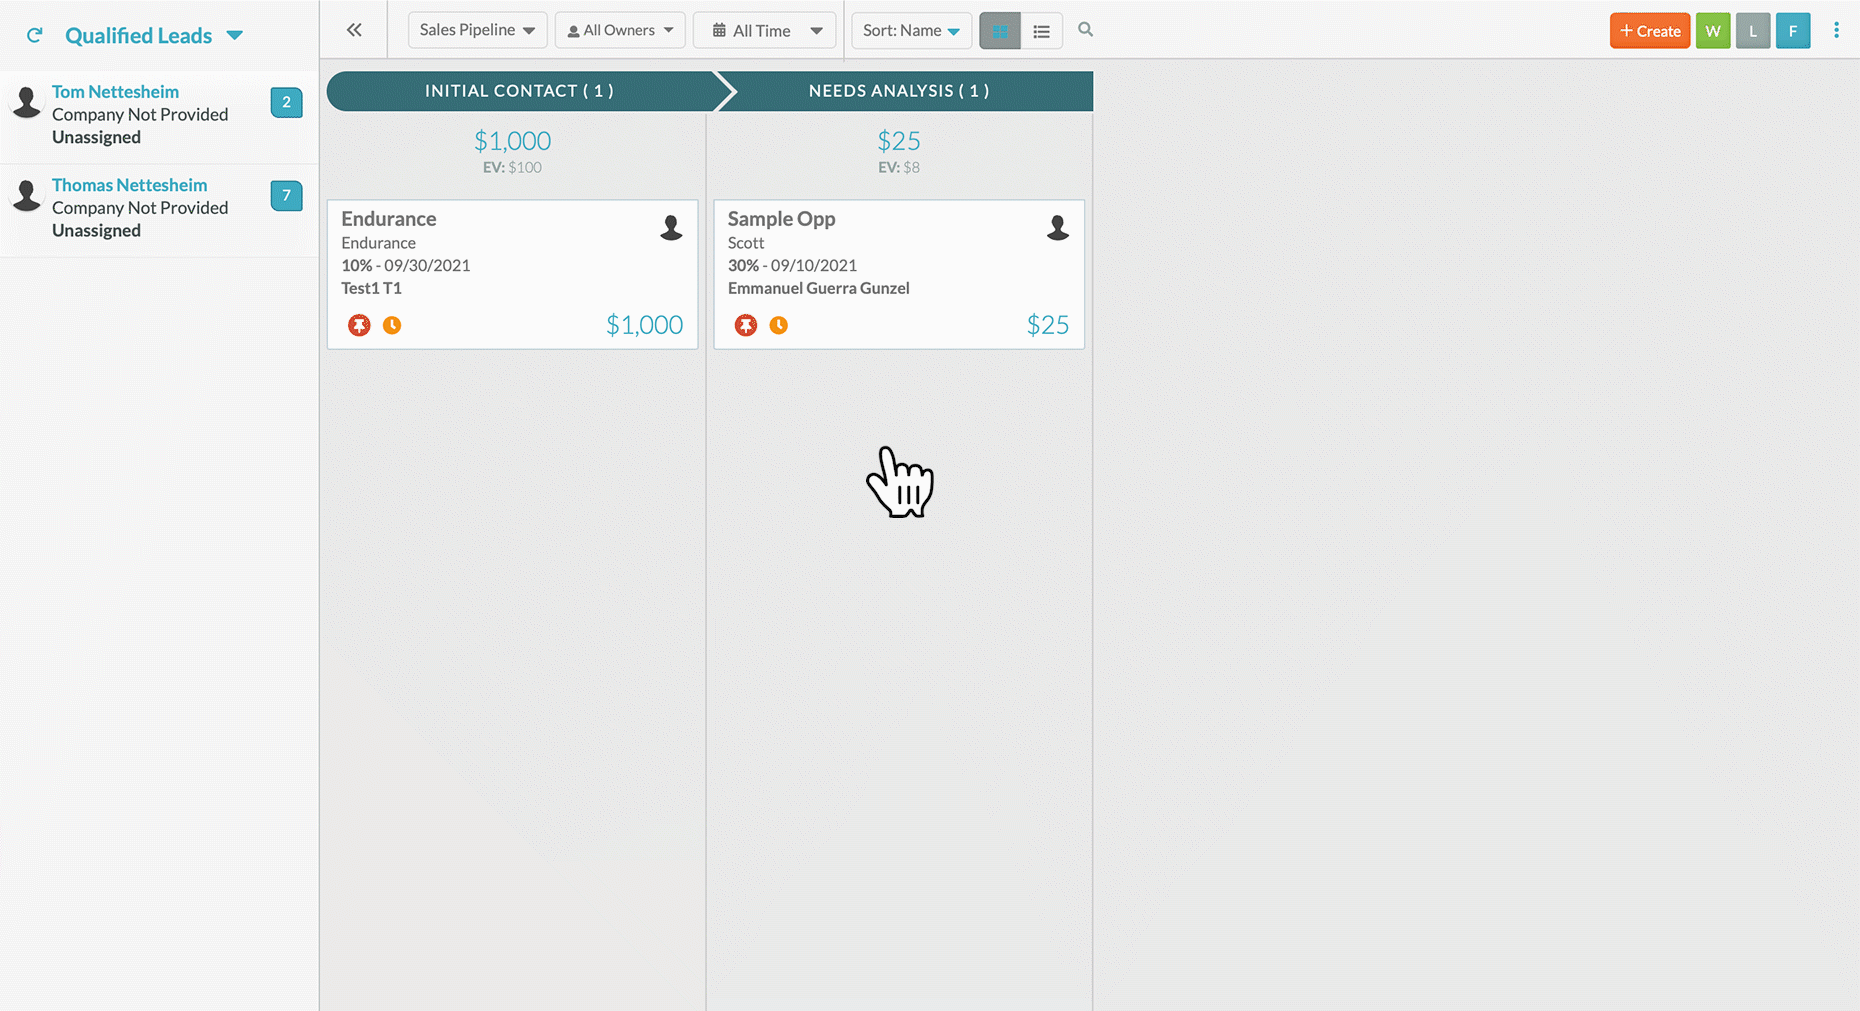
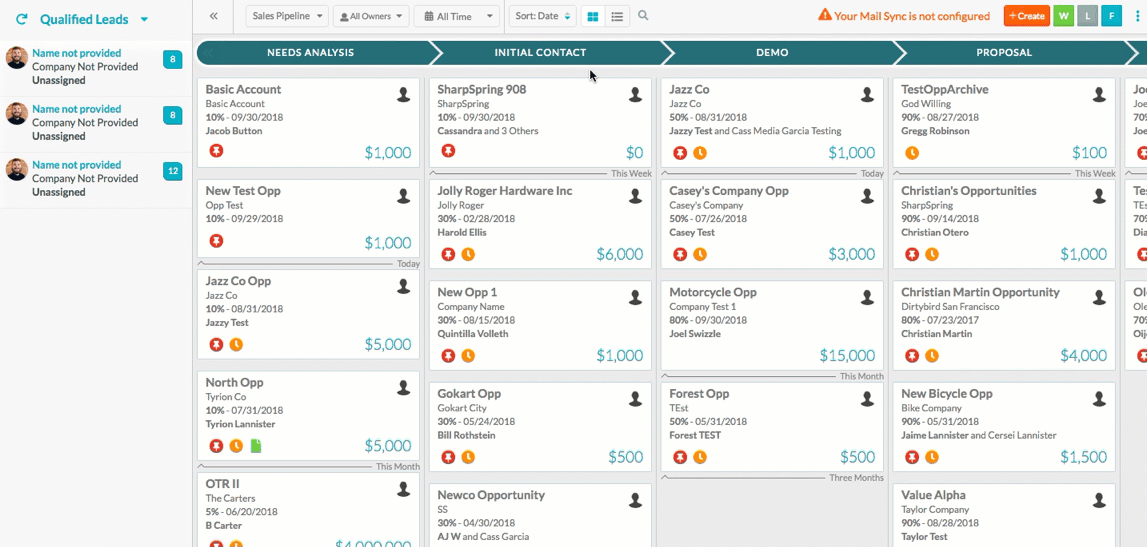
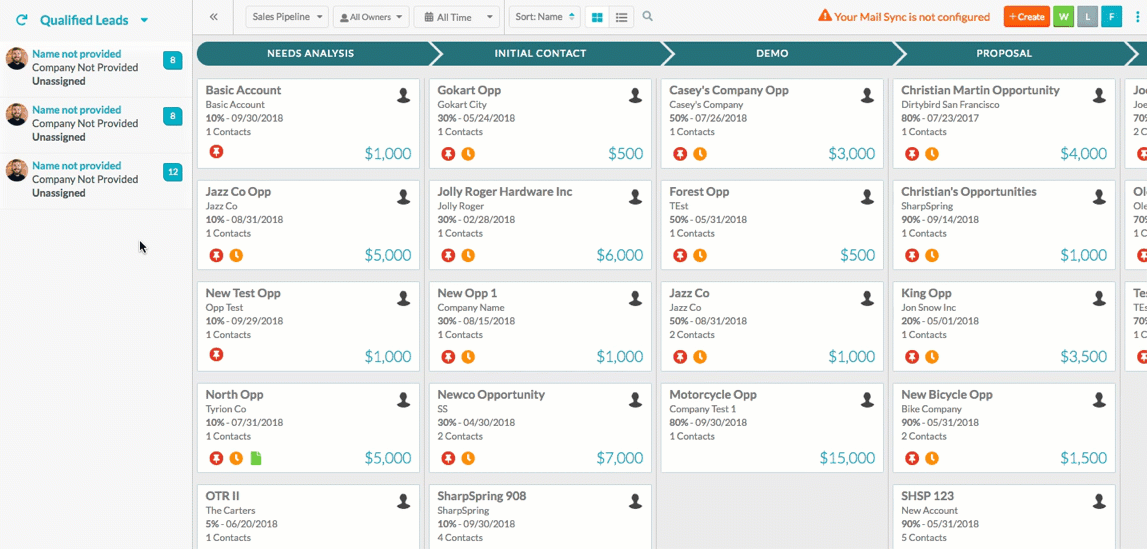
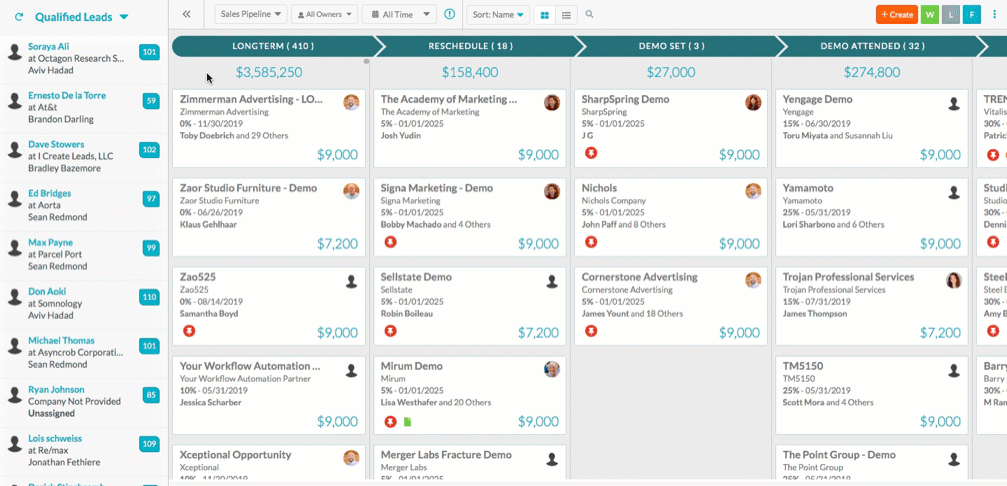
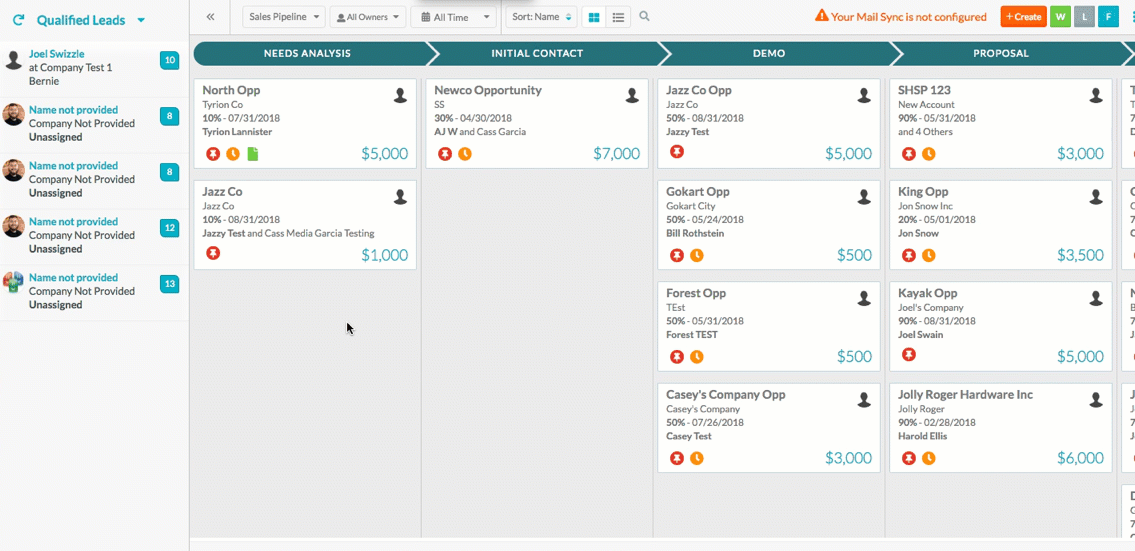
The Pipeline feature is a visual representation of a sales flow, and it is the primary tool to use when managing and tracking sales. The Sales Pipeline is a powerful tool, as it allows you to see at any given moment exactly where a sales opportunity is in the sales flow.

Note: Create up to 2 pipelines on Trial and Essential plans. Create unlimited pipelines on Advanced and Ultimate plans.


Using the Sales Pipeline

Pipelines are wholly customizable and reflect your sales by your given parameters. The purpose of the pipeline is to create opportunities and drag and drop those opportunities from stage to stage until they are considered a sale.

Click Sales > Opportunities in the left toolbar to access the pipeline.


Click Sales Opportunities


Depending on how your leads have been assigned, you may or may not see anything in the Pipeline.


The Pipeline Editor

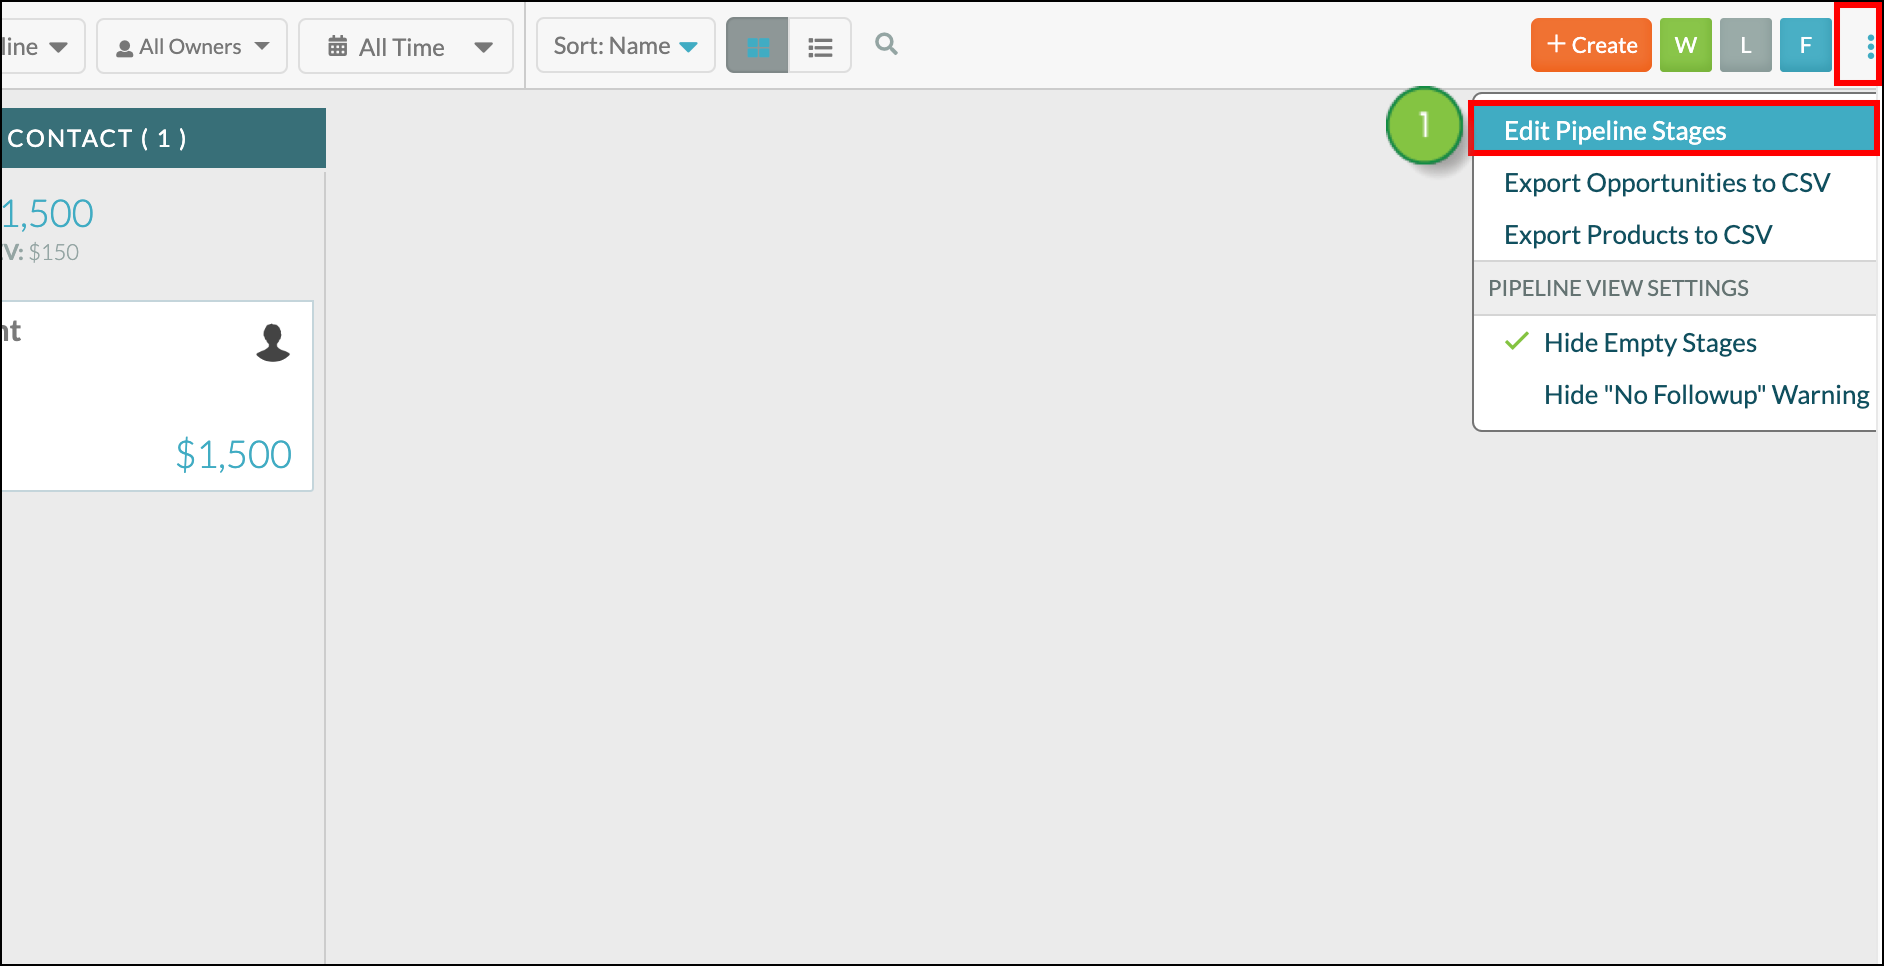
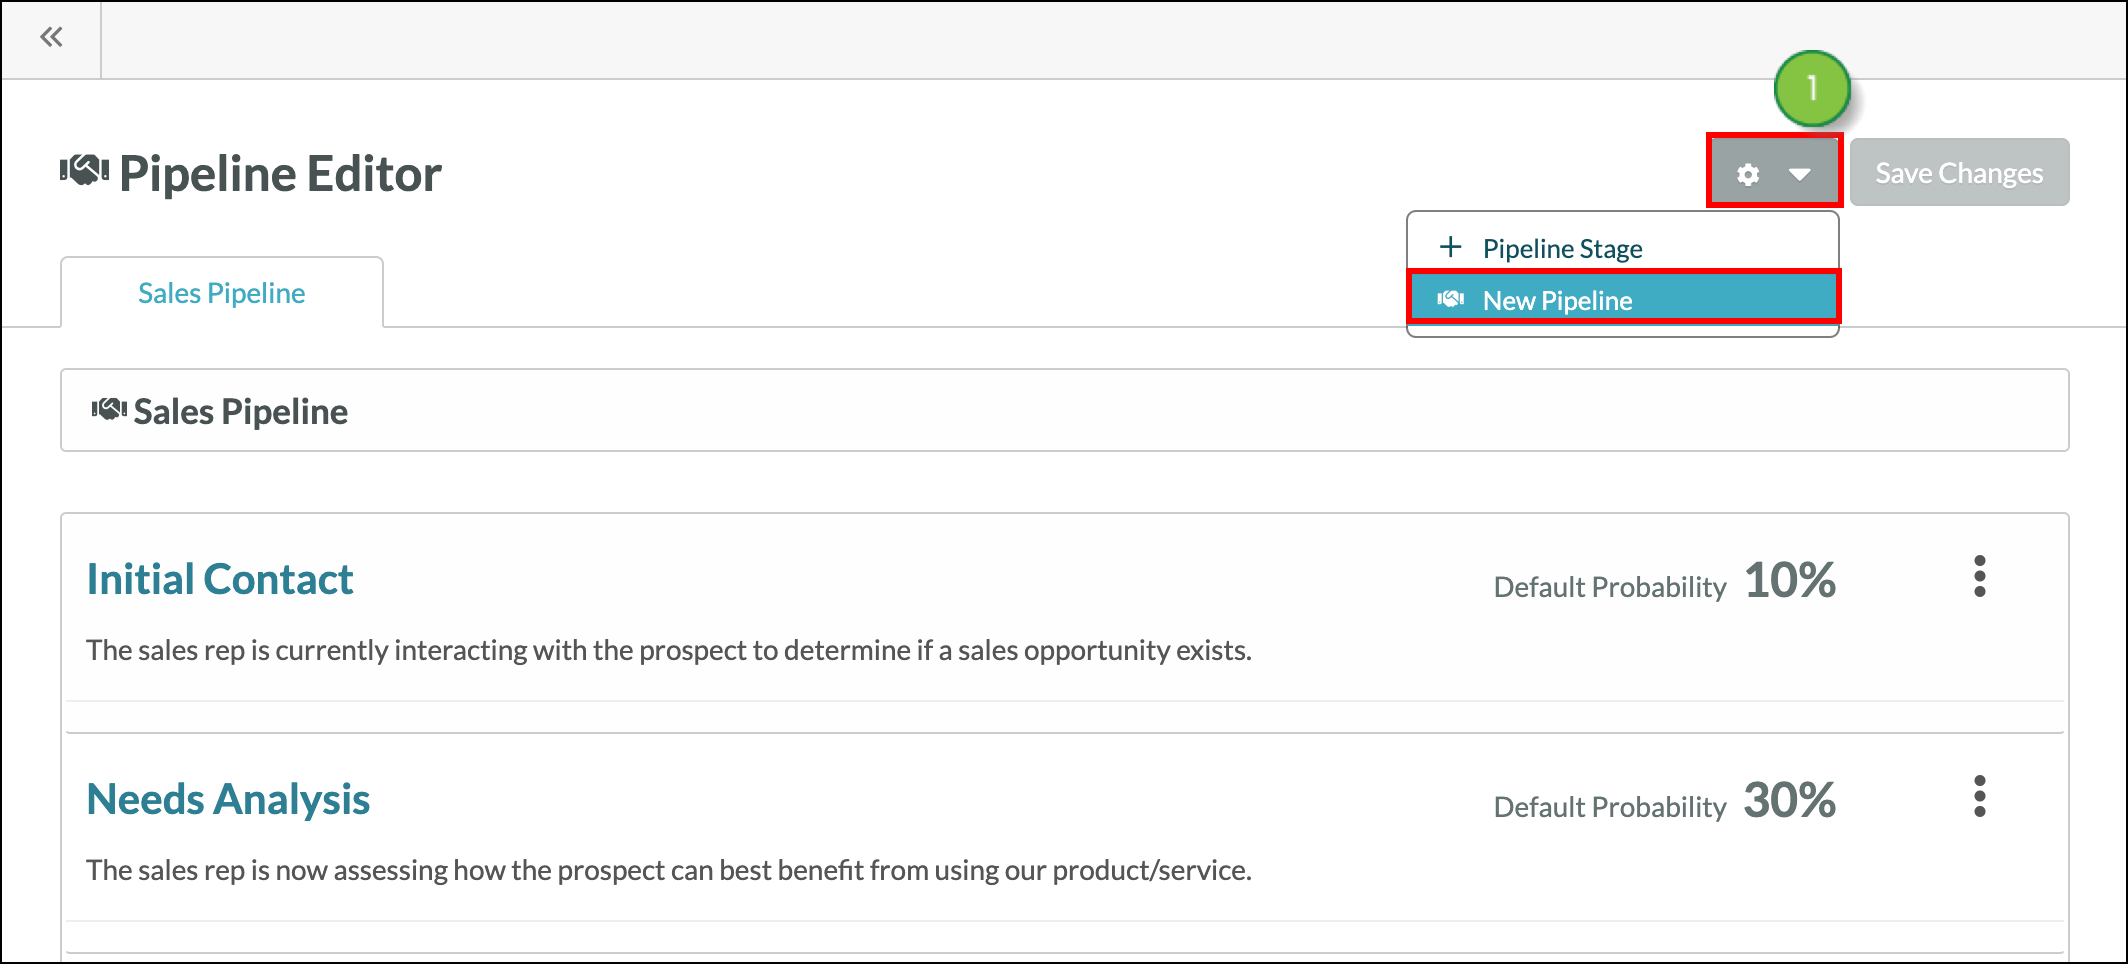
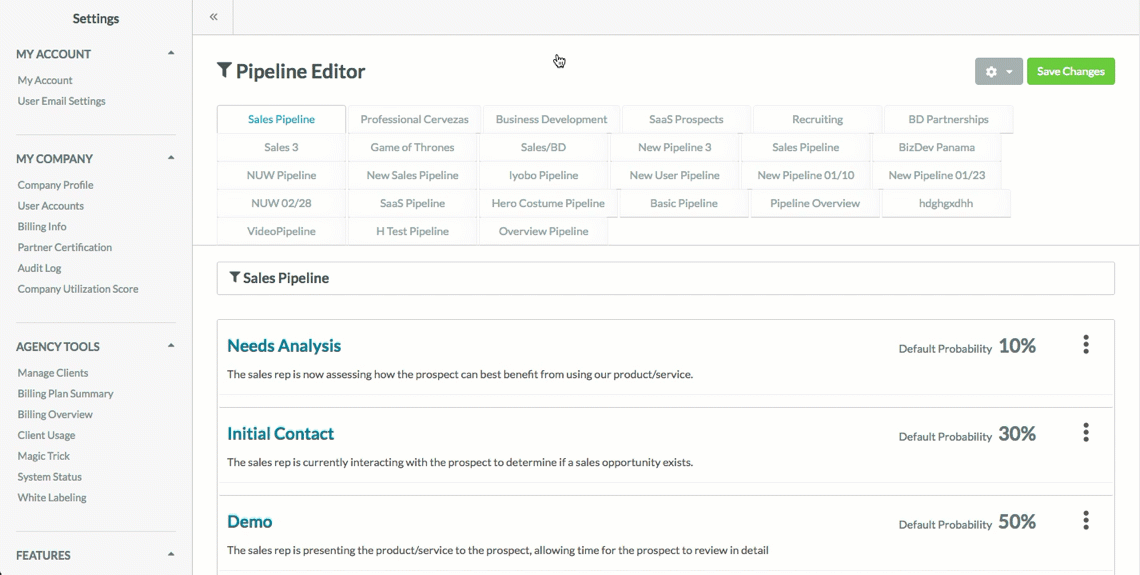
Multiple pipelines can be active at the same time, as different sales types may require different pipeline stages or other parameters. You can create pipelines to better match your sales needs. This is done through the Pipeline Editor.

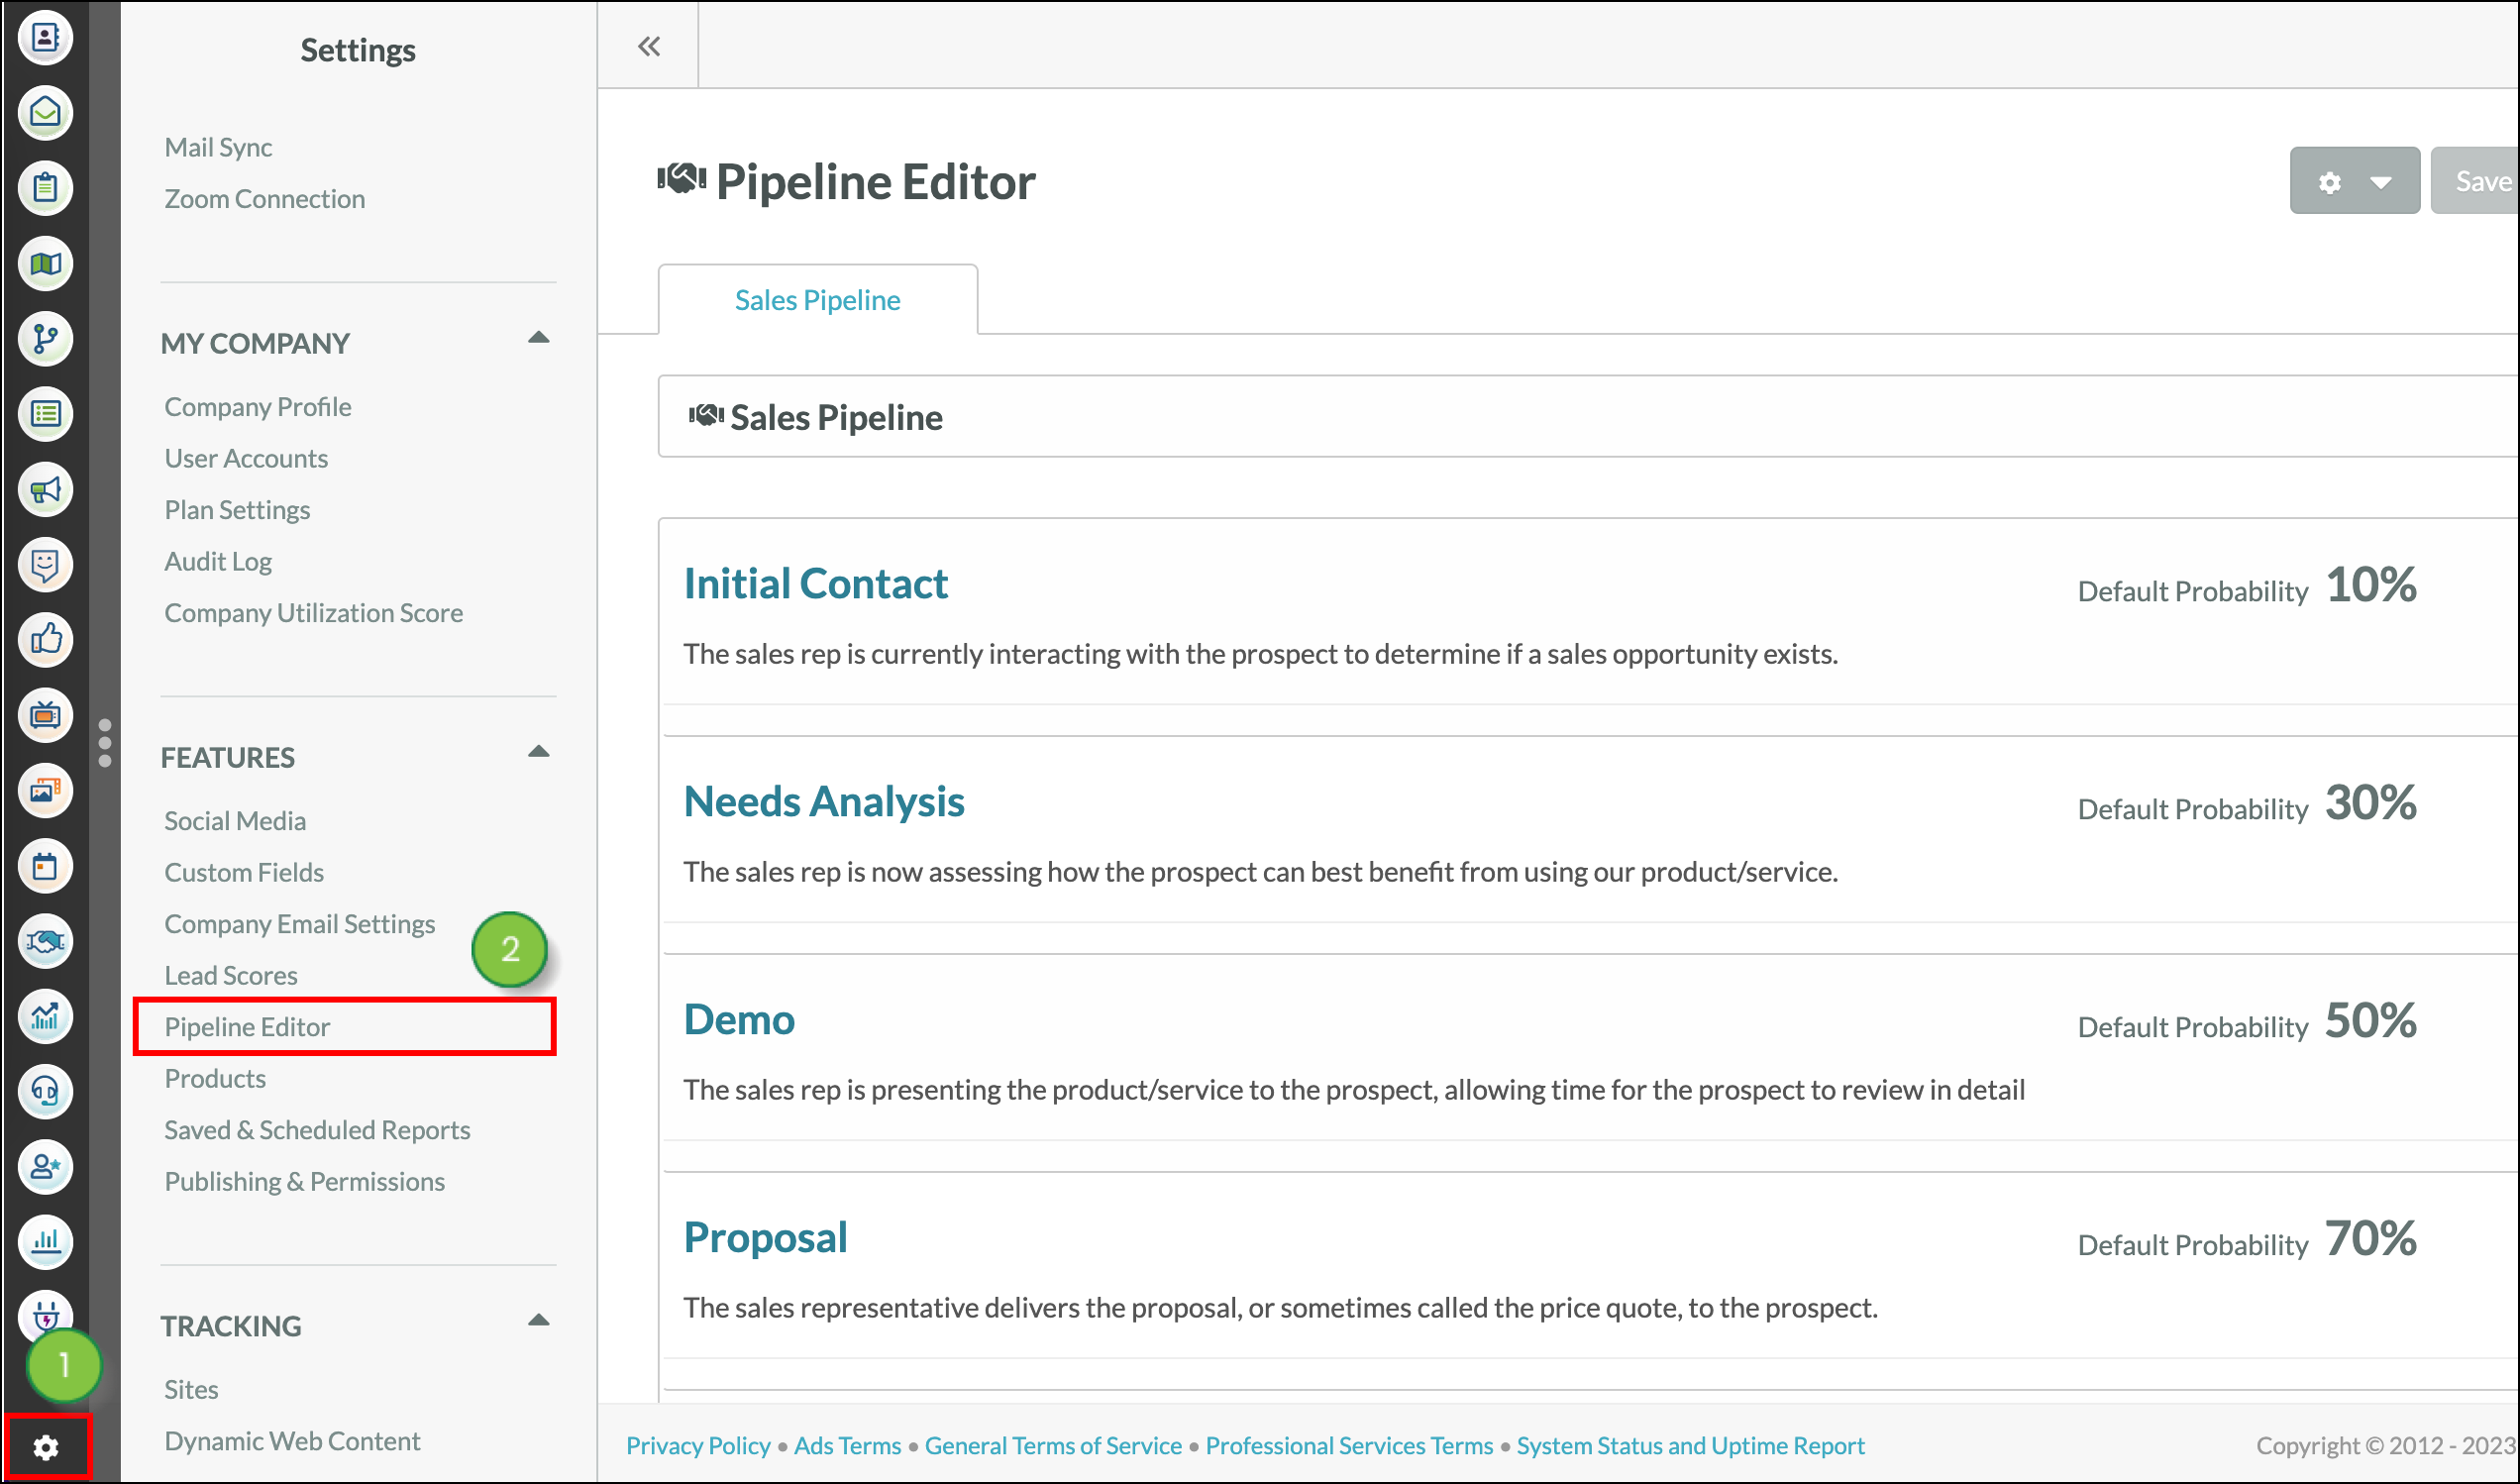
To access the Pipeline Editor, click Sales > Opportunities in the left toolbar.

  1. Click  more.png  Options.
  2. Click Edit Pipeline Stages.

    Click Edit Pipeline Stages


Alternatively, you can do the following:

  1. Click  12personas.png  User Menu > Settings in the top toolbar or Settings in the bottom of the left toolbar. 
  2. Click Pipeline Editor, located under Features in the left panel. 

    Click Pipeline Editor


Creating a New Pipeline

You can create pipelines to house opportunities.

To create a new pipeline, access the Pipeline Editor.

  1. Click  cog.png  Options > New Pipeline.

    Click New Pipeline


  2. Enter a name for the pipeline.
  3. Click Create Pipeline.
     
    Important: Lead Gen & CRM users are limited to one pipeline. Marketing Automation users can create unlimited pipelines.


    Click Create Pipeline


  4. Click the tab for the new pipeline.
  5. Optionally, after creating the pipeline, click  pencil.png  Edit to enter a pipeline description.

    Click Edit to edit the description


Adding Stages to a Pipeline

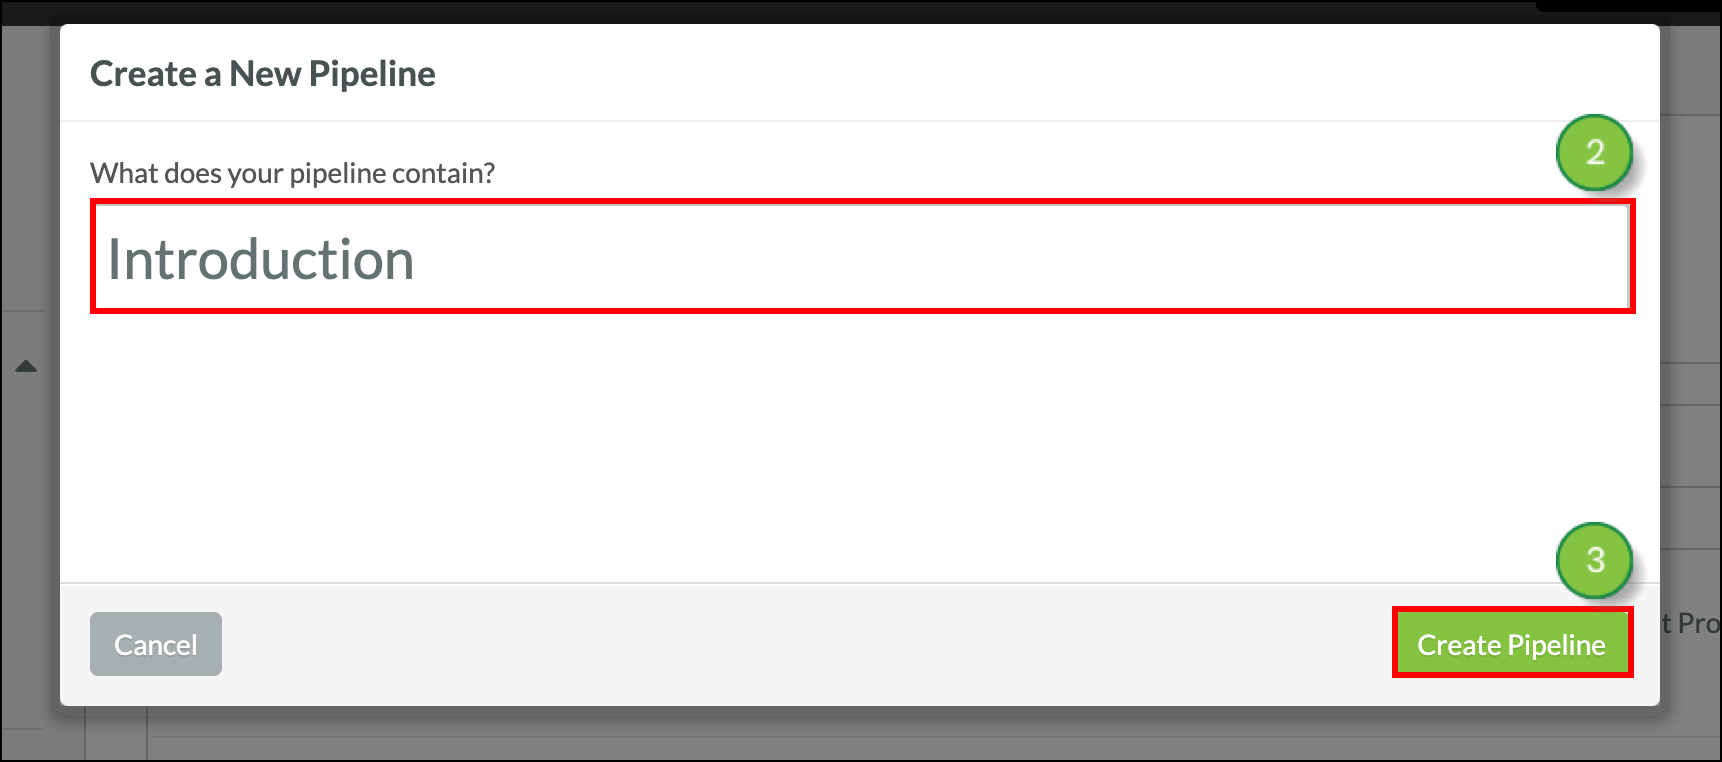
Created pipelines have no stage data. Stage data must be added to a pipeline for the pipeline to be usable. Stages should be different enough from one another to clearly define where in the sales flow an opportunity is. Pipelines can have as few or as many stages as needed.

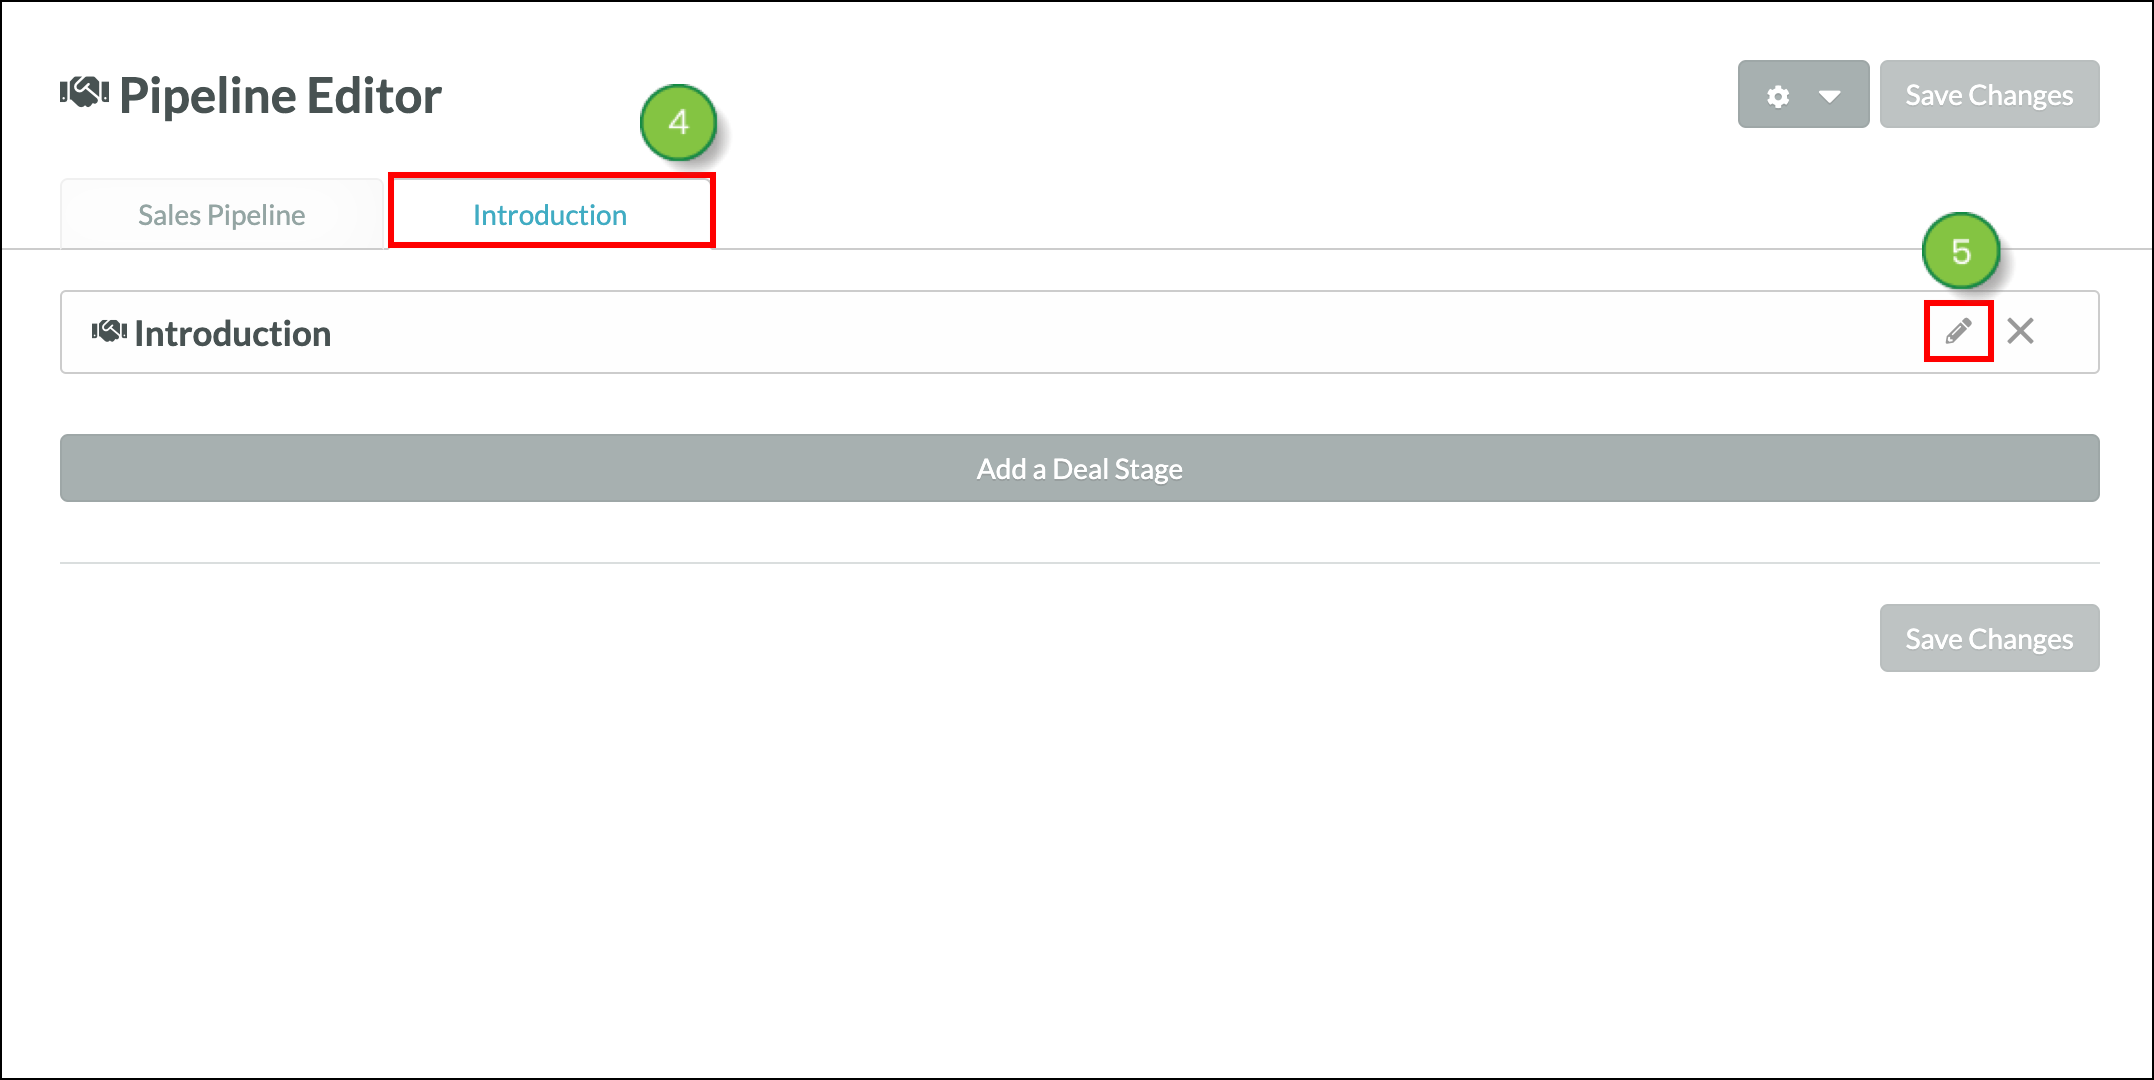
To add stages to a pipeline, do the following:
 

  1. Access the Pipeline Editor.
  2. Click  cog.png  Options > Pipeline Stage.
  3. Enter a name for the stage in the Deal Stage Name field.
  4. Select the pipeline this stage will be part of in the Pipeline drop-down menu.
  5. Select the probability value in the Probability drop-down menu.
  6. Enter a description for the stage in the Description field.
  7. Optionally, enter the number of days between prior contact that opportunities should be engaged via phone and email in the Sales Automation Policy section.
  8. Click Add Pipeline Stage.

Important: The name of the default pipeline, which is titled Sales Pipeline, cannot be edited. This pipeline cannot be erased.


Editing Pipeline Stages

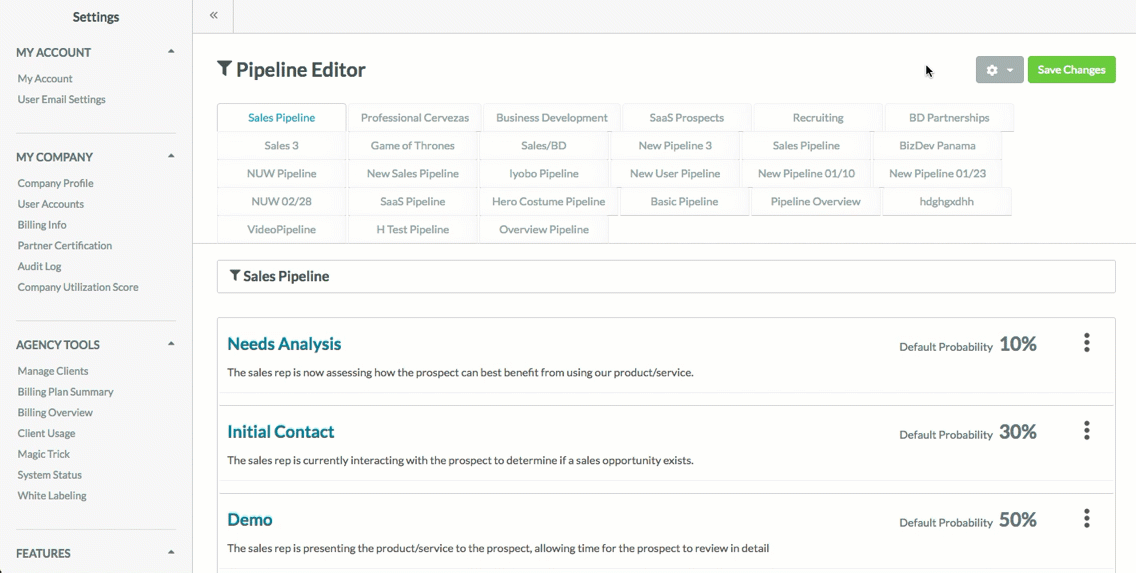
You can edit pipeline stages as necessary.

To edit pipeline stages, do the following:

  1. Access the Pipeline Editor.
  2. Select the tab of the desired pipeline.
  3. Click  more.png  Options > Edit in the desired pipeline stage.
  4. Edit individual stage information as necessary.
  5. Click Save Settings.
  6. Repeat as necessary for all applicable stages.

Important: The default pipeline, which is titled Sales Pipeline, cannot be edited.


Setting a Default Pipeline

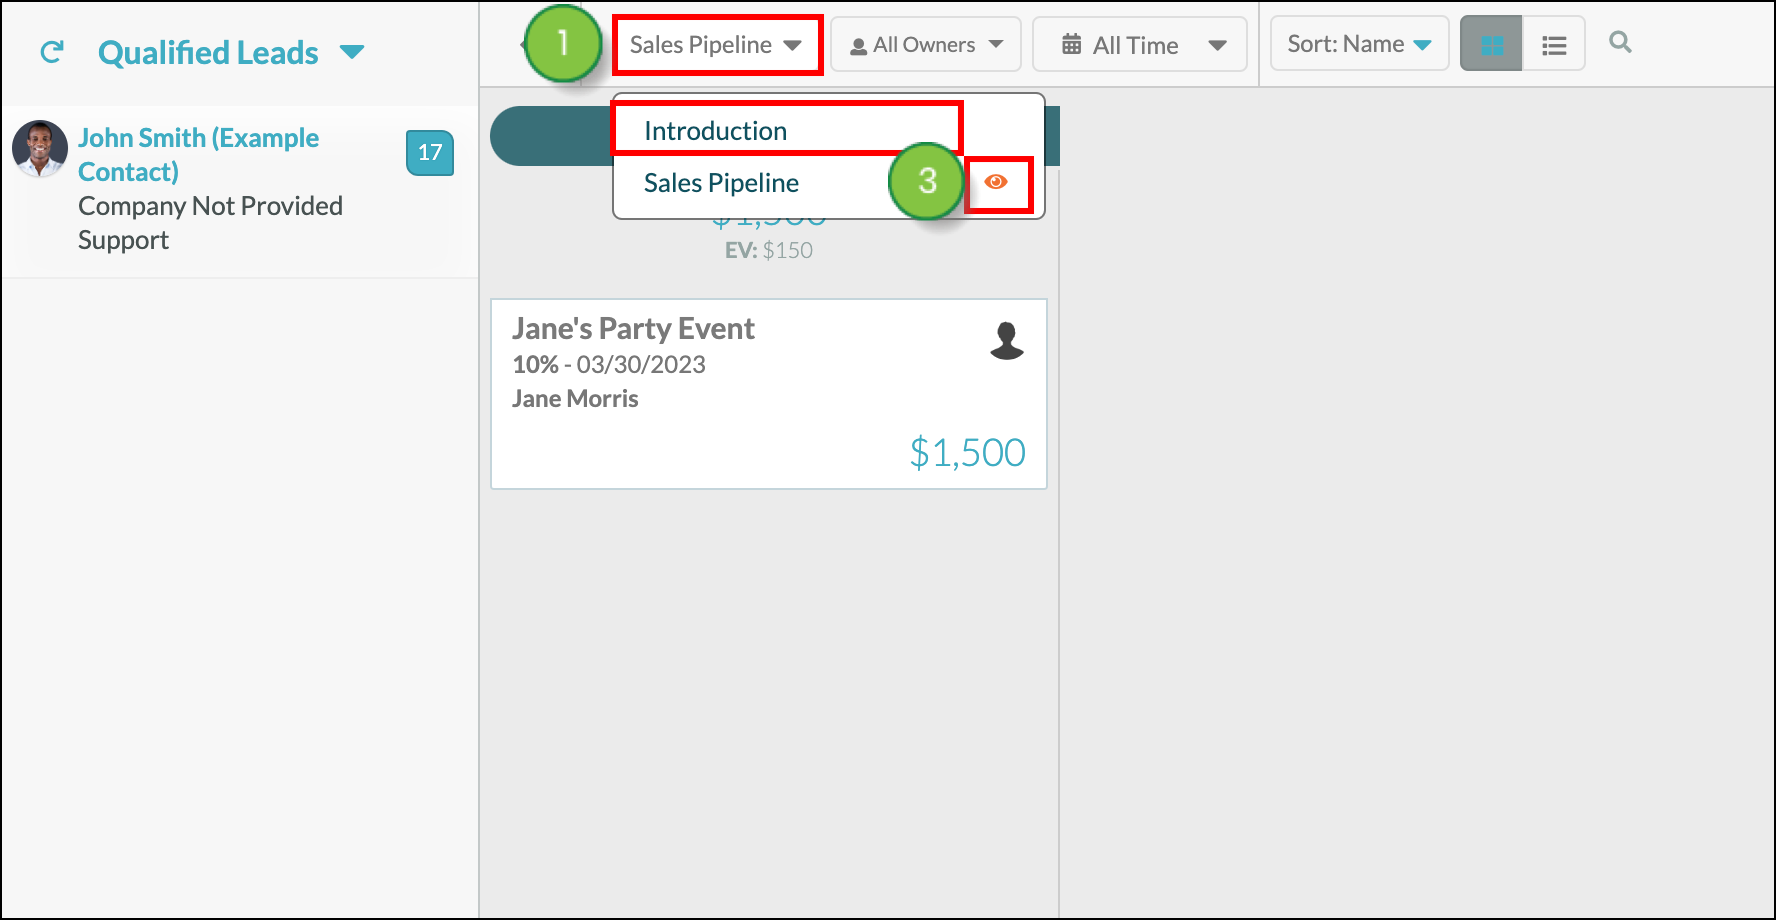
The Pipeline feature allows you to keep track of all your pipelines. You can change a pipeline's parameters to view another pipeline, a pipeline's activity over a given time period, or a pipeline's owners. To change which pipeline you are viewing, start from the Sales > Opportunities in the left toolbar.

  1. In the pipeline drop-down menu, select the desired pipeline.
     
    Note: Only pipelines with set Deal Stages will appear in this list.
  2. Optionally, click the  eye.png  Default icon next to a pipeline name to set that pipeline as the default pipeline.

    Click Default


Exporting Pipeline Data

You can save pipeline data for future reference.

To export pipeline data to a spreadsheet file, do the following:

  1. Click Sales > Opportunities in the left toolbar.
  2. Select the desired pipeline in the Pipeline drop-down menu.
  3. Select the date parameters in the Date Range drop-down menu.
  4. Select the applicable owners in the Owners drop-down menu.
  5. Click  more.png  Options.
  6. Click Export Opportunities to .CSV.
  7. Click the link that appears at the top of the screen.
  8. Click the export to download the file.

Exporting Data


To access exported pipeline information in Lead Gen & CRM's Export Manager, do the following:

  1. Click Contacts in the left toolbar.
  2. Click  more.png  Options > Export Manager.
  3. Click on an item to automatically download the .CSV file

Exporting Data


Deleting Pipeline Stages

You can delete pipeline stages you no longer need. To delete stages within a pipeline, do the following:

  1. Access the Pipeline Editor.
  2. Select the tab of the desired pipeline.
  3. Click  more.png  Options > Delete in a pipeline stage.
  4. Select a deal stage in another pipeline to attach leads to in the modal window that appears.
  5. Type DELETE in the text box.
  6. Click Delete Deal Stage.


Deleting a Pipeline

You can delete pipelines only after you have deleted all stages from a pipeline. To delete pipelines, do the following:

  1. Access the Pipeline Editor.
  2. Select the tab of the pipeline to be deleted.
  3. Hover over the pipeline's name.
  4. Click  close.png  Delete.
  5. Click Delete Pipeline in the modal window that appears.

Important: The default pipeline, which is titled Sales Pipeline, cannot be deleted.


Creating Opportunities from Qualified Leads

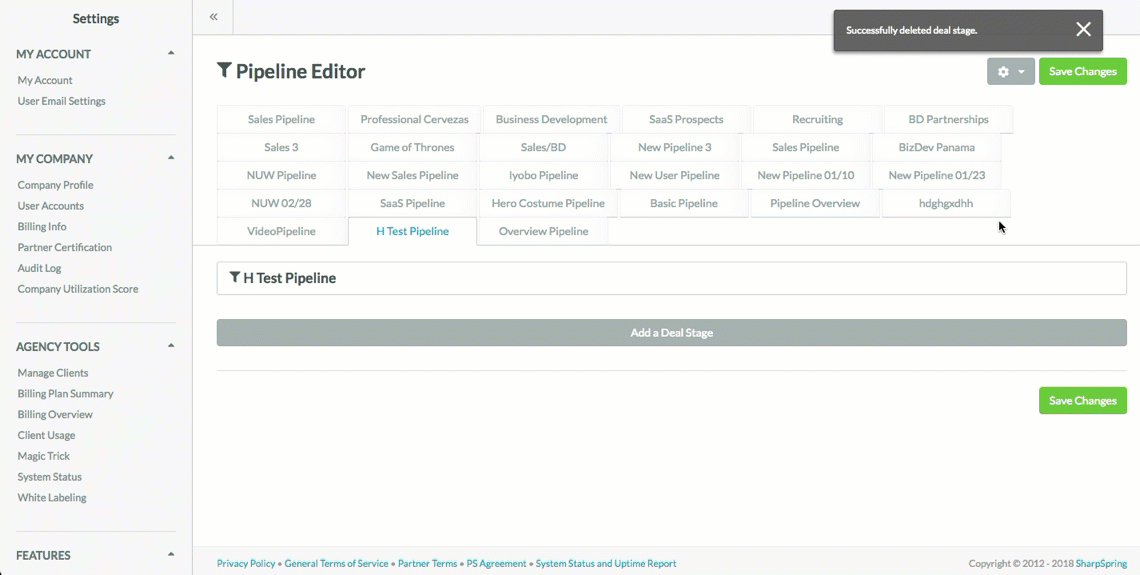
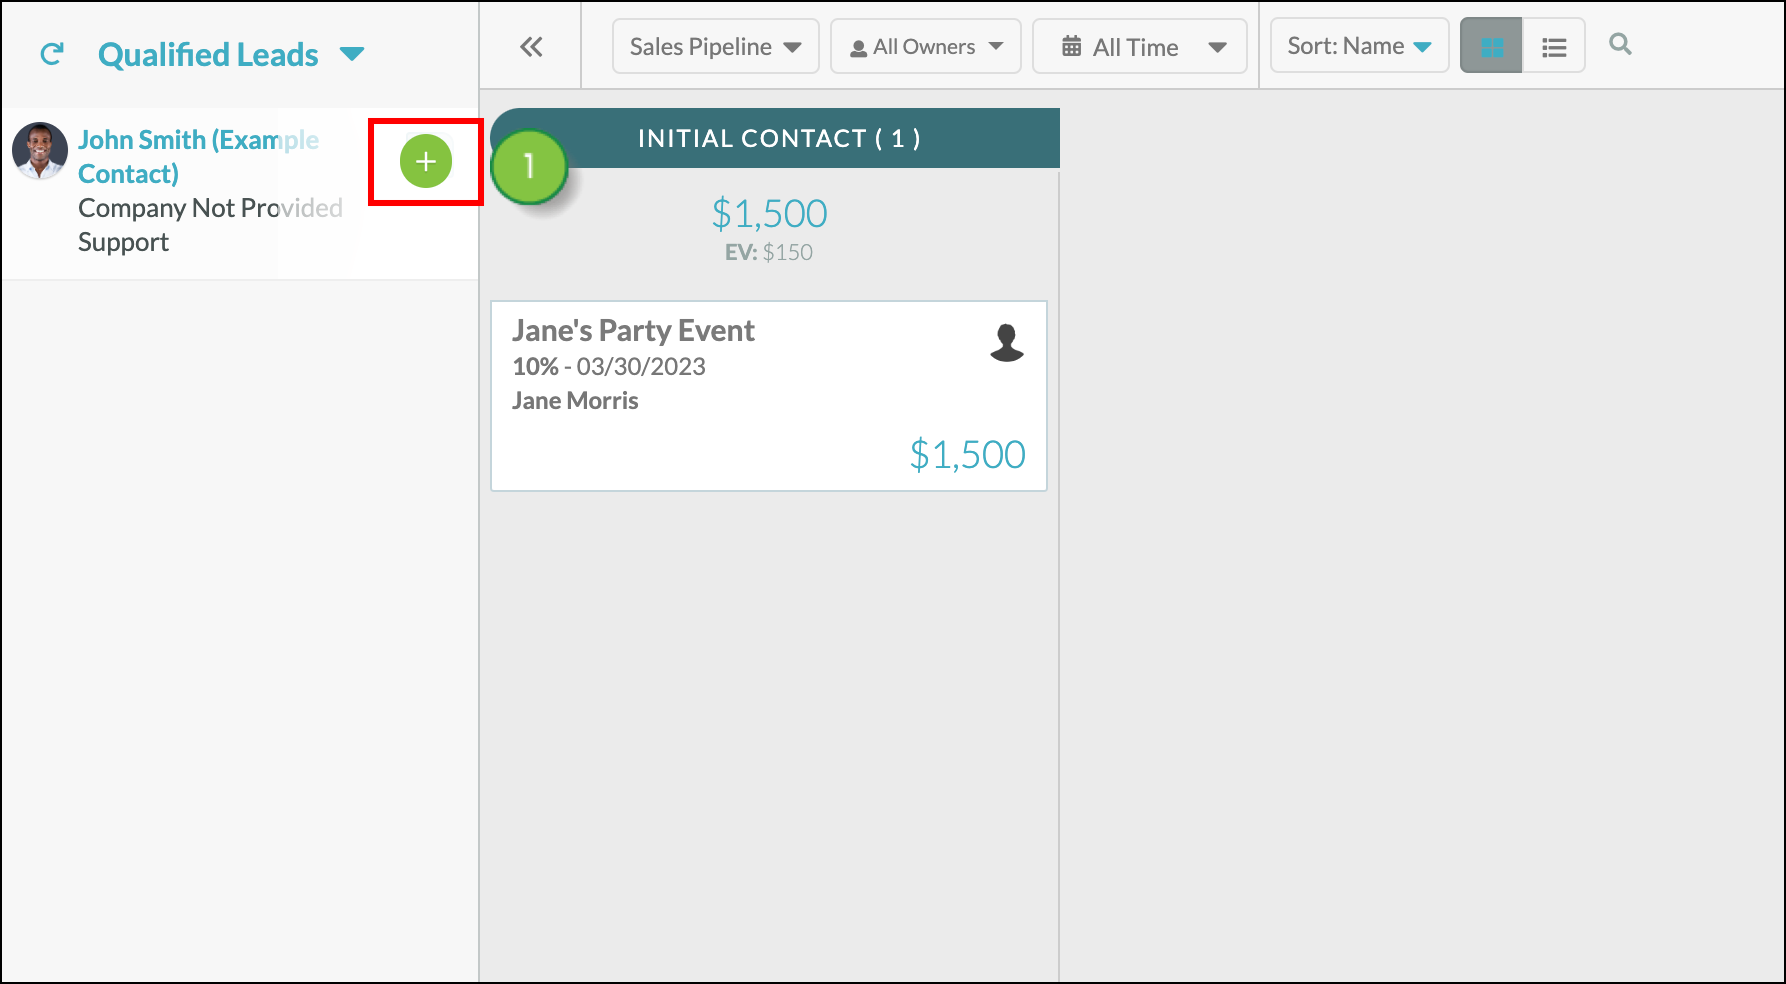
In the left sidebar of the Pipelines section, is a list of all of your qualified leads. You can create opportunities from those qualified leads, so you can attach your projected revenue to its main point of contact.

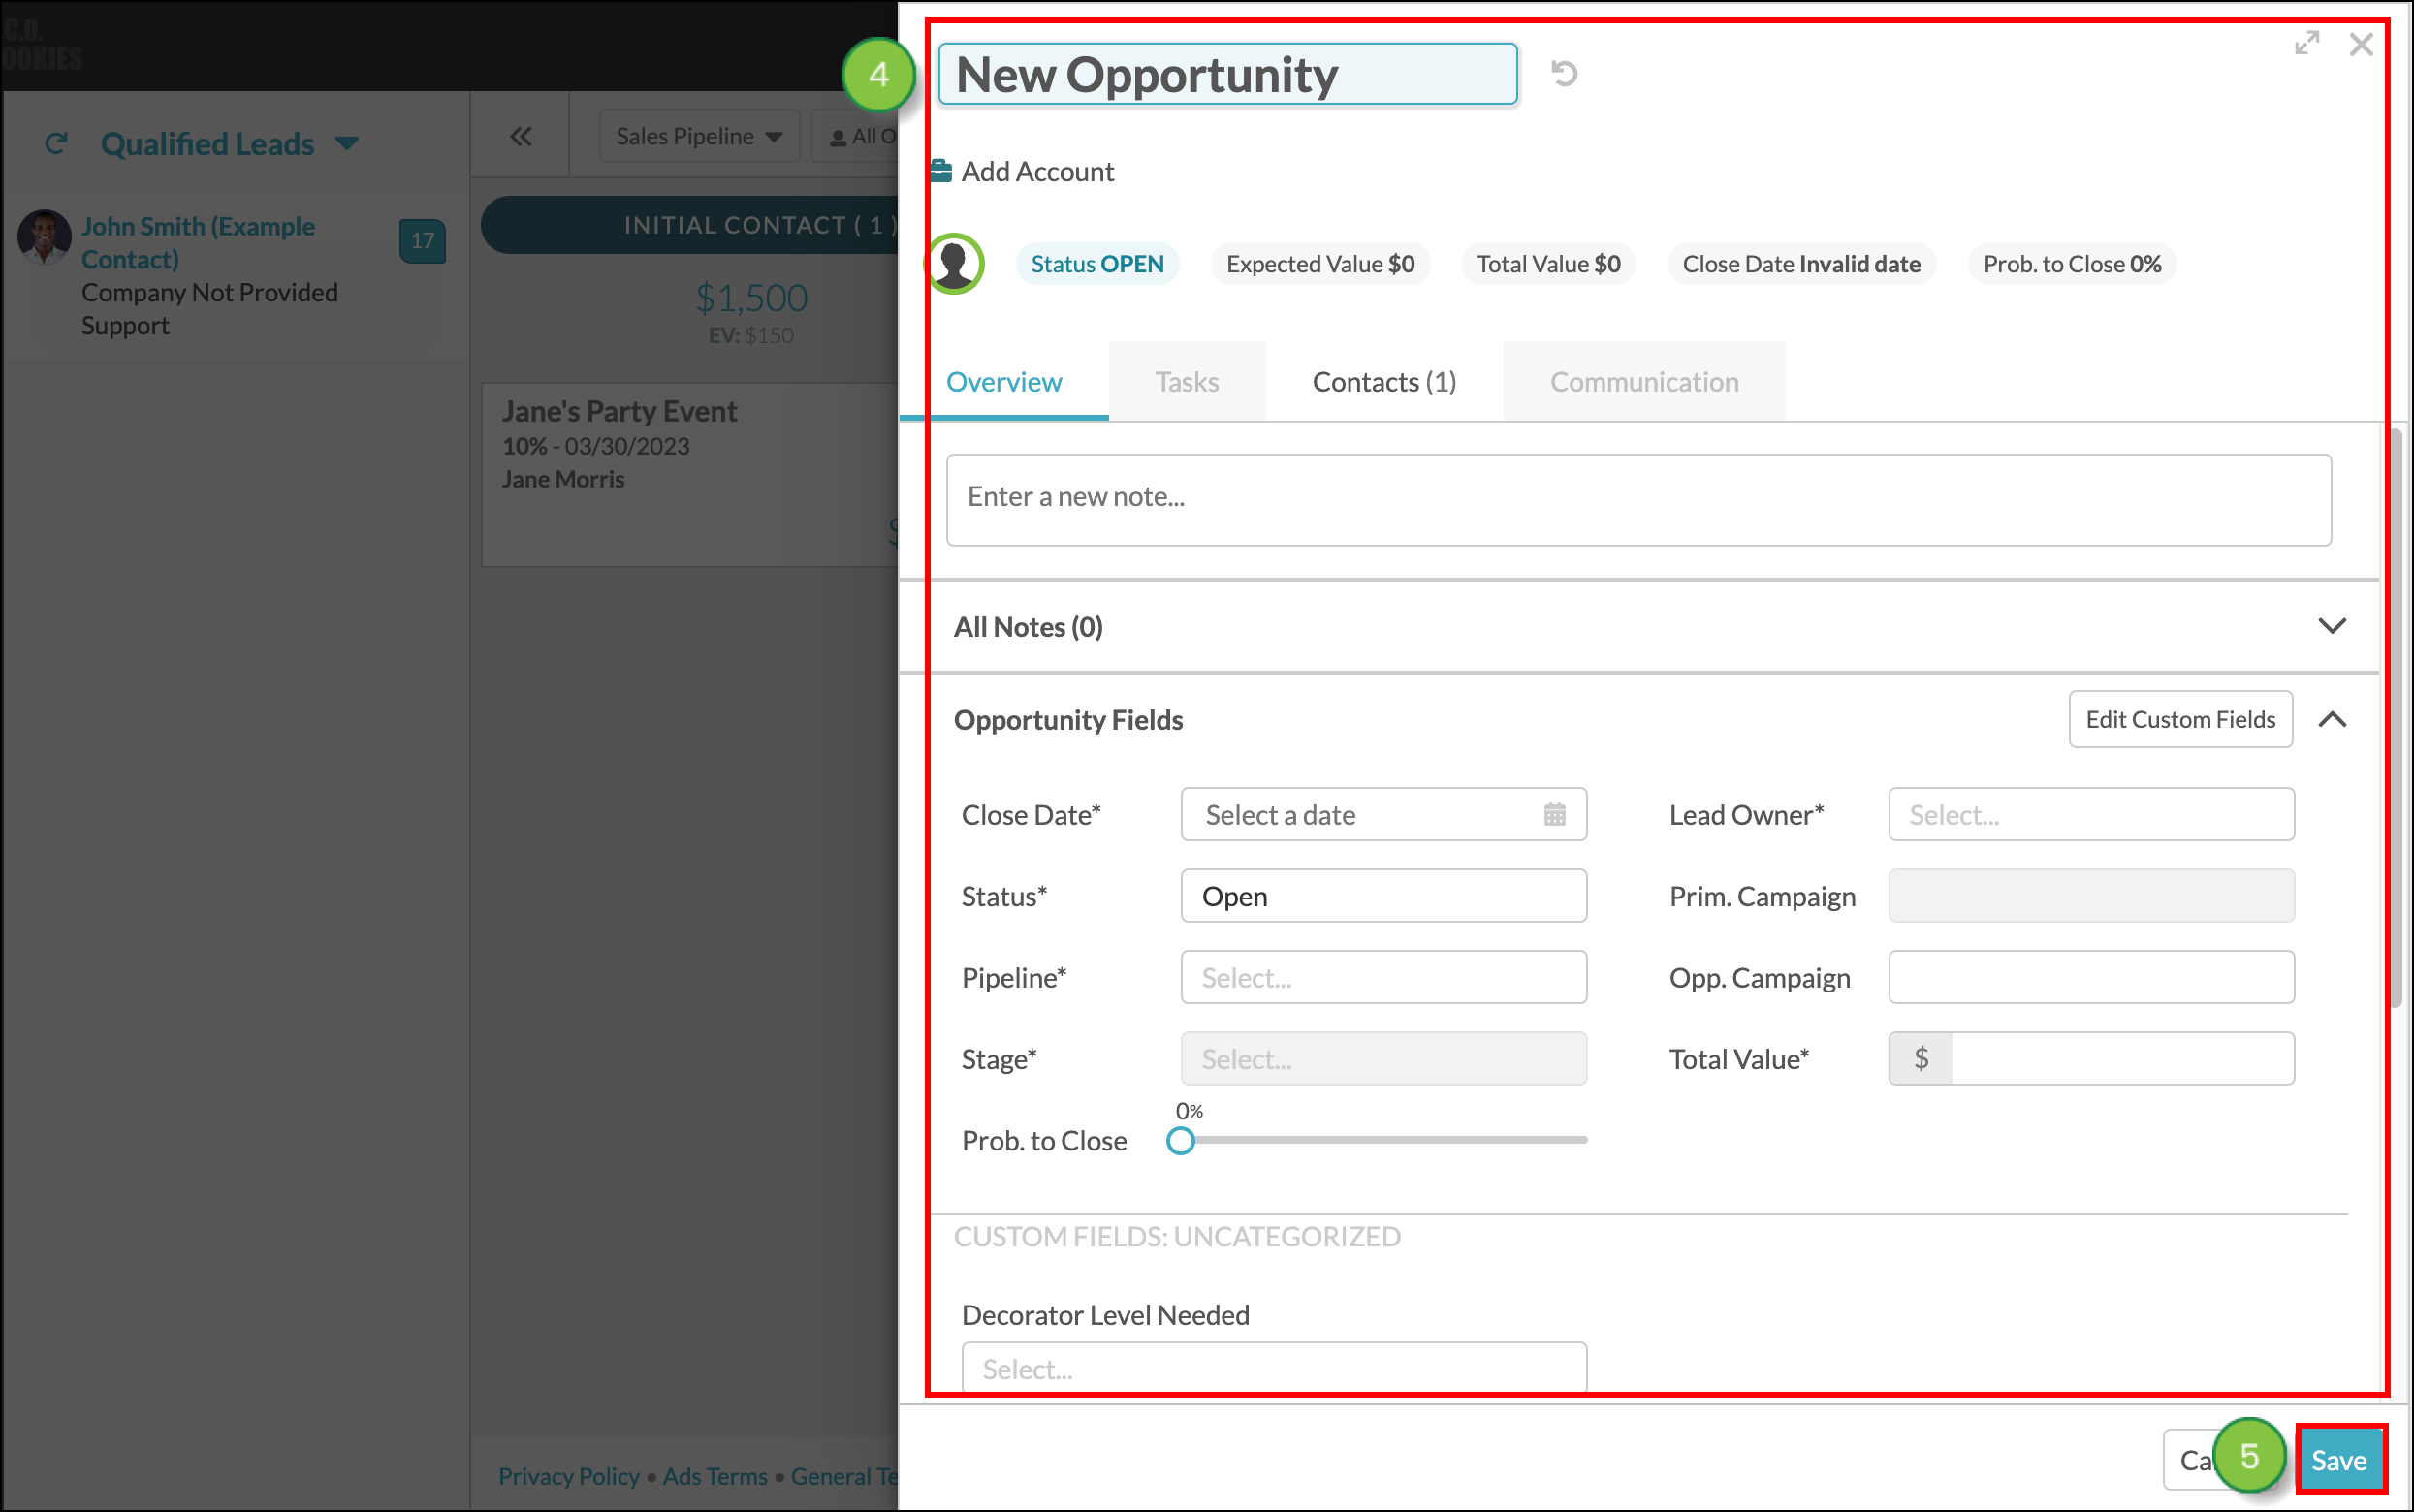
To create opportunities from qualified leads, start from Sales > Opportunities in the left toolbar.

  1. Hover over the desired lead under Qualified Leads in the left panel and click  plus3.png  Add.

    Hover over the desired lead


  2. Enter a name for the opportunity in the Opportunity Name field.
  3. Assign an account using the Add Account button.
  4. Enter the following information in the Opportunity Fields section: 
    • The expected closing date
    • The opportunity's status
    • The desired pipeline
    • The opportunity's pipeline stage
    • A lead owner for the opportunity 
    • The opportunity's monetary value
    • Optionally, enter the Primary campaign
    • Optionally, enter the Opportunity campaign
    • Select the probability to close the opportunity in the Probability to Close section.

    Fill out Opportunity Fields


  5. Optionally, click Add Products to add products to the opportunity.
  6. Click Save.

    Click Save


Note: Pipelines can display a maximum of 500 opportunities at a time.

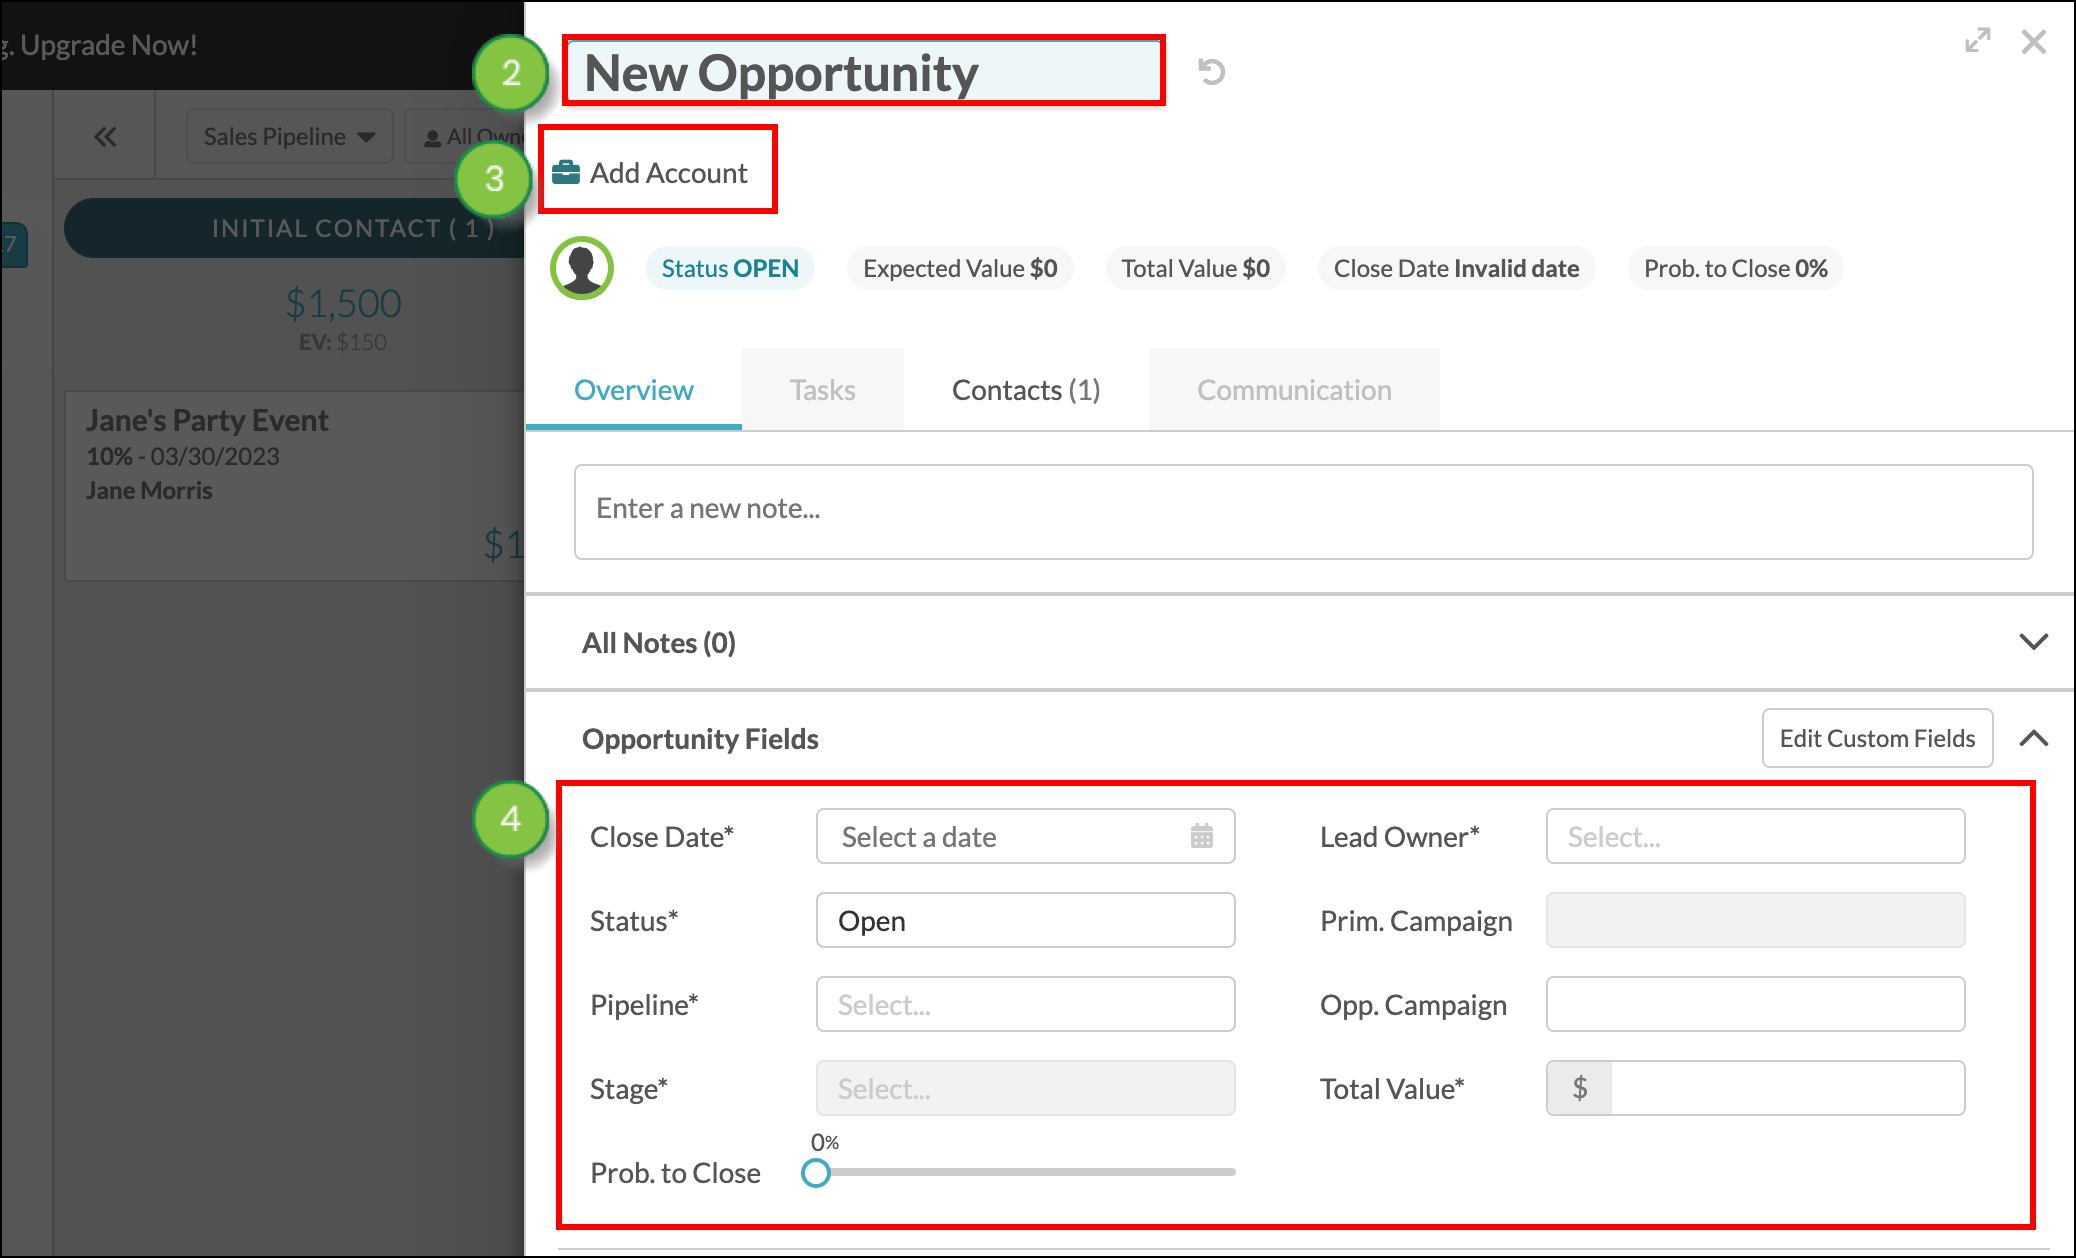
Once your opportunity is created, you can move it around the pipeline by dragging and dropping it from stage to stage.


Creating Pipeline Opportunities

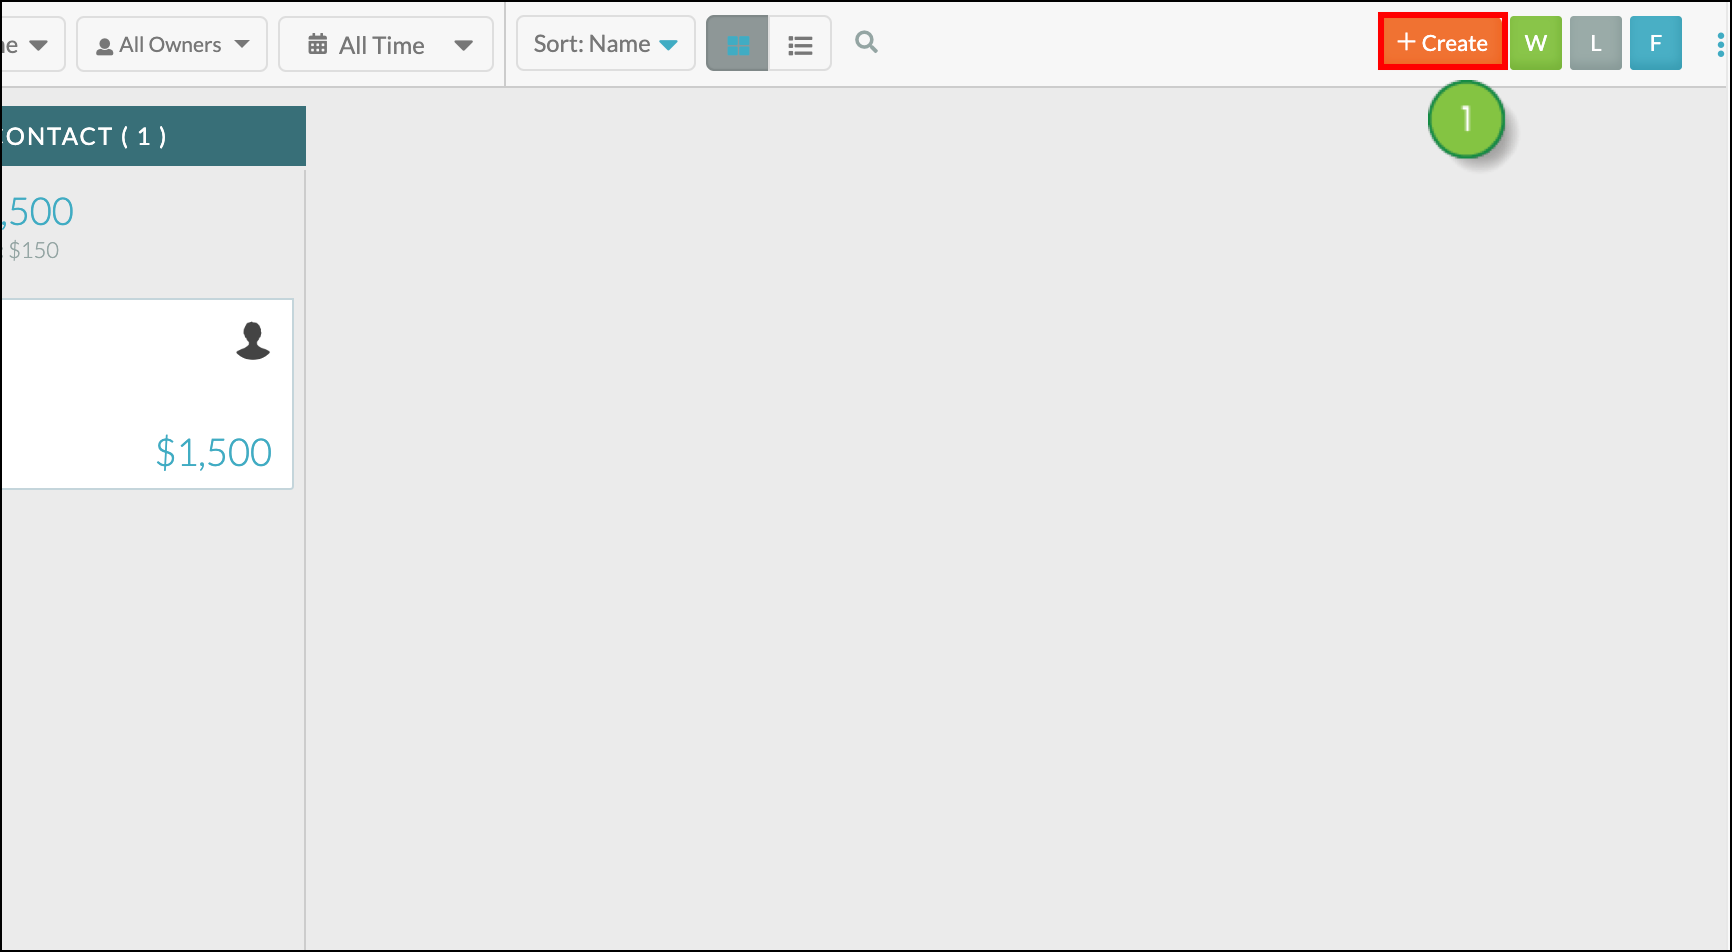
You can create opportunities through pipelines. To create an opportunity through a pipeline, start from Sales > Opportunities in the left toolbar.

  1. Click + Create in the pipeline toolbar.

    Click + Create


  2. Enter the details of an existing contact or by clicking the Create New Contact tab add a new contact's information that will be associated with the opportunity in the text field.
  3. Click Continue.

    Click Continue


  4. Enter opportunity information as necessary.
  5. Click Save.

    Click Save


Note: Pipelines can display a maximum of 500 opportunities at a time.


Understanding Pipeline Opportunity Icons

Opportunities will have icons added to them when they meet certain criteria. These icons provide an at-a-glance view of important information about and necessary actions for an opportunity.

These icons are as follows:

 PipelineIcons.png
   
IconName Description 
pushpin.png

No Follow-up Set


The opportunity has an overdue task or no task assigned. 

 
clock.png

Past Close


The close date has passed for the opportunity.

 
paper.png

Unread Notes


The opportunity has notes that have not been read.


Calendar 

The opportunity has a scheduled task


Sending Smart Mail

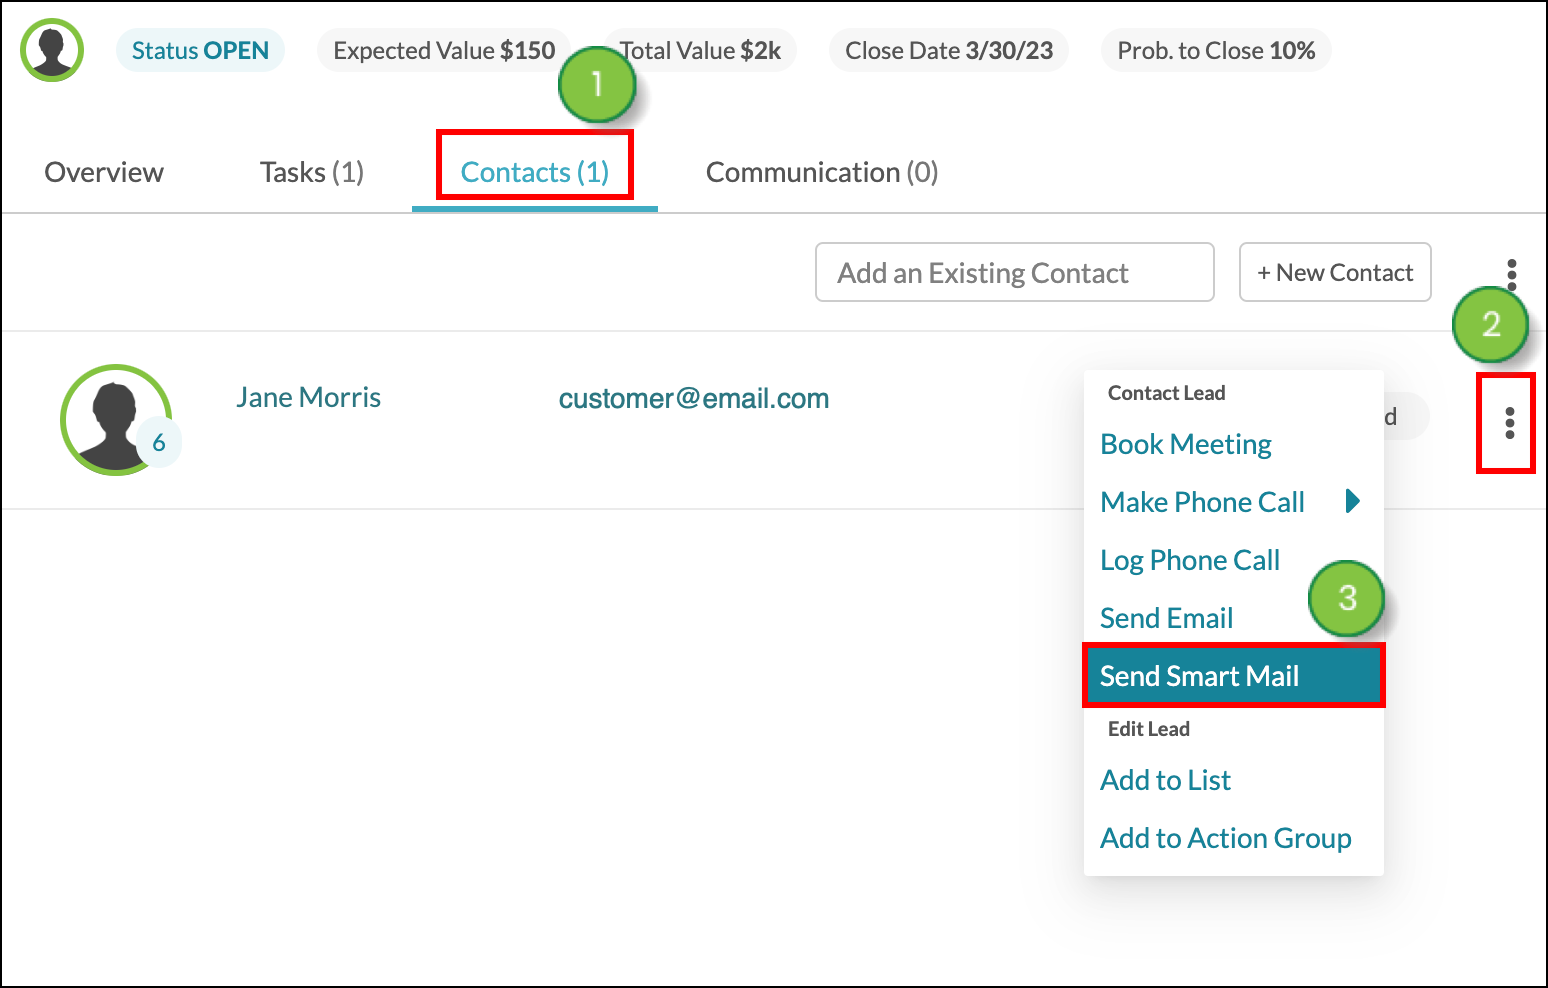
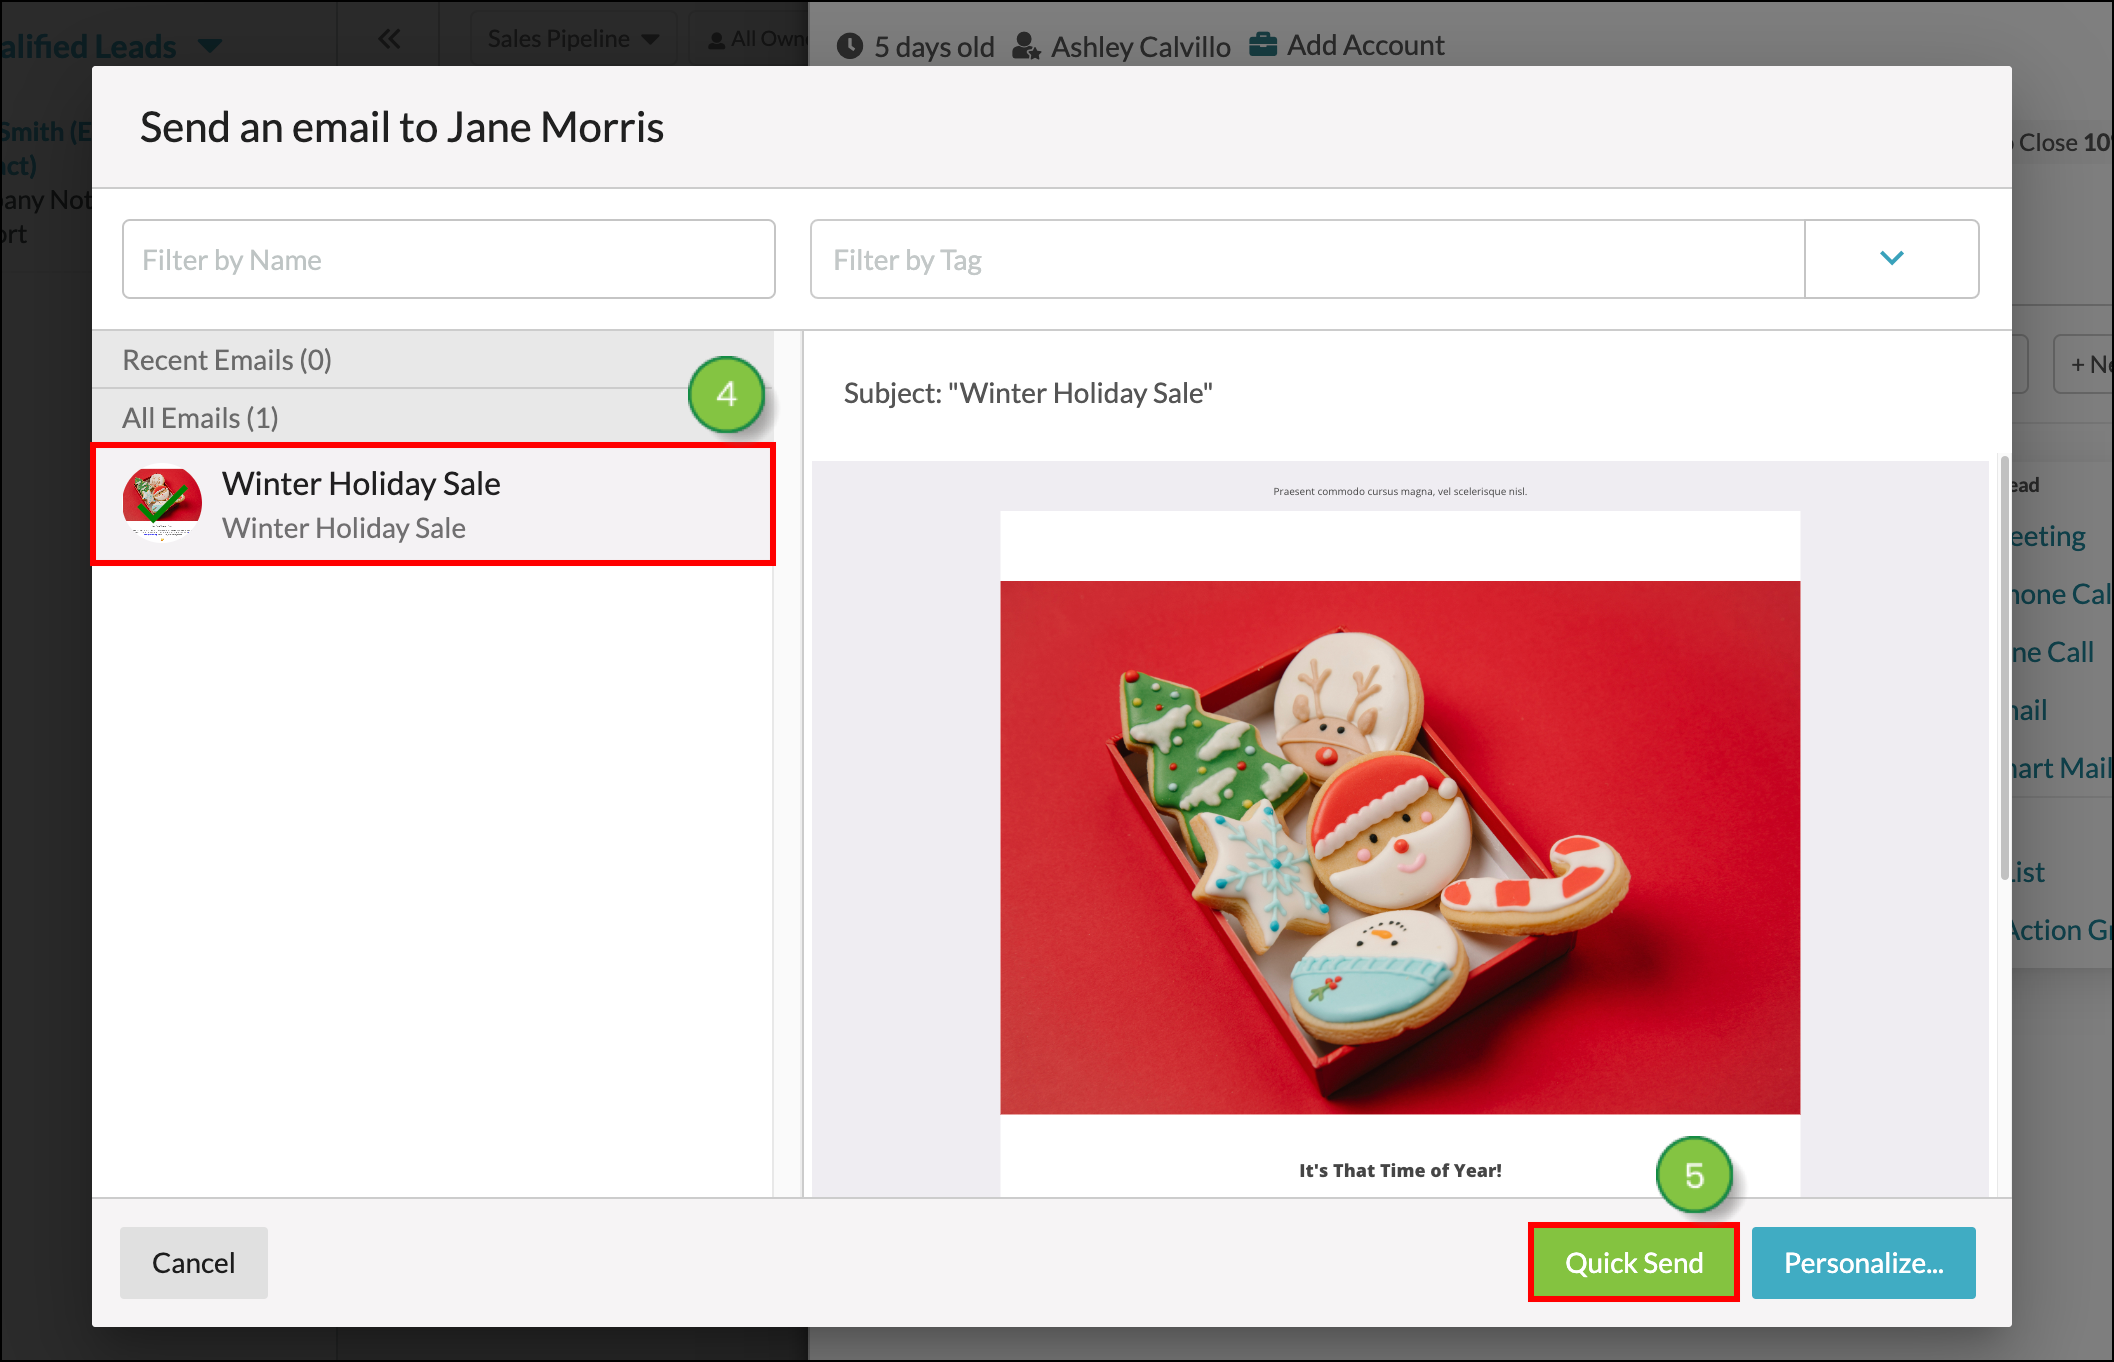
You can send Smart Mails within an opportunity. To send Smart Mails, open an existing opportunity or create a new opportunity from the Sales > Opportunities page in the left toolbar.

  1. Click the Contacts tab in the opportunity.
  2. Next to the desired contact, click  more.png  Options.
  3. Click Send Smart Mail.

    Click Send Smart Mail


  4. Select the Smart Mail to send.
  5. Click Quick Send.

    Click Quick Send


Note: Click Personalize... to modify the content of the Smart Mail before sending.


Sorting Opportunities

Your pipelines may eventually have many different opportunities across many different stages. At this point, it may become difficult to see when opportunities were added to a stage. You can sort pipeline opportunities to better see when opportunities were added to stages.

To sort opportunities, do the following:

  1. Click Sales > Opportunities in the left toolbar.
  2. Click the Sort drop-down menu in the pipeline toolbar.
  3. Select either the Date or Name sorting option.
  4. Select the same option again to swap between
    sort-up.png  ascending order and  sort-down.png  descending order.

Opportunities will be sorted by those that have been added within the past week, added within the past month, added within the past three months, and those added more than three months ago.

Note: Pipelines can display a maximum of 500 opportunities at a time.


Sort Opportunities


Setting Qualified Lead Refresh Intervals

You can manually set how often the list of qualified leads refreshes.

To set lead refresh rates, do the following:

  1. Click Sales > Opportunities in the left toolbar.
  2. Click the Qualified Leads drop-down menu in the Qualified Leads panel.
  3. Select one of the following refresh rate options:
    • Manually
    • Every 5 minutes
    • Every 15 minutes
  4. Optionally, click  ccw.png  Refresh to instantly refresh the list of qualified leads.


Click Refresh

Lead Gen & CRM will automatically save your refresh option.


Sorting Qualified Leads

You can sort the list of qualified leads to better show those leads you want to focus on.

To sort qualified leads in the leads panel, do the following:

  1. Click Sales > Opportunities in the left toolbar.
  2. Click the Qualified Leads drop-down menu in the Qualified Leads panel.
  3. Select one of the following sorting options:
    • Order by last activity
    • Order by Date Created
    • Order by Lead Score
  4. Select the same option again to swap between
    sort-up.png  ascending order and  sort-down.png  descending order.


Sorting Qualified Leads


Saving Qualified Lead Advanced Searches

You can save Advanced Searches.

To save a search of qualified leads, do the following:

  1. Click Contacts in the left toolbar.
  2. Create an Advanced Search.
  3. Save the Advanced Search.
  4. Click Sales > Opportunities in the left toolbar.
  5. Click the Qualified Leads drop-down menu in the Qualified Leads panel.
  6. Select a saved Advanced Search.


Select a Saved Advanced Search


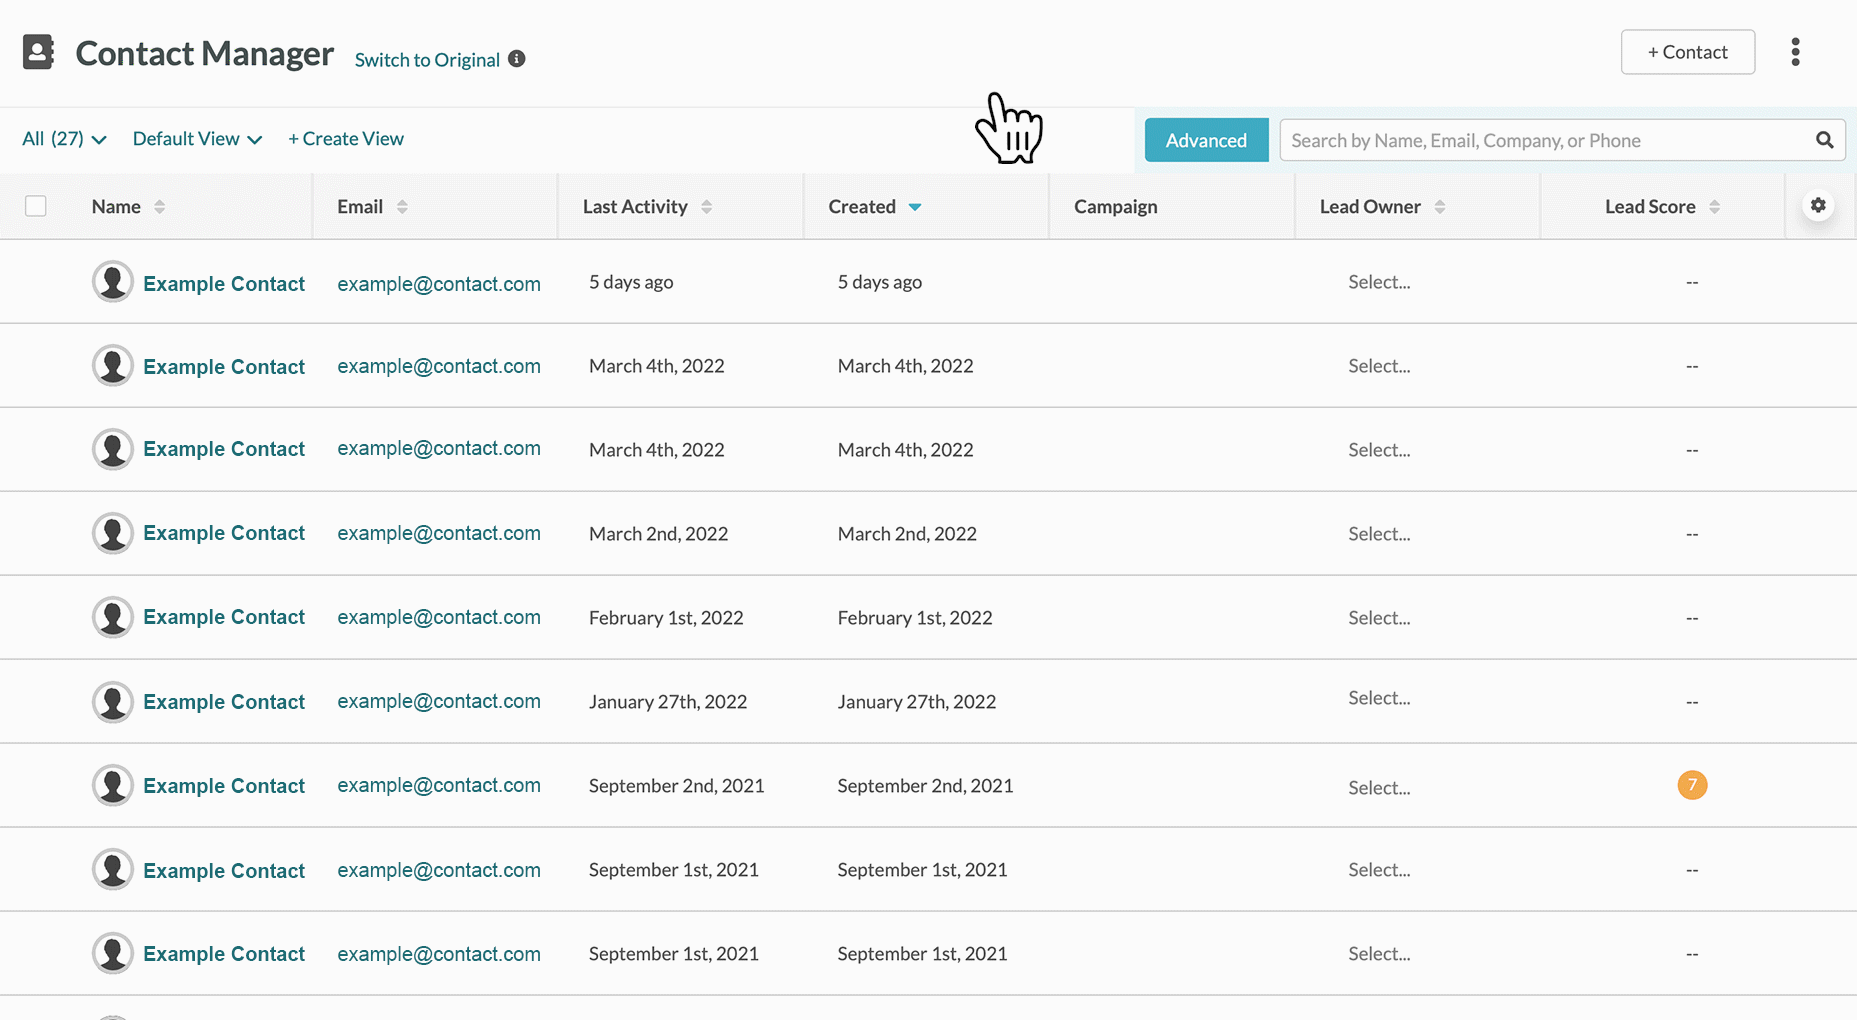
When an Advanced Search has more results than the qualified lead pane can show, click the Go to Contacts link at the bottom of the lead pane to load the full result list in the Contact Manager.


Highlighting Custom Opportunity Fields

You can alert pipeline users to which custom fields are important to fill out for specific pipeline stages. To set custom field highlights, do the following:

  1. Access the Pipeline Editor.
  2. Select the tab of the desired pipeline.
  3. Click  more.png  Options > Edit in the desired pipeline stage.
  4. Click the Select Fields drop-down menu in the Additional Settings section.
  5. Click the checkboxes next to the fields to be highlighted for the pipeline stage.
  6. Enter a message to display that informs users why the custom field is important for the pipeline stage in the Stage Transition Tooltip Message text box.
  7. Click Save Settings.
  8. Set highlight settings across all other pipeline stages in the pipeline.
  9. Click Save Changes.


Highlighting Custom Opportunity Fields


Once you have set field highlights, all opportunities placed in the pipeline stage will have the custom fields highlighted. In a pipeline, different stages can have different custom field highlights, and the opportunities will reflect this as they are moved across pipeline stages.


Pipeline Stage Highlights


Did this article answer your question?


Constant Contact Logo

Copyright © 2025 · All Rights Reserved · Constant Contact · Privacy Center