Learn how to integrate Unbounce forms with Lead Gen & CRM.
Article Contents
Users:
| Administrators | ✓ | |
| Company Managers | | |
| Marketing Managers | | |
| Sales Managers | | |
| Salespersons | | |
| Jr. Salespersons | | |
Configuring Lead Gen & CRM Site Tracking
Important: While checkbox groups are supported in Unbounce forms, they are not supported in the correct way for Lead Gen & CRM to receive the data via their Webhook feature.
Currently, Lead Gen & CRM cannot collect checkbox groups. Single checkboxes, however, are fine.
You can set up Lead Gen & CRM site tracking for Unbounce pages.
To set up Lead Gen & CRM site tracking for Unbounce pages, do the following:
- Open a new tab in your web browser and log in to Lead Gen & CRM in that browser tab.
- Create a site in Lead Gen & CRM.
- Ensure that the domain is the same domain as the URL of your Unbounce pages.
- Make a copy of the Lead Gen & CRM site embed code upon creation of the site.
Setting Unbounce Code
In Unbounce, best practice is to use a base template that you create all other pages from. If you have already created pages, you will need to add the embed script to all pages that you want to track.
The domain you created in Unbounce also needs to be the same domain as the one attached to your site that you created in Lead Gen & CRM. To set Unbounce code, do the following:
- Open another new tab in your web browser.
- Log into Unbounce in that browser tab.
- Click the page you want to edit.
- Click Javascripts.
- Paste the Lead Gen & CRM site embed code inside the page before the end of the body.
- Rename the code embed to SharpSpring Tracking Code.
- Within your Lead Gen & CRM tracking script, after
_ss.push(['_setXXXX', add the following code:
_ss.push(['_setResponseCallback', function(resp) { document.getElementById('trackingid__sb').value = resp.trackingID; }]);
- Finish creating the page.
- Use this as a basis to create all your other pages by using duplicate page in the page options.
- Ensure that these pages are tracking properly after the pages have been publishing by visiting the published pages.
Note: Constant Contact offers Professional Services to assist with custom coding.

Creating a Native Form
You will need to create native forms in order to integrate Unbounce forms.
To create native forms, return to the Lead Gen & CRM browser tab:
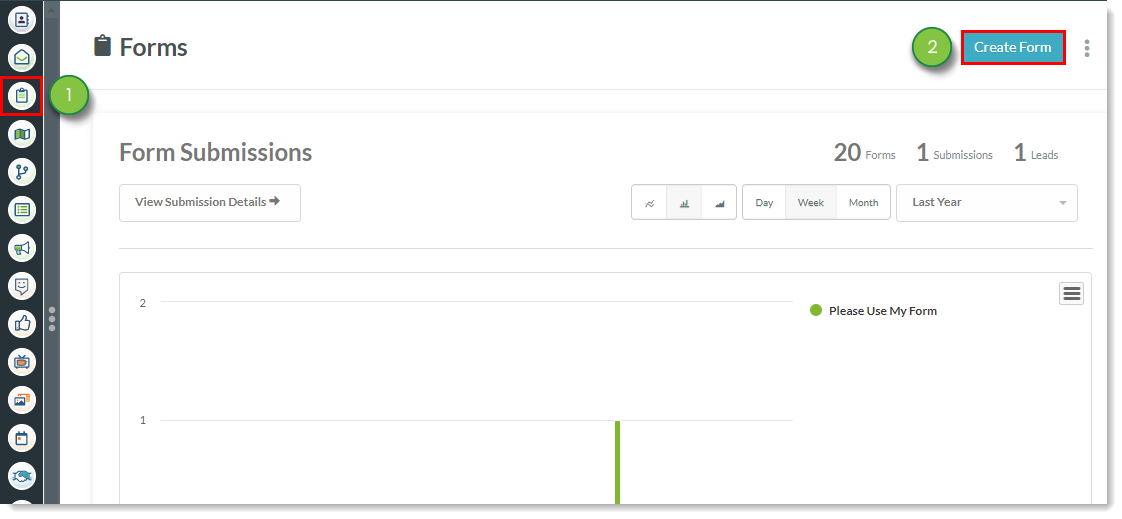
- Click Forms in the left toolbar.
- Click Create Form.
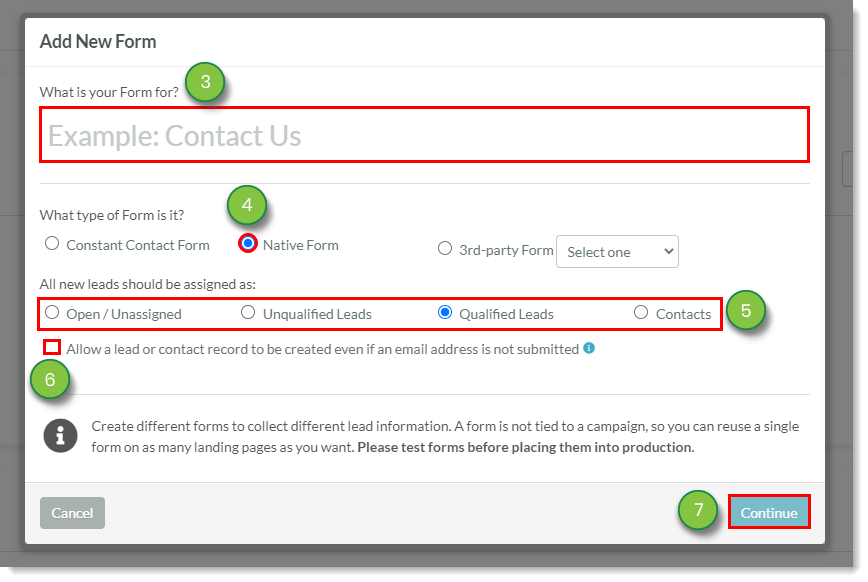
- Enter a name for the form.
- Click the Native Form radio button.
- Click the appropriate radio button to determine how contacts who fill out the form should be assigned.
- Optionally, click the Allow a lead or contact record to be created even if an email address is not submitted checkbox.
- Click Continue.
- Copy the generated Javascript code in the window that appears.
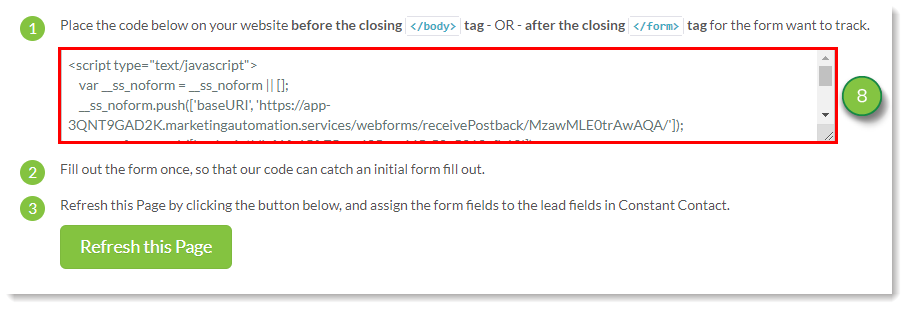
- Paste the copied code into a plain text editor. Keep the plain text editor open for reference.
Adding Hidden Fields and Webhooks
You can add hidden fields and webhooks to Unbounce forms.
To add a hidden field and webhook post to an Unbounce form, do the following:
- Return to the Unbounce browser tab.
- Open the form that will be integrated in Unbounce.
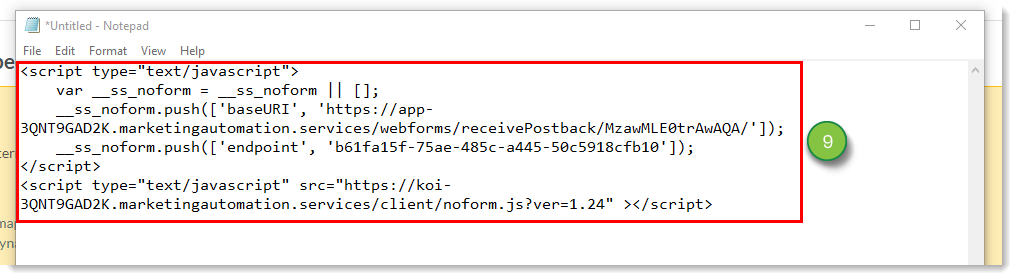
- Add a new hidden field to your form.
- Enter
trackingid__sb in the Field Name and ID field.
Note: The trackingid__sb text has two underscores.
- Add a Webhook Post URL.

The Webhook Post URL is a URL string created using the baseURI, endpoint, jsonp linkage, and the field's parameters.
Consider the following example code:
https://app-XXXXXXX.marketingautomation.services/webforms/receivePostback/XXXXXXXX/xxxxxxxx-xxxx-xxxx-xxxx-xxxxxxxxxxxx/jsonp/?CompanyName=(company)&FirstName=(first_name)&LastName=(last_name)&Email=(email)&Subscribe=(keep_me_updated)&trackingid__sb=(trackingid__sb)
In the example code, the Webhook's parts are as follows:
| Part | | Code |
| baseURL |
|
https://app-XXXXXXX.marketingautomation.services/webforms/
			receivePostback/XXXXXXXX/
|
|
endpoint
|
| xxxxxxxx-xxxx-xxxx-xxxx-xxxxxxxxxxxx |
|
jsonp linkage
|
| /jsonp/ |
| parameters |
|
?CompanyName=(company)&FirstName=(first_name)&LastName=
			(last_name)&Email=(email)&Subscribe=(keep_me_updated)
			&trackingid__sb=(trackingid__sb)
|
When creating a Webhook, consider the following:
- The
baseURI and endpoint can be found in the native form tracking code generated in Lead Gen & CRM.
- For the parameters, the identifying name would be a friendly name, such as
CompanyName. After that name is an equal sign =. This is followed by the Unbounce field ID, which is enclosed in parentheses ( ).
Mapping Forms in Lead Gen & CRM
Once a site has been tracked in Lead Gen & CRM, an Unbounce form and page's code has been modified, a native form has been created, and hidden fields and Webhooks have been added to an Unbounce form, you can map the Lead Gen & CRM native form and Unbounce form.
To map these forms, do the following:
- Return to the Unbounce browser tab and navigate to the live version of the Unbounce page in that browser tab.
- Fill out the form.
- Submit the form once.
Note: This submission used for mapping purposes will not be saved as a lead, but the next submission should create or update a lead.
- Return to the Lead Gen & CRM browser tab.
- Click Forms in the left toolbar.
- Open the native form.
- Click Refresh this Page.
- Map the incoming fields to Lead Gen & CRM fields in the Field Mappings page that appears.
Note: If the form was previously mapped, you will need to reset the form map first.
- Click Save Mappings.