Contact Form 7 is one of the most popular form plugins for Wordpress. Lead Gen & CRM can only integrate with Contact Form 7 4.8 or greater.
If you are using a previous version, upgrade to the latest version of Contact Form 7 prior to integrating with Lead Gen & CRM.
This article details how to integrate a Contact Form 7 form into Lead Gen & CRM via a plugin.
| Administrators | ✓ | |
| Company Managers | ✓ | |
| Marketing Managers | ✓ | |
| Sales Managers | ||
| Salespersons | ||
| Jr. Salespersons |
The Form script that Lead Gen & CRM provides should not be placed on your page. It is only used to complete the procedures in this document.
The provided script is only used for reference, and it should not be on the page when connecting Contact Form 7 via this method. The plugin, which should be downloaded and is available below, replaces what Lead Gen & CRM's Form script would normally do. If both are present, your form will not function as intended.
Download the Plugin
The procedures in this article assume that you have done the following:
Note that if you have used any other method to connect Contact Form 7, you should continue using that method for new forms, or convert them all to this method, rather than mixing them.
Before you can connect Contact Form 7 to Lead Gen & CRM, you need to create a native form. To create native forms, do the following:
The created native form will open a page with an embed code. Keep this embed code window open. You will need the embed code later.
In WordPress, edit the Contact Form 7 form you wish to connect. Be sure to edit the form itself, not a page that it exists on.
You should see fields listed similar to this (it will vary greatly based on your form’s content):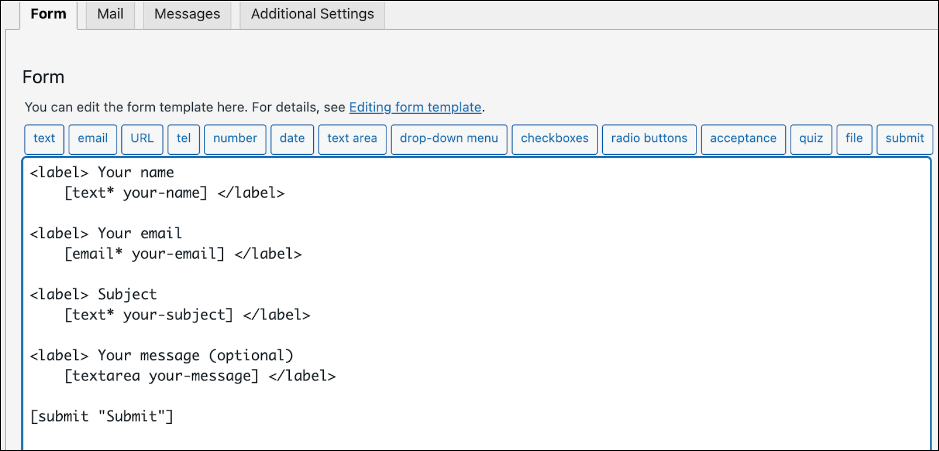
Copy the following two lines above the last line which represents the submit button (you’ll replace some content in them in a moment):
[hidden base_uri "your Base URI goes here"]
[hidden endpoint “your endpoint goes here"]
The embed code you generated and will refer to should look like this, with different values for each form (The Base URI will typically be the same within one company):
<script type="text/javascript">
    var __ss_noform = __ss_noform || [];
    __ss_noform.push(['baseURI', 'https://app-3QNEGVSSPC.marketingautomation.services/webforms/receivePostback/MzawMDEzNzc2AQA/']);
    __ss_noform.push(['endpoint', '7c7a4599-fba8-4592-88e9-70e2ffef46a9']);
</script>
<script type="text/javascript" src="https://koi-3QNEGVSSPC.marketingautomation.services/client/noform.js?ver=1.24" ></script>
Referring to the embed code generated above as a Native Form, locate the line containing “BaseURI” and copy the URL that follows that, including the last slash at the end, but not the quotes. In the above example, it would be:
https://app-3QNEGVSSPC.marketingautomation.services/webforms/receivePostback/MzawMDEzNzc2AQA/
On your Contact Form 7 Form, replace the text ‘your Base URI goes here’ with the URL, between the quotes (leave the existing quotes in place). So in this example, that line would change from:
[hidden base_uri "your Base URI goes here"]
To:
[hidden base_uri "https://app-3QNEGVSSPC.marketingautomation.services/webforms/receivePostback/MzawMDEzNzc2AQA/"]
Similar to the above, locate the line with ‘endpoint’, which will be different for each form, and copy the value that contains several dashes. In the above example it is 7c7a4599-fba8-4592-88e9-70e2ffef46a9
Replace “Your endpoint goes here” with this on the other line in your Contact Form 7 Form. So in this example, this:
[hidden endpoint “your endpoint goes here"]
Becomes:
[hidden endpoint “7c7a4599-fba8-4592-88e9-70e2ffef46a9"]
Once these are in place, save the form again.
Once you have created a third party form, added third party form embed code, and modified Wordpress' functions.php file, you can map the fields in the third party form. Mapping form fields provides Lead Gen & CRM with information on what those form fields refer to. To map third party forms, do the following:
Whenever you fill out the form for the first time, you generate mapping data. As such, do not expect the lead to appear in the system until after the first entry. The next person to fill out the form after mapping will generate a new, or update an existing, lead.
Copyright © 2026 · All Rights Reserved · Constant Contact · Privacy Center