WPForms is an advanced form builder for Wordpress websites and can be placed into the Wordpress functions.php file. These forms can integrate with Lead Gen & CRM forms.
| Administrators | ✓ | |
| Company Managers | ||
| Marketing Managers | ||
| Sales Managers | ||
| Salespersons | ||
| Jr. Salespersons |
| Tip: Are you looking for information about Constant Contact’s Email and Digital Marketing product? This article is for Constant Contact’s Lead Gen & CRM product. Head on over to the Email and Digital Marketing articles by clicking here. Not sure what the difference is? Read this article. |
The Native Form script that Lead Gen & CRM provides should not be placed on your page. It is only used to complete the procedures in this document.
The provided script is only used for reference, and it should not be on the page when connecting WPForms via this method. The modified Wordpress .PHP code replaces what Lead Gen & CRM's Native Form script would normally do. If both are present, your form will not function as intended.
The procedures in this article assume that you have done the following:
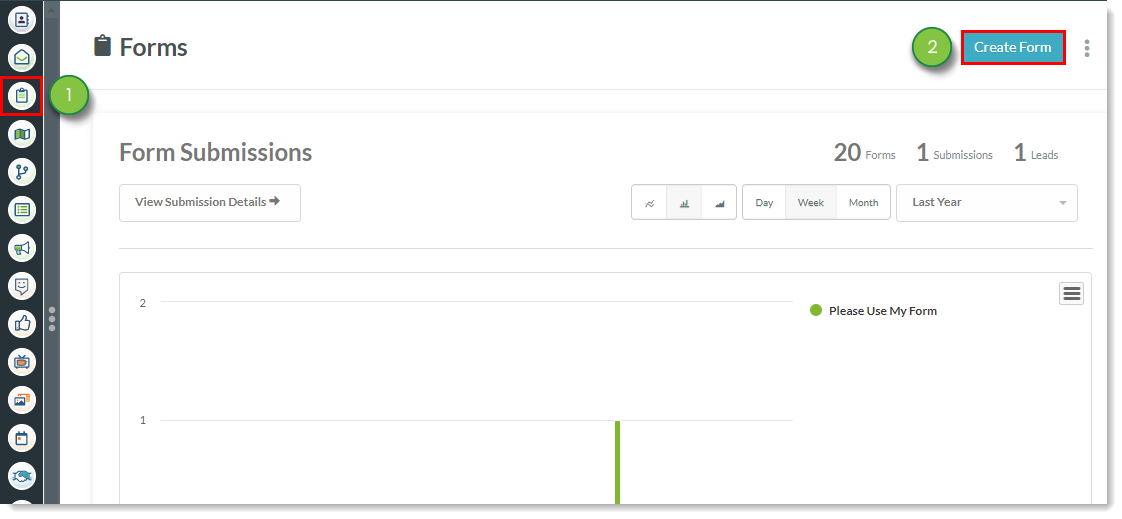
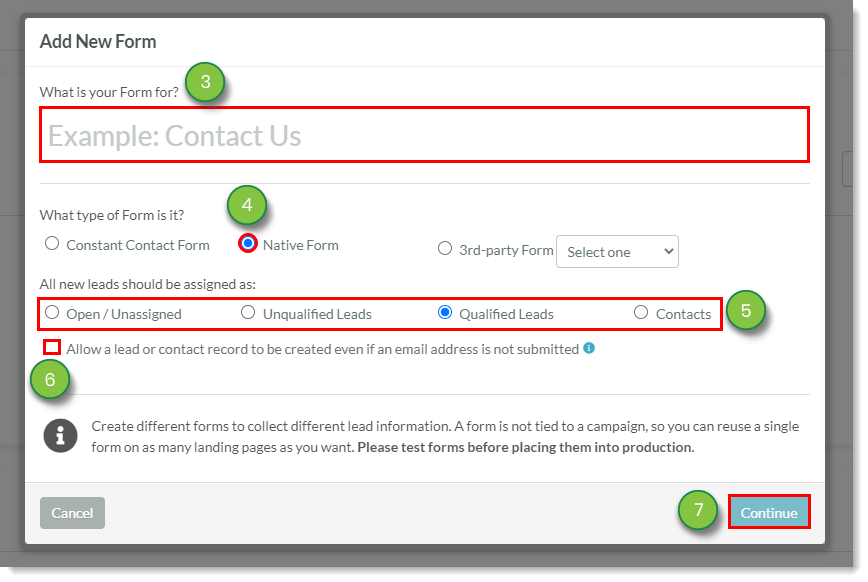
Before you can connect WPForms to Lead Gen & CRM, you need to create a native form. To create native forms, do the following:
The created native form will open a page with an embed code. Keep this embed code window open. You will need the embed code later.
The following is an example of native form embed code. Be aware that your code and its individual values will be different from the following example code:
<script type="text/javascript">

    var __ss_noform = __ss_noform || [];

    __ss_noform.push(['baseURI', 'https://app-3QN7QJRNDE.marketingautomation.services/webforms/receivePostback/MzawMDE1tTA2BQA/']);

    __ss_noform.push(['endpoint', 'ea960f18-cd20-4c6c-acab-4e6b6a959260']);

</script>

<script type="text/javascript" src="https://koi-3QN7QJRNDE.marketingautomation.services/client/noform.js?ver=1.24" ></script>
Once you have created a native form in Lead Gen & CRM, you can begin connecting WPForms.
The connection process requires that you add both baseURI and endpoint information in connected forms.
This information comes from the embed code generated by the created native form in Lead Gen & CRM.
To add baseURI information to WPForms, do the following:
base uri.baseURI line in the embed code in the Lead Gen & CRM embed code browser tab.baseURI string, do not include the single quotation marks.baseURI URL in the Default Value text field in the WPForms browser tab.Be aware that endpoint information is still needed to complete the connection process.
Example code used: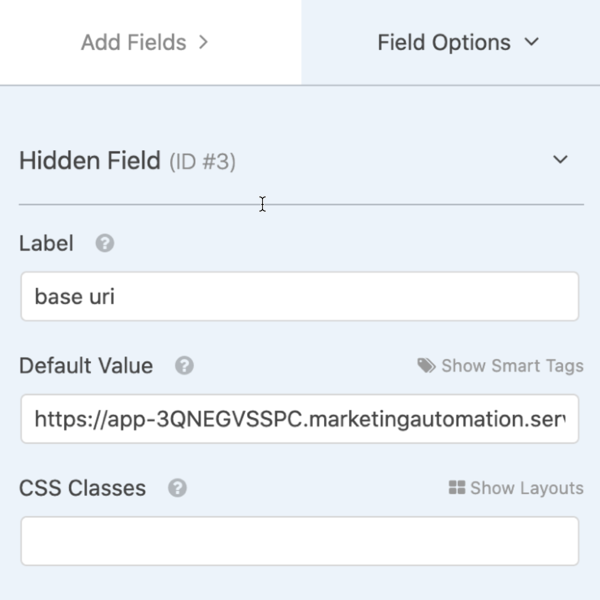
Once you’ve added baseURI information to WPForms, you’ll need to add endpoint information.
This information comes from the embed code generated by the created native form in Lead Gen & CRM.
To add endpoint information to WPForms, do the following:
endpoint.endpoint Field Label value is case-sensitive.endpoint line in the embed code in the Lead Gen & CRM embed code browser tab.endpoint string, do not include the single quotation marks.endpoint string in the Default Value text field in the WPForms browser tab.Example code used: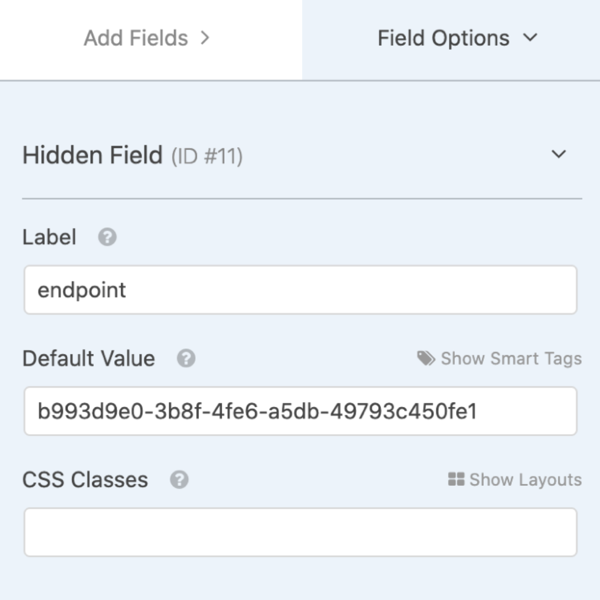
Once you’ve added baseURI and endpoint information to WPForms, you’ll need to enable Wordpress to capture it, which requires some additional code.
The simplest way to do this is by uploading the plugin file found here. Note that this is offered as a way to add the code to WordPress, and the other steps are necessary, aside from copying the PHP code. If there is any issue with using this plugin on your setup, your developer will need to explore adding the PHP code below manually.
If this gives you issues, or you prefer to add the code in your own way, please see the steps below. By using either the plugin or a child theme, it will prevent the code from being removed if your theme updates its functions.php file.
Once you have added baseURI and endpoint information to WPForms, you will need to add .PHP code to Wordpress.
There are certain things to consider when adding .PHP code to Wordpress, however:
To modify Wordpress .PHP code, do the following:
Important: Changes to the functions.php file in Wordpress can result in your site crashing. Be sure you have FTP access in order to backup and revert to your old functions.php file if needed.
function wpf_dev_process_complete( $fields, $entry, $form_data, $entry_id ) {

    $body = [];
    $submitToSharpSpring = false;

    $entry = wpforms()->entry->get( $entry_id );
    $new_json = str_replace("\\n", "\\" . "\\n", "$entry->fields");
    $entry_fields = json_decode( $new_json, true );

    function dupeCheck($fieldName, $bodyData) {
        $cleanLabel = substr(preg_replace("/[^a-zA-Z0-9]+/", "", $fieldName), 0, 24);
        for ($x = 0; $x <= 20; $x++) {
        if(array_key_exists($cleanLabel, $bodyData)) {
            $cleanLabel = $cleanLabel . $x;
        } else { break; }
        }
        return $cleanLabel;
 }

    foreach($entry_fields as $formField):

        $fieldName = $formField["name"];

        // handle checkboxes
        if ($formField["type"] == "checkbox") {
           $body[dupeCheck($fieldName, $body)] = str_replace("\\n", ",", $formField["value"]);

        // Handle WP Forms Fancy name field
        } elseif ($formField["type"] == "name") {
           $body[dupeCheck(($fieldName . "FieldFirstName"), $body)] = $formField["first"];
           $body[dupeCheck(($fieldName . "FieldMiddleName"), $body)] = $formField["middle"];
           $body[dupeCheck(($fieldName . "FieldLastName"), $body)] = $formField["last"];

        // Handle WP Forms Fancy address field
        } elseif ($formField["type"] == "address") {
           $body[dupeCheck(($fieldName . "FieldAddress1"), $body)] = $formField["address1"];
           $body[dupeCheck(($fieldName . "FieldAddress2"), $body)] = $formField["address2"];
           $body[dupeCheck(($fieldName . "FieldCity"), $body)] = $formField["city"];
           $body[dupeCheck(($fieldName . "FieldState"), $body)] = $formField["state"];
           $body[dupeCheck(($fieldName . "FieldPostalCode"), $body)] = $formField["postal"];
           $body[dupeCheck(($fieldName . "FieldCountry"), $body)] = $formField["country"];

        // Convert Date/Time data to SharpSpring format
        } elseif ($formField["type"] == "date-time") {
            if ($formField["time"] != "") {
                $body[dupeCheck($fieldName, $body)] = str_replace(array("T", "Z"), array(" ", ""), gmdate("Y-m-d\TH:i:s\Z", $formField["unix"]));
            } else {
                $body[dupeCheck($fieldName, $body)] = str_replace(array("T", "Z"), array(" ", ""), gmdate("Y-m-d", $formField["unix"]));
            }

        // Capture endpoint data and handle other hidden fields
        } elseif ($formField["type"] == "hidden") {
            if ( $fieldName == "base uri" ) {
                $base_uri = $formField["value"];
            } else if ( $fieldName == "endpoint") {
                $endpoint = $formField["value"];
                $submitToSharpSpring = true;
            } else {
                $body[dupeCheck($fieldName, $body)] = $formField["value"];

            }

        } else {
            $body[dupeCheck($fieldName, $body)] = $formField["value"];
        }

    endforeach;

    $body["trackingid__sb"] = $_COOKIE["__ss_tk"]; //DO NOT CHANGE THIS LINE... it collects the tracking cookie to establish tracking
    if ($submitToSharpSpring) {
        $post_url = $base_uri . $endpoint;

        $request = new WP_Http();
        $response = $request->post( $post_url, array( "body" => $body ) );
    }
}
add_action( 'wpforms_process_complete', 'wpf_dev_process_complete', 10, 4 );
Once you have created a native form, added native form embed code, and modified Wordpress' functions.php file, you can map the fields in the native form. Mapping form fields provides Lead Gen & CRM with information on what those form fields refer to. To map native forms, do the following:
Whenever you fill out the form for the first time, you generate mapping data. As such, do not expect the lead to appear in the system until after the first entry. The second person to fill out the form will be imported as a lead.
When mapping fields and connecting WPForms, consider the following:
Copyright © 2026 · All Rights Reserved · Constant Contact · Privacy Center