Email and Digital Marketing
How can we help you?
Search our help articles, video tutorials, and quickstart guides

You've got this. You've got us. Search our Knowledge Base to quickly find answers to your questions.

Create, customize, and send an email in your Starter Email account

Article: 000055246
Updated: July 7, 2026

Select an email template, customize it with your content and branding, and send it to your contacts

Ready to create a new email? It's as easy as choosing an email template and adding your content and branding! Our mobile-responsive templates are completely customizable and designed to look great on any device.

Desktop instructions:

Mobile web instructions:


Create, edit, and send an email

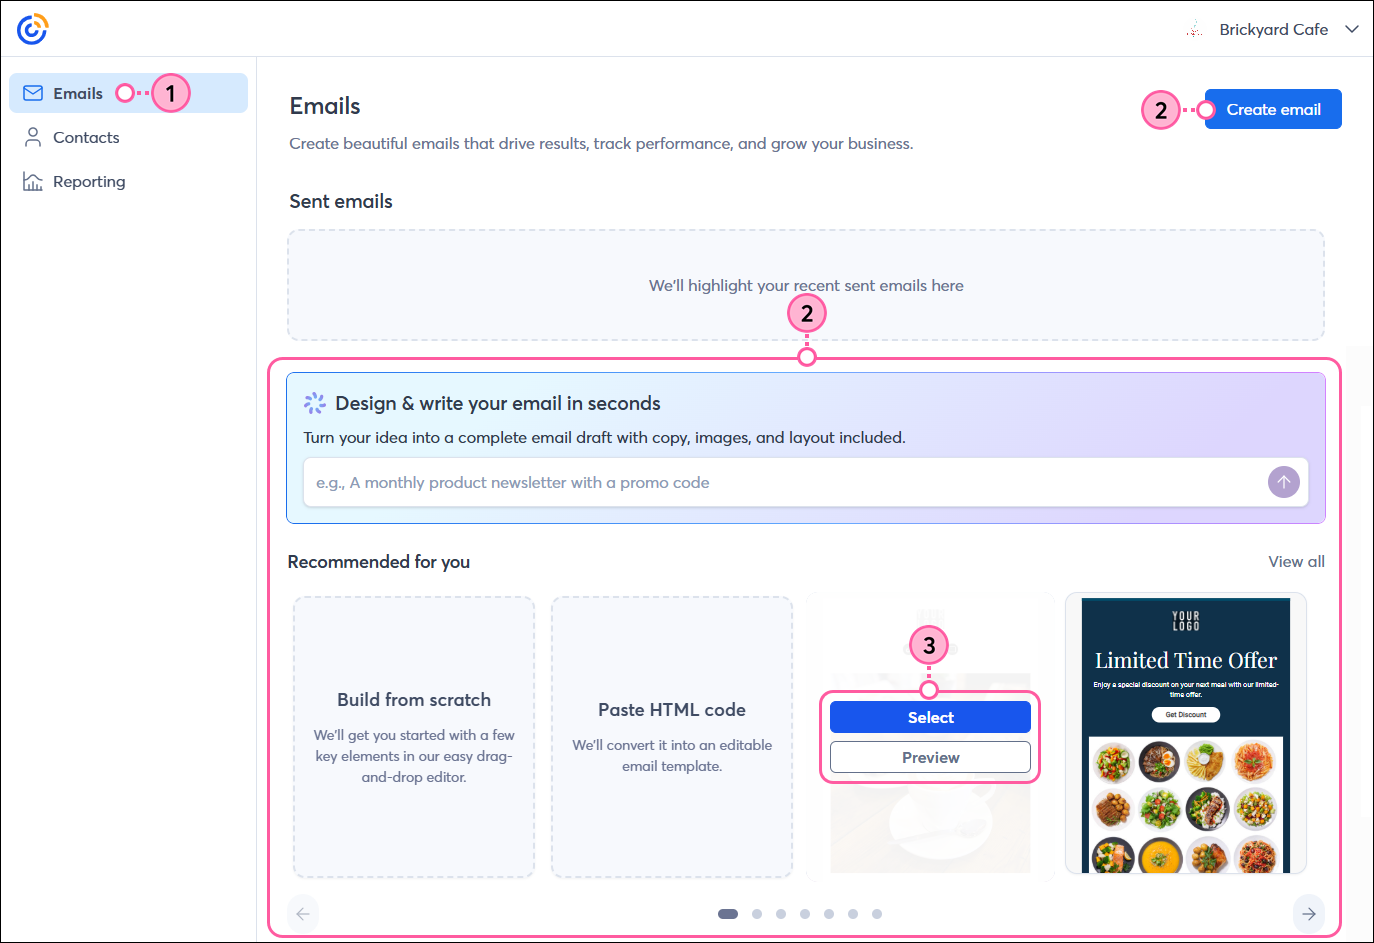
  1. From the left-hand navigation, click Emails.
  2. On this page, you can choose from some recommended and new templates, enter a description of what you'd like to create in the field, and we'll generate email options for you, or click the Create email button to browse all available templates.
  3. Click on a template to preview it.

    Left navigation with Emails option selected, Create Email button, AI search bar, template options, and template selected

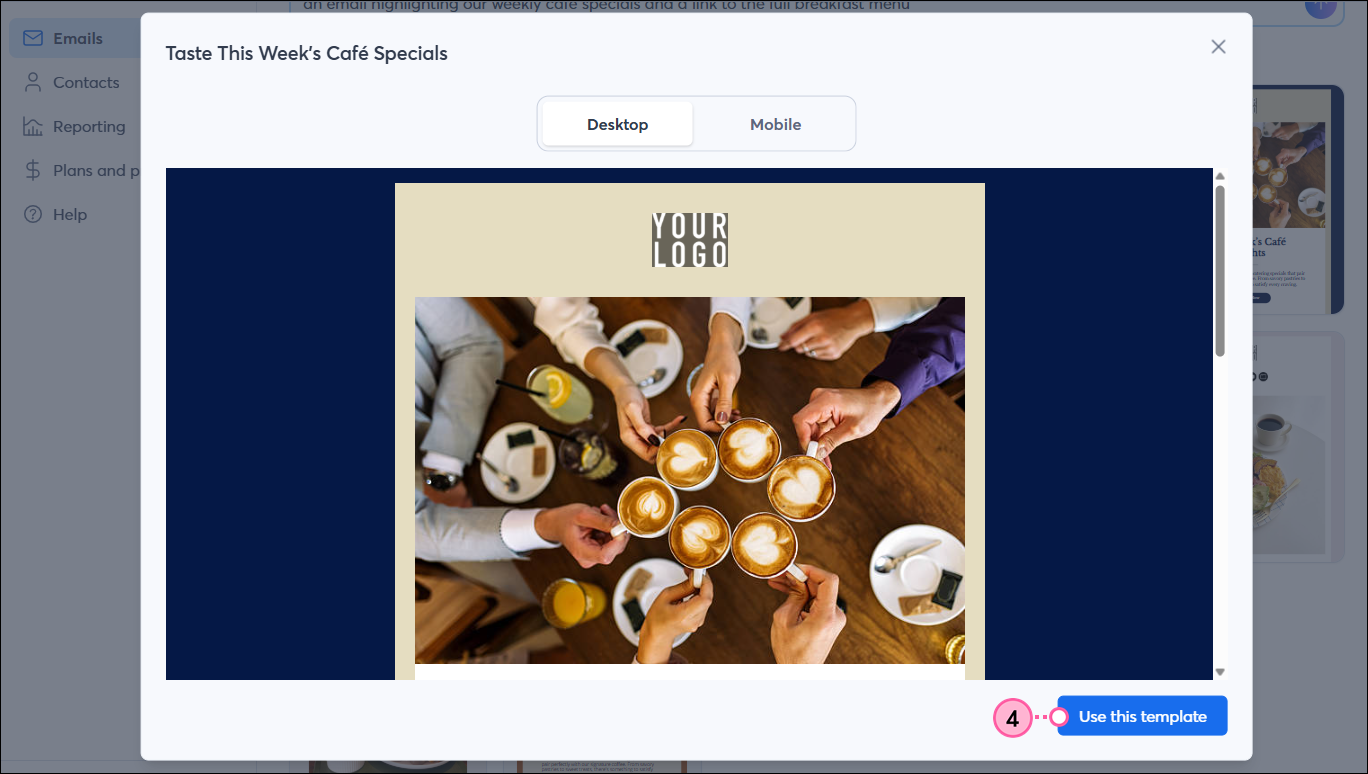
  4. Click Use this template to customize it.

    Email template preview and Use This Template button

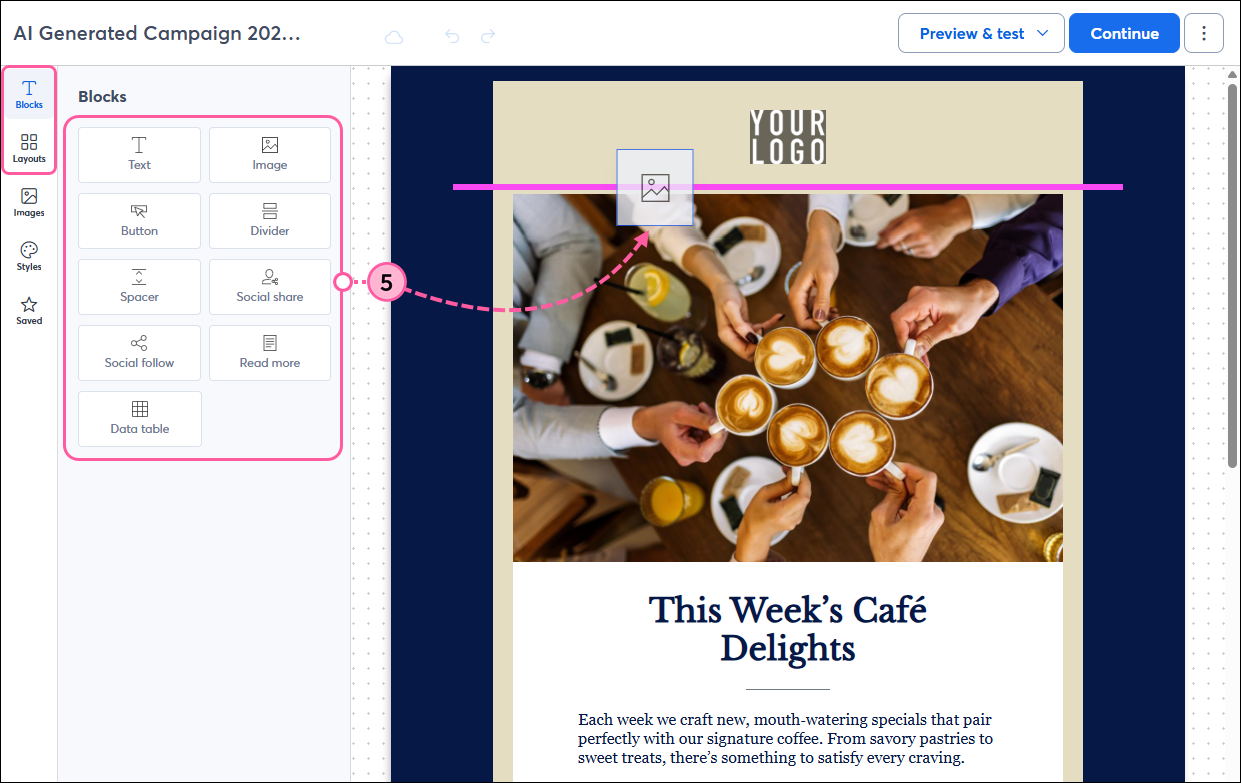
  5. From the Blocks and Layouts panels, you can drag-and-drop elements into your email template, such as a text block, button, or pre-built layout. Use the pink guideline to help you find the right spot.

    Email editor with Blocks panel and block being inserted into template

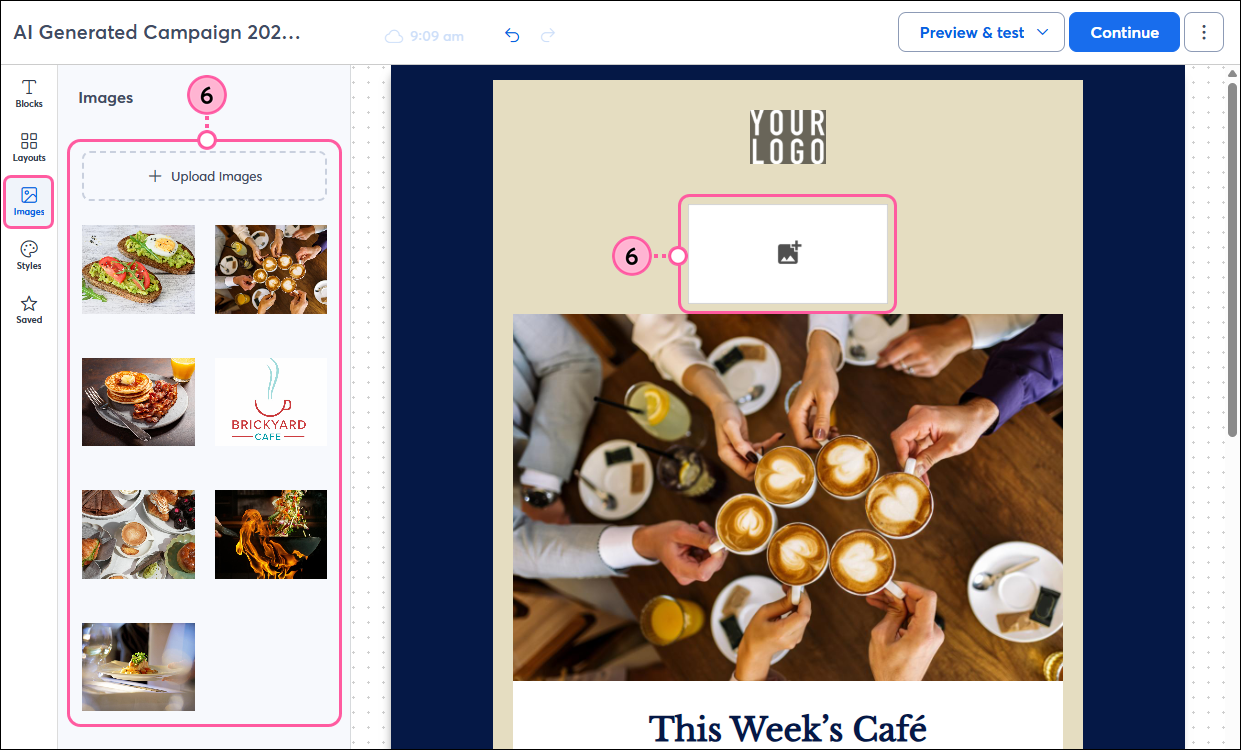
  6. From the Images panel, you can upload images and insert them into your template. You can also click on a placeholder image in your template to change it.

    Email editor with Images panel options

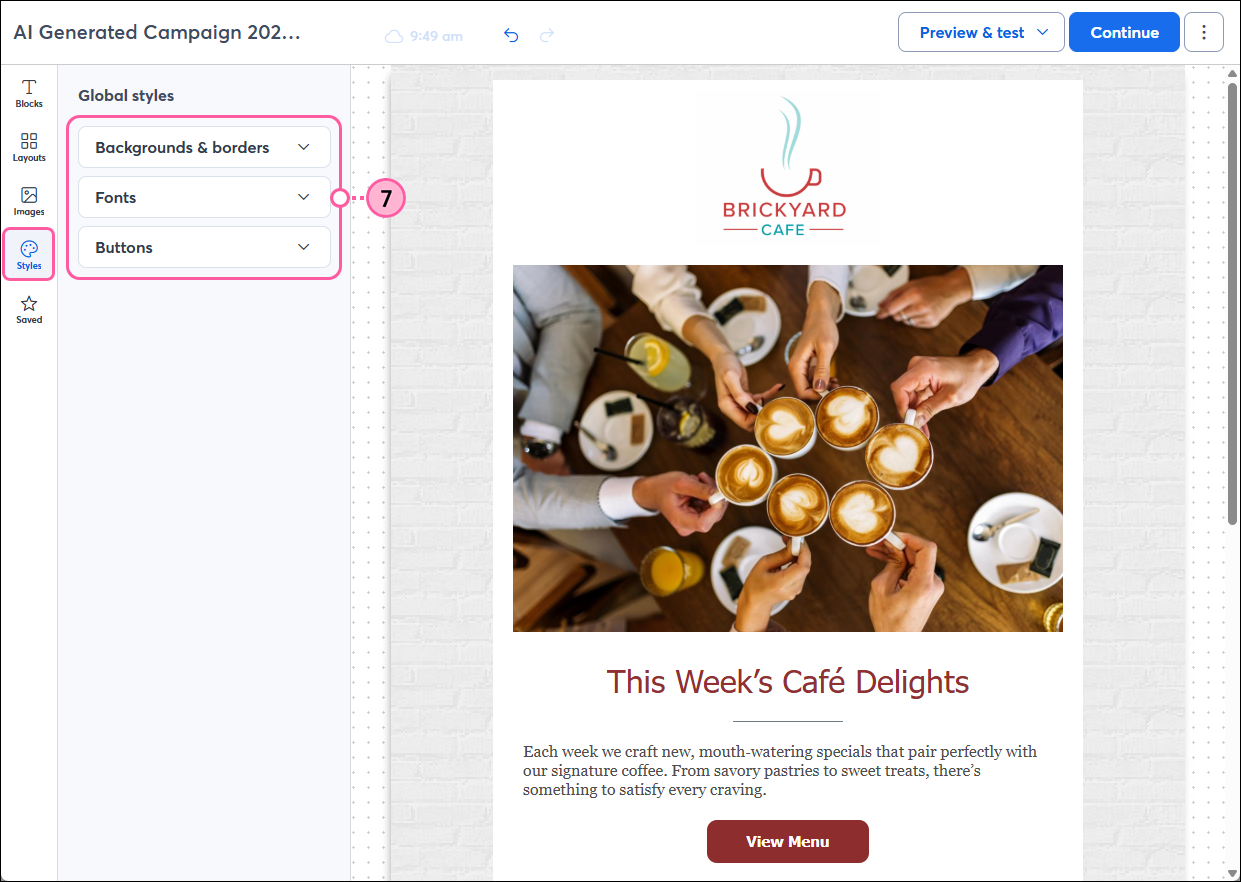
  7. From the Styles panel, you can customize the backgrounds, borders, fonts, and button styles for your entire template.

    Email editor with Styles panel options

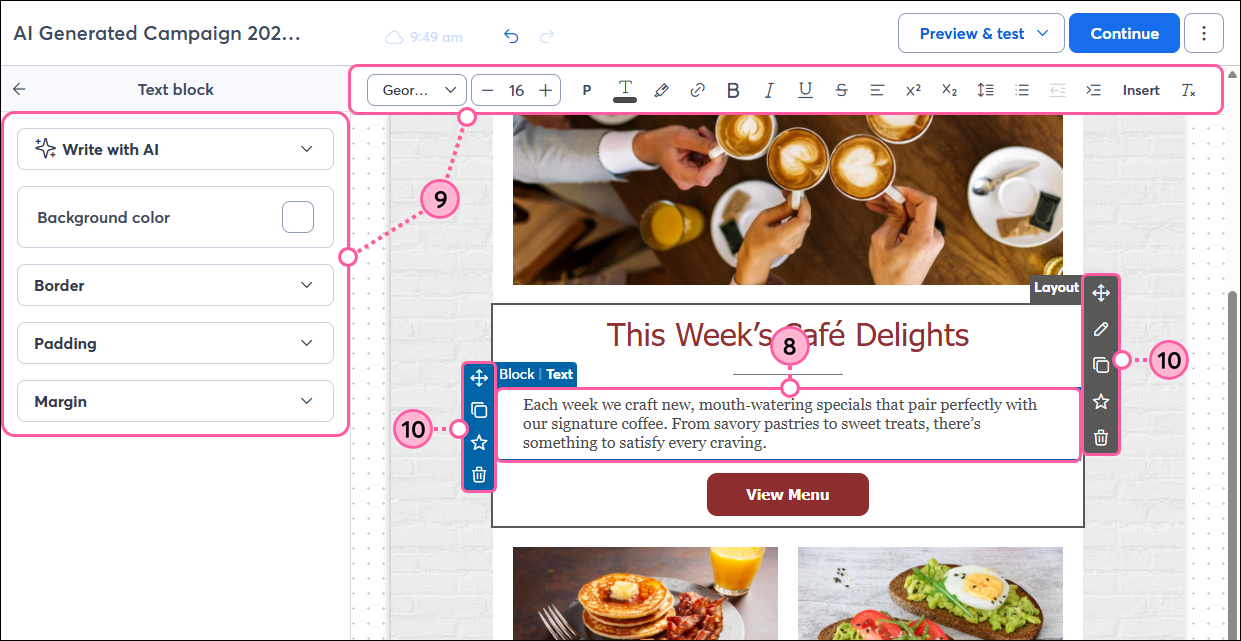
  8. Click on a block to add your content.
  9. Use the options in the left-hand panel or toolbar at the top of the editor to customize the text and block's appearance.
  10. Use the controls on the left or right to:
    • Move an element to a new location in your template by clicking and dragging the directional arrows up or down.
    • Copy an element by clicking the Copy icon.
    • Delete an element by clicking the trash can icon.
    • Save a block of content to reuse in later emails by clicking the Star icon.

      Email editor with Text block selected, Text block panel and toolbar editing options, and Block and Layout controls

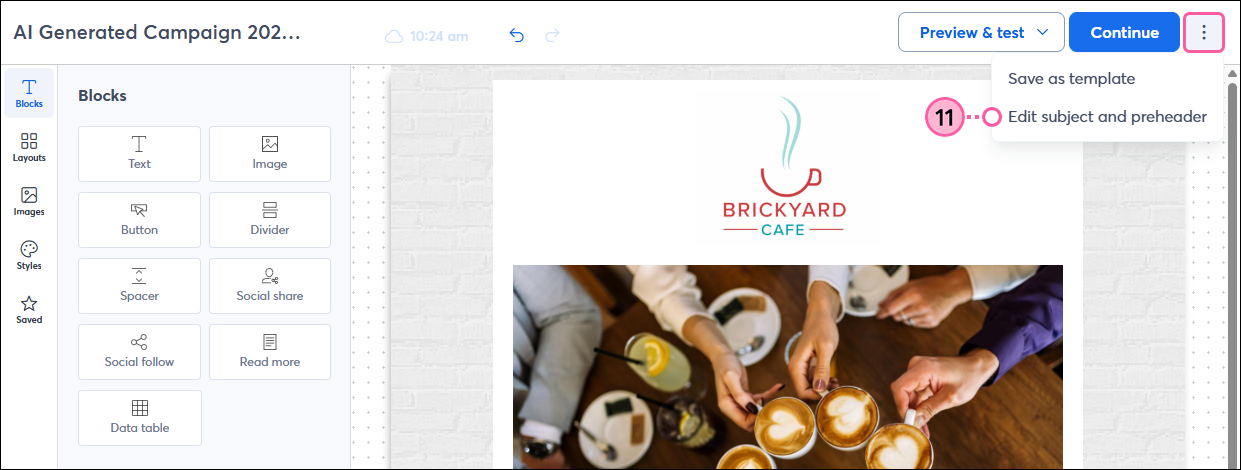
  11. Click the three dots in the upper-right and select Edit subject and preheader.

    Email editor with More drop-down and Edit Subject and Preheader option selected

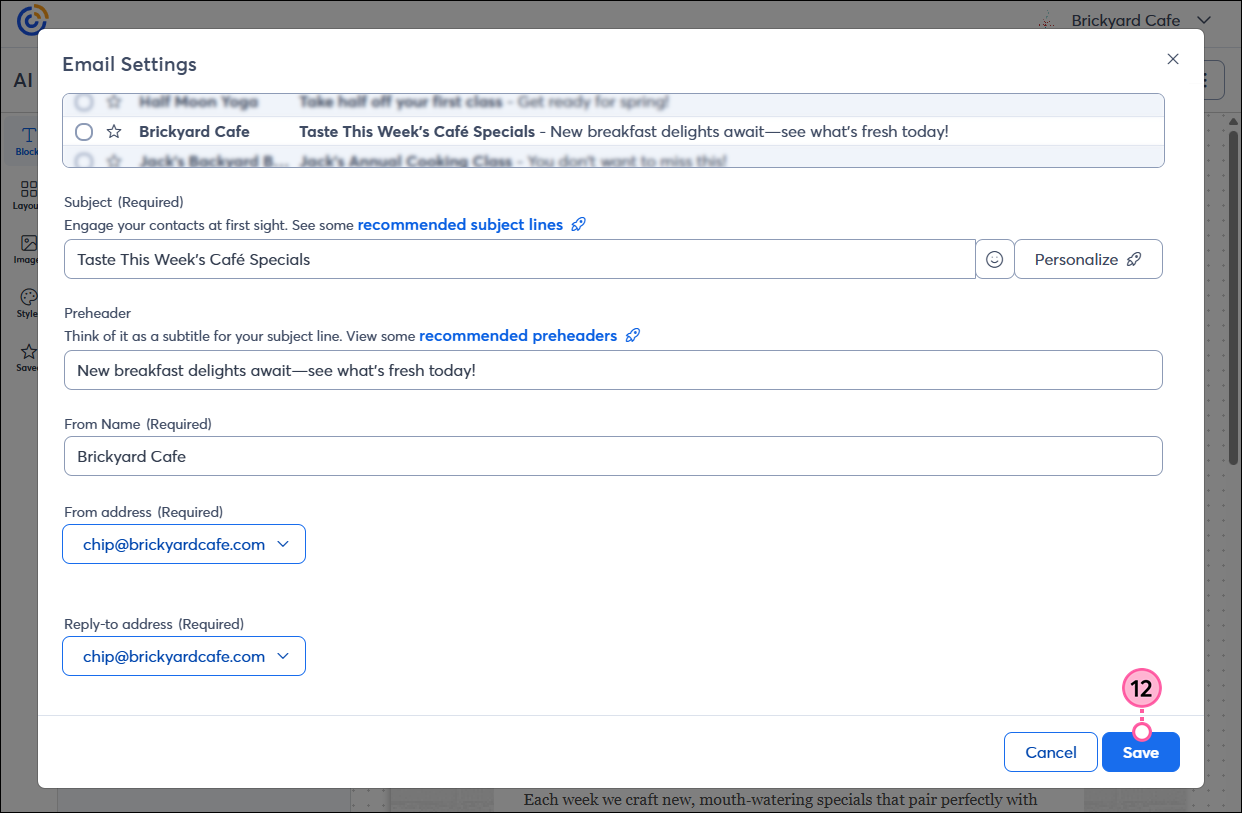
  12. Update your email header and click Save:
    • Subject line - This is the first thing your contacts see and can be what makes them decide to open your email or not.
    • Preheader - This supports your subject line. 
    • From name - This should be a name your contacts will recognize, whether it's your organization's name, your personal name, or a combination of both.
    • From email address - This helps your contacts' email clients determine whether your emails are valid or should be sent to the spam folder. We recommend using a custom domain to best represent your organization. If you need to add a new email address to use, select "Add another email" from the drop-down to verify it.
      Exclamation point iconImportant: Due to industry email authentication requirements, your “From” email address may be rewritten using our shared ccsend.com domain if you don’t have your own domain or haven’t self-authenticated it. This ensures your emails continue to be delivered to your contacts. 
    • Reply-to email address - This receives replies from your contacts when they want to respond to your email.  Make sure it's an email account that you check regularly.

      Email Settings pop-up and Save button

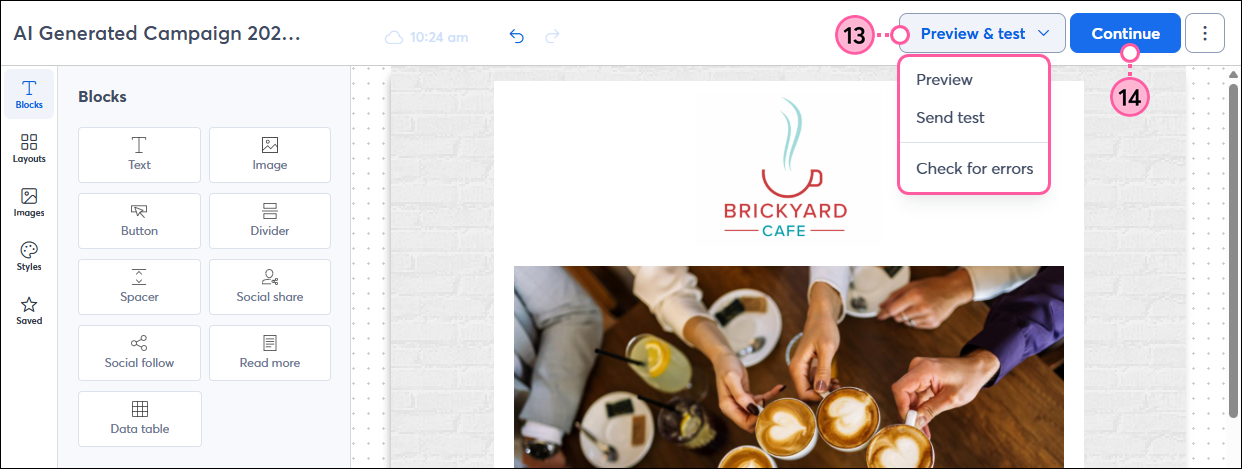
  13. When you’re finished designing your email, we recommend double-checking it before sending it to your contacts. Click Preview & test and select:
    • Preview to see how your email will look to your contacts on desktop and mobile.
    • Send test to send a test version of your email to yourself or others to review before sending to your contacts.
    • Check for errors to check for any issues with your links, etc.
  14. When you're ready to send, click Continue.

    Email editor with Preview and Test drop-down options and Continue button

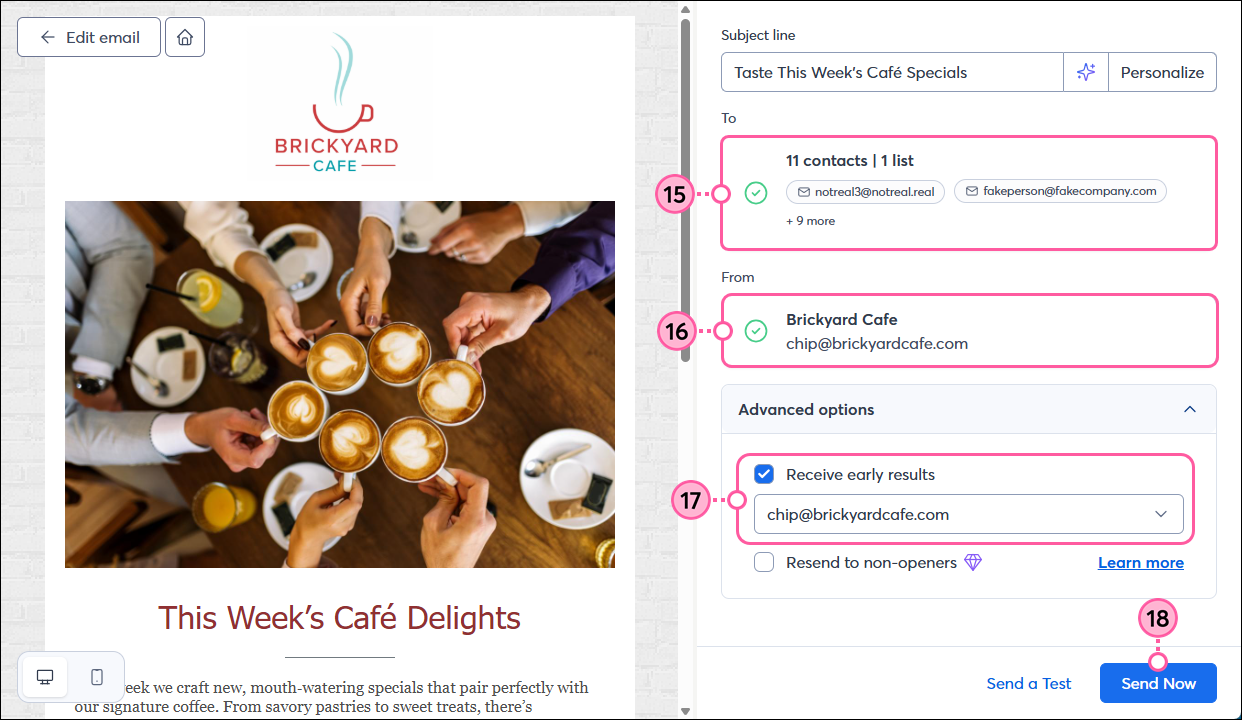
  15. In the To section, select the contact list(s) you want to send your email to.
  16. In the From section, review or update your “From” name and “From” and “Reply-to” email addresses.
  17. (Optional) In the Advanced settings section, check the box and select a verified email address to receive the early results email. This tells you how your email performed in the first 48 hours after it was sent.
  18. Click Send now to send your email to your selected contacts.

    Email schedule page options and Send Now button

Once your email has been sent, give your contacts time to open it, then check the results to see how it's performing.


Create, edit, and send an email (mobile web)

If you’re using Constant Contact on your mobile device's web browser (versus your desktop computer), it’s easy to create, edit, and send an email:
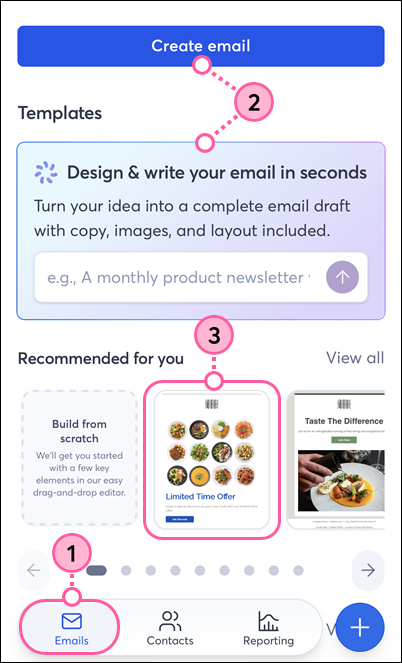
  1. If needed, tap Emails in the bottom navigation.
  2. Tap Create email to browse all templates, choose from some recommended or new templates, or enter a description for what you'd like to create, and we'll generate email options for you.
  3. Tap on a template to preview it.

    Constant Contact on mobile web browser, Emails option in bottom navigation, Create Email button, search bar, and template selected

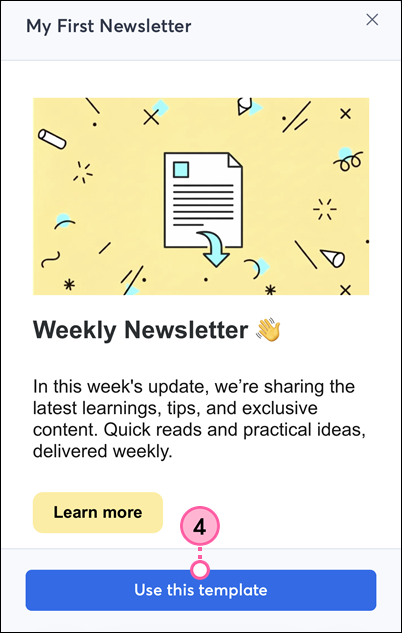
  4. Tap Use this template to customize it.

    Constant Contact on mobile web browser, template preview, and Use This Template button

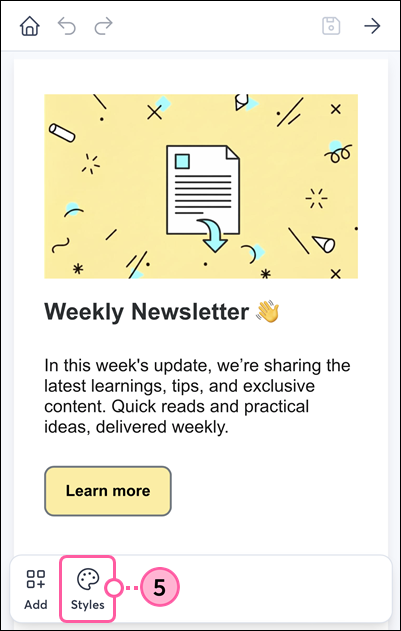
  5. From the bottom menu, tap the Styles icon to customize the template colors, font, and button styles. 
    Tip: You can also customize the colors of individual text blocks and buttons (see steps 13 and 14).

    Email editor on mobile web browser with Styles option in bottom menu

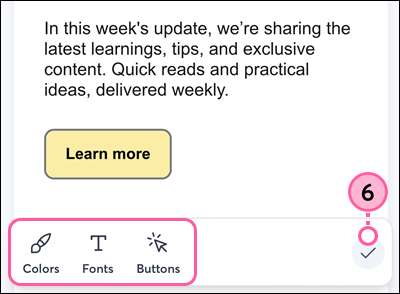
  6. Tap to edit the Colors, Fonts, and Buttons. When you’re finished with each, tap the check mark icon, then tap it again to return to editing your email.

    Email editor on mobile web browser, Colors, Fonts, and Buttons options in bottom menu, and check mark

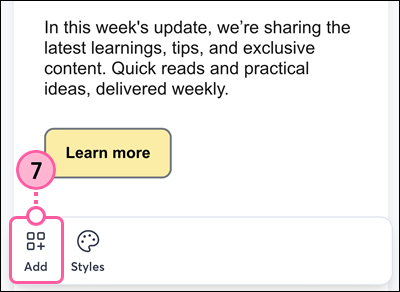
  7. Tap the Add icon to add an element to the template, such as a text block, image, or button.

    Email editor on mobile web browser with Add option in bottom menu

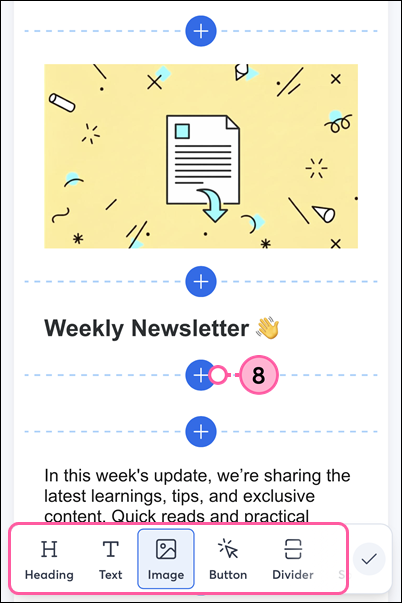
  8. Select the element you want to add, then tap the plus symbol to choose where you want to insert it in the template. 
    Note: The blocks you’re able to insert are limited compared to the desktop email editor. Scroll to the right to see all available options for mobile web.

    Email editor on mobile web browser, element options in bottom menu, and plus symbols to insert in template

  9. Tap on an element to edit it.
    Note: Some blocks are not editable in mobile web browsers and will need to be edited on a desktop.
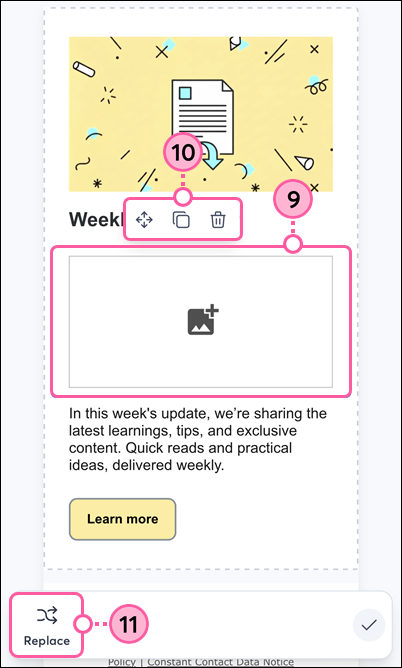
  10. (Optional) Tap and drag the directional arrows to move the element up or down in your template, tap the copy icon to duplicate it, or the trash can icon to remove it completely.
  11. For Image blocks, tap Replace to choose or change an image.

    Email editor on mobile web browser, image block selected, copy, move, and delete icons, and Replace button

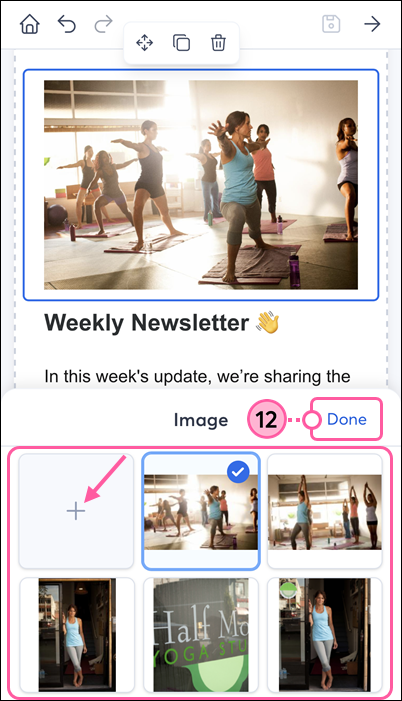
  12. Select an image from your Constant Contact Library, or tap the plus symbol to take a new photo or select a photo from your device’s photo library or files. Then tap Done.

    Email editor on mobile web browser, Image library, and Done button

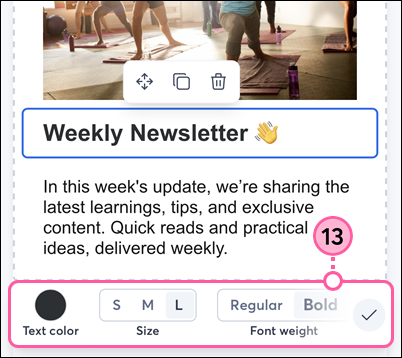
  13. For Text blocks, tap on the text to update the content, and use the design options in the bottom menu to customize the text color, size, font weight, and alignment. Scroll to the right to access all of the customization options.

    Email editor on mobile web browser, Text block selected, and text editing options in bottom menu

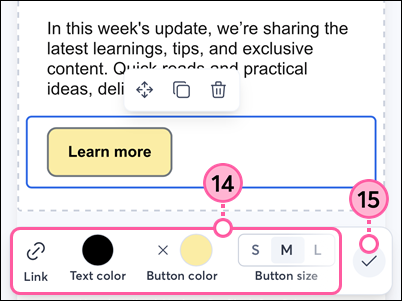
  14. For Button blocks, tap to update the text displayed on the button, tap the Link icon to enter the URL you want to direct your contacts to, and customize the text color, button color, button size, font weight, and button alignment. Scroll to the right to access all of the customization options.
  15. When you’re finished editing an element, tap the check mark to return to editing your email.

    Email editor on mobile web browser, Button block selected, and button editing options in bottom menu

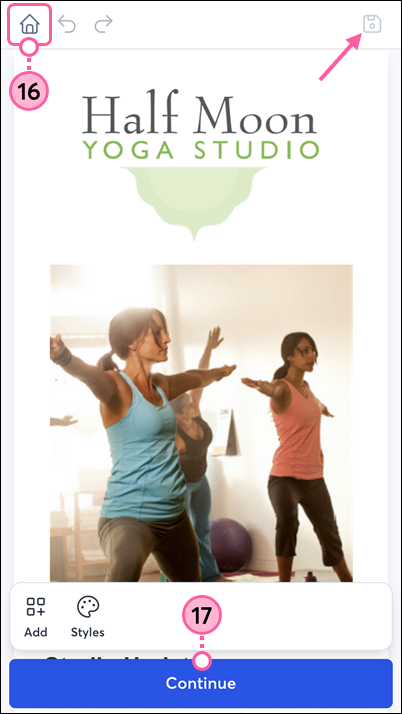
  16. If you’re not ready to send your email, tap the Save icon, if needed, to save your email draft. You can then tap the Home icon to exit the email editor, and your draft will be available in your campaigns list to finish editing and send later.
  17. If you’re finished designing, tap the arrow in the upper-right to prepare your email to send.

    Email editor on mobile web browser, Home and Save icons, and Forward arrow

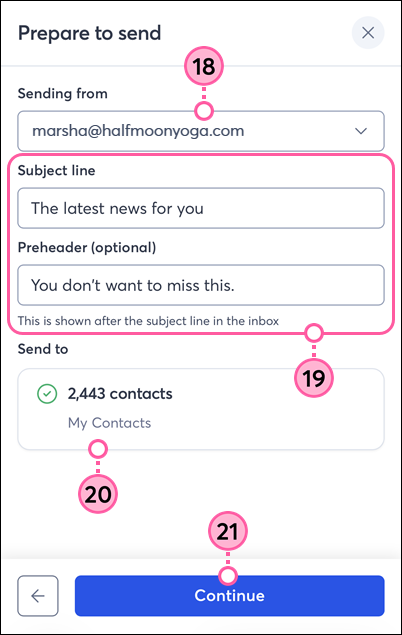
  18. Select your Sending from email address.
  19. Update your subject line and preheader.
  20. Select the Contact list option, then choose the list(s) you want to send to, or you can send this email to yourself as a test or to a friend by entering an individual email address.
  21. Tap Continue.

    Constant Contact on mobile web browser, Sending From email address drop-down, Subject line and Preheader fields, Send To options, and Continue button

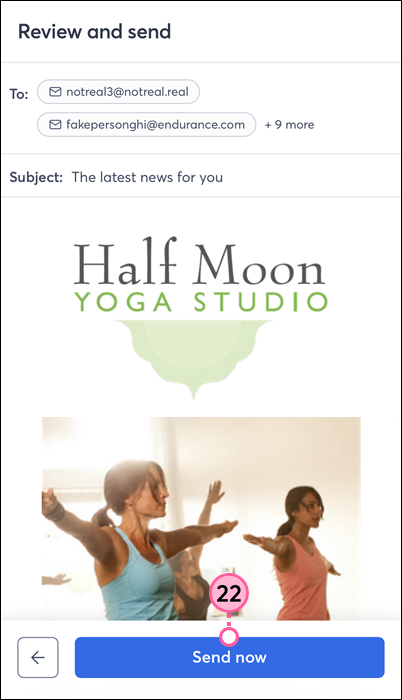
  22. Review your email, then tap Send now when you're ready.

    Constant Contact on mobile web browser, Review email, and Send Now button


Questions?

Ask the Community

Did this article answer your question?


Constant Contact Logo

Copyright © 2026 · All Rights Reserved · Constant Contact · Privacy Center