Email and Digital Marketing
How can we help you?
Search our help articles, video tutorials, and quickstart guides

You've got this. You've got us. Search our Knowledge Base to quickly find answers to your questions.

Install and use the Constant Contact Claude connector

Article: 000055227
Updated: August 18, 2026

Build emails and social posts with live previews using the Constant Contact Claude connector on Claude Enterprise accounts

Constant Contact has launched a Claude AI connector that lets you create and preview new emails and social posts in minutes, incorporating assets from your Library.

Note: Currently, the Constant Contact Claude connector is only available for Claude Enterprise accounts. 

Connectors let you chat about your business use cases in the Claude AI interface, with context from the business or product that launched the connector, making it faster and easier to complete projects. 

With the Constant Contact connector, you can generate an email or social post, optimize your subject line, preheader text, captions, and other email or social post details, and get a live desktop or mobile preview to see how those emails and posts will look to customers. 

The Constant Contact Claude connector is available for installation on Claude’s Customize page.


Installing the Constant Contact Claude AI connector

To start, you’ll need a Claude Enterprise account:

  1. Log in to your Constant Contact account first. 

    Constant Contact log in page 
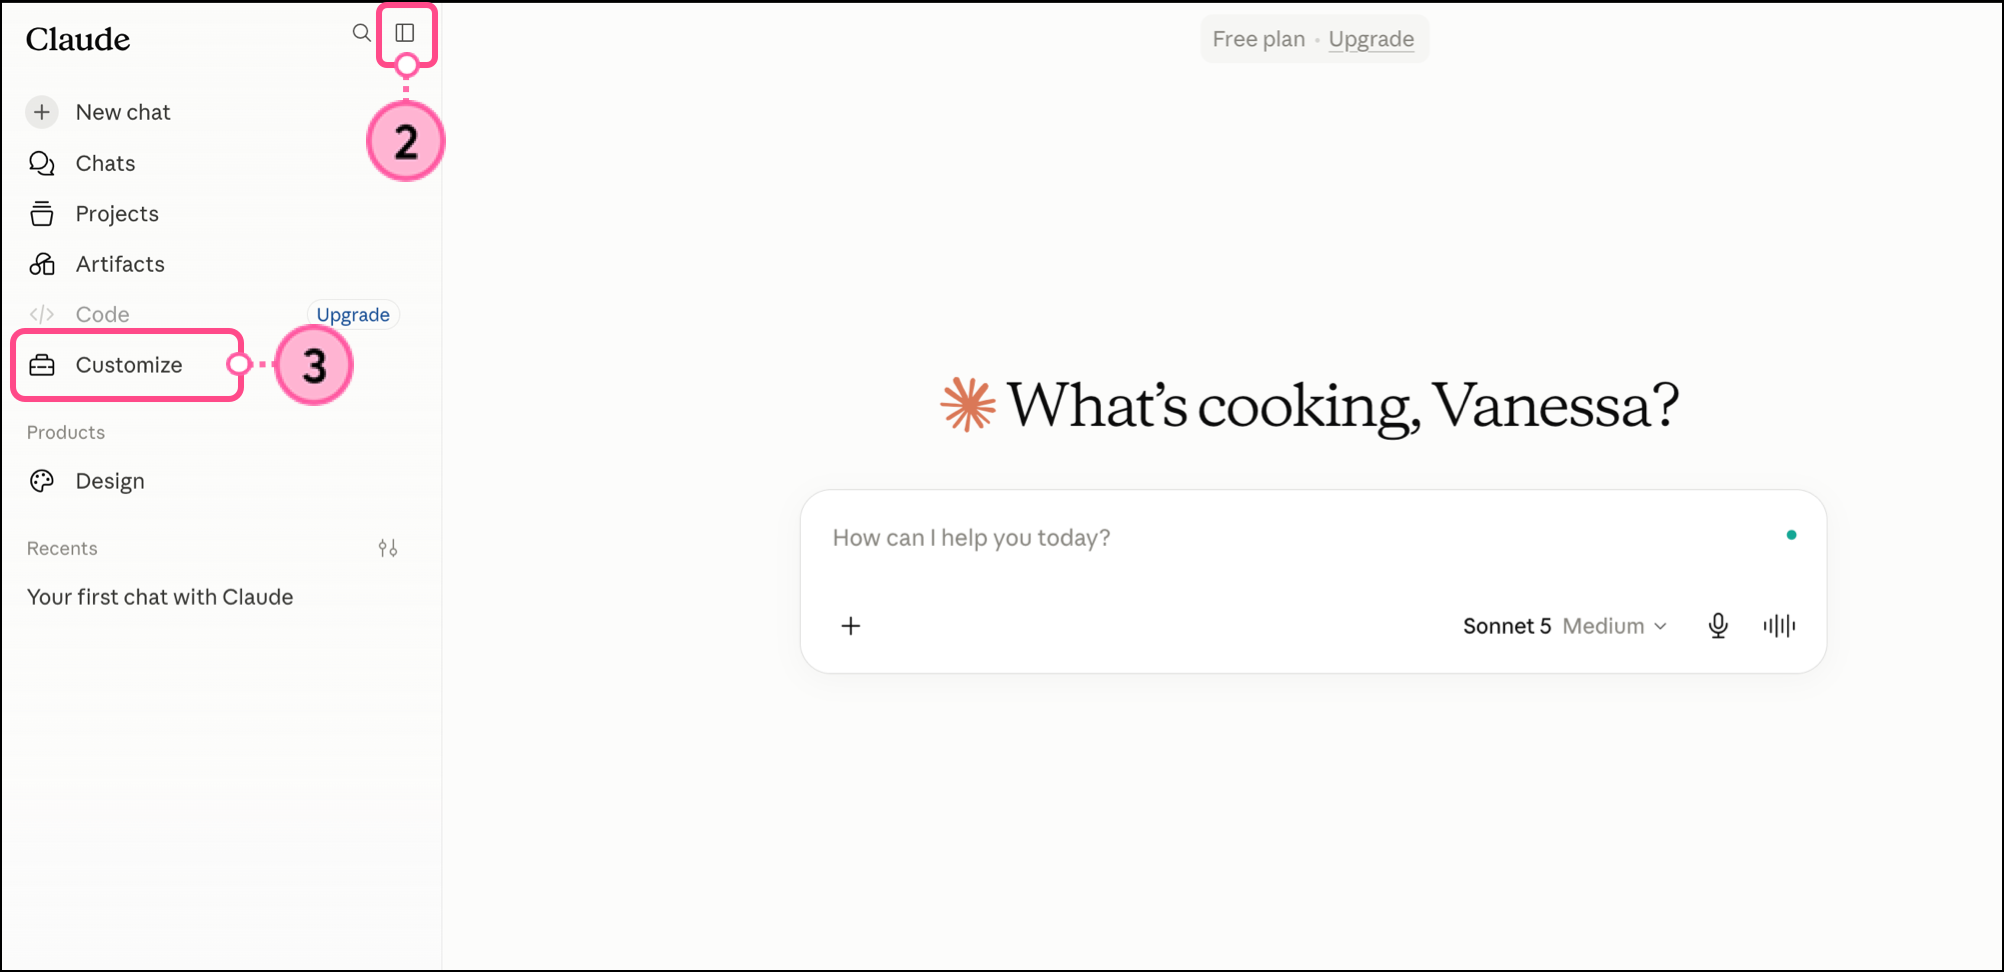
  2. In Claude AI, expand the side navigation menu. 
  3. Click Customize.

    Claude AI expand icon and Customize button 
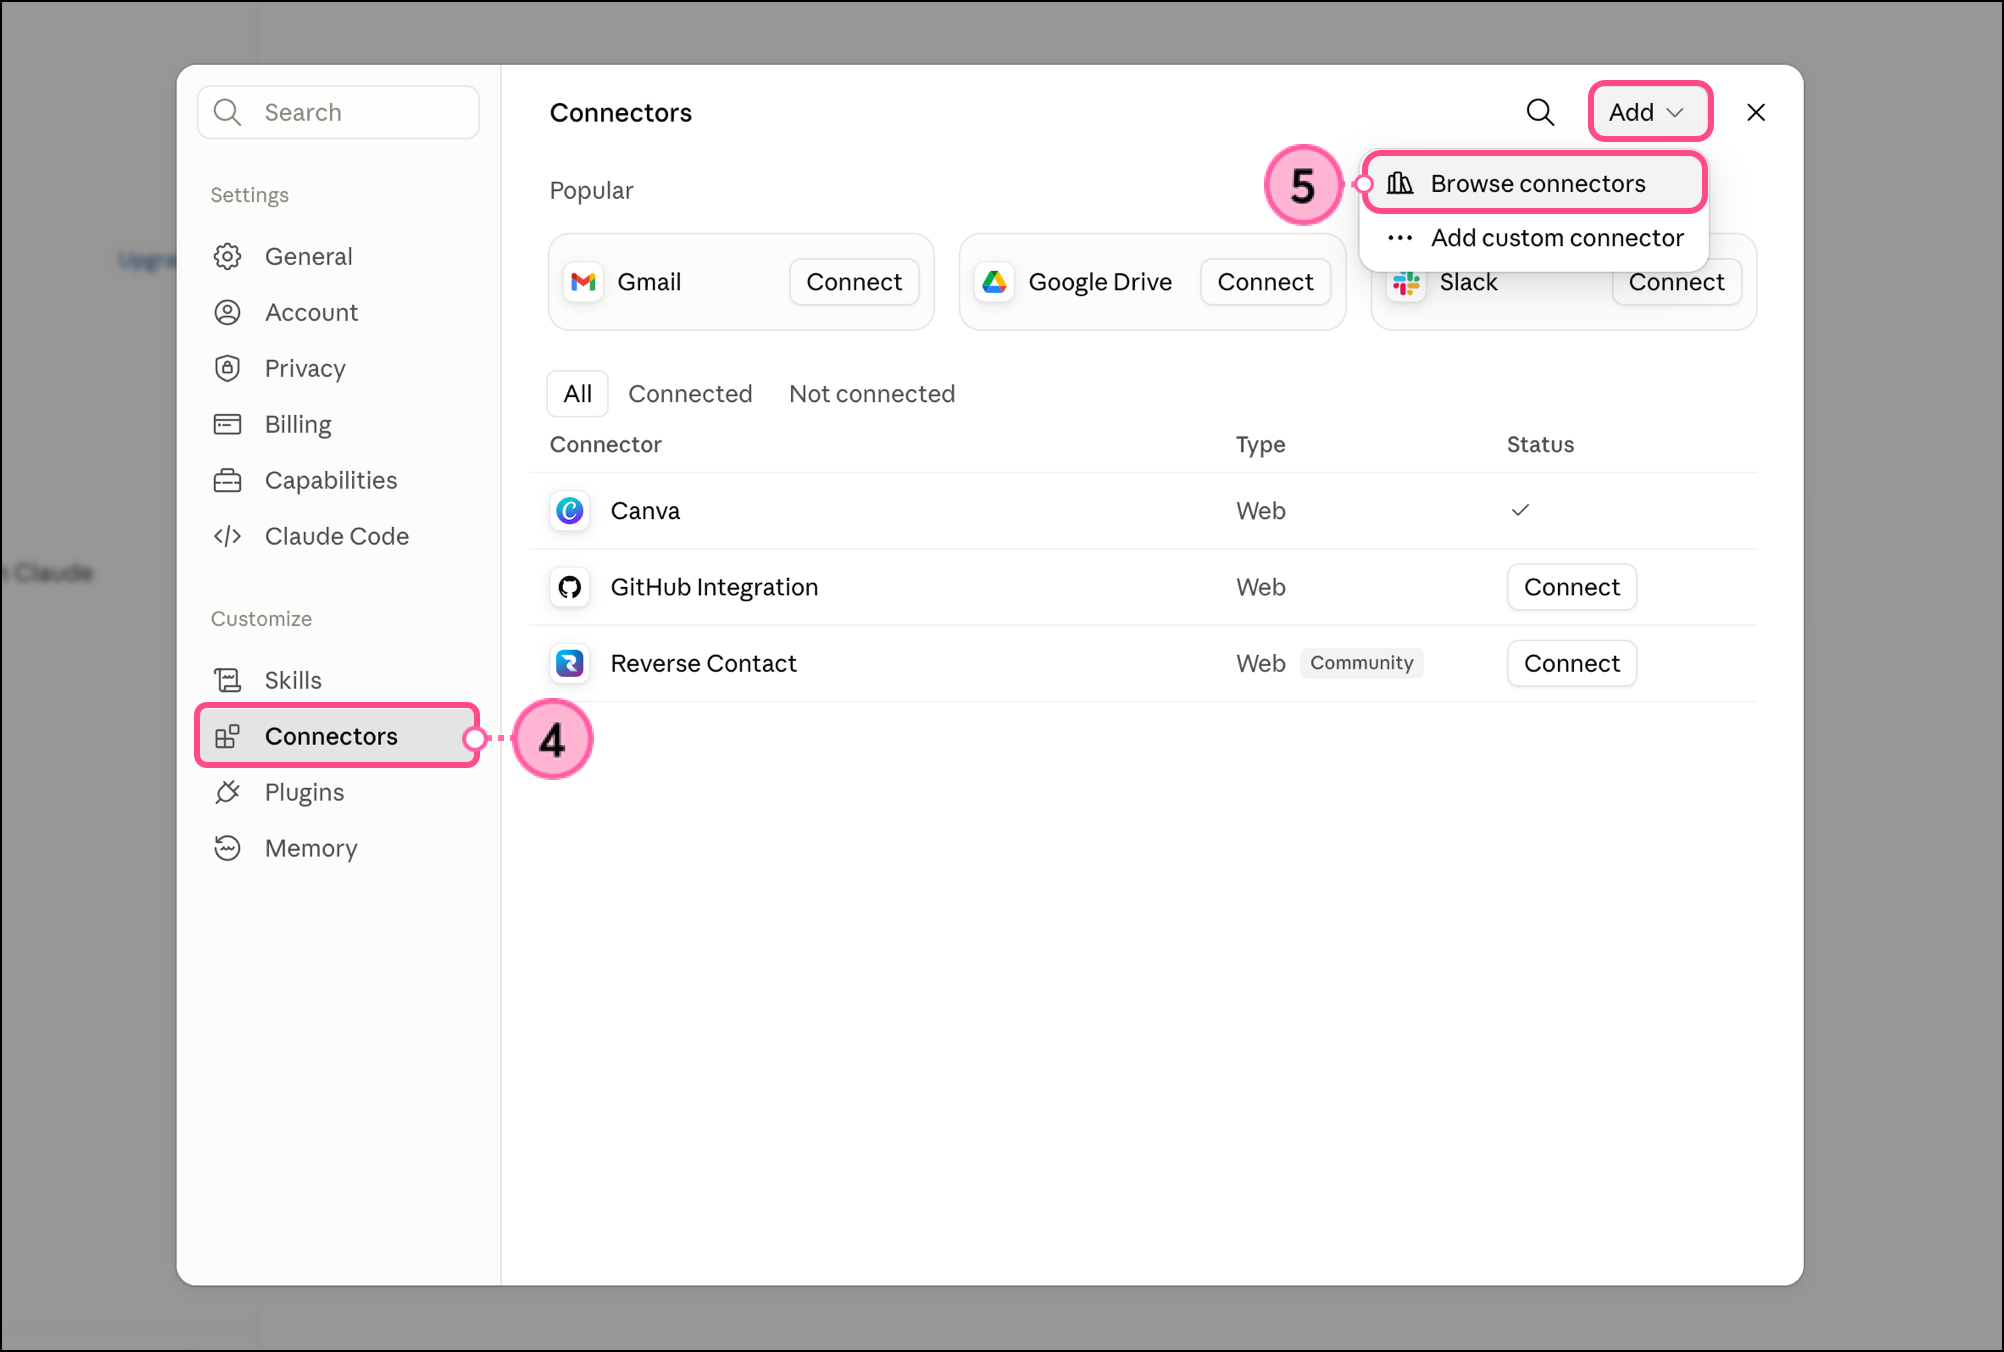
  4. Click Connectors.
  5. Click Add and select Browse connectors.

    Browse connectors option in the expanded Add menu in the Connectors section  
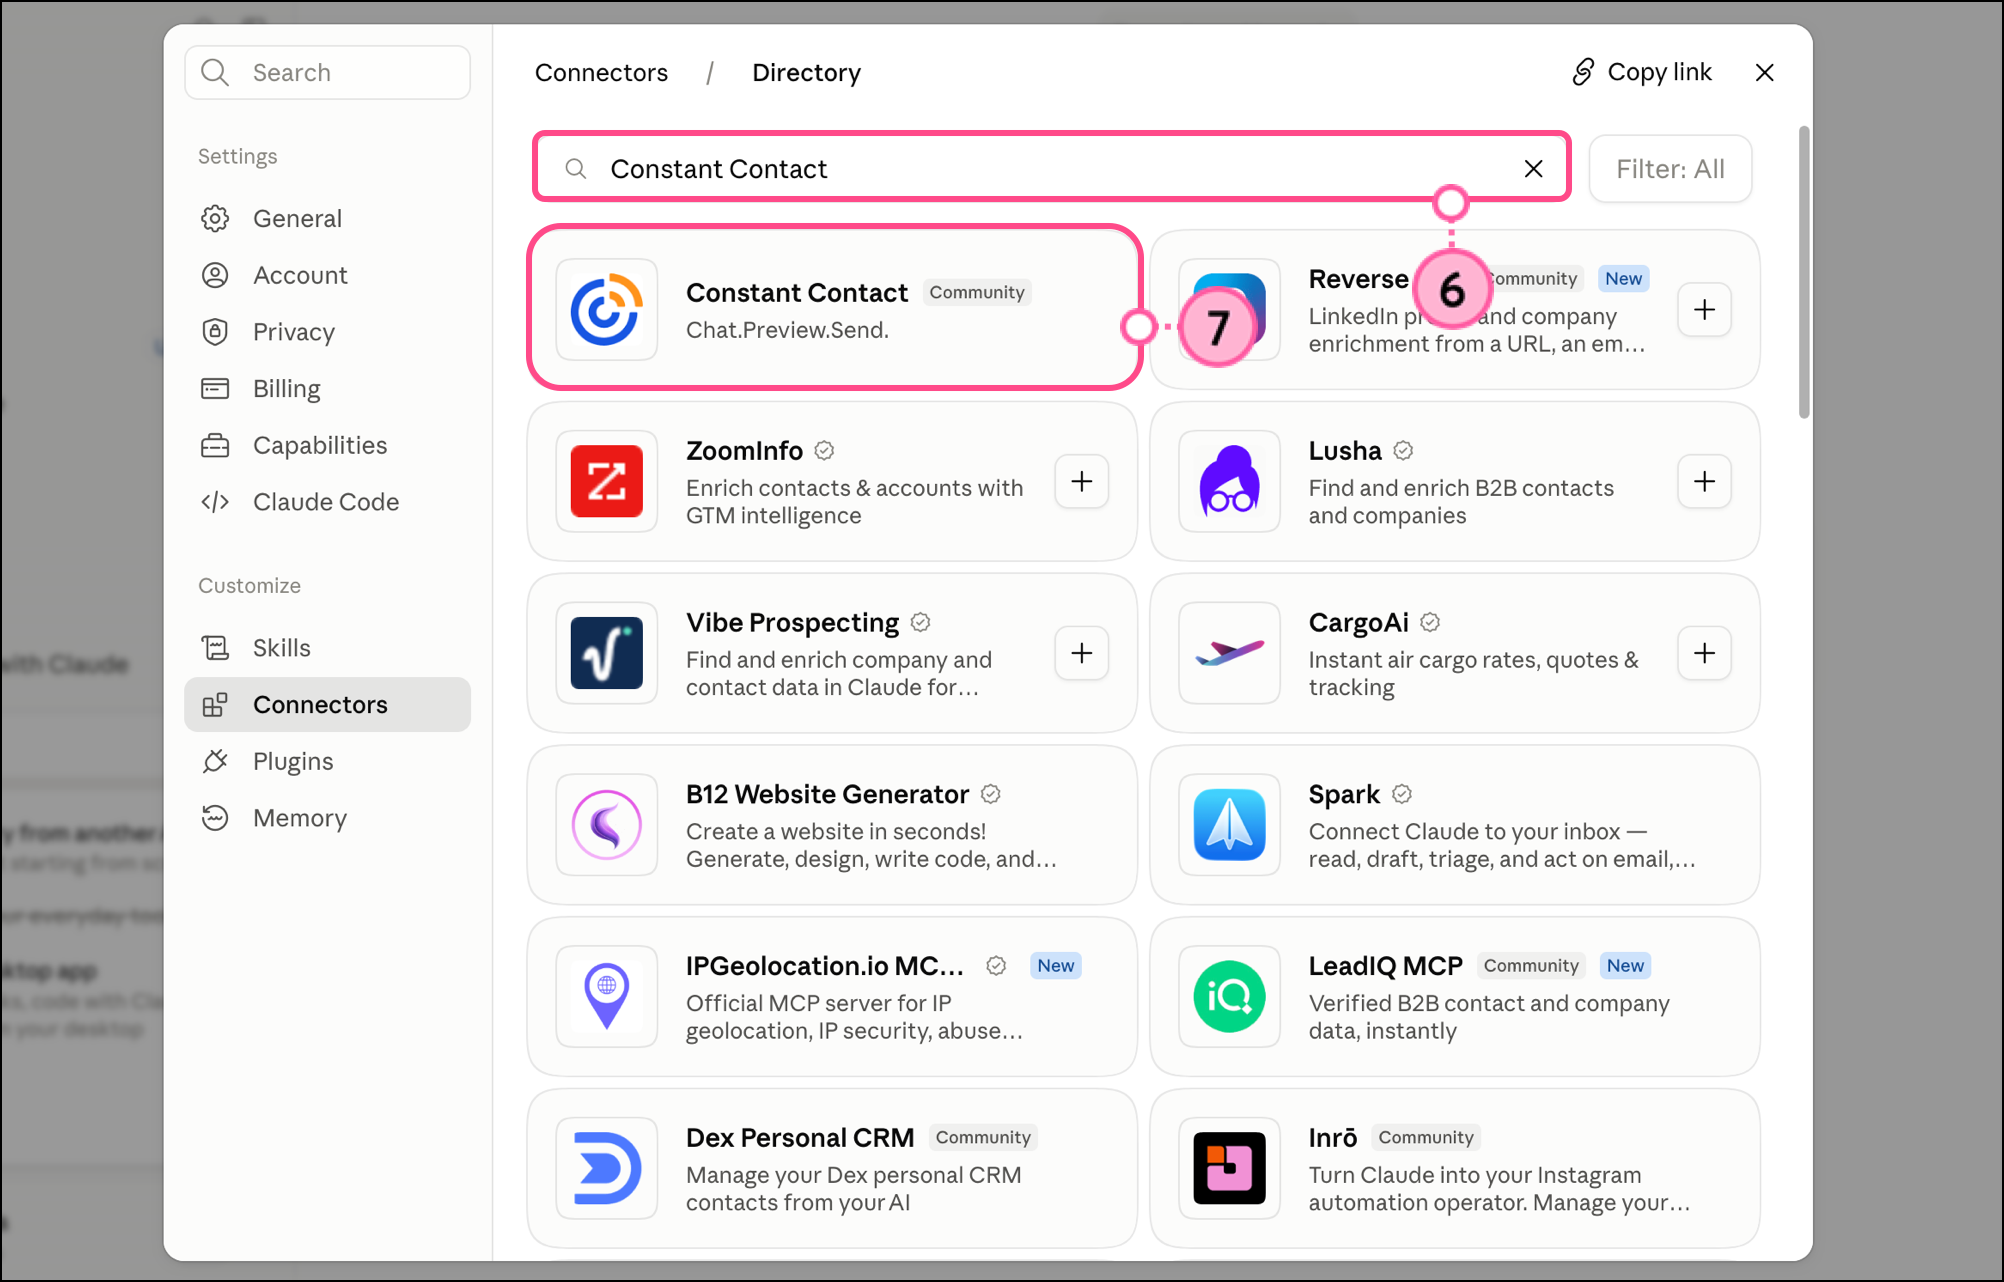
  6. Search for Constant Contact in the search bar. 
  7. Click on the Constant Contact connector from the list. 

    Constant Contact in the search bar and the Constant Contact connector card in the search results list 
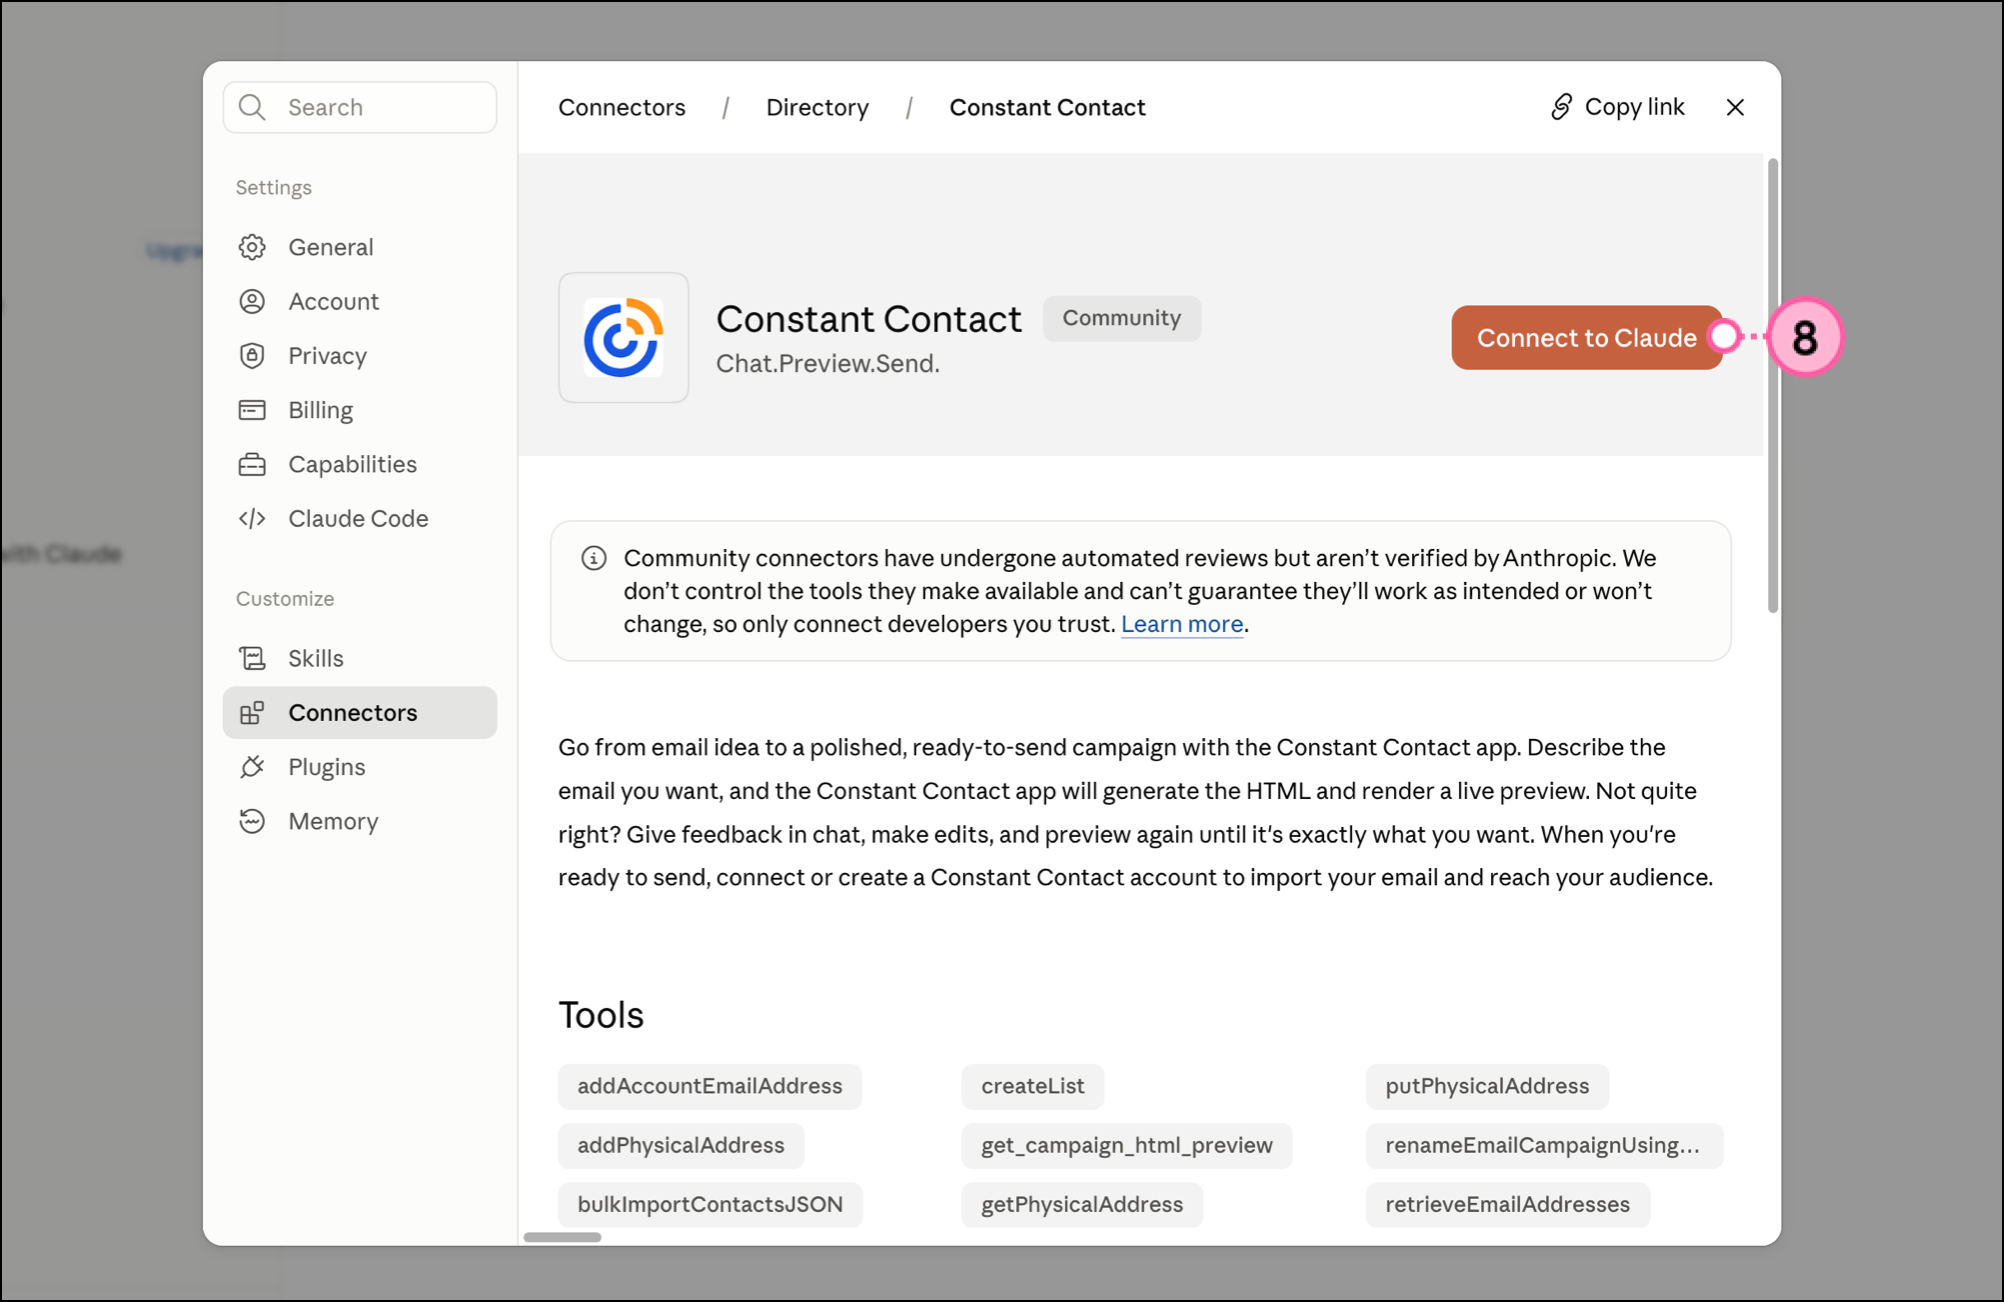
  8. Click Connect to Claude

    Orange Connect to Claude button on the Constant Contact connector

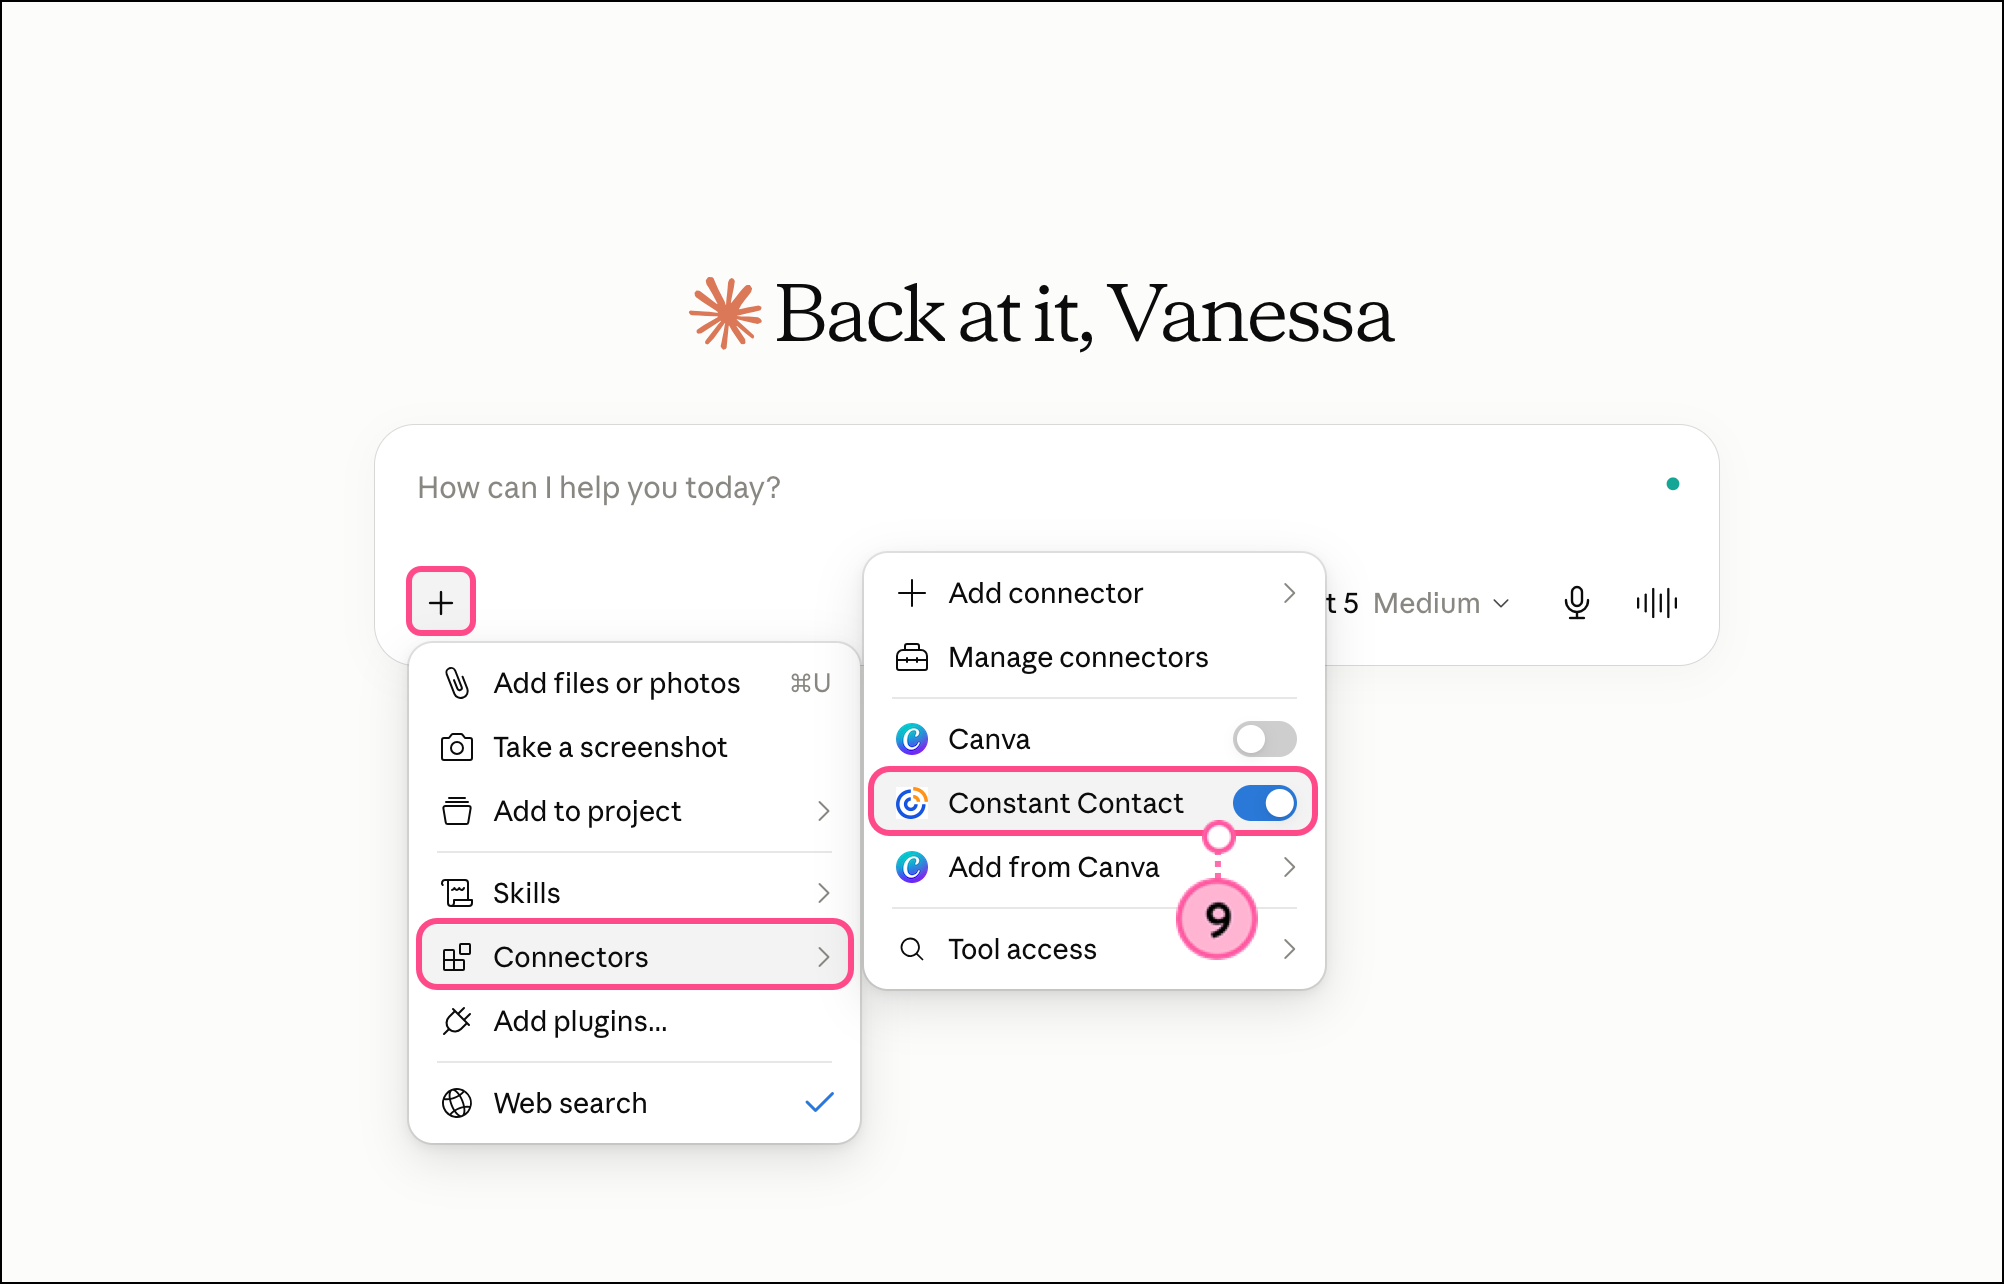
  9. To confirm the connector is enabled, click the + plus sign > select Connectors > ensure Constant Contact is toggled to ON. 

    Toggled on Constant Contact connector in the expanded Connectors menu 

Once the connector is installed, it'll be available to apply to future conversations in Claude. Type @ConstantContact to apply the connector to the conversation.
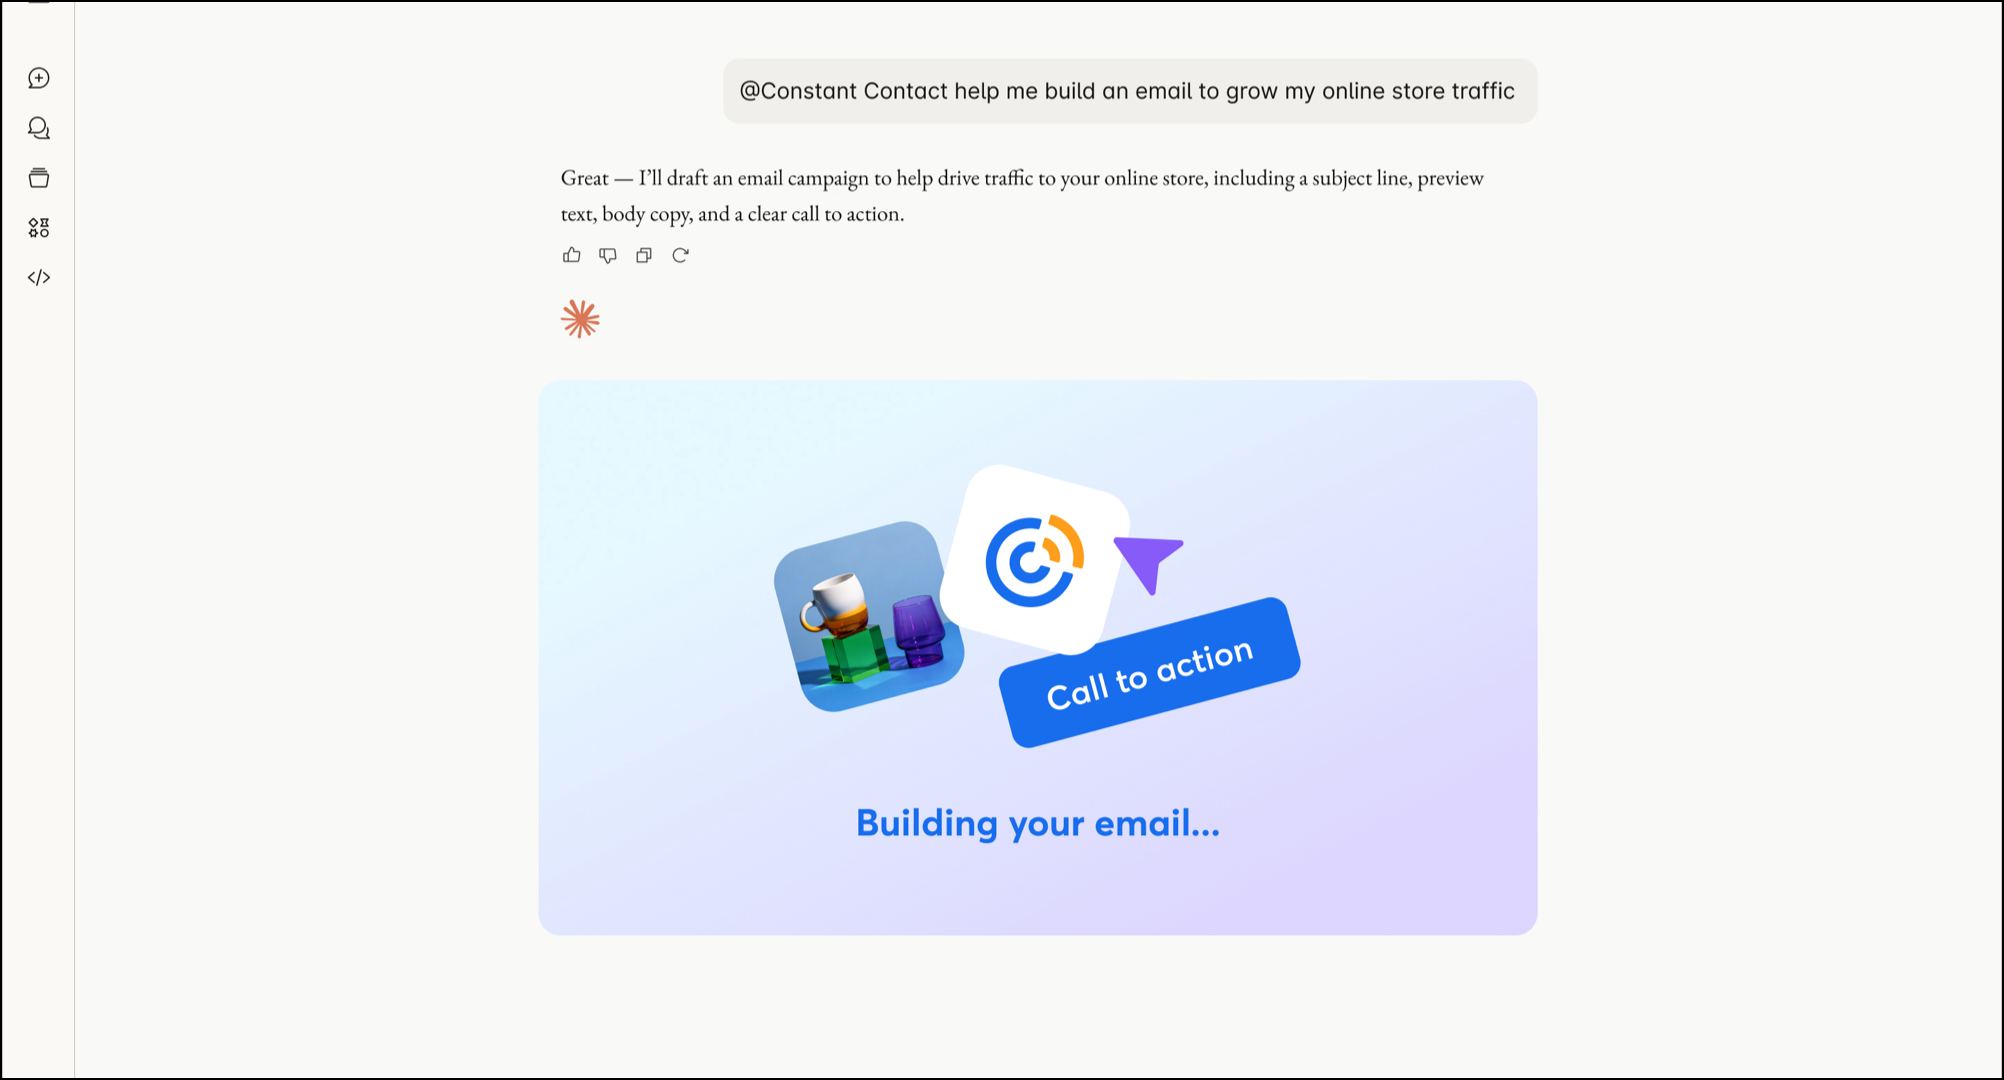
 

Claud chat using @Constant Contact to call the Constant Contact connector


Use the Constant Contact Claude connector to create an email

To generate an email campaign using the Constant Contact Claude connector, start by describing your business and the primary goal of your email. Briefly mention who the audience is and what’s important to them (are they previous customers, new customers, churning customers, etc.). 

Include the URL to any images or assets you’d like to add to your emails from your Library. Be sure to include the link to your logo image! 

You’ll be able to get a look at both desktop and mobile views in the live preview. If you know the call to action or tone you want, be sure to include those details; if you’re not sure, the Constant Contact Claude connector can advise you on a tone based on your goals. It can also help you with the subject line, preheader text, and any other email details you need.

With the connector, Claude can identify and generate global elements, such as your email footer, and automatically include them in your generated email. When the template is generated, Claude will give you a recap of the following email details:

  • Campaign name
  • Email Status (Draft, Sent, Etc.)
  • Campaign ID
  • Primary Email Activity ID
  • Subject line
  • Preheader Text
  • From Email
  • Call-to-action link

How to build an email campaign using the Constant Contact Claude AI connector: 


  1. Click the + plus sign > Connectors to apply a connector to your post.
  2. Toggle the Constant Contact connector from the list to ON. 
  3. Describe your email campaign, including any image links you want to use. Enter @ConstantContact to call the Constant Contact connector.
  4. The Constant Contact connector will generate an email. Navigate through the email preview. 
  5. Use the connector to modify and optimize your posts as needed—you can ask for updates to the message or images. Use natural language to communicate with Claude AI and request or suggest changes.
  6. As you work through the project, make edits by simply typing your request into Claude — change colors, text, or tone. Claude will update your live preview as you go. If not, ask to update the live preview.
  7. When ready, tell Claude to send the email. It will review everything to confirm there are no missing email details, then generate a final send/schedule button link for you. 

Clicking that link takes you to Constant Contact, where you can finalize your sending details and launch the campaign. Read Schedule and send an email to learn more about scheduling or sending an email. 


Use the Constant Contact Claude connector to create a social post

To generate a social post using the Constant Contact Claude connector, start by describing your business and the primary goal of your post. Briefly mention who the audience is and what’s important to them (are they previous customers, new customers, churning customers, etc.).

Explain what you want the post to communicate or what you want the post to advertise. Finally, discuss the type of engagement you want from your audience — do you want viewers to like, click, comment, or share?

Be sure to include links to any image files or videos (hosted in your Constant Contact library or elsewhere) you would like to include: 

  1. In Claude AI, click New chat. 
  2. Click the + plus sign > Connectors
  3. Toggle the Constant Contact connector from the list to ON
  4. Describe your social post, including any image links you want to use. 
  5. Add @ConstantContact to call the Constant Contact connector.
  6. Submit the message.    
  7. The Constant Contact connector will generate a social post. Navigate through the post preview.   
  8. Use Claude to modify and optimize your posts as needed—you can ask for updates to the message or images. Use natural language to communicate with Claude and request or suggest changes. 
  9. Claude will update your live preview as you go. If not, ask to update the live preview.
  10. Once you're ready, scroll down and click Log in and Activate.
  11. Click Open link in the pop-up that appears. This will take you into the saved social post draft in your Constant Contact account.   
  12. Finish editing your post in the Constant Contact application as needed, and when you're ready, click Continue to save and schedule it.
     

Read Create a Social Post and schedule it to publish on social media to learn more about scheduling social posts in Constant Contact.


Use the Constant Contact Claude connector to upload an image to your library

You can upload a hosted image or an image file to your Constant Contact library while working in Claude AI. Provide Claude with the hosted image URL or simply prompt a library upload and then select an image file (or drag-and-drop an image file) from your computer. 


Uploading a hosted image

To upload an image that is hosted somewhere else on the web:

  1. Click New chat
  2. Ask Claude to upload the image to your library, and provide the image URL. Be sure to include @ConstantContact to apply the Constant Contact connector to the conversation.

The connector will inform you when the upload is finished. When you navigate to your Constant Contact library, you will see the image as the latest upload.


Uploading an image file

To upload an image that is saved to your computer, simply prompt Claude to help you upload an image to your library.

  1. Ask Claude to help you upload an image to your Constant Contact library. Be sure to include @ConstantContact to apply the Constant Contact connector to the conversation.
  2. Claude will present an image file uploading widget. Drag and drop your file into it or click Select a file.
  3. Select the image file you want to upload from your computer folder(s).
  4. Click Upload Images

The connector will inform you when the upload is finished. When you navigate to your Constant Contact library, you will see the image as the latest upload.

Any links we provide from non-Constant Contact sites or information about non-Constant Contact products or services are provided as a courtesy and should not be construed as an endorsement by Constant Contact.


Questions?

Ask the Community

Did this article answer your question?


Constant Contact Logo

Copyright © 2026 · All Rights Reserved · Constant Contact · Privacy Center