 | In need of multiple accounts? Our multi-account solution is designed for organizations seeking unique accounts for their various locations, departments, or users. Take advantage of bulk pricing, product features for brand control, customized onboarding, and more! |
Single sign-on (SSO) makes logging into third-party platforms, like Constant Contact, easier by allowing you to authenticate your login credentials through a central domain, reducing the number of usernames and passwords needed to perform daily tasks. Teams and Partners who use SSO can enable their Constant Contact accounts to use existing user credentials to log into subaccounts.
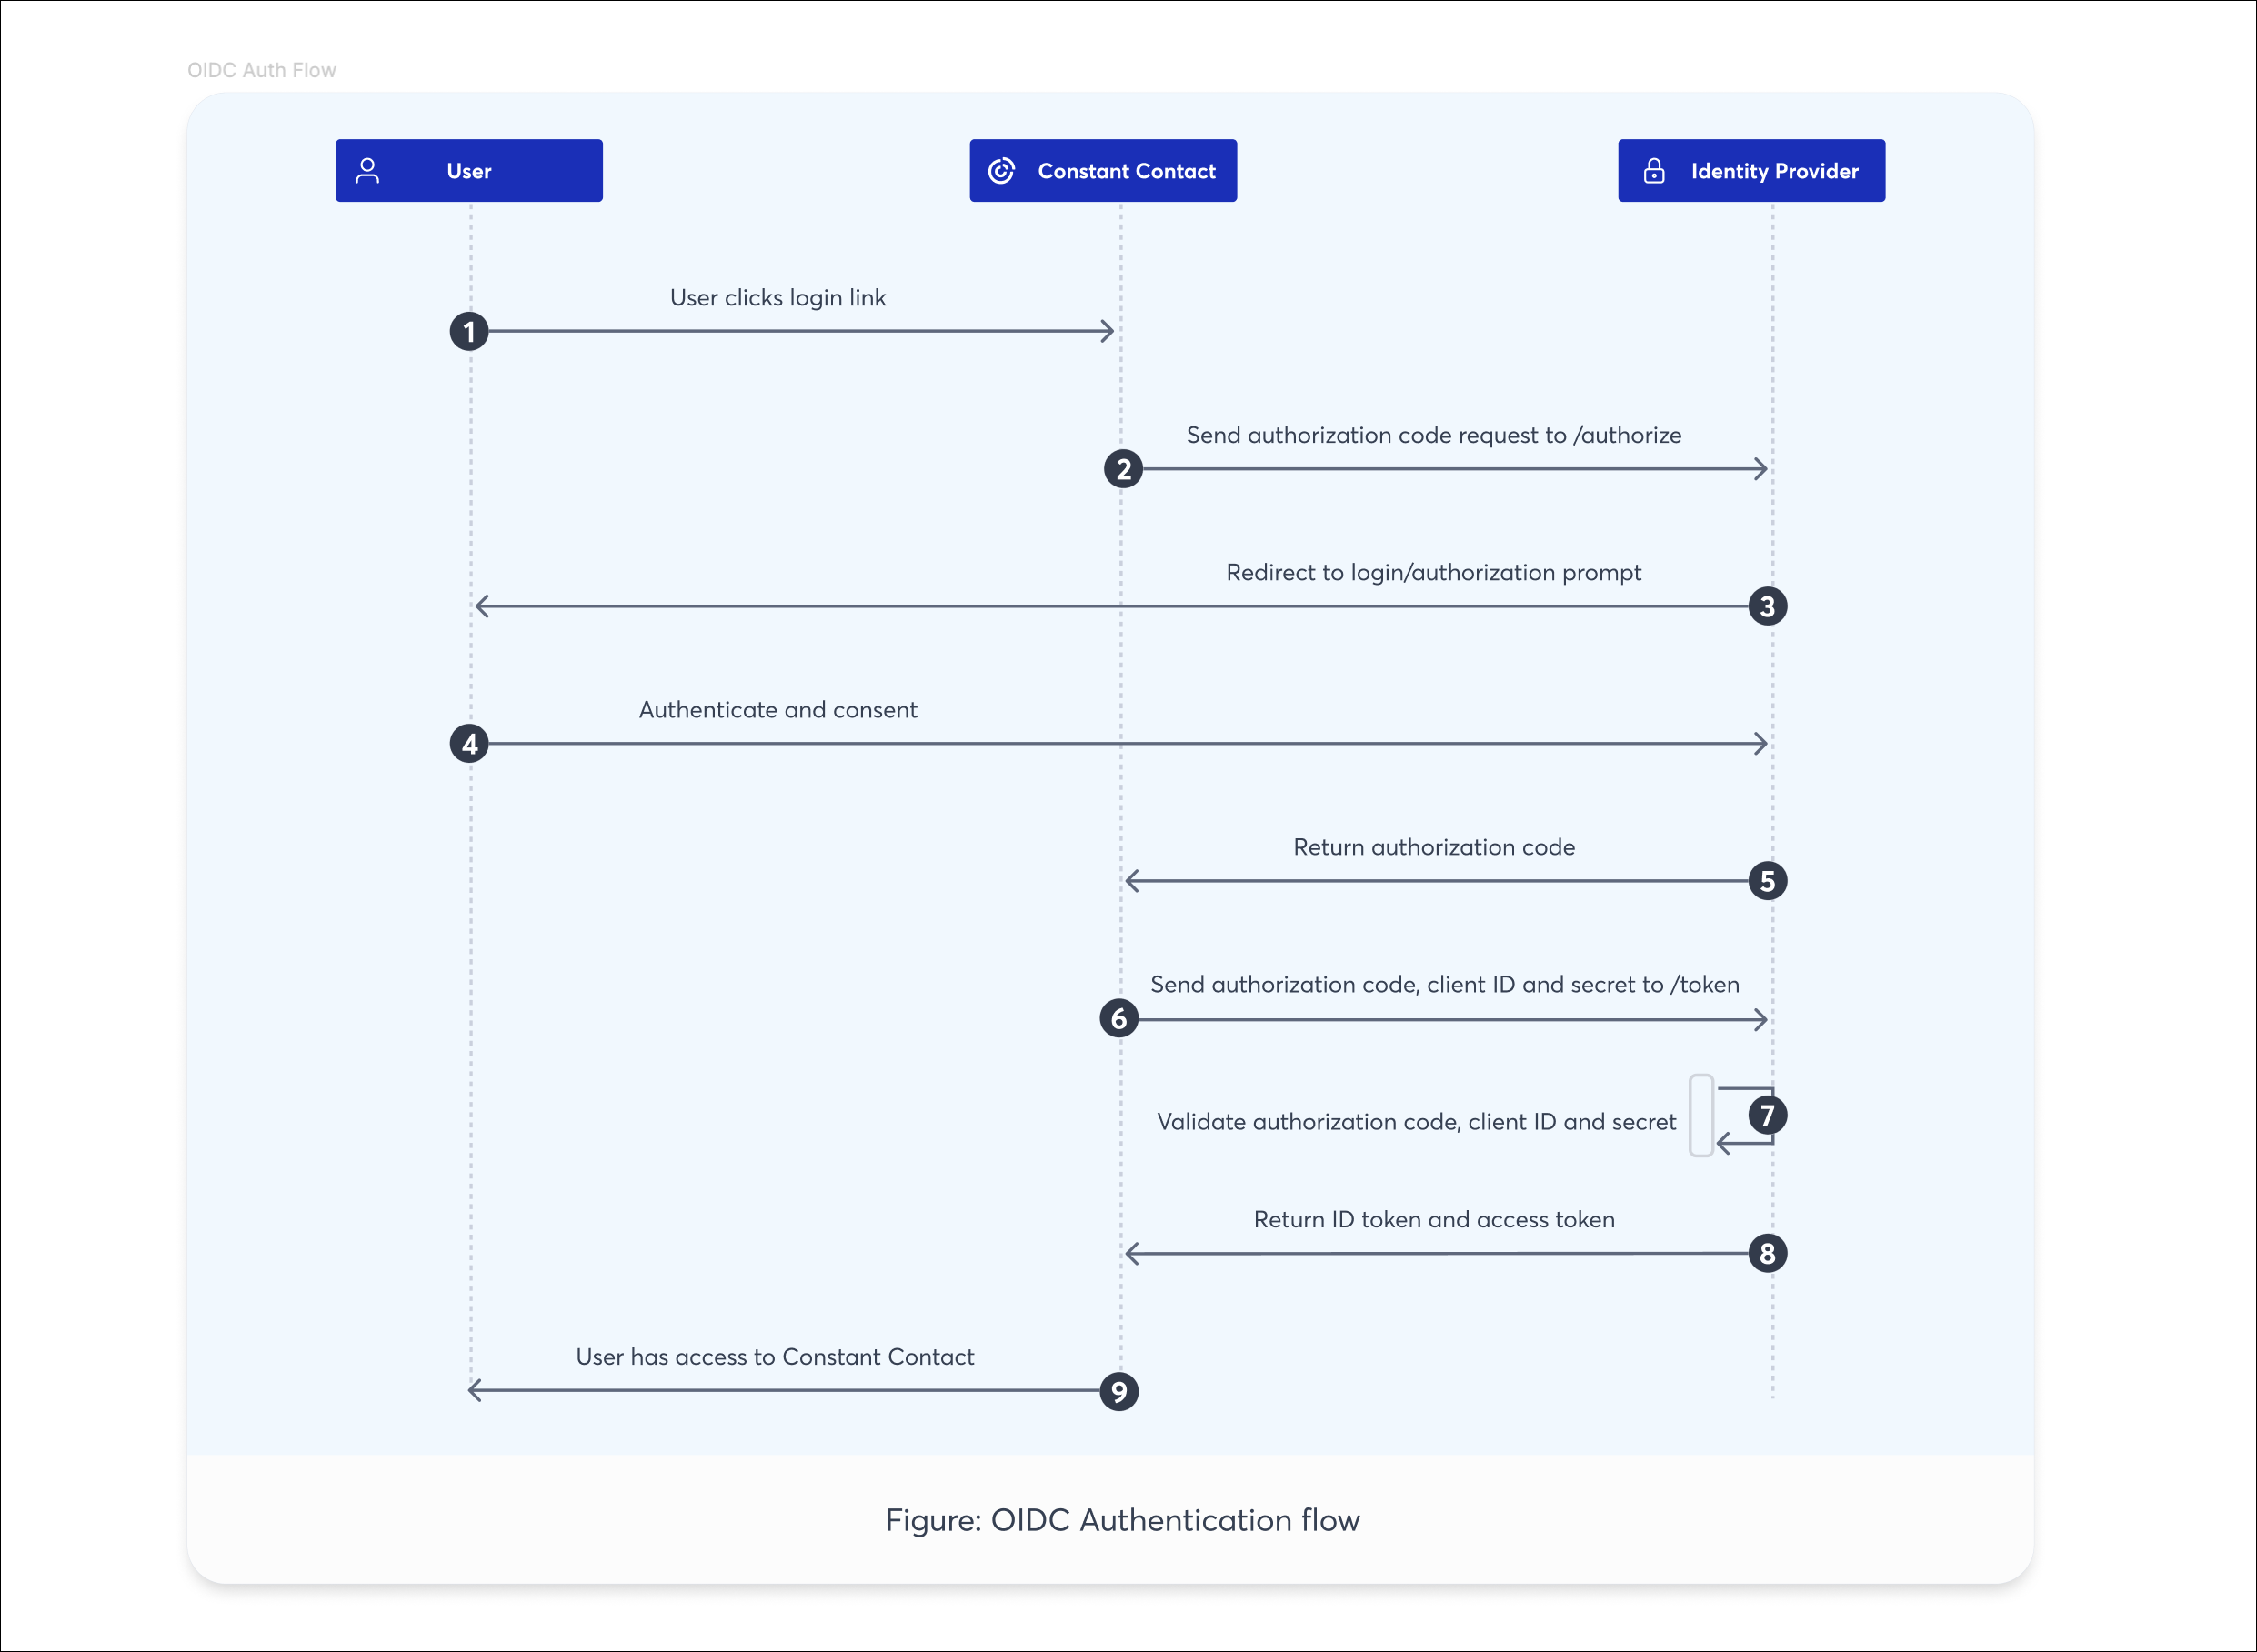
Understand the SSO flow using OpenID Connect (OIDC)
Constant Contact uses OpenID Connect (OIDC) as an identity authentication protocol to authenticate and authorize users for SSO. OIDC is built on top of the OAuth 2.0 framework and uses Web Tokens (JWT) to transfer data between two parties. Here is the basic flow:
- The user navigates to the login page for the application/Relying Party (RP), in this case, Constant Contact.
- Constant Contact requests the authorization code from the IdP.
- Constant Contact redirects the user to the IdP to enter their login credentials.
- The user enters their SSO login credentials and provides consent to the IdP.
- The IdP provides an authorization code to Constant Contact.
- Constant Contact makes a call to the IdP with the authorization code and the client secret.
- The IdP validates the authorization code and application credentials.
- The IdP issues an access token and an identity token and returns them to Constant Contact.
- The user is allowed access to Constant Contact.
For more information on how OIDC works, please see the OpenID developers site.
Common IdPs that support OIDC
Each Identity Provider (IdP) that supports OIDC has a Discovery URL that stores its various OIDC URLs, which an application can retrieve to enable SSO. When setting up SSO through Constant Contact, you need:
- The OIDC Discovery URL: When you configure OIDC in your Constant Contact account and enter this URL, the following URLs are auto-populated for you.
- The Authorize URL
- The Token URL
- The Issuer URL
- The JWKS URL
Here is a list of the most common IdPs and their Discovery URLs. If you don't see your IdP listed, please contact them to obtain the Discovery URL. The Discovery URL is often customized with your unique domain.
| Identity Provider | OIDC Discovery URL |
| Amazon Cognito | https://cognito-idp.{region}.amazonaws.com/{userPoolId}/.well-known/openid-configuration |
| Apple ID | https://appleid.apple.com/.well-known/openid-configuration |
| Auth0 | https://{yourDomain}/.well-known/openid-configuration |
| Cisco Duo | https://sso-abc1def2.sso.duosecurity.com/oauth/DIABC123678901234567/.well-known/oauth |
| Facebook Login | No Discovery URL — custom flow with OIDC-like behavior |
| Frontegg | https://[your-frontegg-subdomain].frontegg.com/.well-known/openid-configuration |
| Google Workspace | https://accounts.google.com/.well-known/openid-configuration |
| JumpCloud | https://oauth.id.jumpcloud.com/.well-known/openid-configuration |
| Keycloak | https://{host}/auth/realms/{realm}/.well-known/openid-configuration |
| LoginRadius | https://cloud-api.loginradius.com/sso/oidc/v2/{sitename}/{oidcappname}/.well-known/openid-configuration |
| Microsoft Entra (formerly Azure Active Directory) | https://login.microsoftonline.com/{tenant-id}/v2.0/.well-known/openid-configuration |
| Okta | https://{yourOktaDomain}/.well-known/openid-configuration |
| OneLogin | https://{yourDomain}.onelogin.com/oidc/2/.well-known/openid-configuration |
| Ping Identity | https://{env-id}.pingidentity.com/as/.well-known/openid-configuration |
| SecureAuth | https://.../secureauth1/.well-known/openid-configuration |
| WorkOS | https://.authkit.app/.well-known/openid-configuration |
Enable and configure SSO
An Identity Provider (IdP), such as Auth0, Cisco Duo, Microsoft Entra, Okta, PingOne, etc., is needed in order to enable SSO.
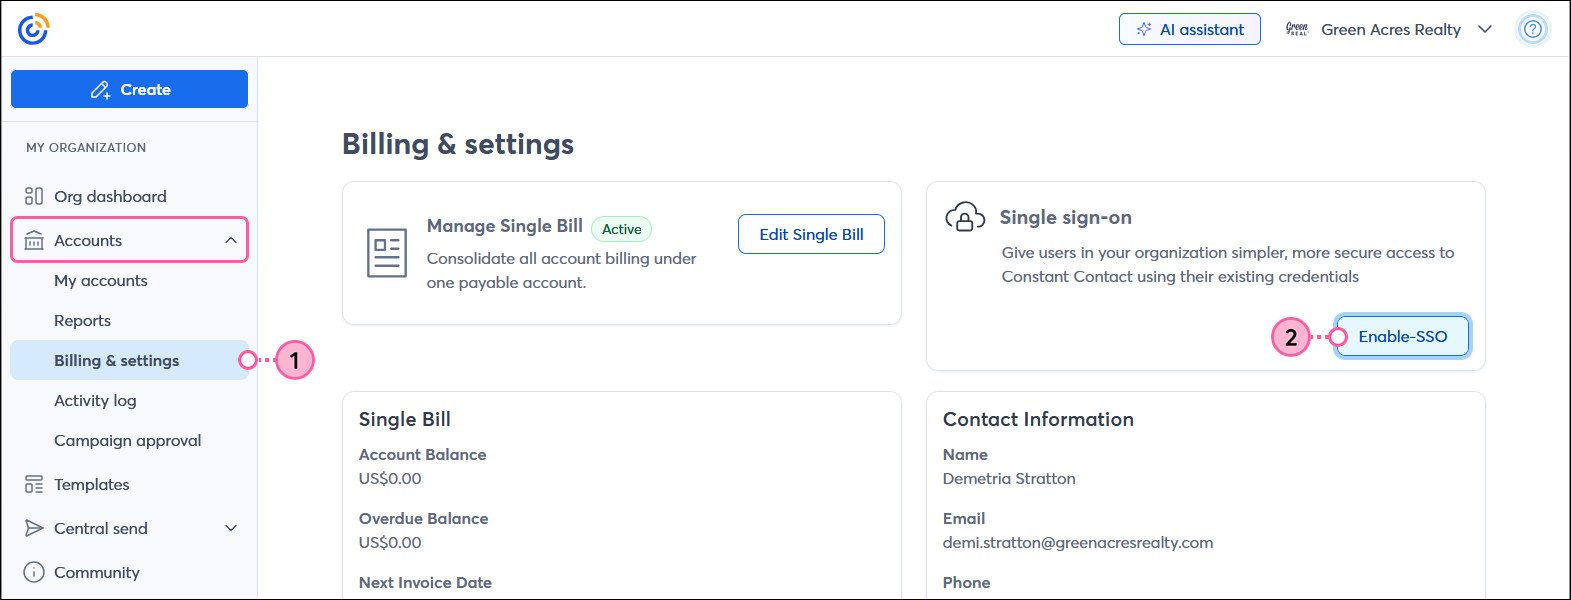
- In the "My Organization" section of the left-hand menu, click Accounts > Billing & settings.
- In the Single sign-on section, click the Enable SSO button.
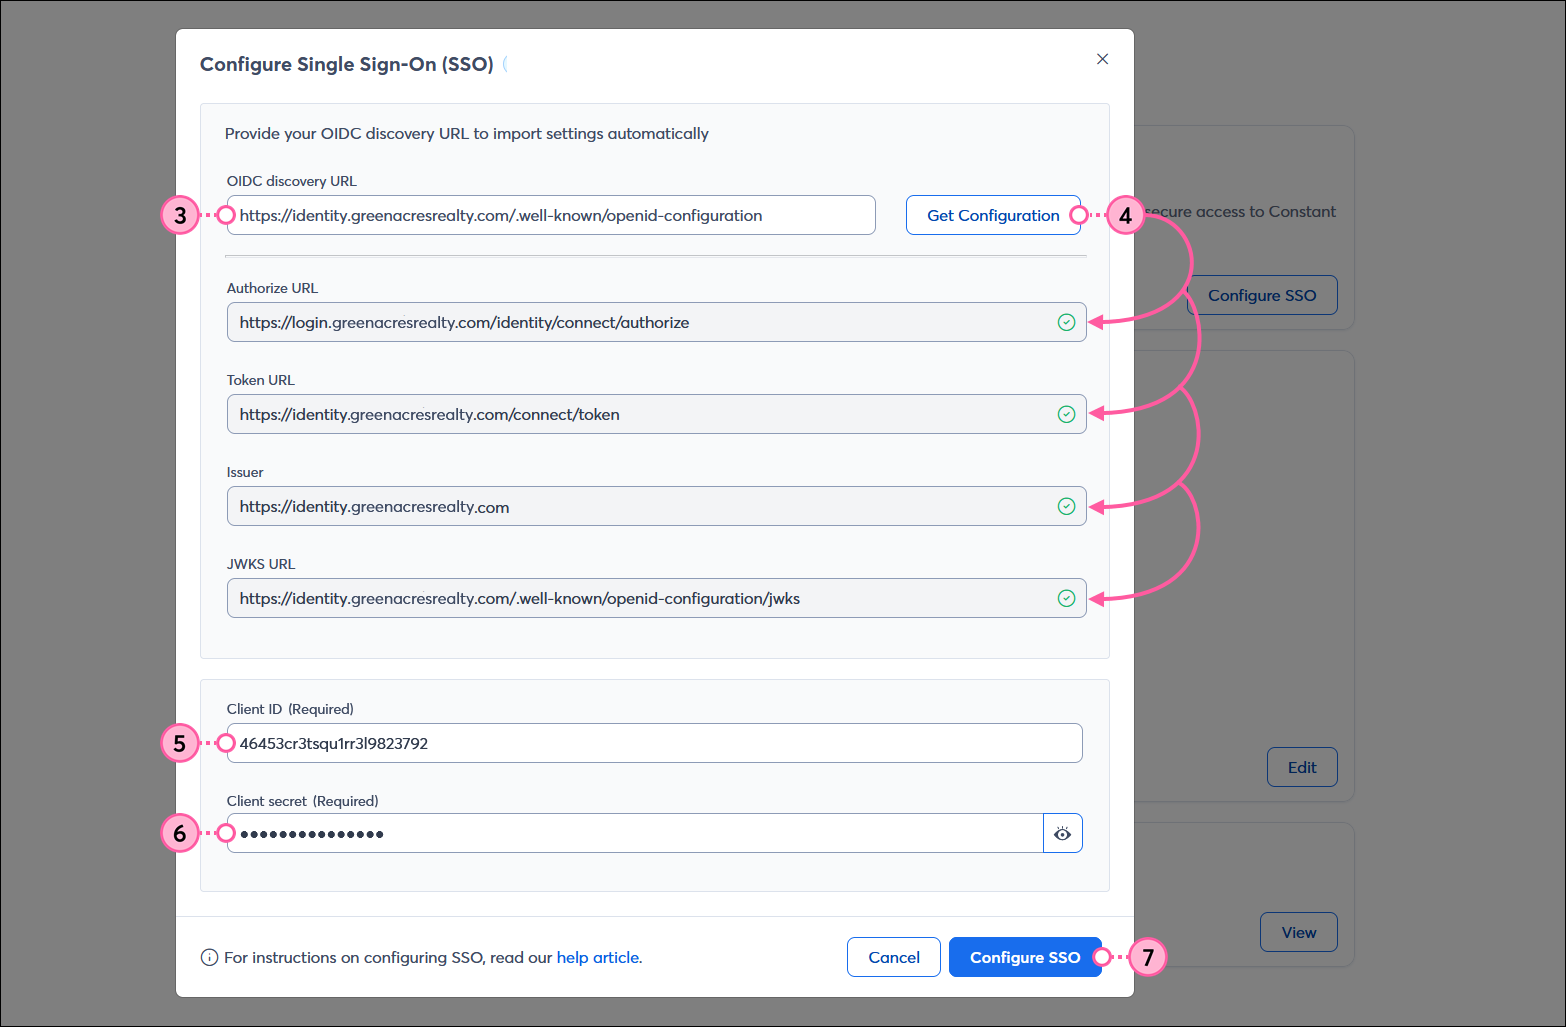
- In the Configure Single Sign-On (SSO) overlay, enter your OIDC discovery URL into the field. This URL is provided by your IdP. Users are redirected to this URL to begin the SSO process. (See the list of IdPs above to find your Authorize URL.)
- Click the Get Configuration button. Once the Authorize URL is added, the Authorize URL, Token URL, Issuer, and JWKS URL auto-populate for you.
- Enter your Client ID into the field. Your ID is issued by your IdP to identify your organization.
- Enter your Client secret into the field. This is a type of password that is shared with an authorized application, like Constant Contact, that proves to the IdP that it has permission to access the information for SSO.
- Click the Configure SSO button.
View, edit, or disable your SSO configuration
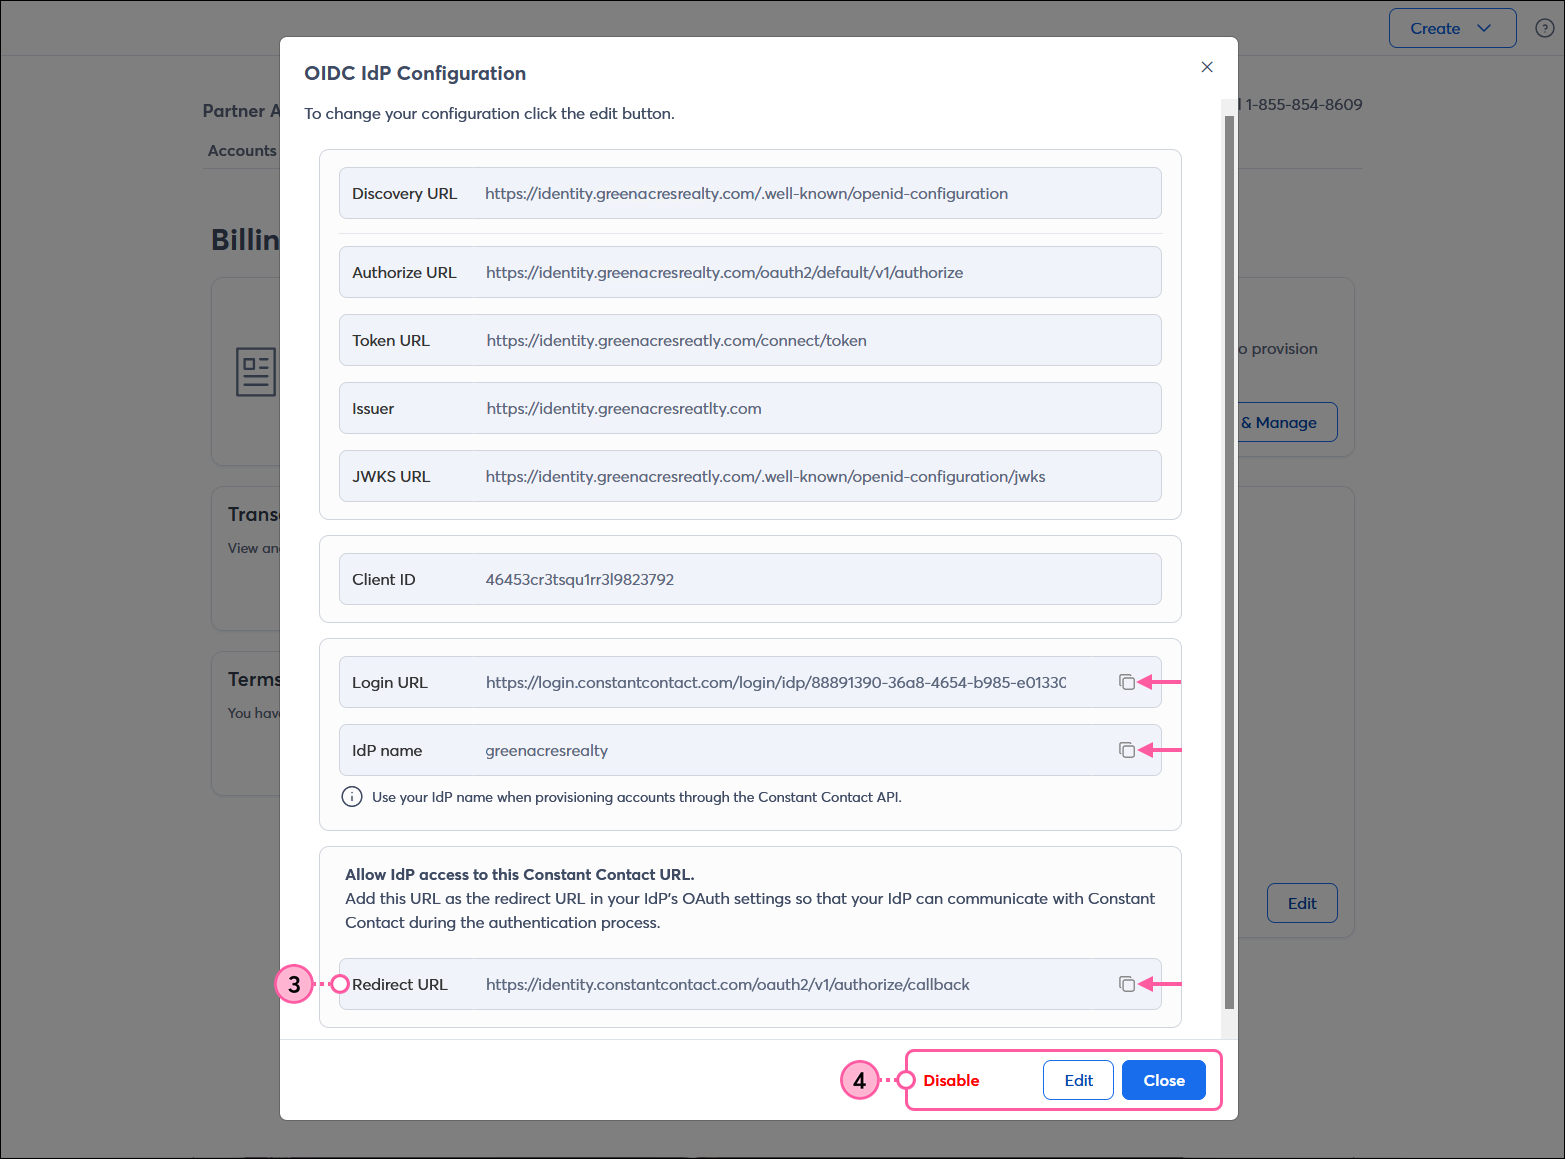
Once SSO is enabled for your Constant Contact account, you're able to edit your credentials if you switch to a different IdP or disable SSO if you want to stop using it. SSO can always be re-enabled later. In addition, if you need a redirect URL to add to your IdP, or need to copy your Login URL or IdP name, you can do that too.
- In the "My Organization" section of the left-hand menu, click Accounts > Billing & settings.
- In the Single sign-on section, click the View & Manage button.

- (Optional) Copy the Redirect URL to add it to your IdP's OAuth settings so that your IdP can communicate with Constant Contact during the authentication process. The need for a redirect URL depends on which authorization protocols your organization uses to verify the identity of another party.
- In the OIDC IdP Configuration overlay, click one of the following options:
- The Edit button - This lets you enter a new OIDC discovery URL. The Authorize URL, Token URL, Issuer, and JWKS URL update automatically based on the discovery URL.
- The Close button - This closes the OIDC IdP Configuration overlay without making any changes.
- The Disable option - This doesn't delete the OIDC IdP Configuration options, but it prevents SSO. You can always enable it again later and make changes if needed. You must type "confirm" into the field and then click the Disable SSO button to complete the action.
Add new users to your account
In order to add new users to your account, please reach out to Support to have this functionality enabled. Once enabled, take the following steps to add new users to your account:
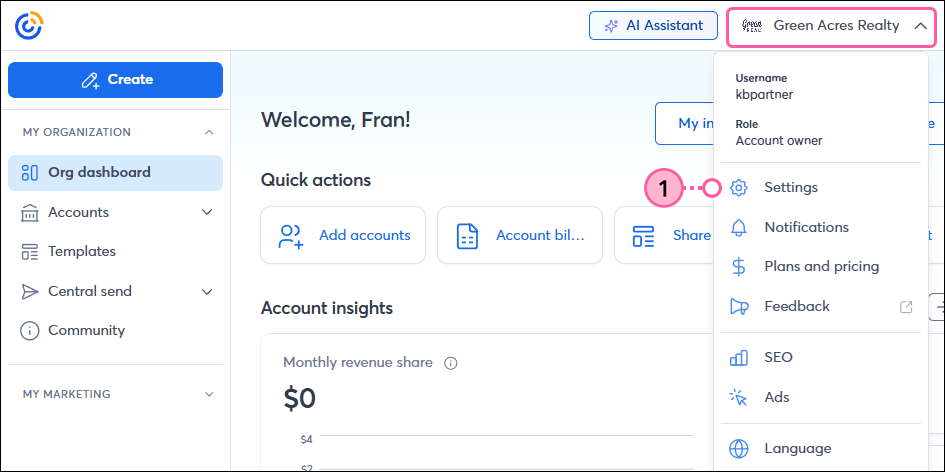
- Click the profile name in the upper-right and select Settings from the drop-down.
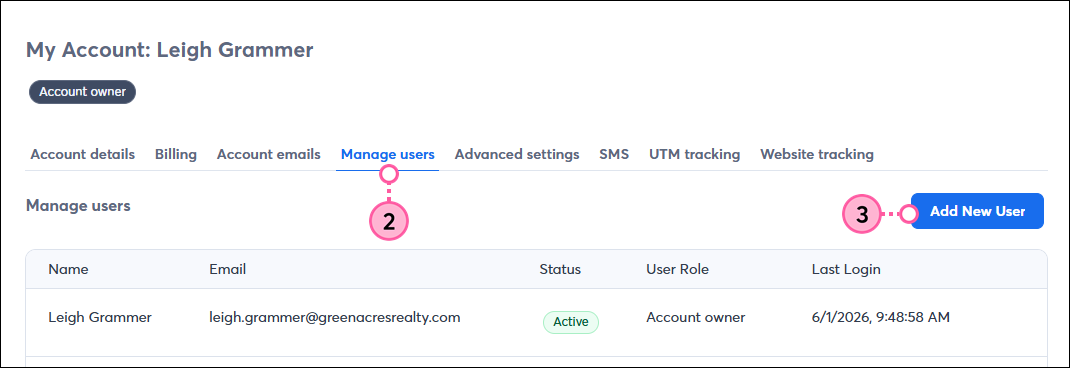
- Click the Manage Users tab.
- Click the Add New User button.
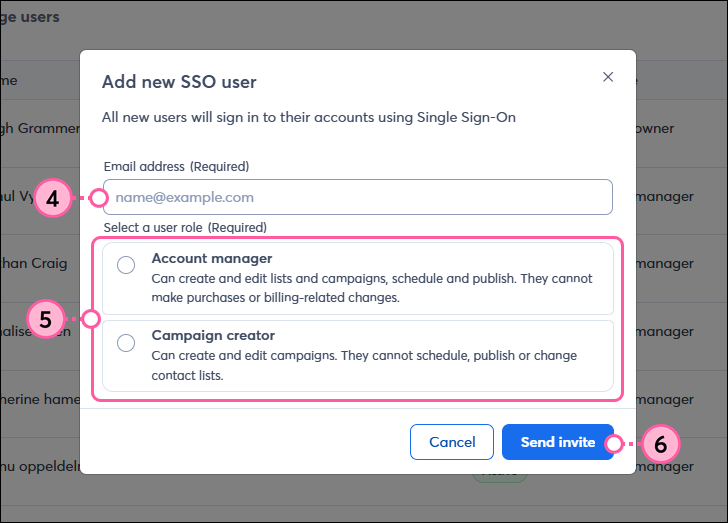
- Enter the email address for your new user.
- Select a user role:
- Account manager - Can create and edit lists and campaigns, and schedule and publish campaigns.
- Campaign creator - Can create and edit campaigns, but cannot schedule or publish campaigns or edit lists.
- Click Send invite.
- Click Got it.
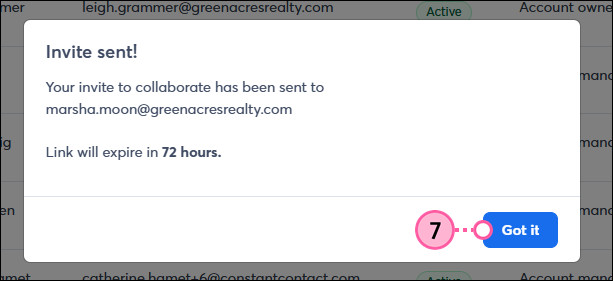
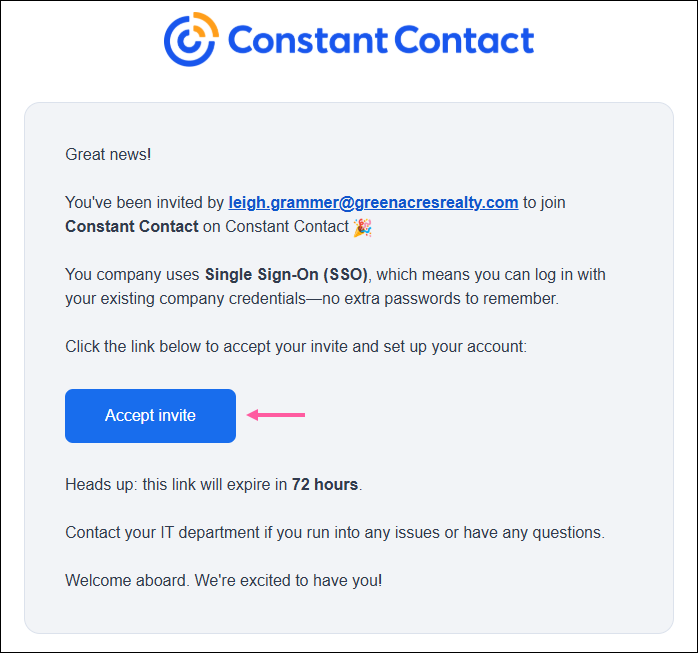
The user will receive an email allowing them to accept the invite and log into their account via SSO. The invite link expires after 72 hours.
Add subaccount owners via SSO
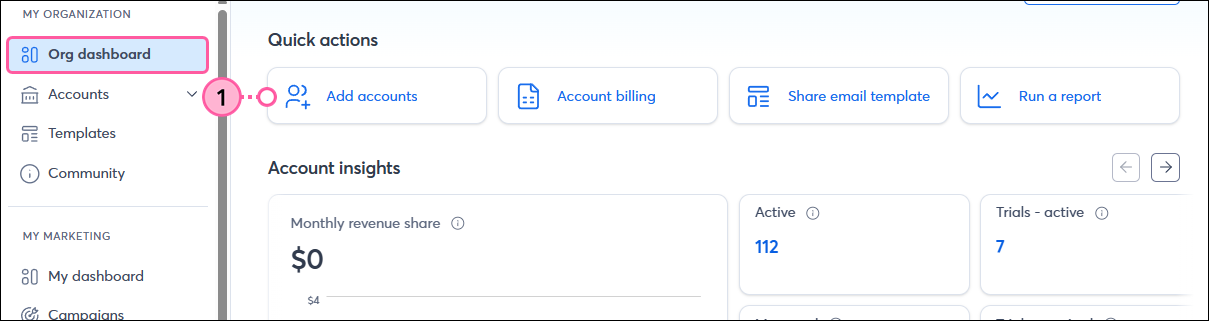
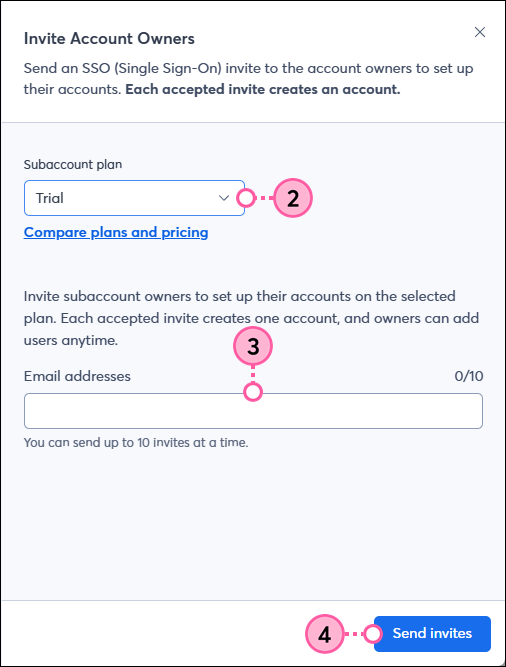
Send an SSO invite to the account owners to set up their accounts. Each accepted invite creates an account.
- In the "Quick Actions" section of the Org dashboard page, click Add accounts.
- Select a plan type from the dropdown.
- Enter up to 10 email addresses that you'd like to invite.
- Click Send invites.
View and manage your invites
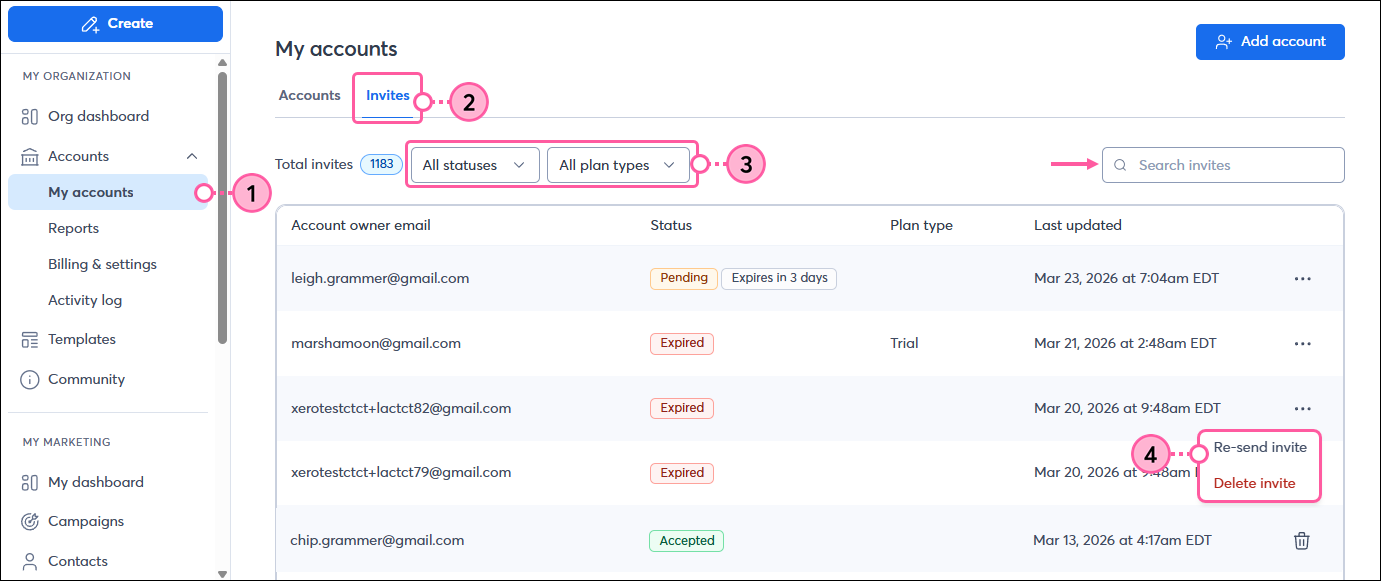
To see the status of your SSO invites and resend/delete an invite if needed:
- In the "My Organization" section of the left-hand menu, click Accounts > My accounts.
- Click the Invites tab.
- Optionally, filter by invite status and/or plan type. You can also search for a specific invite.
- To resend or delete an invite, click the three dots, then select Re-send invite or Delete invite.
Troubleshooting steps
When logging in via SSO, if you receive an error message such as "Sorry, we couldn't log you in" or "Sorry, we're having trouble logging you in," please take the following troubleshooting steps.
Note: The steps below are specific to Microsoft Entra/Azure. Steps may vary depending on the program you are using.
Enable Access Tokens
Our system requires Entra ID to pass an access token back to us to complete the SSO flow. To enable access tokens:
- In your Microsoft Entra admin center, navigate to App registrations and select your Constant Contact application.
- In the left menu, click Authentication.
- Scroll down to the Implicit grant and hybrid flows section.
- Ensure the box for Access tokens (used for implicit flows) is checked.
- Click Save.
Add the Email Claim to the Access Token
After enabling access tokens, add your email address to the token.
- In your App registrations menu, click on Token configuration on the left side.
- Click Add optional claim.
- Under Token type, select Access.
- From the list of claims, check the box next to email.
- Click Add.
Note: If a prompt appears asking to add the Microsoft Graph profile permission, please accept it and then click Add.
Any links we provide from non-Constant Contact sites or information about non-Constant Contact products or services are provided as a courtesy and should not be construed as an endorsement by Constant Contact.