Email and Digital Marketing
How can we help you?
Search our help articles, video tutorials, and quickstart guides

You've got this. You've got us. Search our Knowledge Base to quickly find answers to your questions.

Teams & Partners: Setting up Single Bill

Article: 000044215
Updated: August 18, 2026

Single Bill allows you to pay for multiple subaccounts/workspaces with one payment each month on a date of your choosing

Add People IconIn need of multiple accounts? Our multi-account solution is designed for organizations seeking unique accounts for their various locations, departments, or users. Take advantage of bulk pricing, product features for brand control, customized onboarding, and more!


Single Bill allows you to take over the responsibility of paying for multiple Constant Contact subaccounts/workspaces on their behalf. When you use Single Bill, you have the option to choose which subaccounts/workspaces you want to pay for using Single Bill and which you want to bill directly.


Exclamation Point IconImportant: Please note that since you are paying for Single Bill accounts, you’ll receive an upfront discount on accounts, in place of the normal revenue share percentage. It's important that you're actively monitoring your Single Bill balance to prevent large balances from occurring. Accounts enrolled in Single Bill aren't automatically cancelled when their balances are past due.


Set up Single Bill for the first time


When a subaccount/workspace is enrolled in Single Bill, it has its own specific billing/renewal date. On the billing date, it passes the bill to the Single Bill program without any transaction posting to its own direct-billing ledger. This means that it's not debited for services and does not retain a copy of the invoice. Costs are instead passed to the Partner/Teams account and accumulate until the selected invoice date for the Single Bill program, where they are settled as a single transaction, using the payment method provided by you, the Partner/Teams account.


To set up Single Bill, you’ll first need to log into your Partner/Teams Constant Contact account, and then enroll by following these steps:
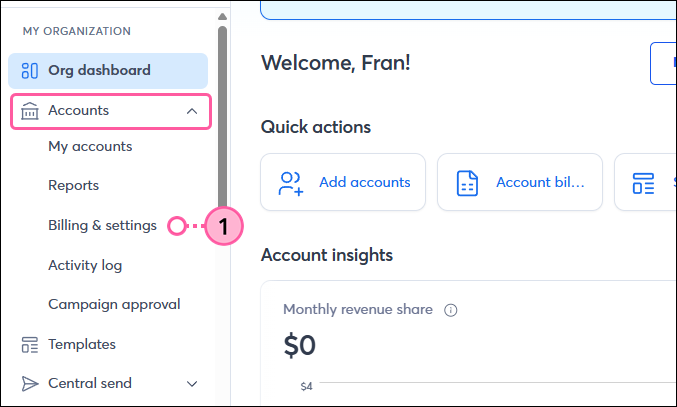
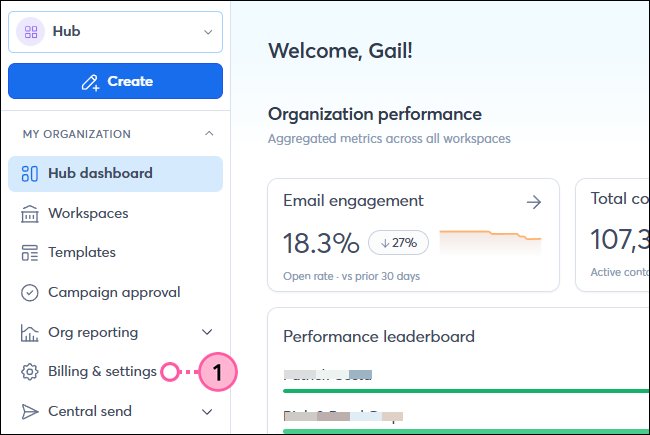
 

  1. If you are a:
    • Partner - In the "My Organization" section of the left-hand menu, click Accounts > Billing & settings.

      Partner account Left navigation menu Accounts dropdown Billing and settings option

    • Teams Account - In the "My Organization" section of the left-hand menu, click Billing & settings.

      Teams account left navigation Billing and settings option

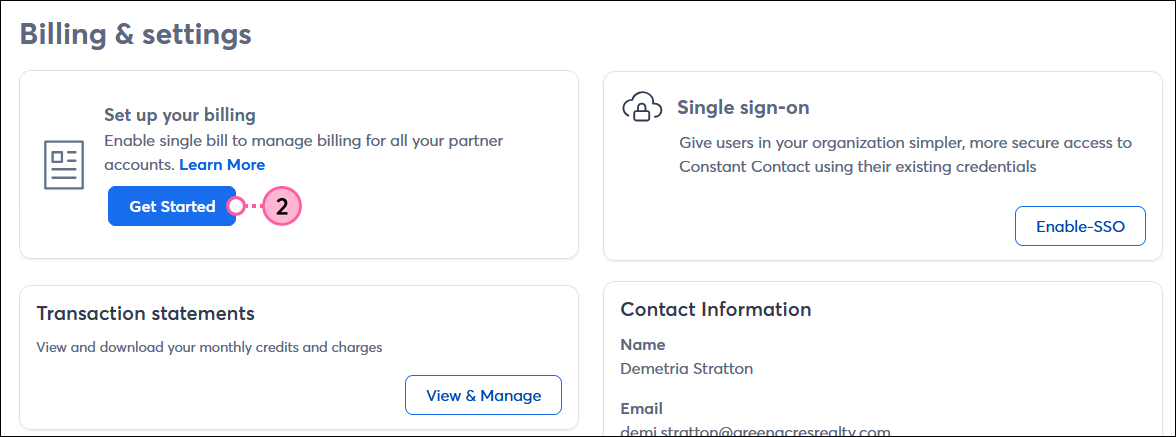
  2. In the Set up your billing section, click the Get Started button.

    Set up your billing section, and Get Started button 

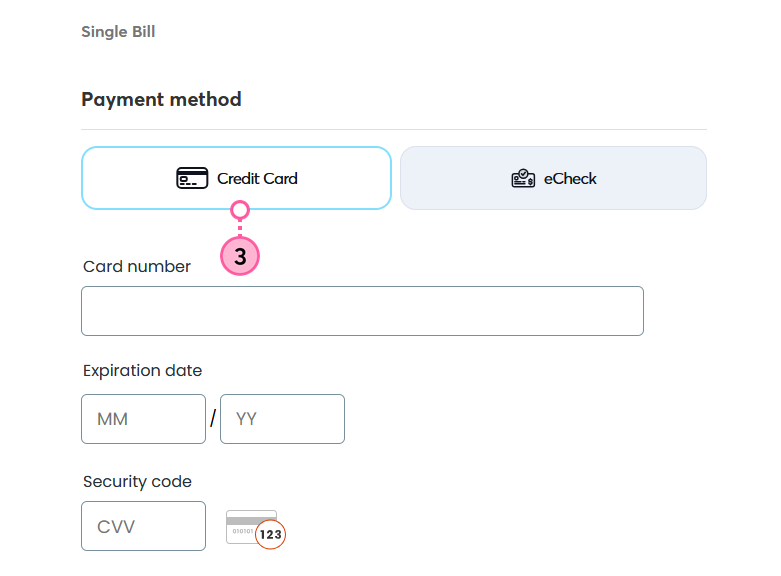
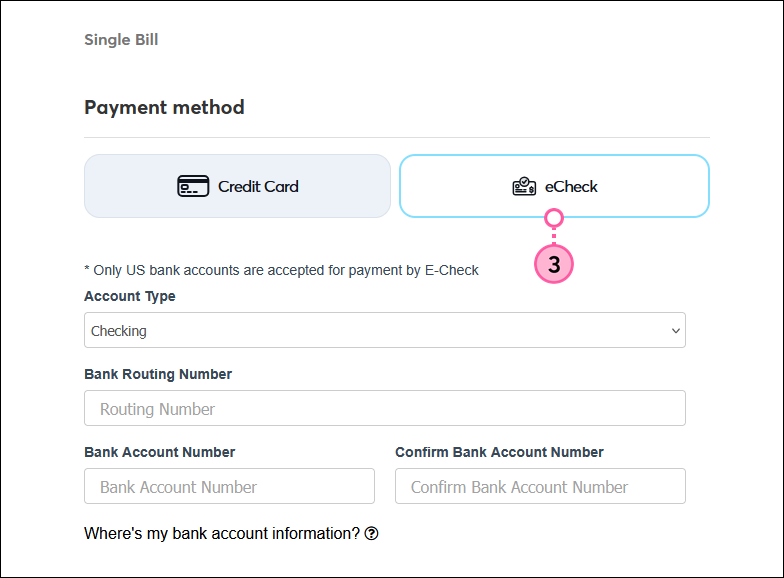
  3. Select a payment method. You can either set up your payment with a credit card, or with a checking or savings account:

    Credit CardChecking / Savings Account Information
    Single Bill page with Credit Card payment method selected and Card number field, Expiration date fields, and Security code fieldSingle Bill page with eCheck payment method selected, and Account Type field, Bank Routing Number and Account Number Fields


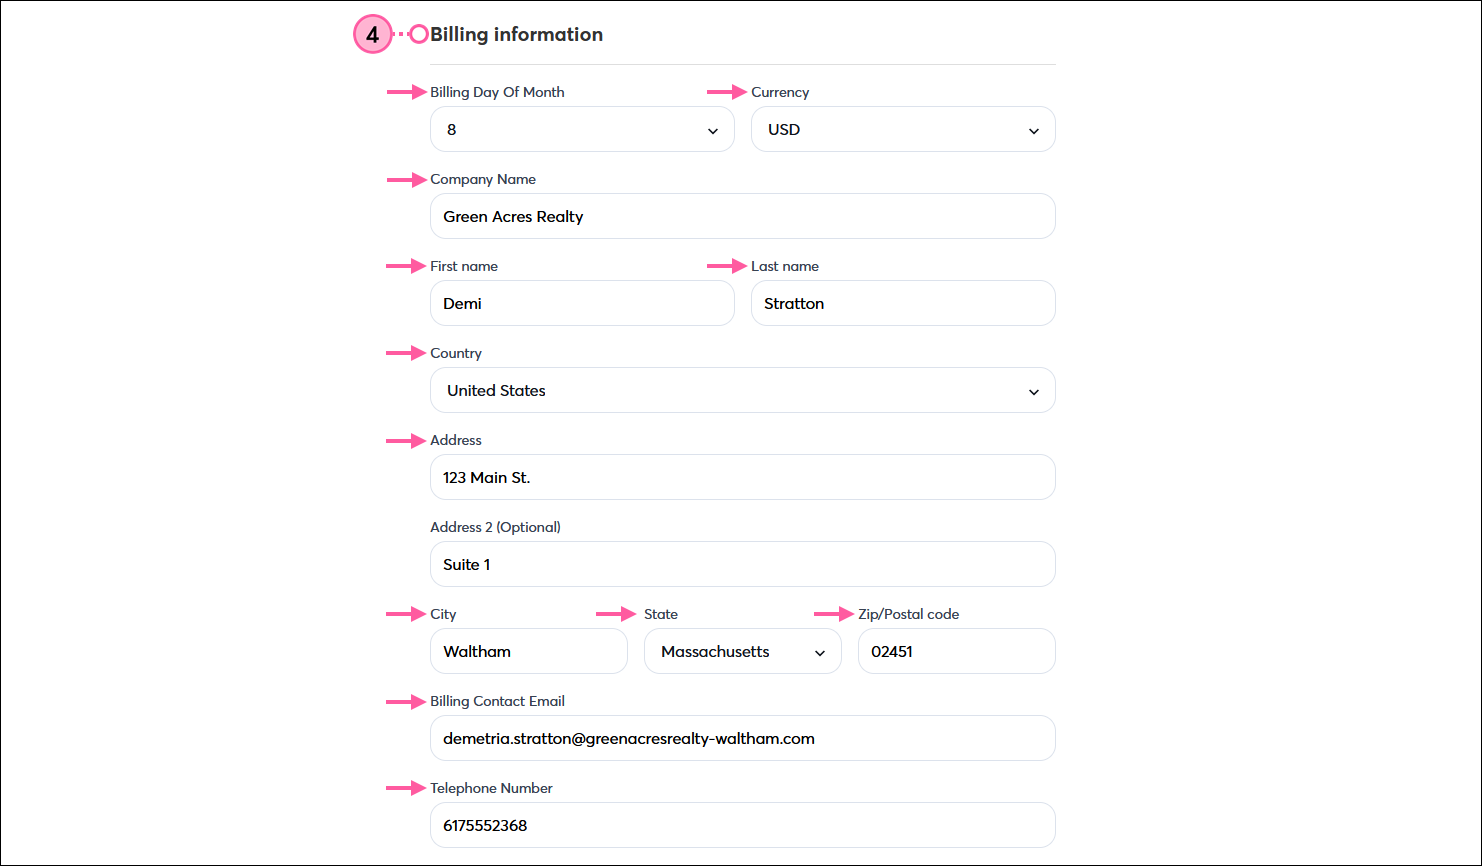
  4. Enter your company's Billing Information. Your Billing Contact can be different from the Account Owner.
    Note: Once the Billing Day of Month and Currency options are selected, they can't be changed. It takes 2-3 days from your bill date before the money is withdrawn from your bank account.

    Single Bill Billing information section with Billing Day of Month and Currency drop-down menus, Company Name field, First name and Last name fields, Country drop-down menu, Address fields, Billing Contact Email field, and Telephone Number field 

  5. In the Additional Information section, enter your Partner Contact information. This can be different from your your Billing Contact.
  6. Click the Create button when finished.

    Single Bill Additional Information section with Partner Contact Name field, Partner Contact Email field, and Create button

Once you have single billing set up, you can view, print, and/or save your single billing statements via the Billing & Settings tab.


Edit billing information later

Although you can't change your billing date, you can edit your payment method. There can only be one payment method on file at a time.
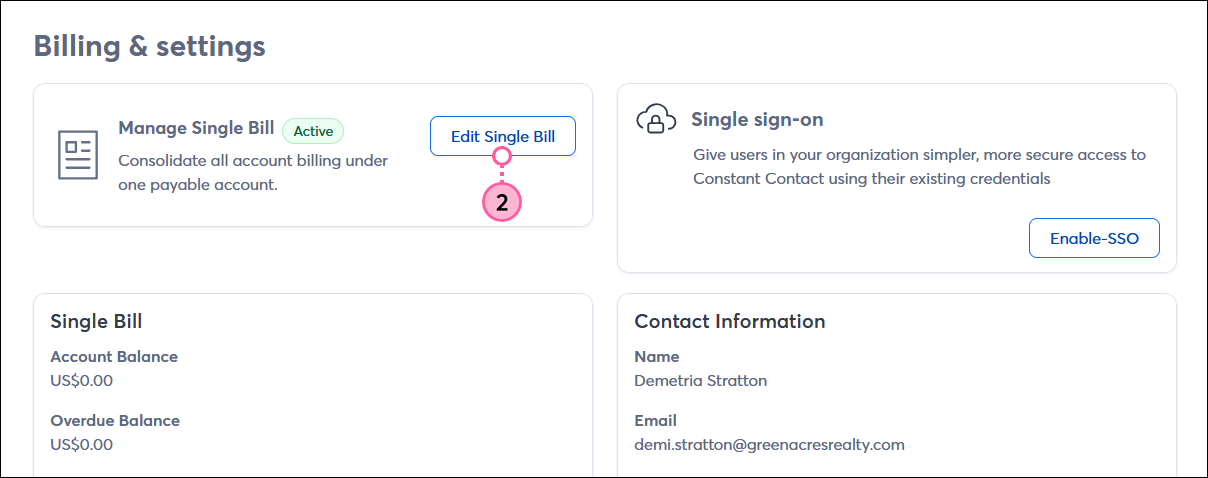
 

  1. If you are a:
    • Partner - In the "My Organization" section of the left-hand menu, click Accounts > Billing & settings.

      Partner account Left navigation menu Accounts dropdown Billing and settings option

    • Teams Account - In the "My Organization" section of the left-hand menu, click Billing & settings.

      Teams account left navigation Billing and settings option

  2. In the Edit Single Bill section, click the Edit Single Bill button.

    Manage Single Bill section with Edit Single Bill button  

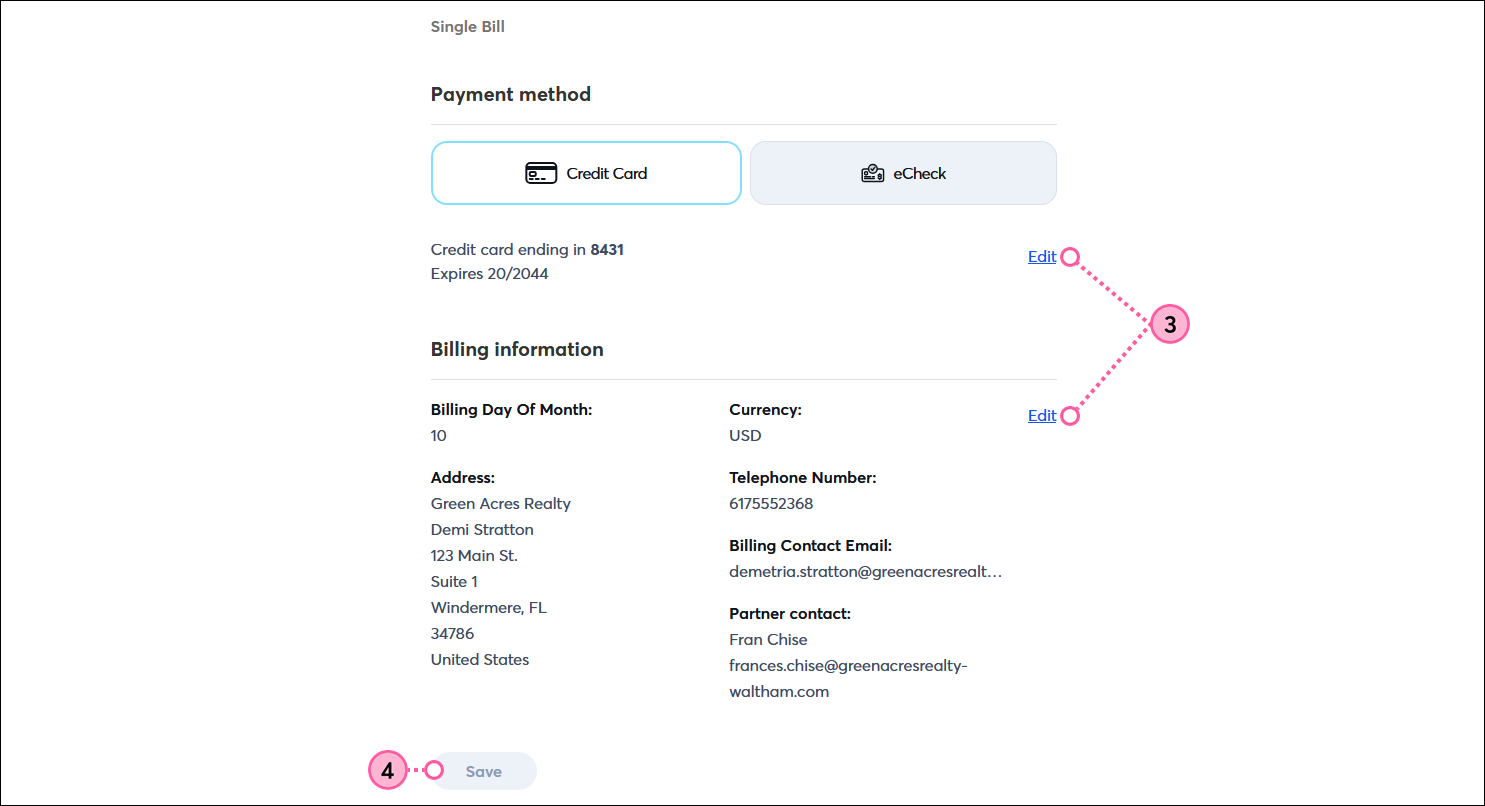
  3. Click "Edit" next to the Payment method or Billing information options (see steps 3 - 6 in section above).
  4. When finished, click the Save button.

    Single Bill page with Payment method section and Edit option, Billing information section with Edit option, and Save button


Add a subaccount/workspace to Single Bill


To add a subaccount/workspace to Single Bill:
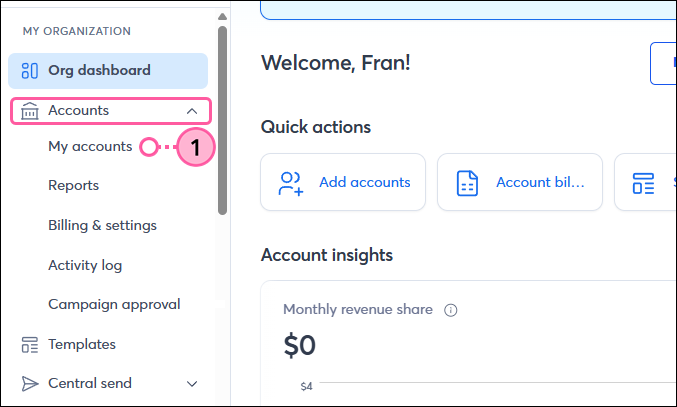
  1. If you are a:
    • Partner - In the "My organization" section of the left-hand menu, click Accounts > My accounts.

      Left-hand menu Accounts dropdown My Accounts

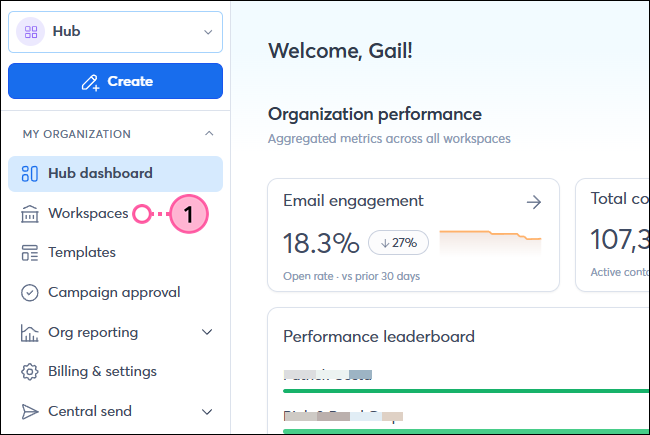
    • Teams account - In the "My organization" section of the left-hand menu, click Workspaces.

      Left-hand menu Workspaces option

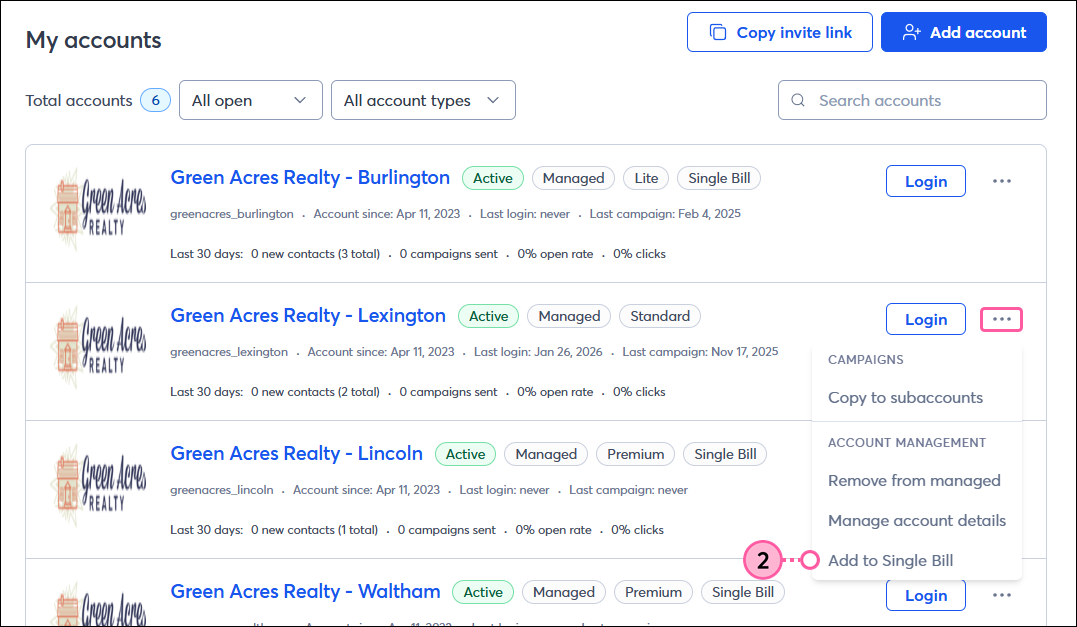
  2. To the right of the subaccount/workspace you'd like to add to Single Bill, click the three dots and then click Add to Single Bill.

    Account more dropdown Add to single bill option

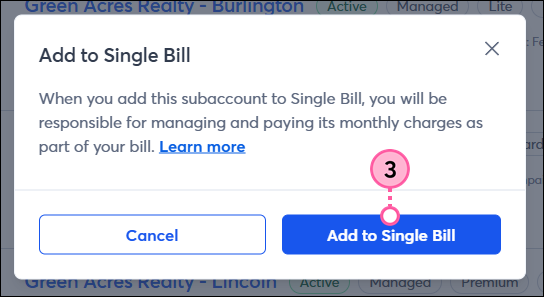
  3. Click Add to Single Bill within the confirmation message.

    Confirmation window Add to Single Bill button


Remove a subaccount/workspace from Single Bill


When you remove an account from Single Bill, the subaccount/workspace will be responsible for the cost of their account. 


To remove a subaccount/workspace from Single Bill:
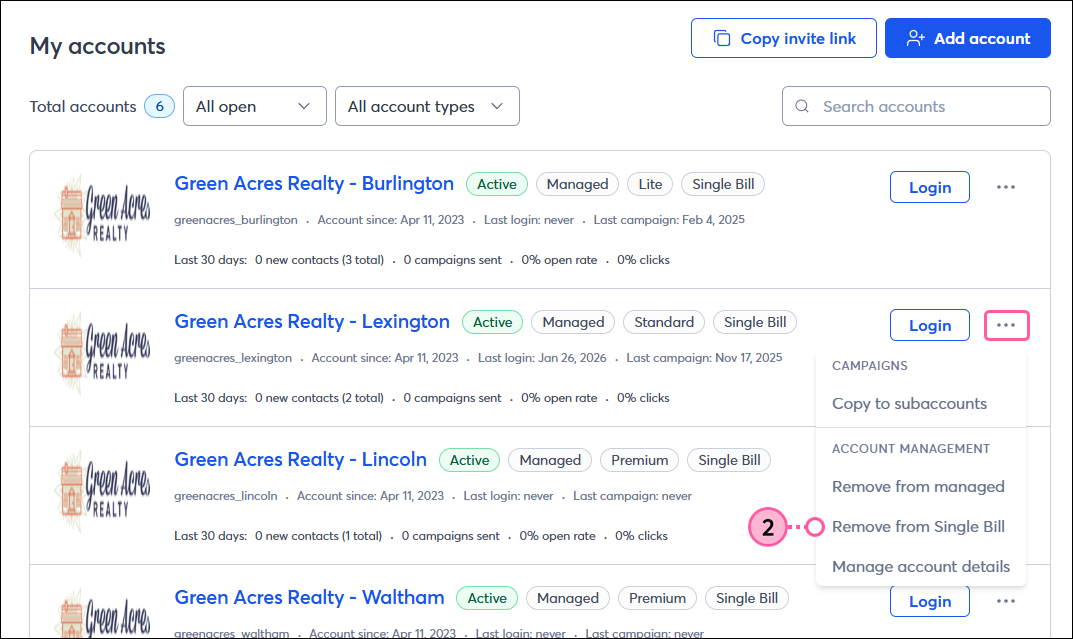
  1. If you are a:
    • Partner - In the "My organization" section of the left-hand menu, click Accounts > My accounts.

      Left-hand menu Accounts dropdown My Accounts

    • Teams account - In the "My organization" section of the left-hand menu, click Workspaces.

      Left-hand menu Workspaces option

  2. To the right of the subaccount/workspace you'd like to remove from Single Bill, click the three dots and then click Remove from Single Bill.

    Account more dropdown Remove from Single Bill option

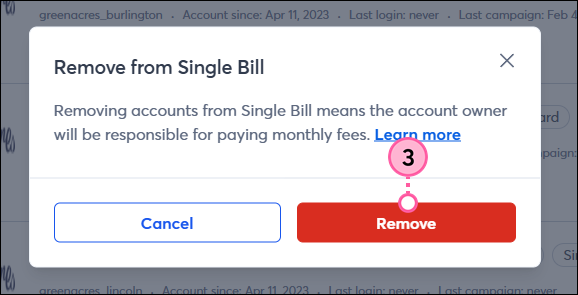
  3. Click Remove from Single Bill within the confirmation message.

    Confirmation Window Remove from Single Bill button


Once removed, the subaccount/workspace should make sure to update their billing information in order to pay for their account. Additionally, ensure the subaccount/workspace information is updated to the correct account owner. If the subaccount/workspace is managed, this can be done by clicking the three dots and then clicking Manage account details.


Questions?

Ask the Community

Did this article answer your question?


Constant Contact Logo

Copyright © 2026 · All Rights Reserved · Constant Contact · Privacy Center