Lead Gen & CRM
How can we help you?
Search our help articles, video tutorials, and quickstart guides

You've got this. You've got us. Search our Knowledge Base to quickly find answers to your questions.

Creating Time-Based Automations

Article: 000050485
Updated: July 16, 2024

Time-based action groups can be used to create automated events that are centered around a certain date and time. This article will provide an overview on how to create time-based automations, including an example situation of how to utilize time-based action groups in tandem with forms and emails to create a larger workflow for an event. 


Article Contents


Users:
Administrators 
Company Managers 
Marketing Managers 
Sales Managers  
Salespersons  
Jr. Salespersons  


Tying Automations Together

Consider the following: You have a webinar that you are hosting on 1 July. To generate interest for the webinar, you will need to send out webinar emails with forms. These forms, in turn, will need to have a way to register information to send reminder emails before the event and thank you emails after the event.

Automated tasks are a valuable asset. After initial preparation and setup, automated tasks can quickly and efficiently handle this information and go about registering interested parties for the webinar.


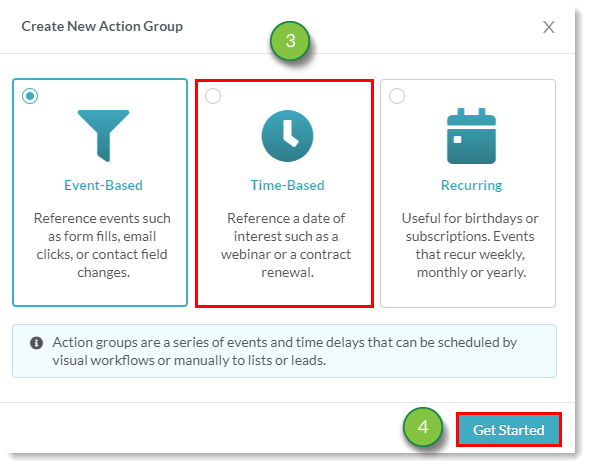
Note: Standard action groups are available on the Trial and the Essential plan. Standard, Time-Based, and Recurring action groups are available on the Advanced and Ultimate plans.


Creating a Custom Field

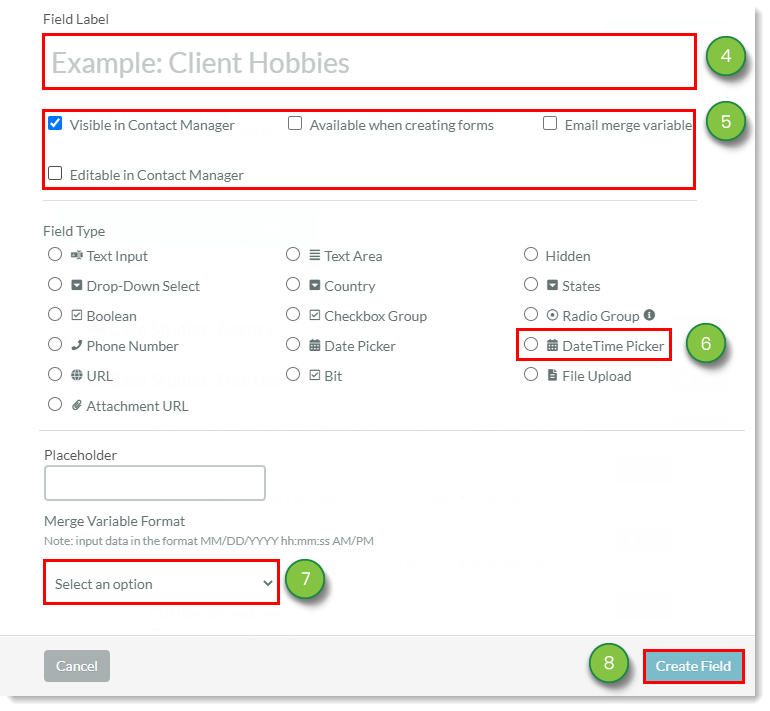
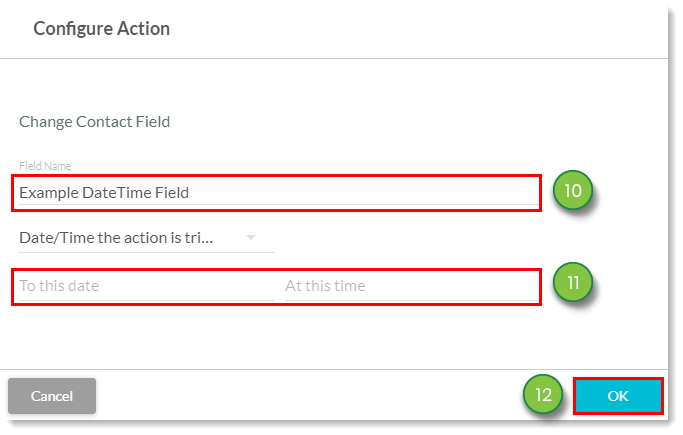
Automations require specific information to correctly fire. Often, automations require specific information. This information can be gathered with default fields, or through more customized means. As the name implies, custom fields allow you to create a field that captures custom information for more specialized use. One of the more important custom fields is the DateTime Picker field. The DateTime Picker field allows you to have users pick a desired date and time from available options. This field is especially useful when setting up future events, and these events are predicated on the DateTime Picker field.

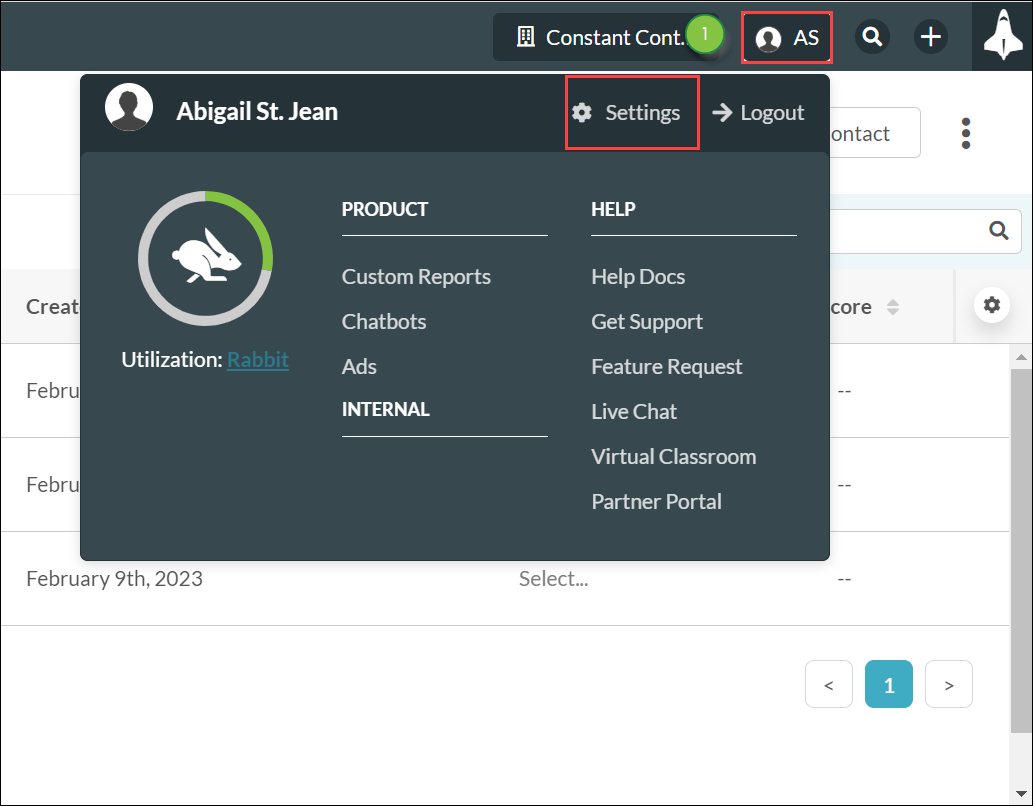
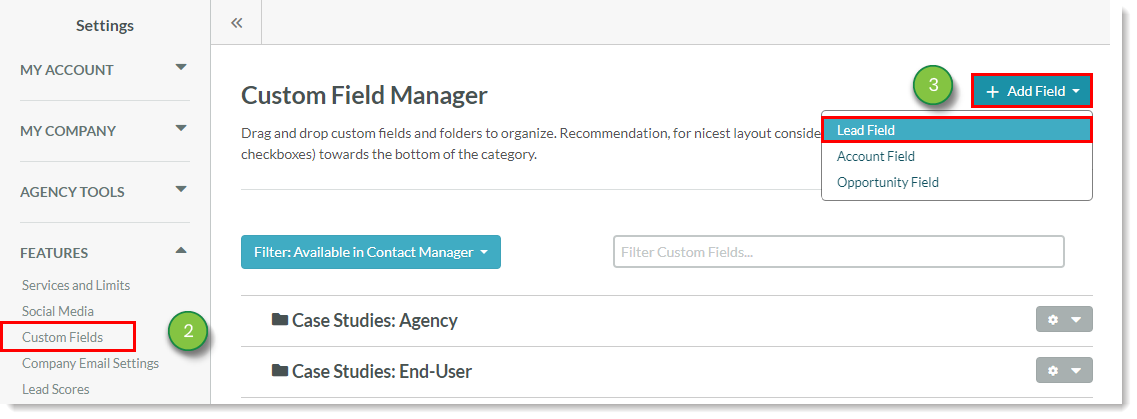
To create a custom DateTime Picker field, do the following:

  1. Click  12personas.png  User Menu > Settings in the top toolbar.

    Setting option in the top navigation
     
  2. Click Custom Fields, located under Features in the left panel.
  3. Click Add Field > Lead Field.

    Choosing Add field in the custom field manager


  4. Enter a name for the field in the Field Label text box.
  5. Click all of the checkboxes under the Field Label text box.
  6. Click the DateTime Picker radio button.
  7. Select the desired time format in the Merge Variable Format drop-down menu.
  8. Click Create Field.

    Custom field options


Creating a Form for Action Groups

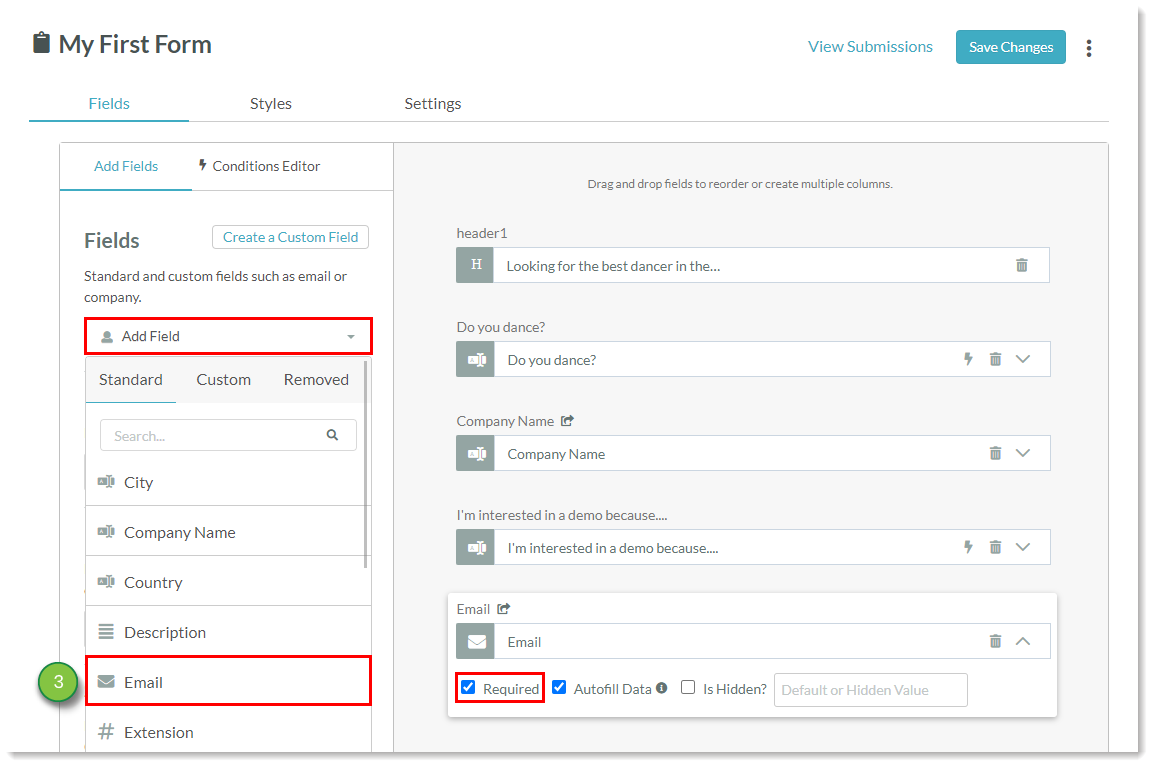
Forms take the field information a lead submits and attach that information to the lead’s Contact Record. Used in conjunction with forms, time-based automation can perform tasks before or after a lead interacts with a form.

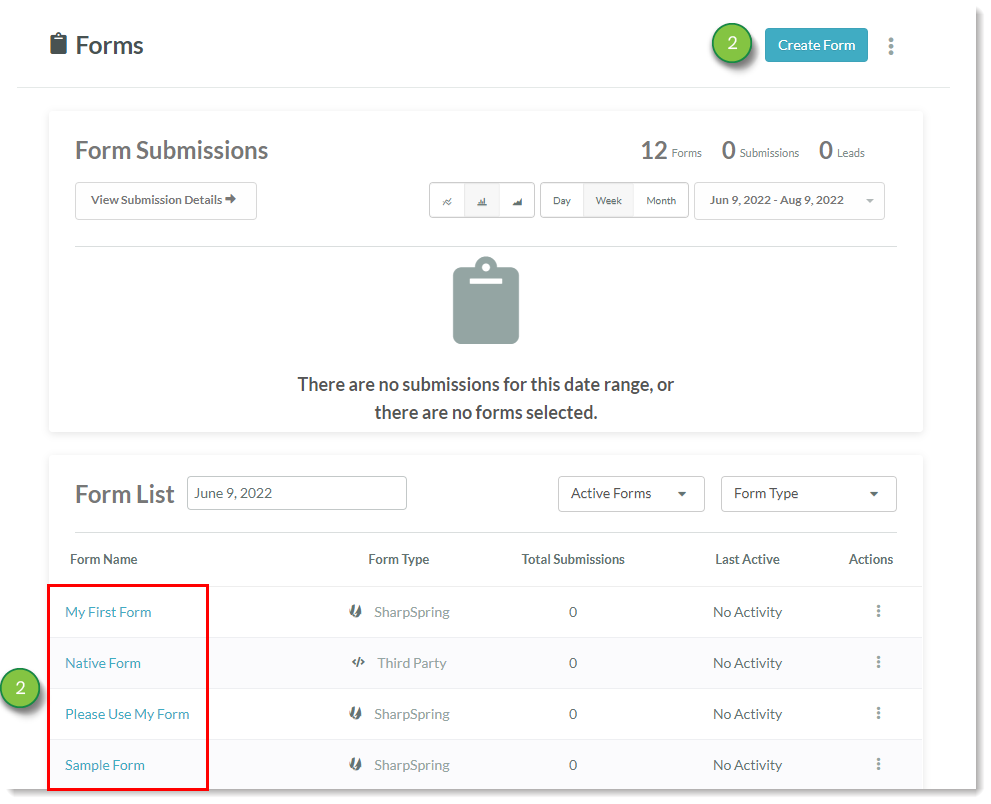
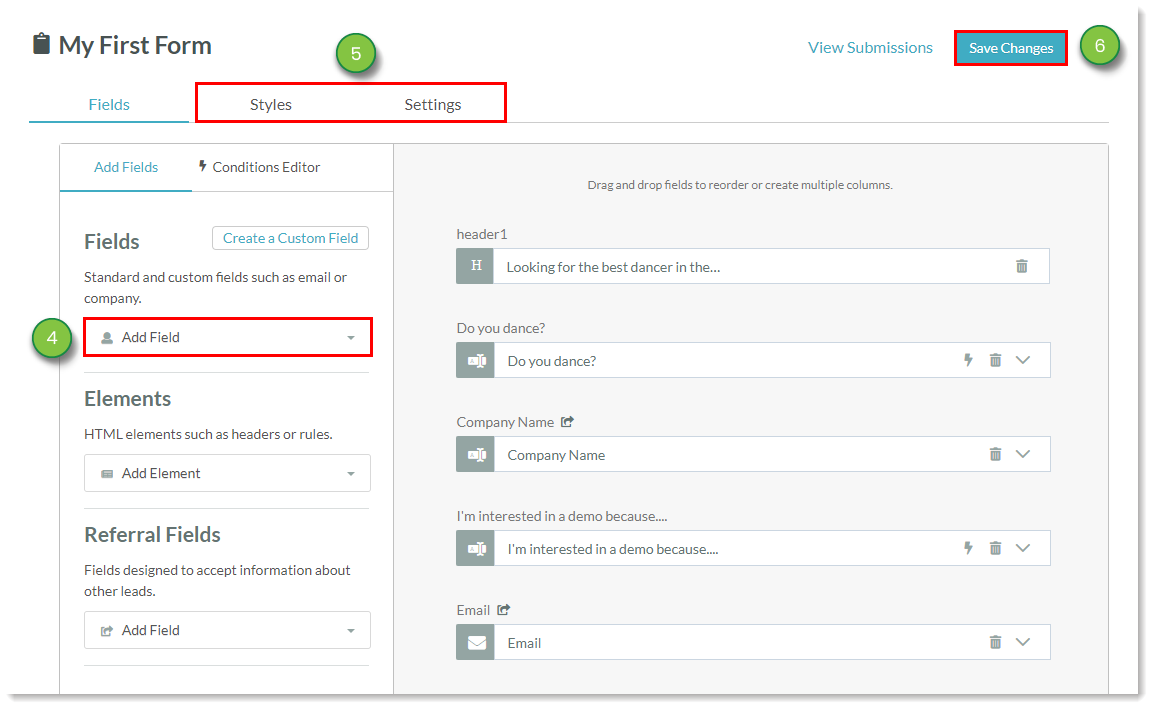
To create a form for use with time-based automation, do the following:

  1. Click Forms in the left toolbar.
  2. Create or edit a form.

    Create or edit a form


  3. Click the Add Field dropdown and insert the required Email field.

    Adding a required email field


  4. Add optional fields as desired.
  5. Modify form parameters, dynamic content, and design as desired.
  6. Click Save Changes.

    Making changes in the form editor


Creating a Landing Page for the Form

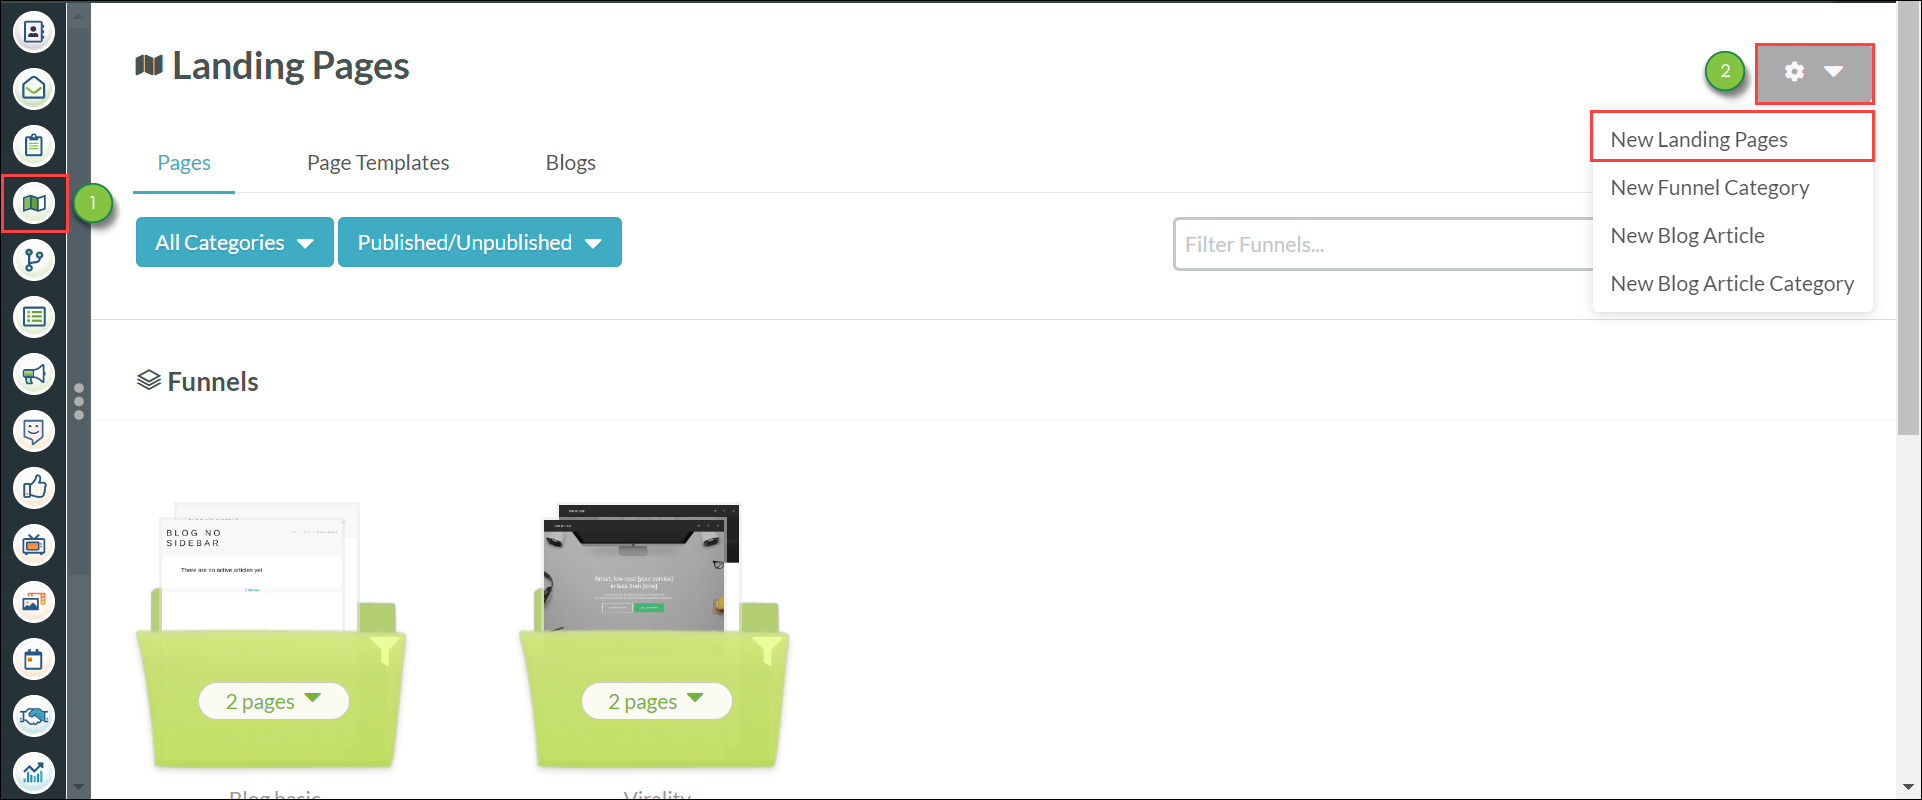
To set this automation into motion, a lead will need to fill out a form. Forms are housed in landing pages.

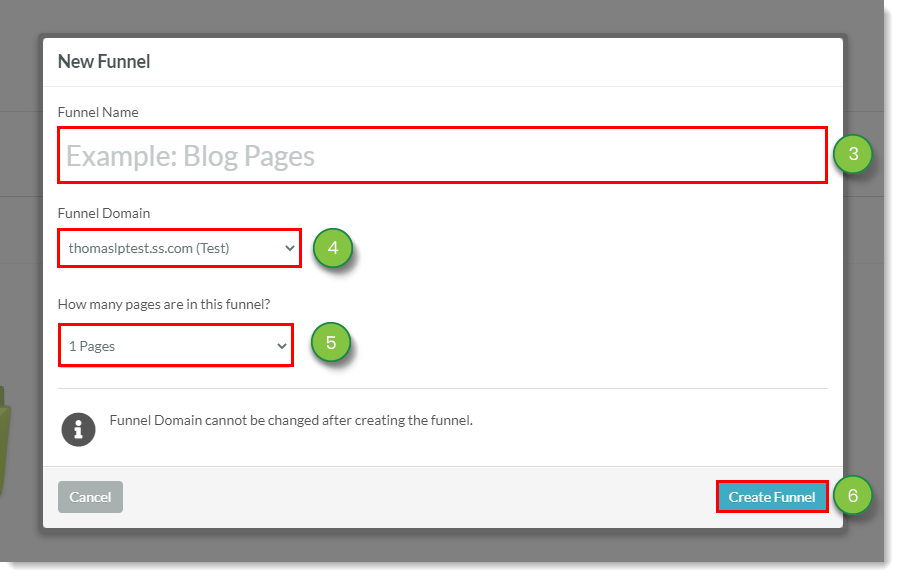
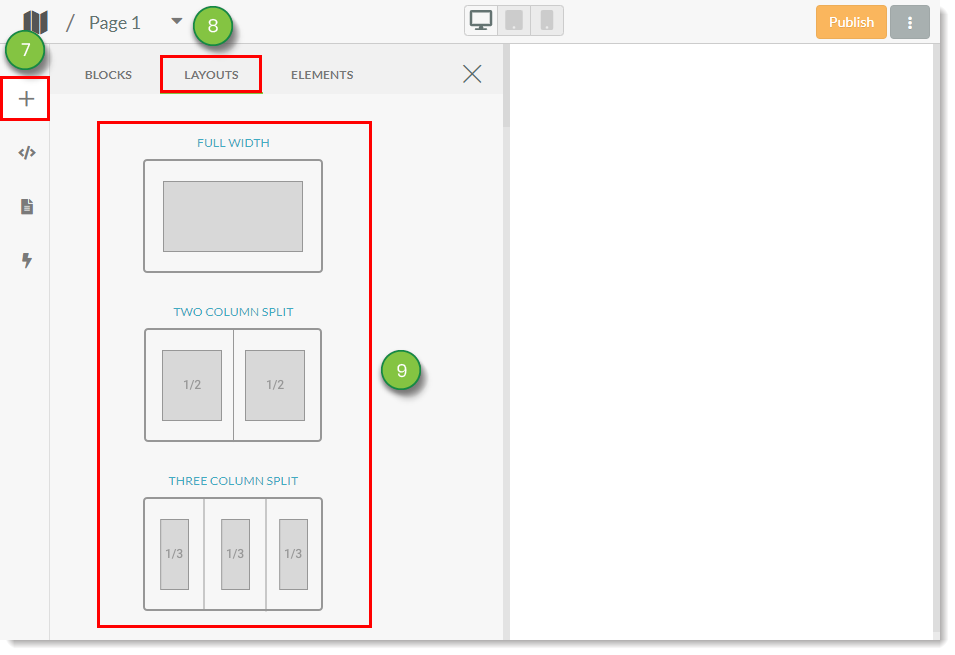
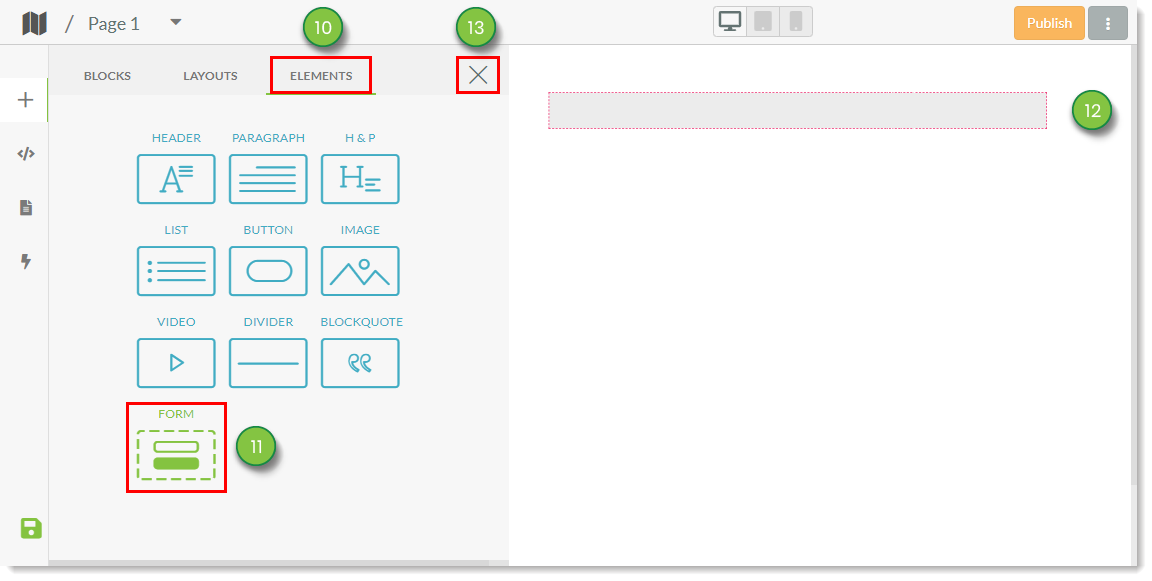
To create a landing page for a form, do the following:

  1. Click Landing Pages in the left toolbar.
  2. Click  cog.png  Options > New Landing Pages.

    Landing page and new landing page selected


  3. Enter a funnel name.
  4. Select a funnel domain.
    • Important: The funnel domain cannot be changed after the landing page has been created
  5. Select the number of pages in the funnel.
  6. Click Create Funnel.Landing page options
  7. Click  plus2.png  Add Content.
  8. Click the Layouts tab.
  9. Select the desired layout.

    Add the layout to the landing page
  10. Click the Elements tab.
  11. Click Form.
  12. Click the purple box in the section where the form will go in the landing page editor.
  13. Click  12close.png  Close in the Add Content panel.

    Add the form block to the layout


  14. Click the added form block.

  15. Select the created form in the Select a Form drop-down menu.

  16. Click Publish.

    Choose the created form then publish


Creating Emails for Automation

Creating Reminder Emails

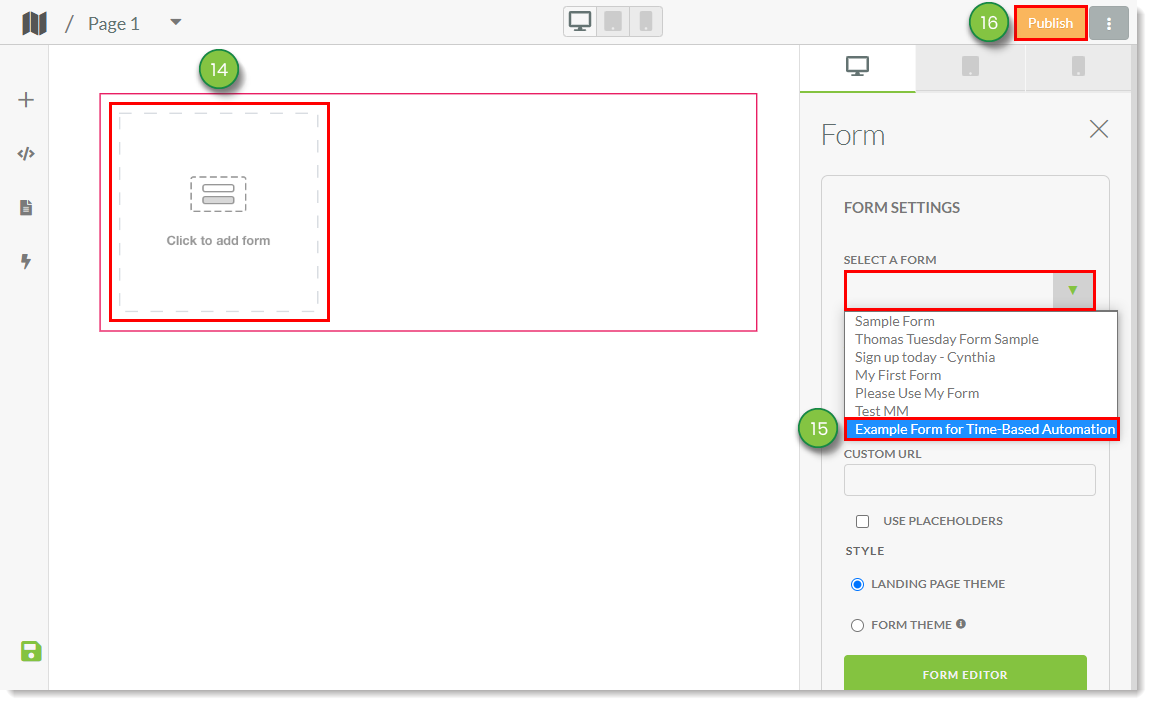
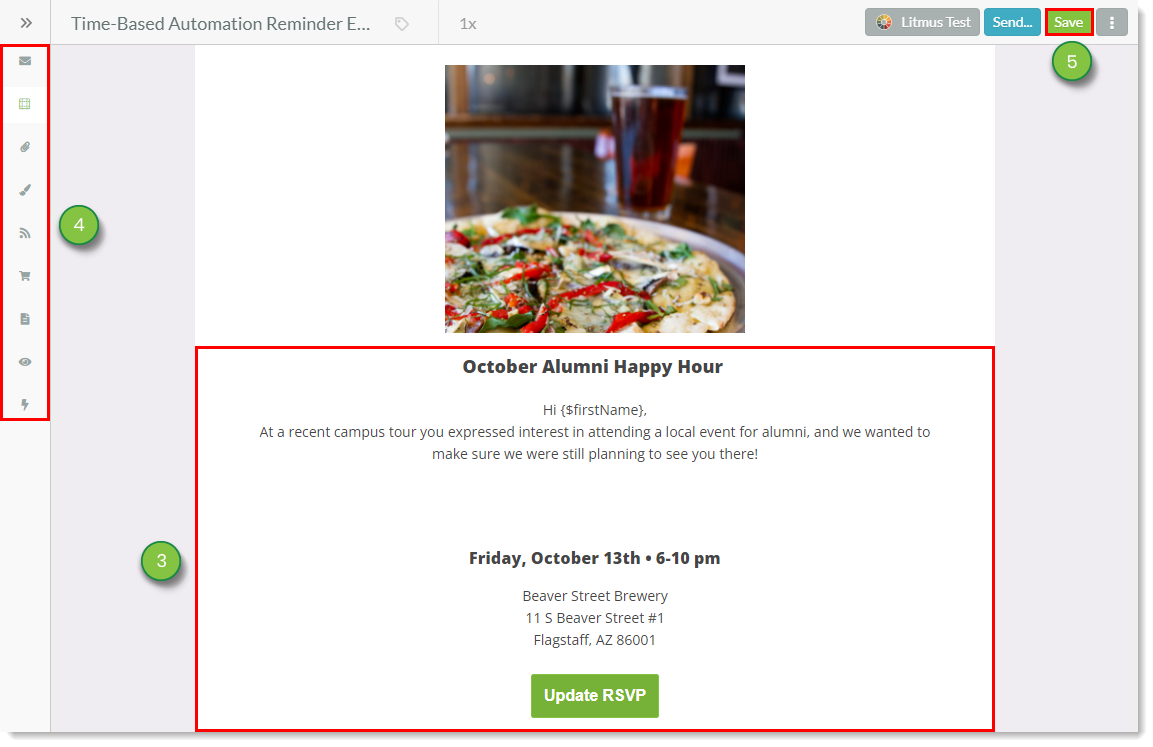
When creating a future event, you may want to remind attendees some time before the event occurs. These reminders most often take the shape of reminder emails, which are sent out in advance of an event to remind attendees of the event, as well as providing information and relevant communication and attendance web links.

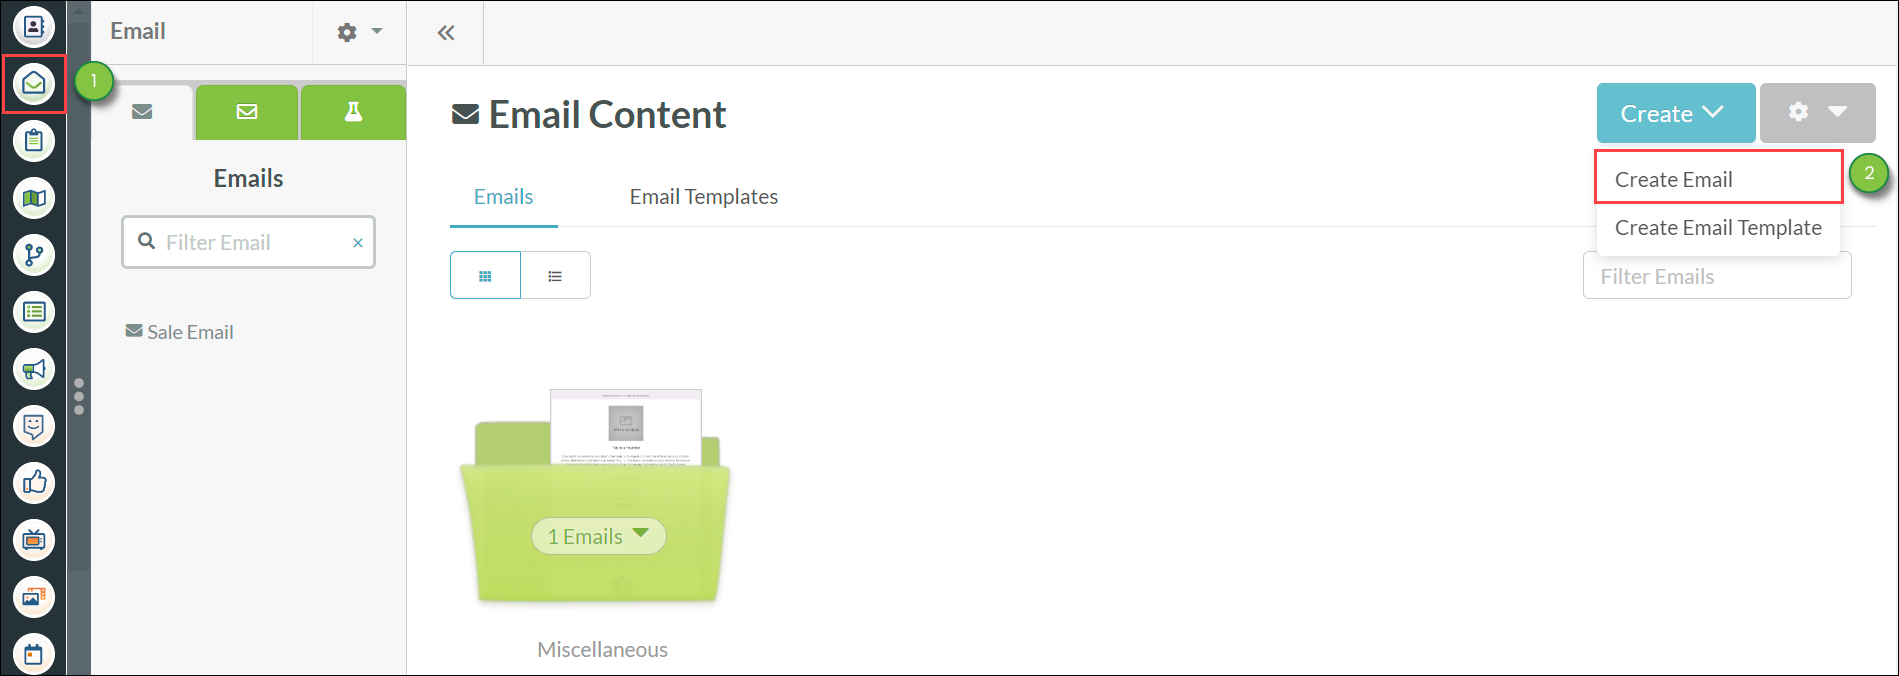
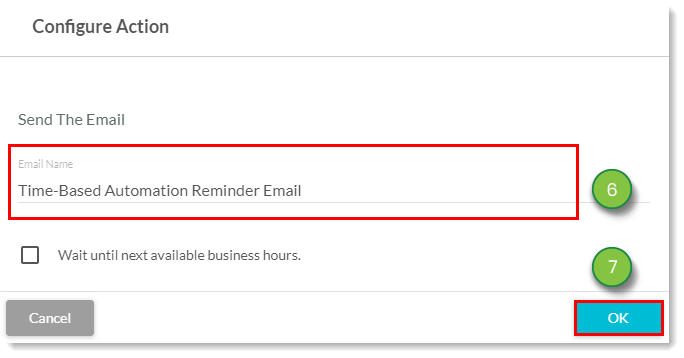
To create a reminder email, do the following:

  1. Click Emails in the left toolbar.
  2. Create or edit an email.

    Email page from the left navigation


  3. Add the following recommended content:
    • A statement on how the user previously signed up for the event
    • Details on what the event is about
    • When the event is taking place
    • Web links to the event
  4. Modify the email’s parameters, dynamic content, and design as desired.
  5. Click Save.

    Creating a reminder email in the email editor


Creating Thank You Emails

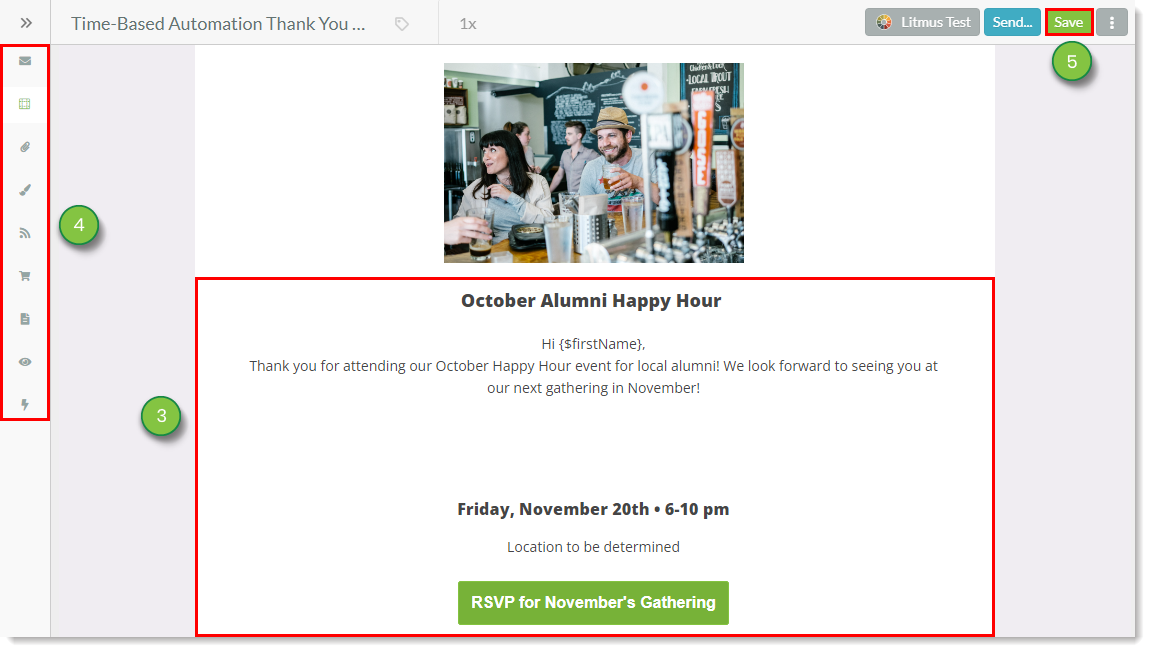
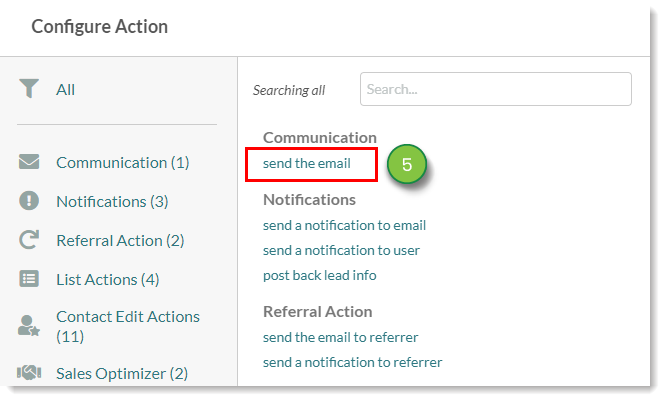
It is considered good business practice to re-engage with event attendees after an event ends to let them know that you are thankful for their attendance. This outreach can be done through an automated email.

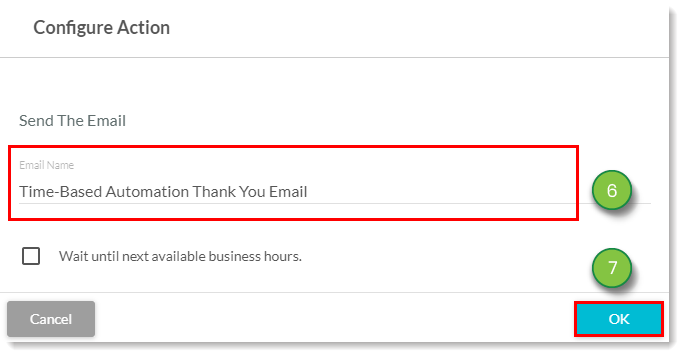
To create an email that thanks those who attended your event, do the following:

  1. Click Emails in the left toolbar.
  2. Create or edit an email.

    Email page from the left navigation


  3. Add the following recommended content:
    • A statement of thanks for attending the event
    • A recap on what the event was about
    • Web links to relevant websites, videos, or other content of the event
    • References or web links to future events
  4. Modify the email’s parameters, dynamic content, and design as desired.
  5. Click Save.

    Creating a Thank you email in the email editor


Creating a Time-Based Action Group for Reminders and Thank You Email Automation

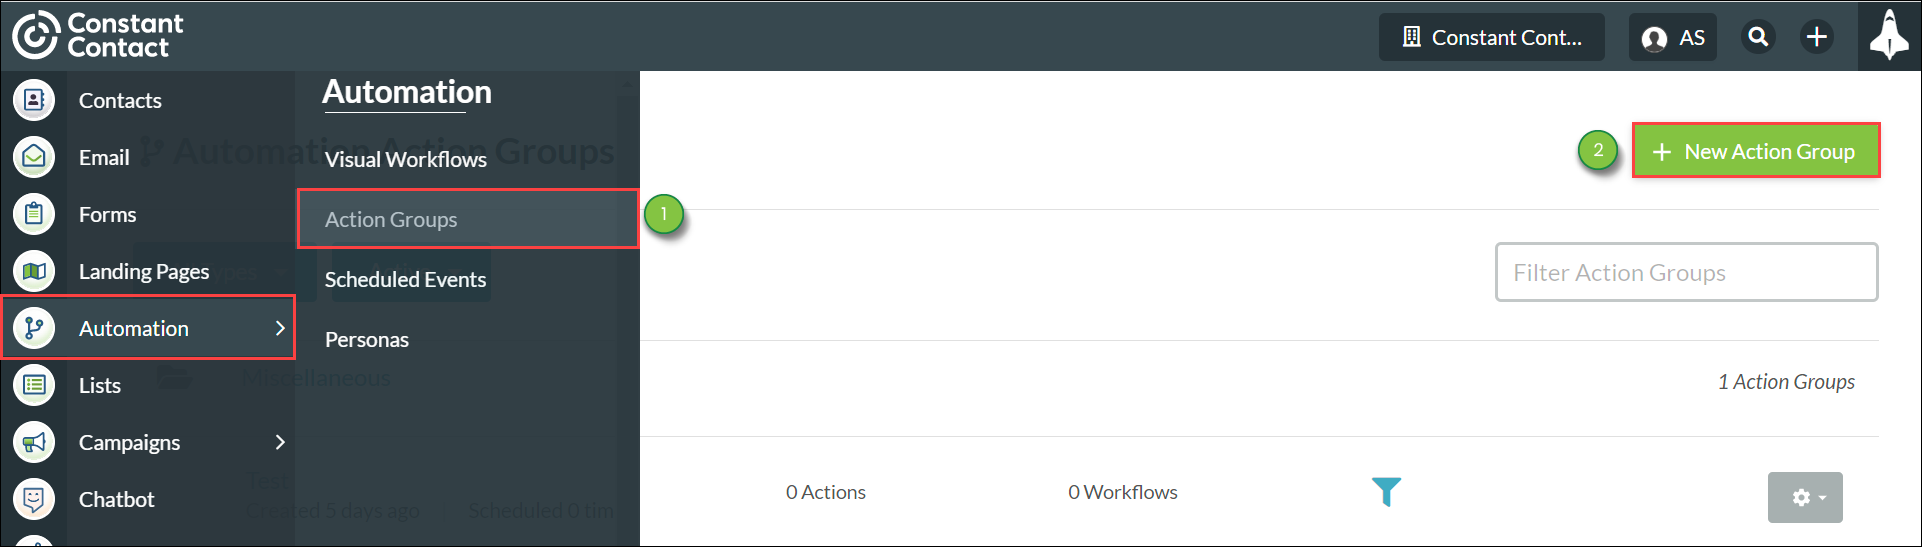
Sending automated content requires date and time parameters. This way, automated content can be sent at specific times before or after a fixed date.

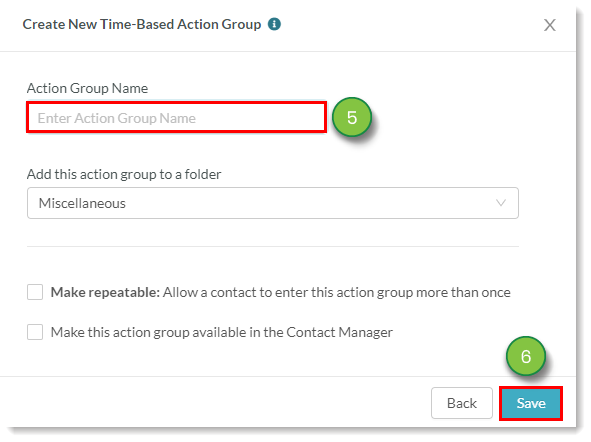
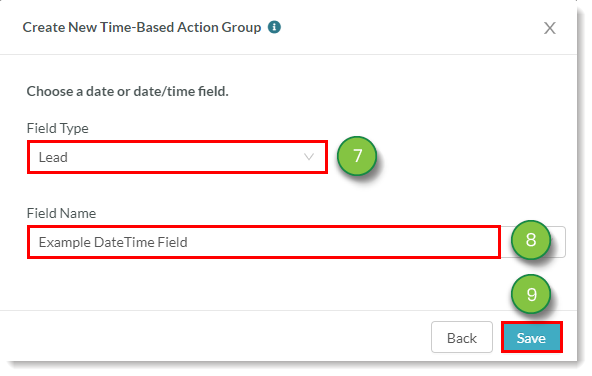
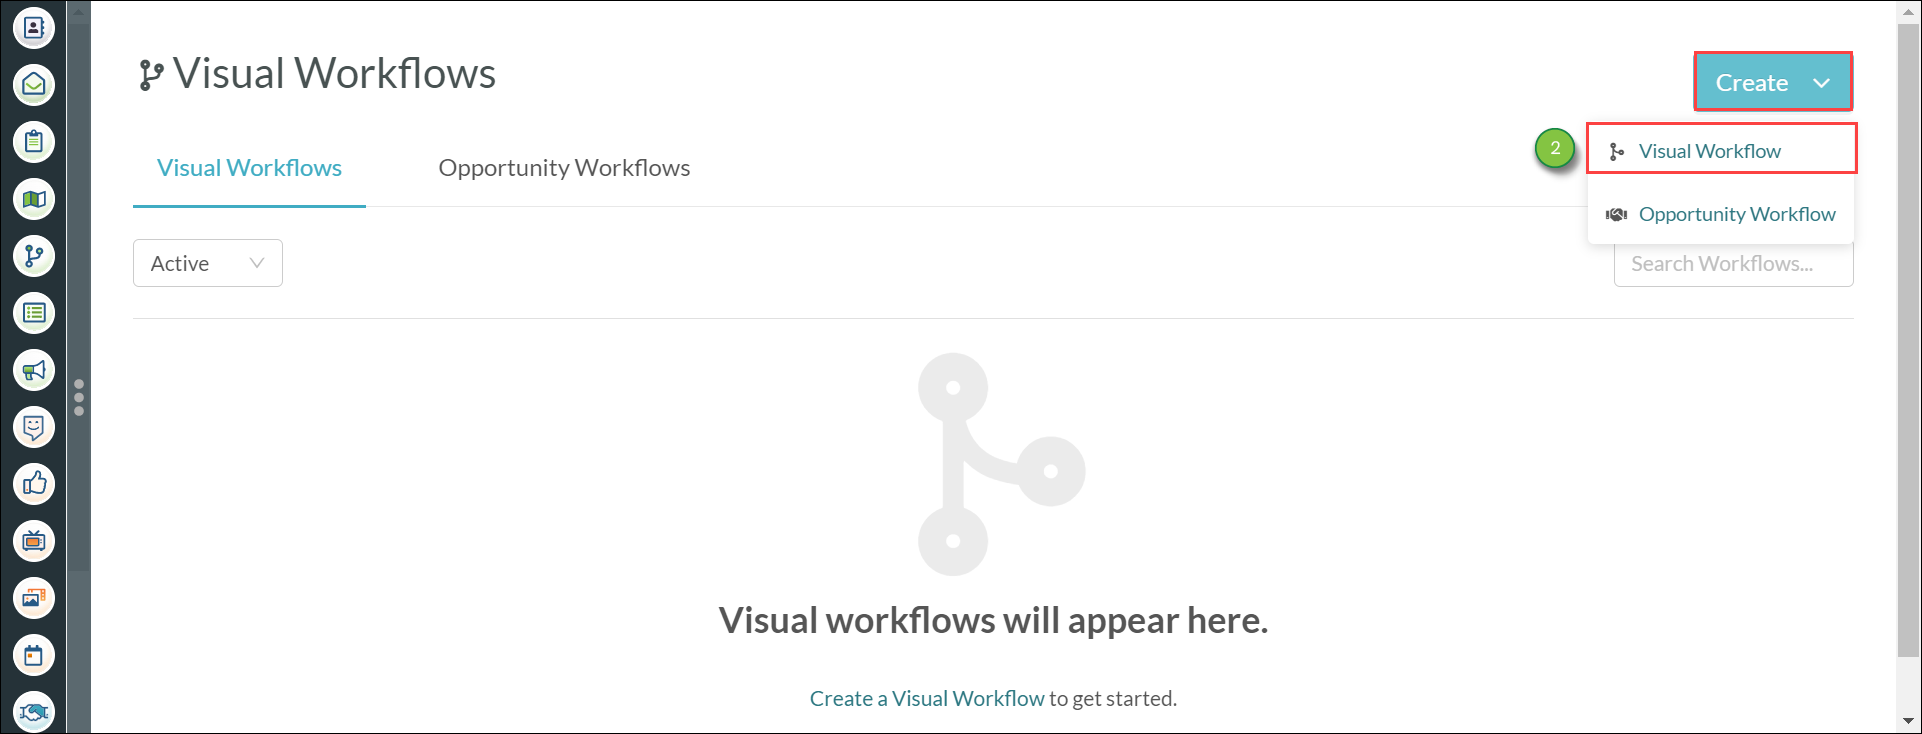
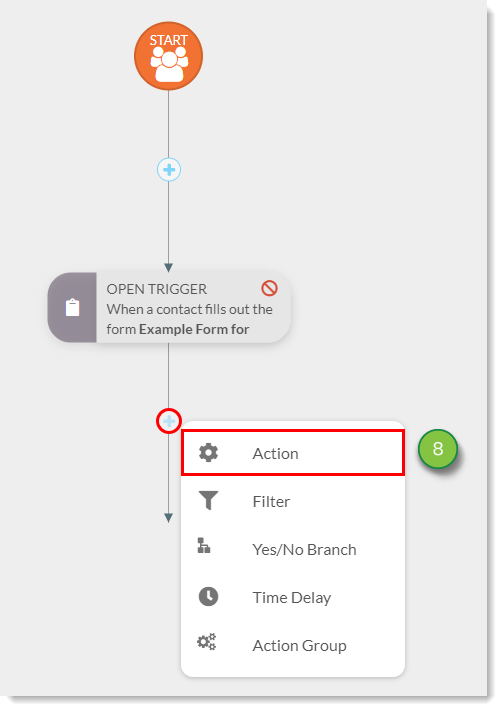
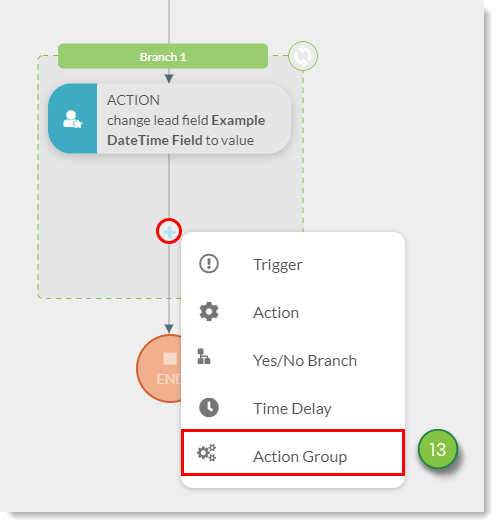
To create a time-based action group in the Visual Workflow Builder, do the following:

  1. Click Automation > Action Groups in the left toolbar.
  2. Click New Action Group.

    Creating a new Action group


  3. Click the Time-based checkbox.
  4. Click Get Started.

    Selecting the time based option
     
  5. Enter a name for the time-based action group in the window that appears.
  6. Click Save.

    Naming the Action group
     
  7. Select Lead as the Field Type.
  8. Select the created custom date/time field under.
  9. Click Save.

    Select the field type and desired field

When creating time-based action groups, be aware that these groups differ from branches. Reusable action groups are a collection of standalone events that can be referenced within a visual workflow or be manually scheduled to a list.

Branches are not action groups. Branches refer to a collection of actions created for use only within a visual workflow. As the name implies, this collection of actions branch out from the action group and are dependent upon additional criteria in order to function. Branches will not be added as reusable, standalone action groups.


Creating a Reminder Automation

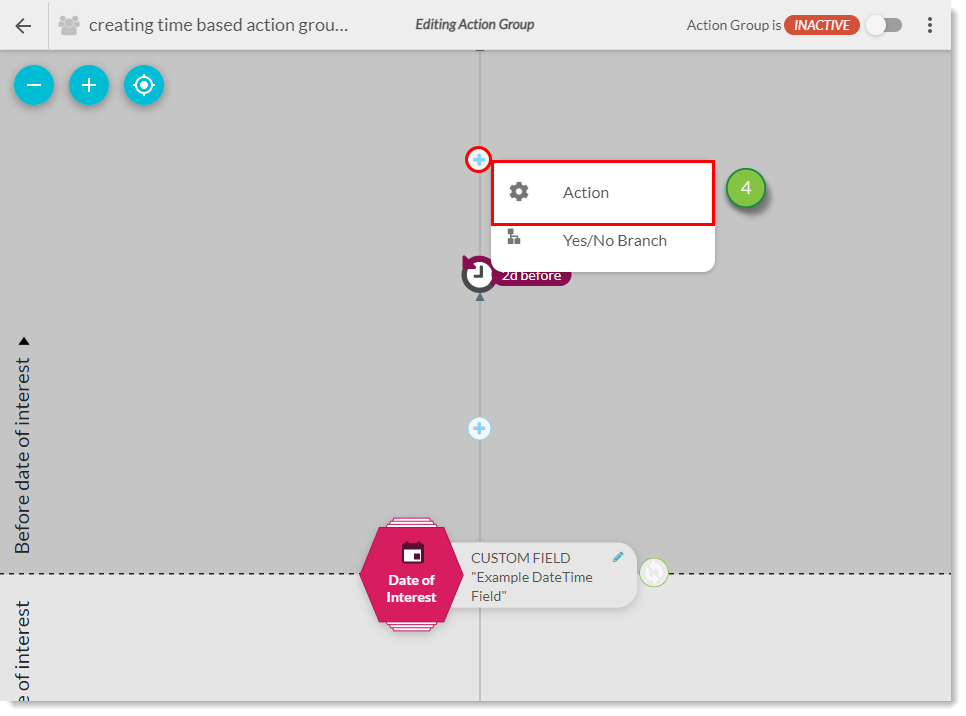
Setting an event’s date and time creates a fixed point from which you can automate emails to be sent before the event. This way, you can automate reminder emails to be sent to attendees prior to the event taking place.

To create reminder automation, do the following:

  1. Click + Add > Time Before in the Before date of interest section of the created action group.
    • Note: Time delays in the visual workflow builder are structured around the timing of the prior event. The visual workflow builder does not use from start time delays. When adding time delays to a visual workflow, that delay is timing iterative from the previous event
      Add action before the event


  2. Enter the desired unit of time.
  3. Click OK.

    Choose the time before the event
     
  4. Click Add > Action above the created action.

    Add action before the event


  5. Click send the email, located under Communication in the window that appears.

    Select send the email option
     
  6. Enter the name of the created reminder email.
  7. Click OK.

    Select the reminder email
     

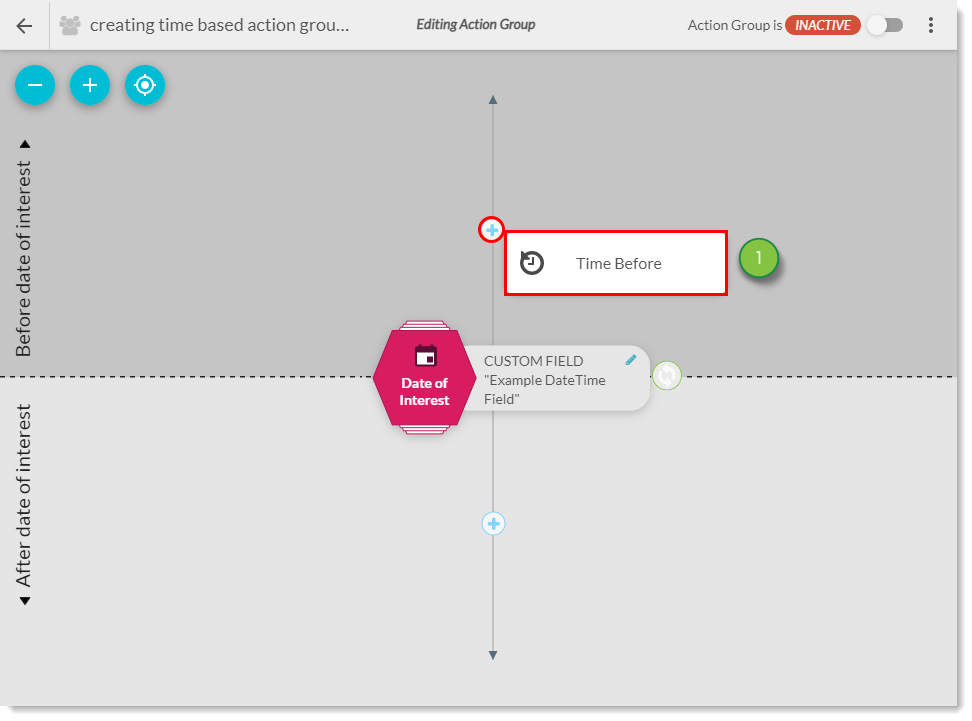
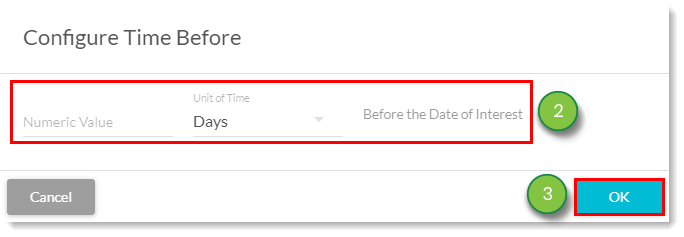
As an example, if you enter 1 and select week, this action will take place a week before the event date.


Creating a Thank You Automation

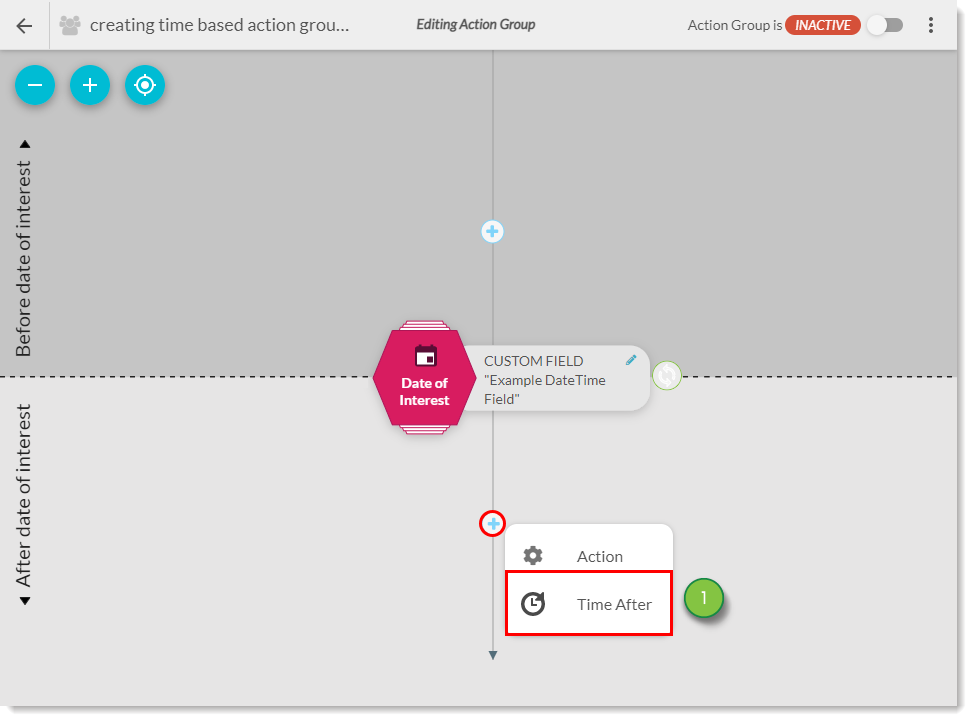
In the same fashion as creating reminder email automation, you can create automation that sends emails thanking attendees for attending an event. This automation can be set to fire at any time after the fixed date and time for the event.

To create automation that sends emails after an event, do the following:

  1. Click + Add > Time After in the After date of interest section of the created action group.

    Adding a time delay after the date


  2. Enter the desired unit of time.
    • Note: Time delays in the visual workflow builder are structured around the timing of the prior event. The visual workflow builder does not use from start time delays. When adding time delays to a visual workflow, that delay is timing iterative from the previous event.
  3. Click OK.

    Add the time interval
     
  4. Click + Add > Action below the created action.

    dding an action after the time delay 
  5. Click send the email, located under Communication in the window that appears.

    Select send the email
     
  6. Enter the name of the created thank you email.
  7. Click OK.

    Add the thank you email
     
  8. Set the Workflow Toggle to Active.

    Activate the action group 

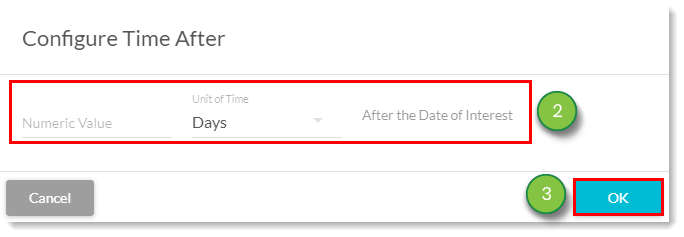
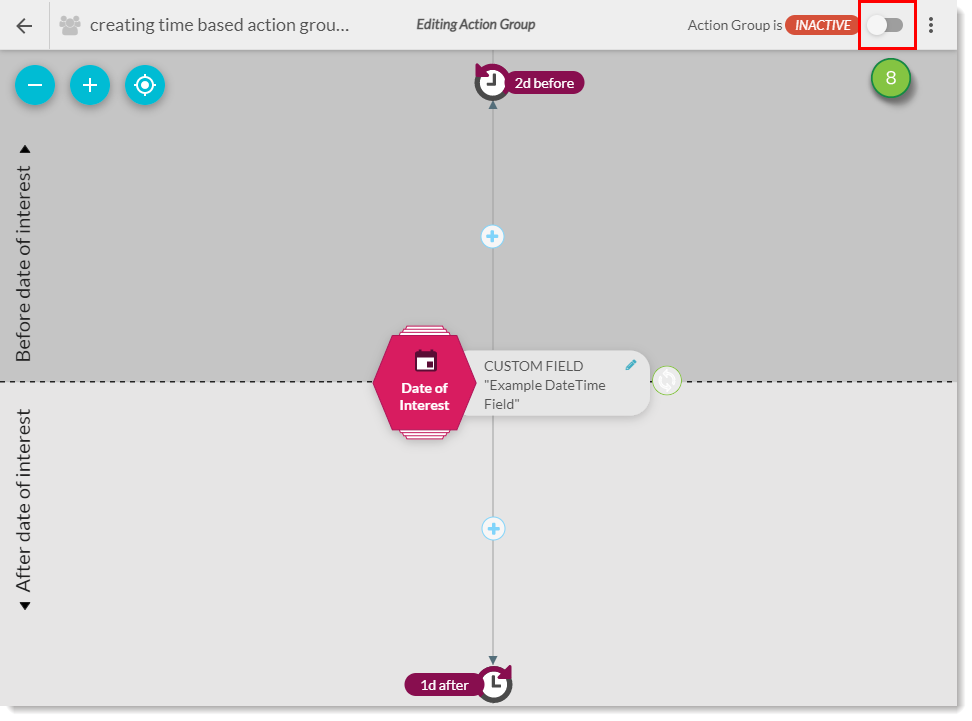
As an example, if you enter 1 and select week, this action will take place a week after the event date. 


Creating Time-Based Event Workflow for Form Fills

Once all of the necessary event content has been created, it can be tied together with a workflow. When configured, the workflow will facilitate the following:

  • Log form fill information in Contact Records
  • Send an email reminding leads of the event
  • Send an email thanking event attendees
  • Log custom field information in Contact Records

Important: The Visual Workflow Builder is not supported in Internet Explorer 11. Use one of the other browsers supported by Lead Gen & CRM to create visual workflows.

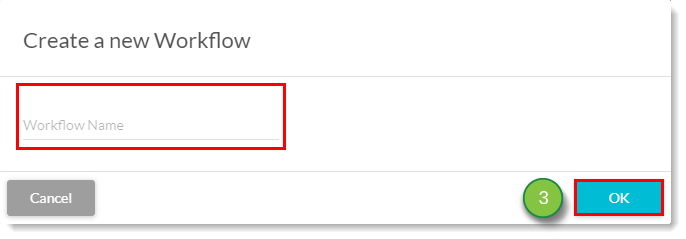
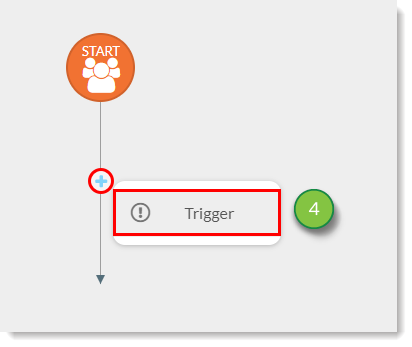
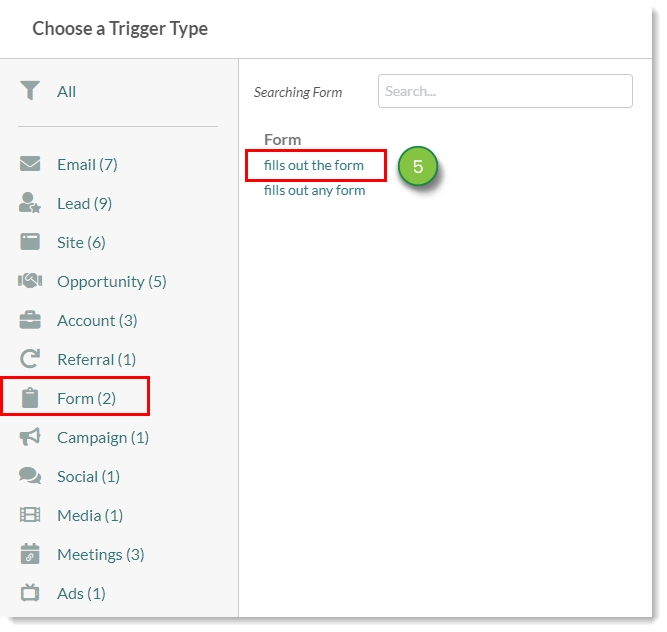
For this event, since attendance information depends upon attendees filling out a form, setting a form fill as the first trigger is key. To create a visual workflow that sets up event actions with a form fill as the primary event trigger, do the following:

  1. Click Automation > Visual Workflows in the left toolbar.
  2. Click Create > Visual Workflow.

    Create a new visual workflow 
  3. Enter a name for the workflow and click OK.

    Add workflow name
     
  4. Click + Add > Trigger under Start.

    Add a trigger
     
  5. Click fills out the form, located under Form in the window that appears.

    Select fills out the form 
  6. Select the created event form.
  7. Click OK.

    Add the form
     
  8. Click + Add > Action under the created trigger.

    Add an action to the workflow 
  9. Click change contact field, located under Contact Edit Actions in the window that appears.

    Select change contact field 
  10. Enter the created DateTime Picker field.
  11. Set the event’s date and time.
  12. Click OK.

    Select the DateTime field previously created  
  13. Click + Add > Action Group under the change lead field action.

    Add an action group to the workflow
     
  14. Enter the created time-based action group’s name.
  15. Click OK.

    Select the action group previously created
     
  16. Add additional actions and time delays as desired, and when ready set the Workflow Toggle to Active.

    Activate the workflow 

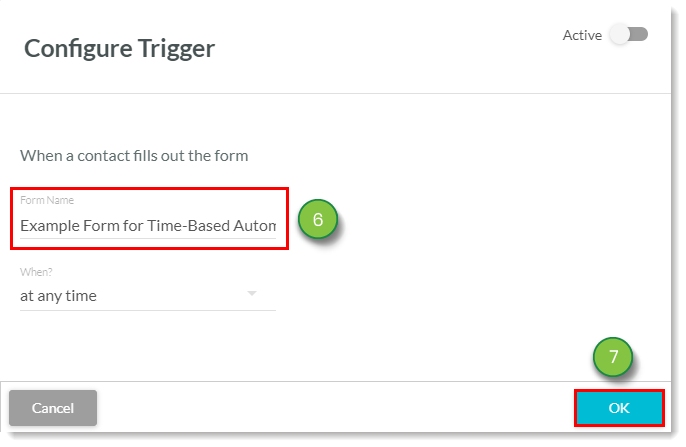
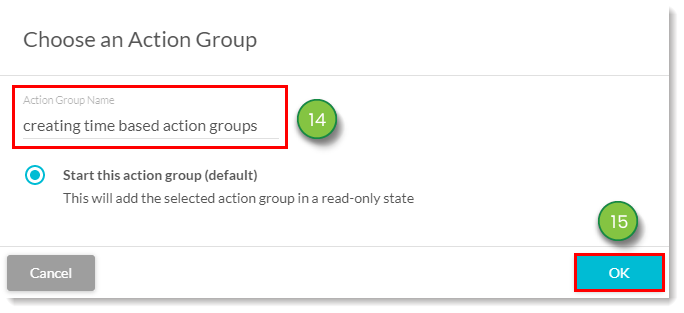
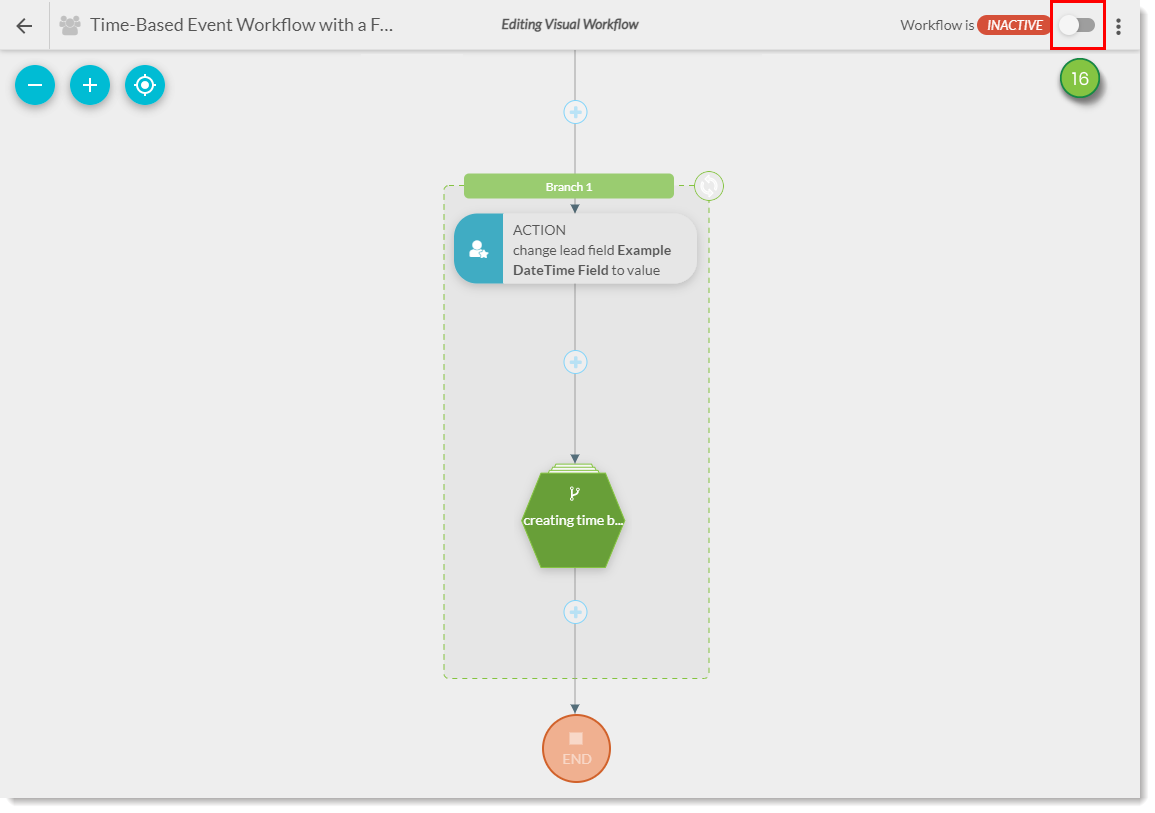
Once the time-based action group has been inserted into the visual workflow, the overall event automation process is complete. Now, when a lead fills out an event form, Lead Gen & CRM will automatically log the form fill and set the DateTime Picker field information in the lead’s Contact Record, send a reminder email at a specified date and time before the event, and send a thank you email at a specified date and time after the event.

This is only an example scenario. You can use time-based actions, workflows, emails, forms, and other Lead Gen & CRM features together in many other ways.


Did this article answer your question?


Constant Contact Logo

Copyright © 2025 · All Rights Reserved · Constant Contact · Privacy Center