Connecting Ninja Forms 3 to Lead Gen & CRM requires a different approach than normal native form embed code usage.
This article details how to use Ninja Forms 3 with Lead Gen & CRM.
| Administrators | ✓ | |
| Company Managers | ||
| Marketing Managers | ||
| Sales Managers | ||
| Salespersons | ||
| Jr. Salespersons |
The procedures in this article assume that you have done the following:
Ninja Forms needs connected using a special method, which requires some additional code. The simplest way to do this is by uploading the plugin file found here. Note that this is offered as a way to add the code to WordPress, and the other steps are necessary, aside from copying the PHP code. If there is any issue with using this plugin on your setup, your developer will need to explore adding the PHP code below manually.
If this gives you issues, or you prefer to add the code in your own way, please see the steps below. By using either the plugin or a child theme, it will prevent the code from being removed if your theme updates its functions.php file.
Note that this is only required if not using the plugin as noted above. If using the plugin, please proceed to the Generating Native Form Embed Codes section below.
Note: Constant Contact offers Professional Services to assist with custom coding.
To connect Ninja Forms 3 with native forms in Lead Gen & CRM, you will need to modify Wordpress code.
To modify Wordpress code, do the following:
add_action( 'ninja_forms_after_submission', 'send_ninja_form_to_sharpspring' );
function send_ninja_form_to_sharpspring($formData){

	$formFields = $formData['fields_by_key'];

	foreach($formFields as $formField):
		if($formField['key']=='sharpspring_post_url')://if this field is the sharpspring post url
			$post_url = $formField['value'];

		else://it's a form field, so let's add it to the body

			//if they specified an admin label to make it easier to map fields in sharpspring, use it
			$trimmedName = trim($formField['admin_label']);
                        if(!empty($trimmedName)):
				$fieldNiceName = $formField['admin_label'];
			else://use the field key
				$fieldNiceName = $formField['key'];
			endif;

			//add this field to the body
			if($formField['type'] != 'listcheckbox' && $formField['type'] != 'listmultiselect'):
				$body[$fieldNiceName] = $formField['value'];
			else://implode values if it is a checkbox or multi-select
				$body[$fieldNiceName] = implode(',',$formField['value']);
			endif;

		endif;

	endforeach;

	$body['trackingid__sb'] = $_COOKIE['__ss_tk']; //DO NOT CHANGE THIS LINE... it collects the tracking cookie to establish tracking

	$request = new WP_Http();
	$response = $request->post( $post_url, array( 'body' => $body ) );

}
You will need to generate a native form embed code to connect to Ninja Forms 3.
Note: When connecting Ninja Forms 3, you should not place the native form embed code on the page. However, you will need to generate one for each form to refer to it.
To generate native form embed codes, do the following:
You will need to modify a form and connect Ninja Forms 3 with native forms in Lead Gen & CRM.
To connect to Ninja Forms 3, do the following:
‘sharpspring_post_url’.
baseURI and endpoint values to form the post URL for this form.post URL for this form.post URL as the Default Value for the hidden field.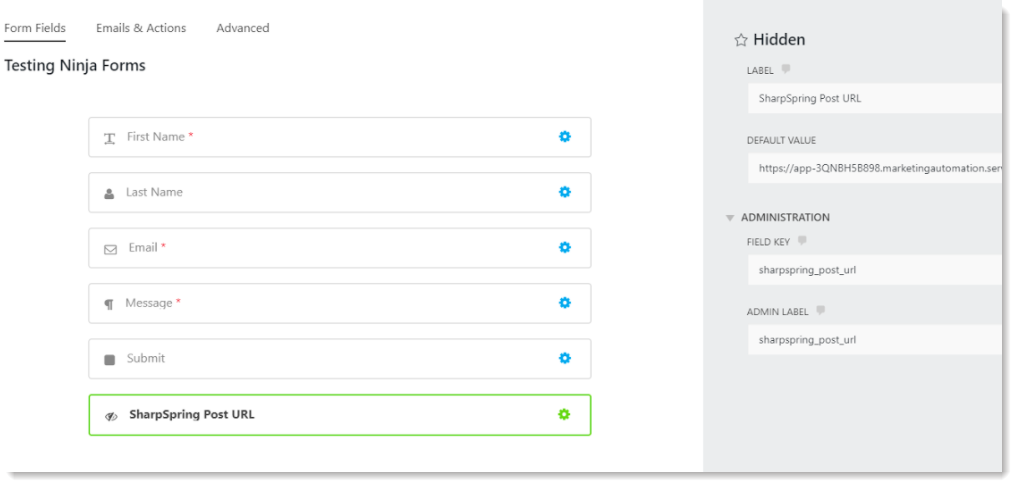
When forming the post URL, the baseURI and endpoint code should appear similar to the following example code:
 __ss_noform.push(['baseURI', 'https://app-3Q4K3MJUEA.marketingautomation.services/webforms/receivePostback/MzYwNzKzMDM0BAA/']);
    __ss_noform.push(['endpoint', 'f65d1953-da63-489b-8b68-9d1684a8d93b']);
When combined, this creates the following post URL:
https://app-3Q4K3MJUEA.marketingautomation.services/webforms/receivePostback/MzYwNzKzMDM0BAA/f65d1953-da63-489b-8b68-9d1684a8d93b
When connecting Ninja Forms 3, keep in mind the following:
‘sharpspring_post_url’ that contains a valid URL should be able to be mapped and then captured into Lead Gen & CRM. Ensure that you use a new native form code to create the post URL for each form, as those should be unique.Copyright © 2026 · All Rights Reserved · Constant Contact · Privacy Center