Lead Gen & CRM
How can we help you?
Search our help articles, video tutorials, and quickstart guides

You've got this. You've got us. Search our Knowledge Base to quickly find answers to your questions.

Styling Forms with Stylesheets

Article: 000050455
Updated: July 26, 2024

Customize the look of your form using a CSS stylesheet

If you would not prefer to use the Visual Form Styler to create your forms, you can instead use CSS stylesheets. Lead Gen & CRM forms can be edited or otherwise styled using the form stylesheet, which provides another option to customize your form's code and design.


Article Contents


Users:
Administrators 
Company Managers 
Marketing Managers 
Sales Managers  
Salespersons  
Jr. Salespersons  


Pasting External CSS URLs

When using stylesheets with forms, you have the option of bringing in CSS from external sites. External CSS URLs are necessary only if you have a stylesheet that is already associated with your site and want the form to have the same look and feel. Otherwise, consider creating a new stylesheet.

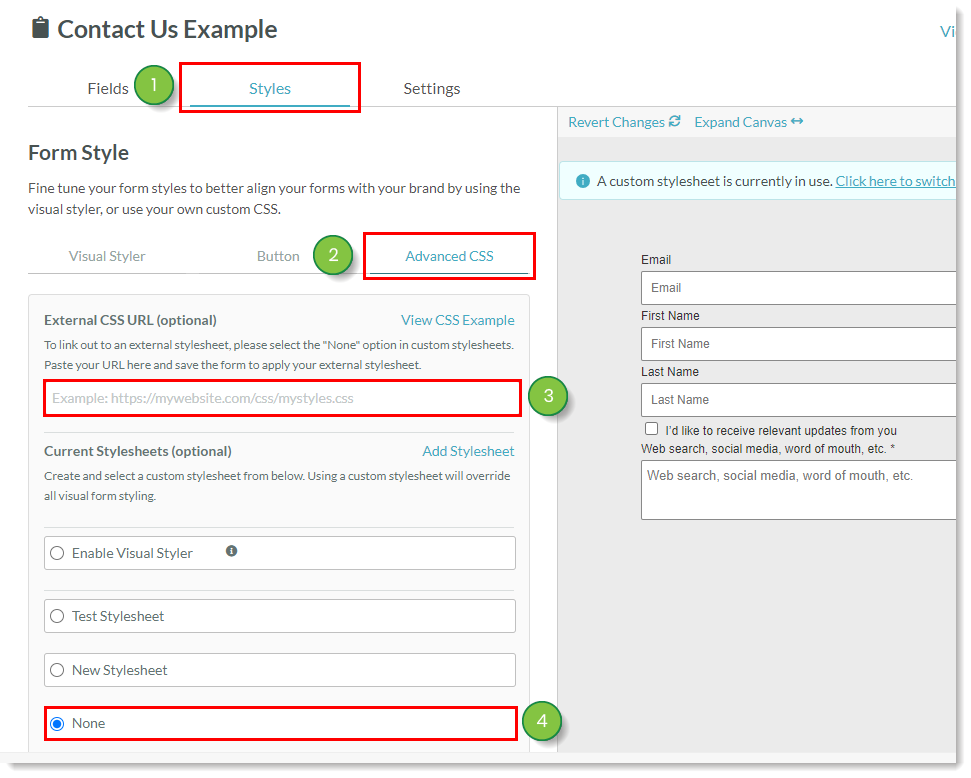
To use an external CSS stylesheet for your forms, you will need to paste the URL of the desired CSS stylesheet.

To paste external CSS URLs into your forms, create a new or edit an existing form:

  1. Click the Styles tab.
  2. Click the Advanced CSS tab.
  3. Paste an external CSS URL in the External CSS URL field.
  4. Select None in the Select Current Stylesheets section.

    Paste external CSS URL and select None for current stylesheet
     
  5. Do either of the following in the Submit Button Style section:
    • Create a custom Submit button.
    • Choose from any of the existing default buttons.
  6. Click Save Changes.

    Choose Button style and save
     

Note: Constant Contact offers Professional Services to assist with custom coding.


Create a new Stylesheet

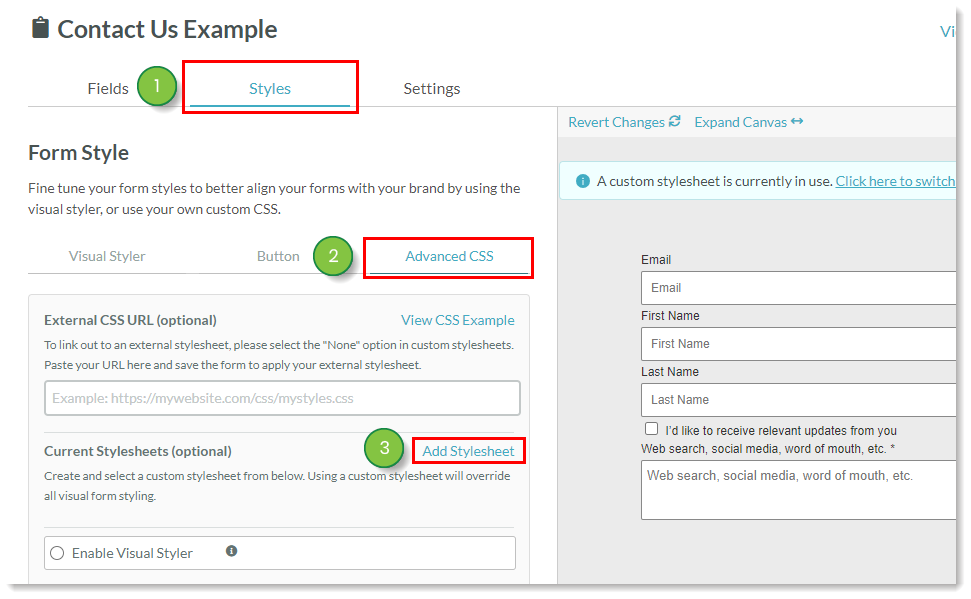
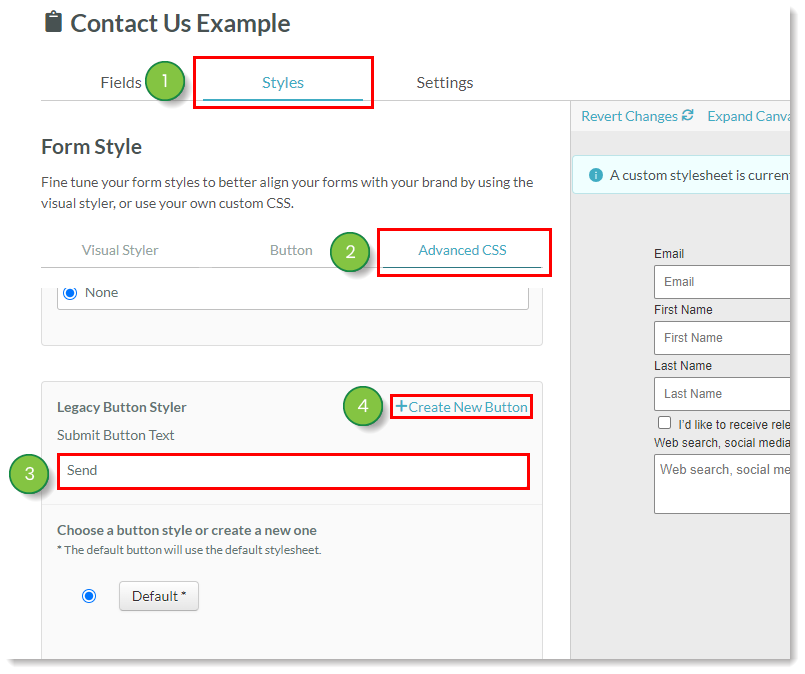
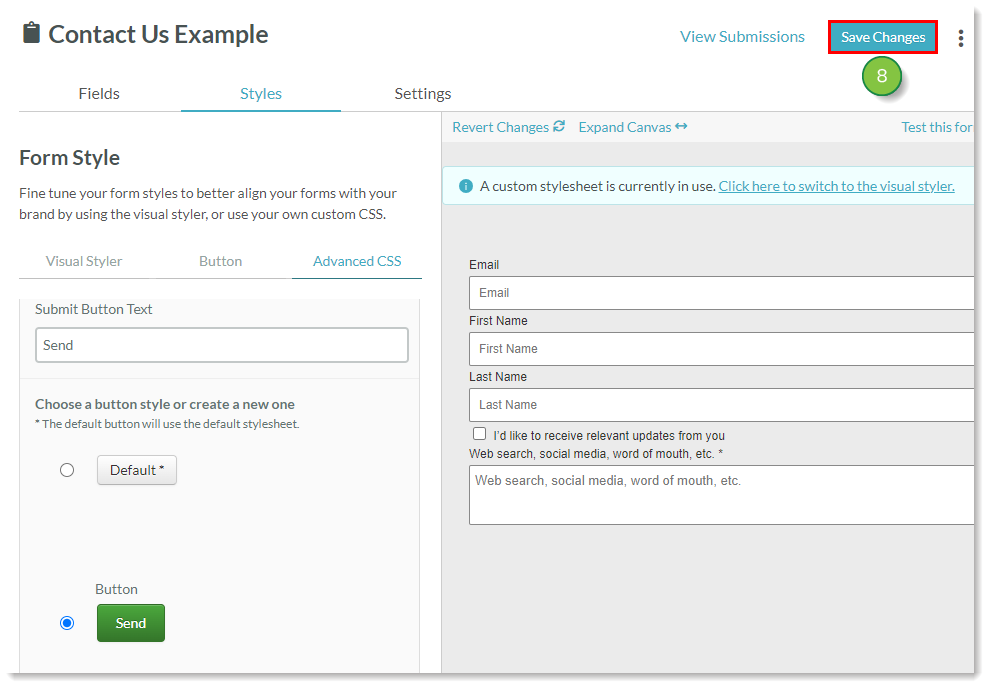
To create a new stylesheet and apply it to the form, create or edit a form:
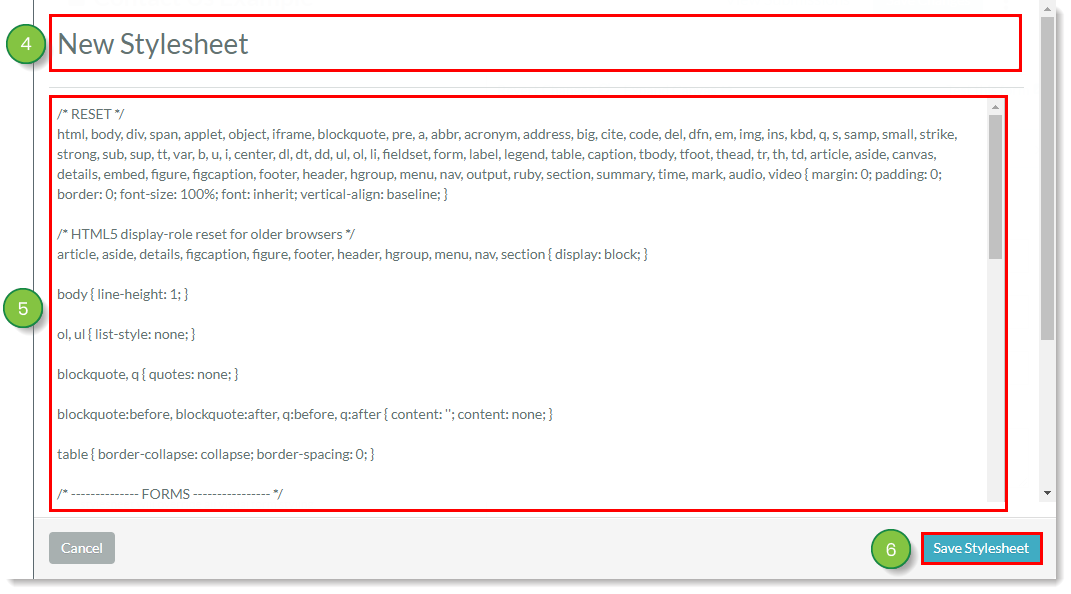
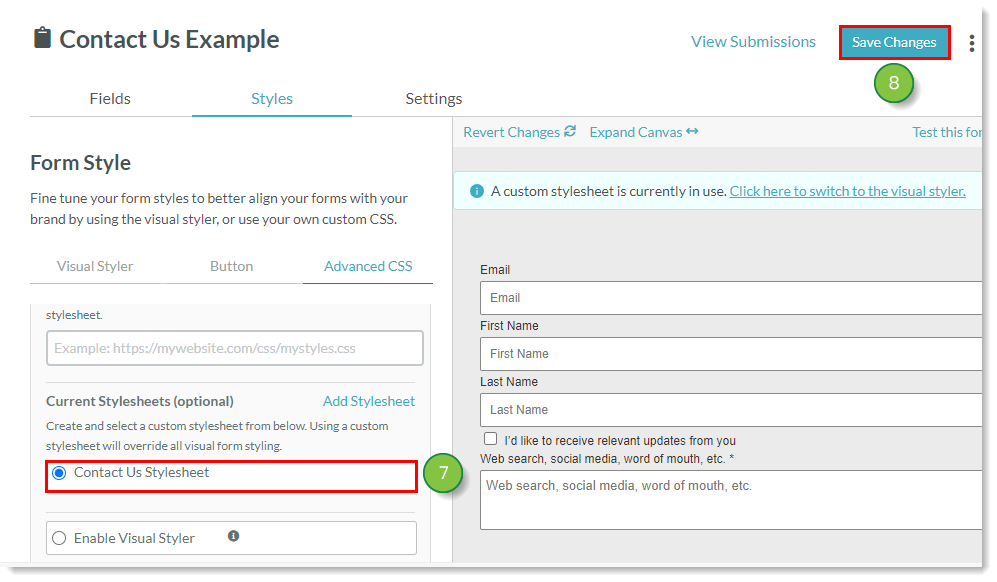
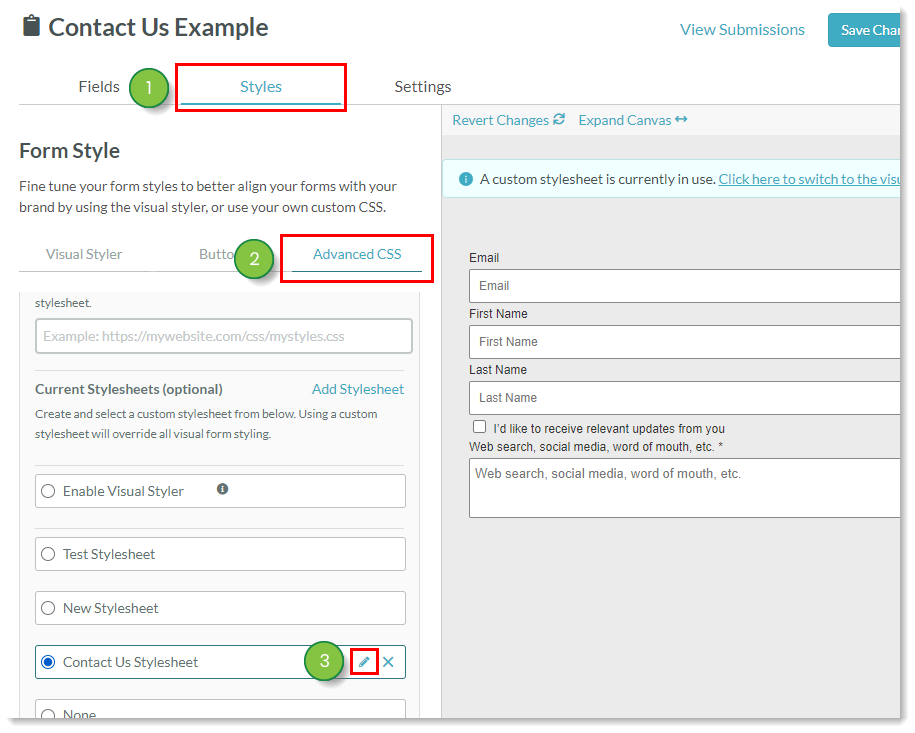
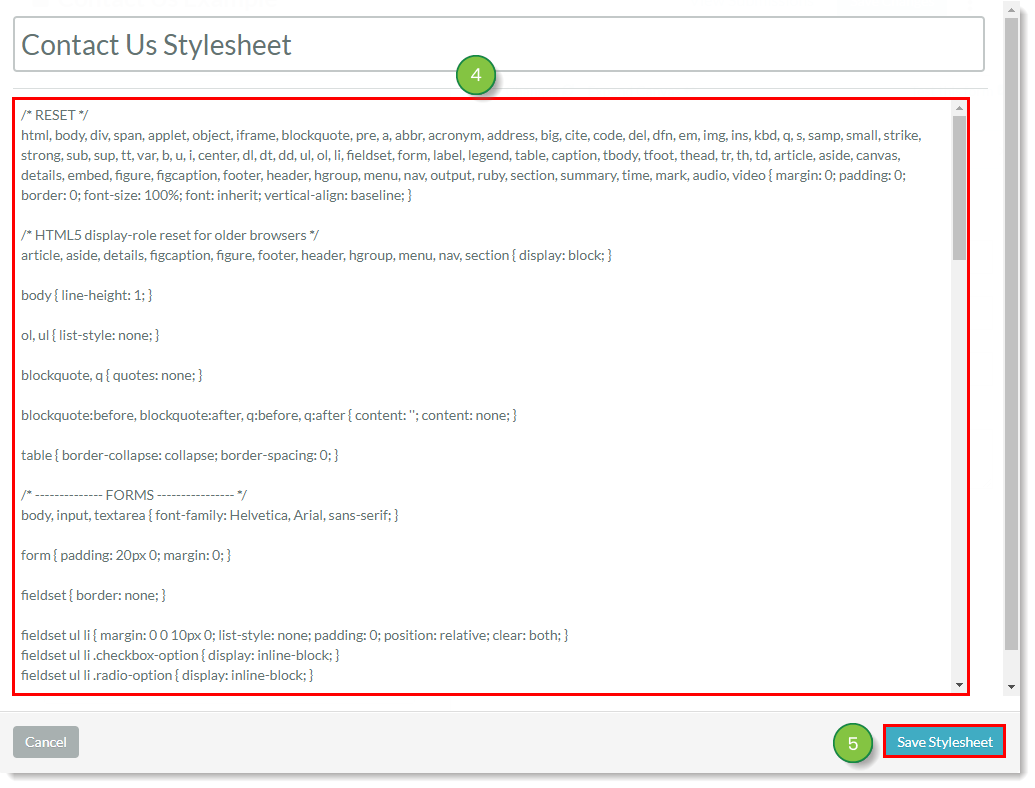
  1. Click the Styles tab.
  2. Click the Advanced CSS tab.
  3. Click Add Stylesheet.

    Add a new stylesheet
  4. Name the stylesheet in the window that appears.
  5. Edit the stylesheet as necessary.
  6. Click Save Stylesheet.

    Enter a name for your stylesheet, edit, and save
     
  7. Select the created stylesheet radio button in the Select Current Stylesheets section. 
  8. Click Save Changes.

    Select your created stylesheet and save


Edit an existing Stylesheet

To edit an existing stylesheets, ​​​​within the form editor:

  1. Click the Styles tab.
  2. Click the Advanced CSS tab.
  3. Hover over an existing stylesheet and click  pencil.png  Edit.

    Edit an existing stylesheet
     
  4. Edit the stylesheet as necessary.
  5. Click Save Stylesheet.

    Make edits to your stylesheet and save


Delete a Stylesheet

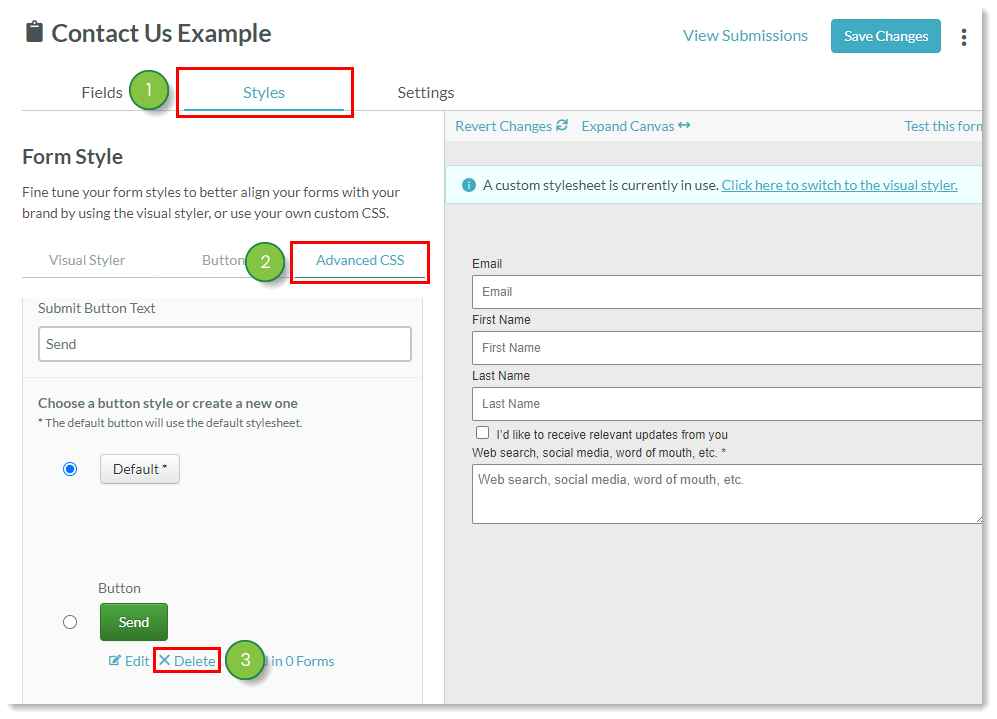
You can delete stylesheets you no longer need.

To delete stylesheets, within the form editor:

  1. Click the Styles tab.
  2. Click the Advanced CSS tab.
  3. Hover over an existing stylesheet and click  1close.png  Delete.

    Delete a stylesheet
     
  4. Click Delete Stylesheet in the modal window that appears.

    Delete stylesheet confirmation
     

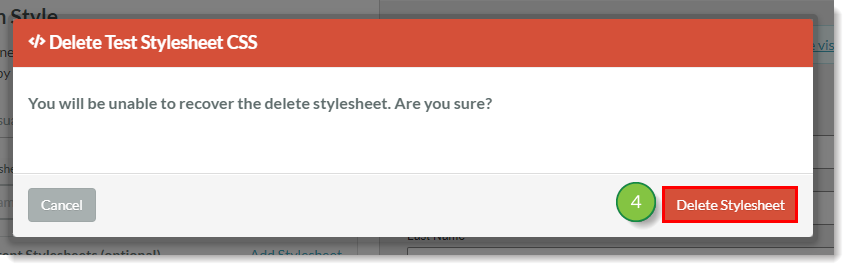
Be aware that stylesheets cannot be recovered when deleted. Also, stylesheets cannot be deleted if they are associated with any form, even ones you are not currently creating or editing. You will need to associate those forms with different stylesheets before you can delete the stylesheet.


    Creating Stylesheet Buttons

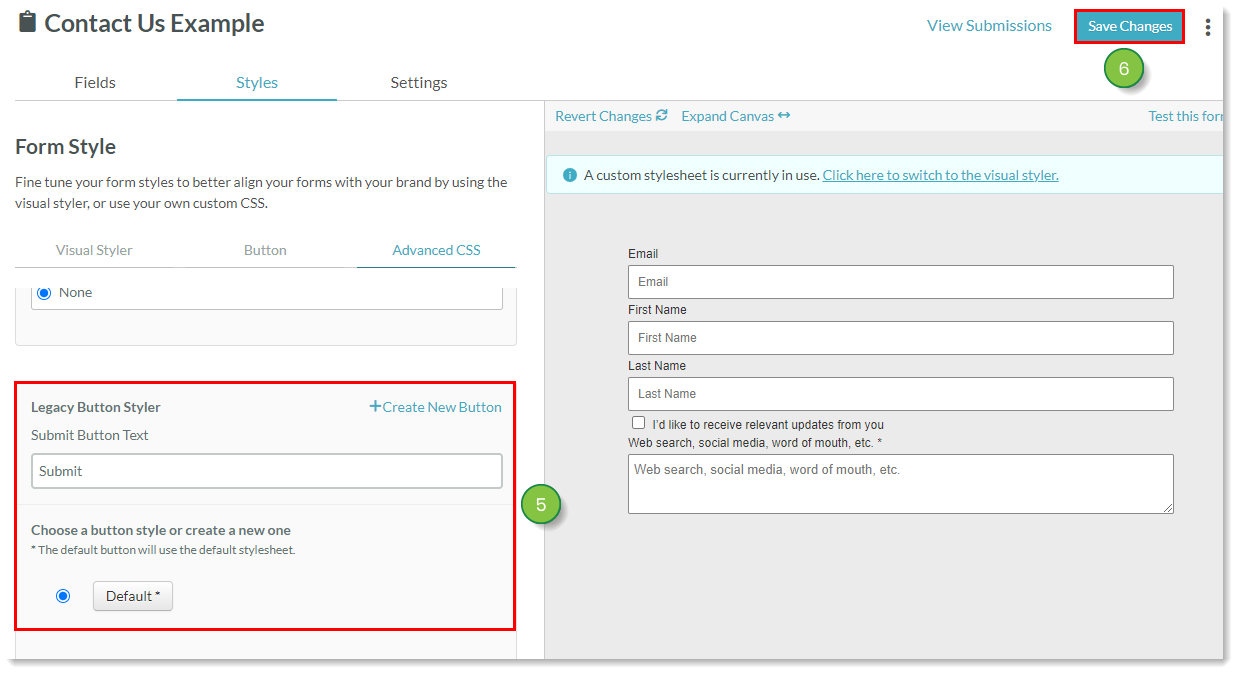
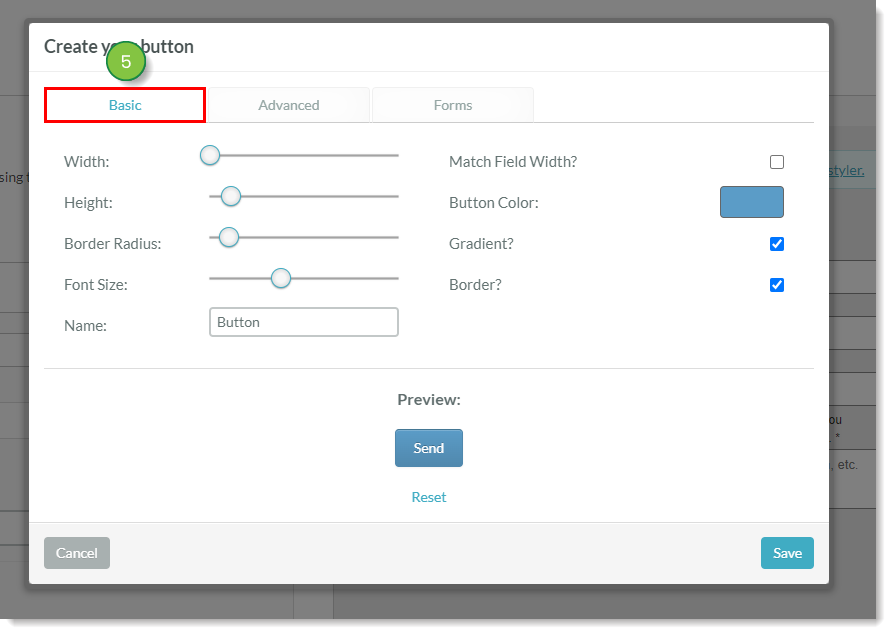
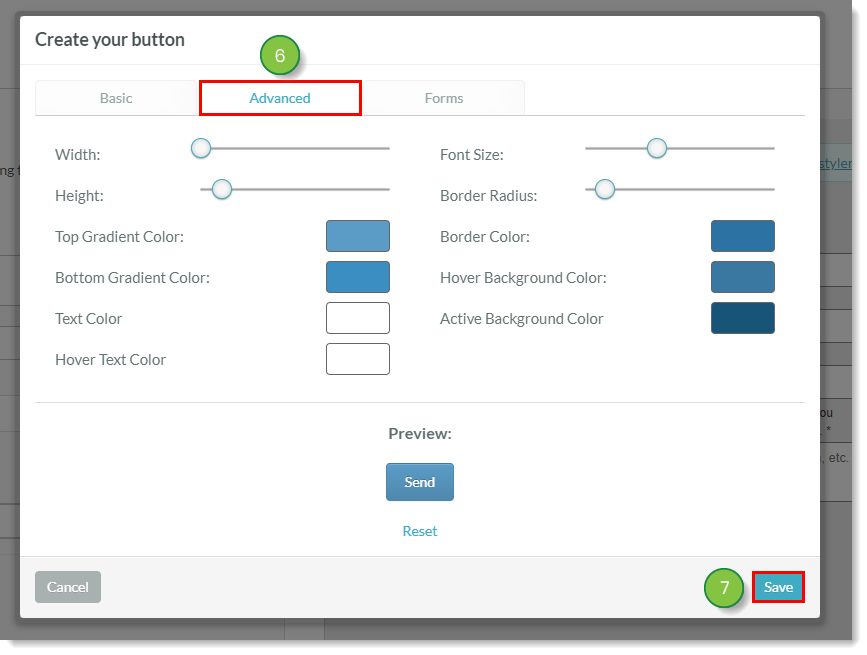
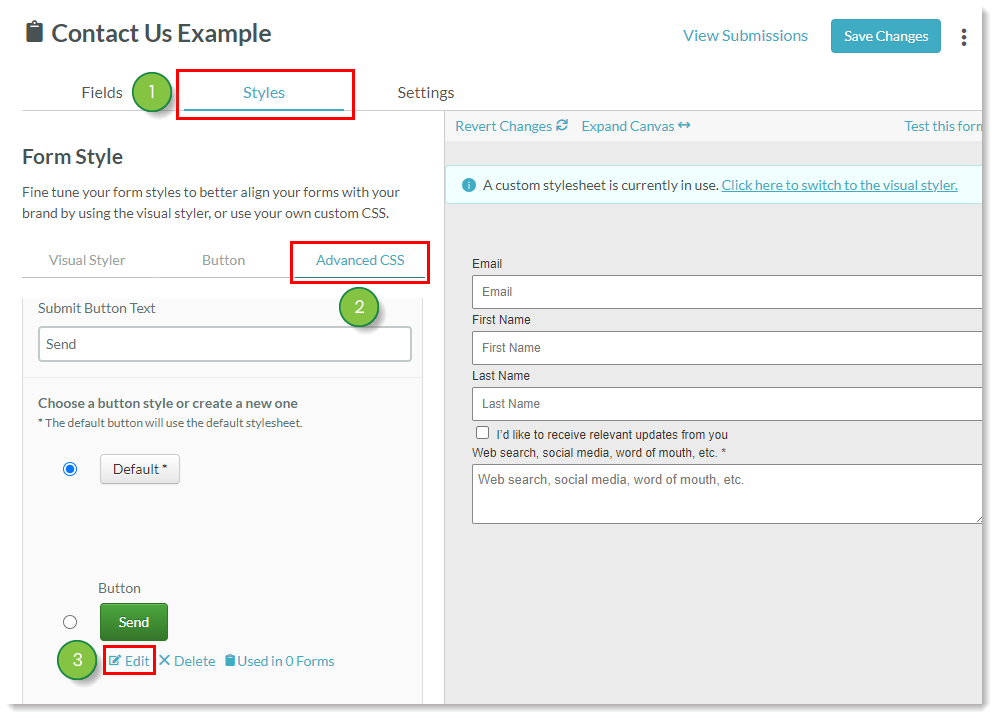
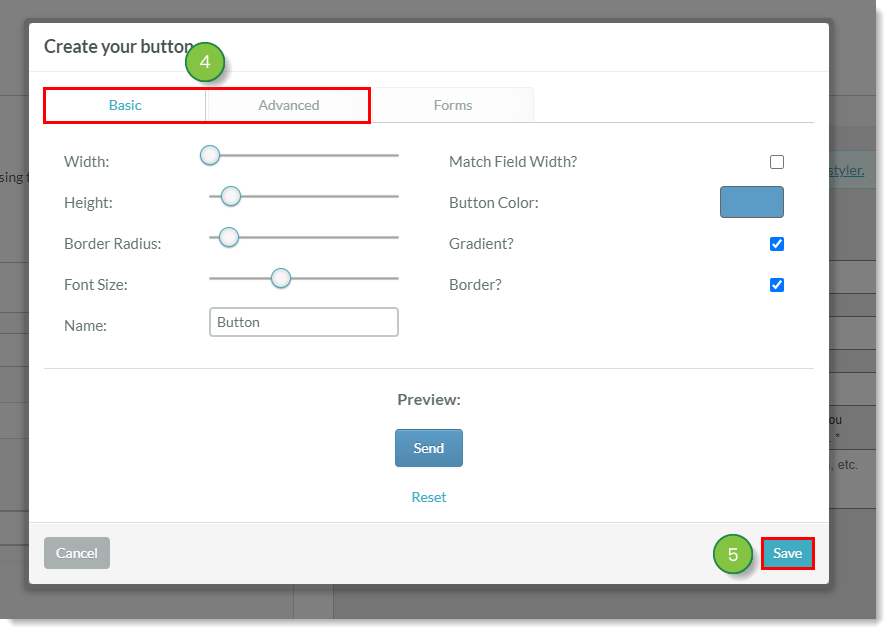
    You can create buttons for your stylesheets. To create a custom form button for use with stylesheets, within the form editor:

    1. Click the Styles tab.
    2. Click the Advanced CSS tab. 
    3. Scroll down to the Legacy Button Styler section and enter text into the Submit Button Text field. 
    4. Click Create New Button.

      Create a custom button
       
    5. Adjust the following visual attributes in the Basic tab of modal window that appears:

         •   Width
         •   Height
         •   Border Radius
         •   Font Size
         •   Button Name

         •   Field Width
         •   Button Color
         •   Gradient
         •   Border


      Button Basic Settings
       
    6. Adjust the following visual attributes in the Advanced tab of the modal window that appears:
      Note: The Forms tab of the button creation modal window displays which forms the button is currently attached to.

         •   Top Gradient
              Color
         •   Bottom Gradient
              Color
         •   Text Color
         •   Hover Text Color

         •   Border Color

         •   Hover
              Background
              Color

         •   Active
              Background
              Color

    7. Click Save.

      Button Advanced Settings
       
    8. Click Save Changes. 
      Note: Once saved, the form will automatically update with the button.

      Select custom button and save form
       

    Please be aware that if you are not using a custom stylesheet for your form, the Visual Form Styler should be used when creating buttons instead.


    Editing Stylesheet Buttons

    To edit an existing stylesheet button, within the form editor:

    1. Click the Styles tab.
    2. Click the Advanced CSS tab. 
    3. Scroll down to the Legacy Button Styler section and hover over the desired button. Click  12edit.png  Edit.

      Edit a form button
       
    4. Edit available button attributes as desired.
      Note: The Forms tab of the button creation modal window displays which forms the button is currently attached to.
    5. Click Save.

      Make edits to button


    Select a Stylesheet Button to use in your Form

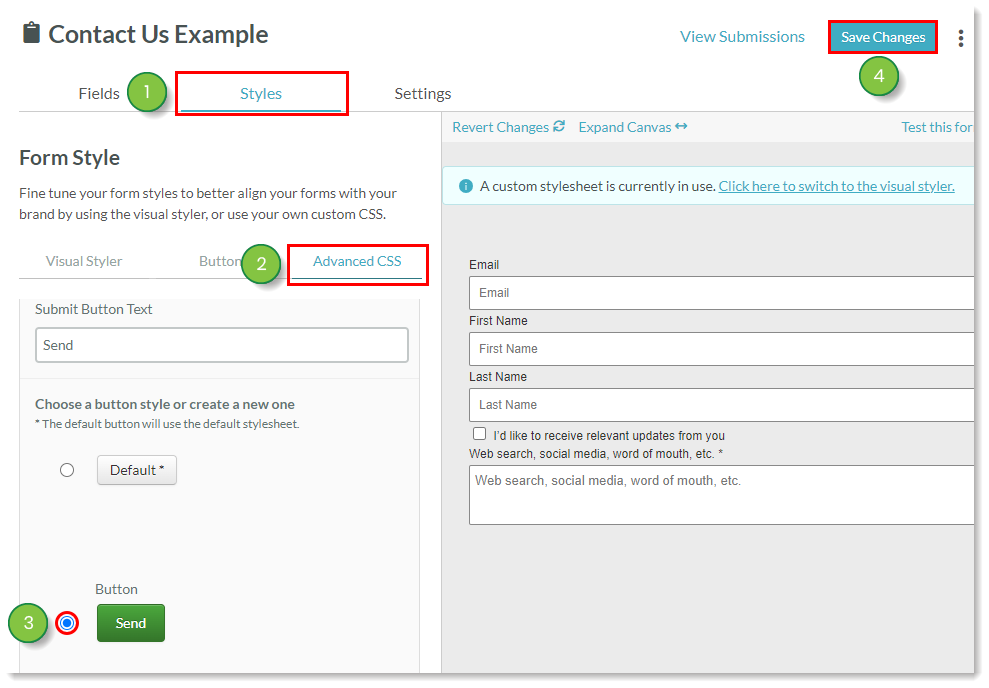
    You can set buttons to be used with stylesheets.

    To use a specific button with a form stylesheet, within the form editor:

    1. Click the Styles tab.
    2. Click the Advanced CSS tab. 
    3. Scroll down to the Legacy Button Styler section and click the radio toggle next to the desired button.
    4. Click Save Changes. 

      Select a button to use in your form


    Deleting Stylesheet Buttons

    To delete stylesheet buttons that you no longer need, within the form editor:

    1. Click the Styles tab.
    2. Click the Advanced CSS tab. 
    3. Scroll down to the Legacy Button Styler section. Hover over the desired button and click  1close.png  Delete

      Delete a custom button

    Switch from Using a Stylesheet to the Visual Form Styler

    If you are using a stylesheet and want to instead use the Visual Form Styler, you can change to the Visual Form Styler. 

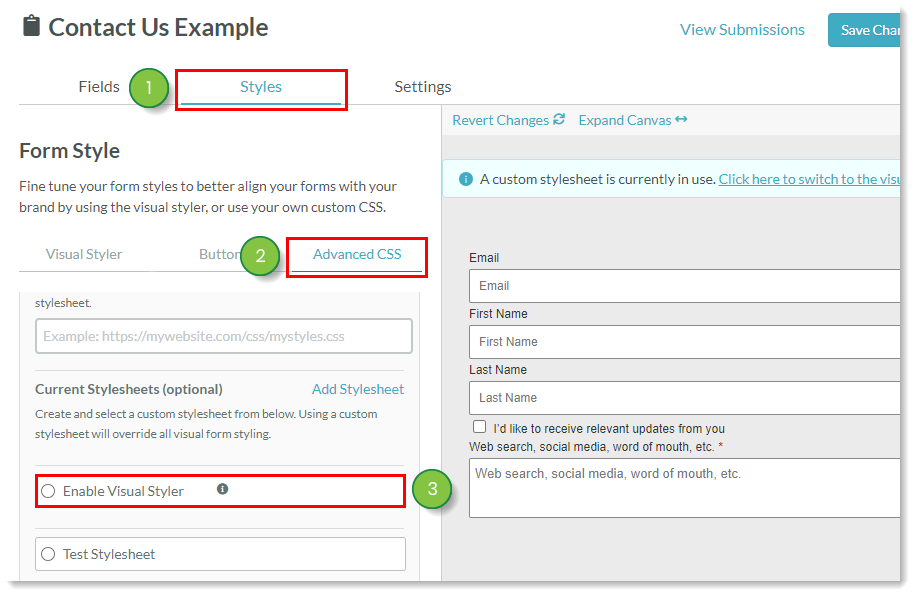
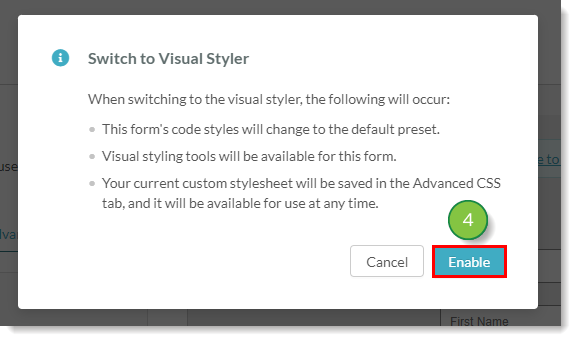
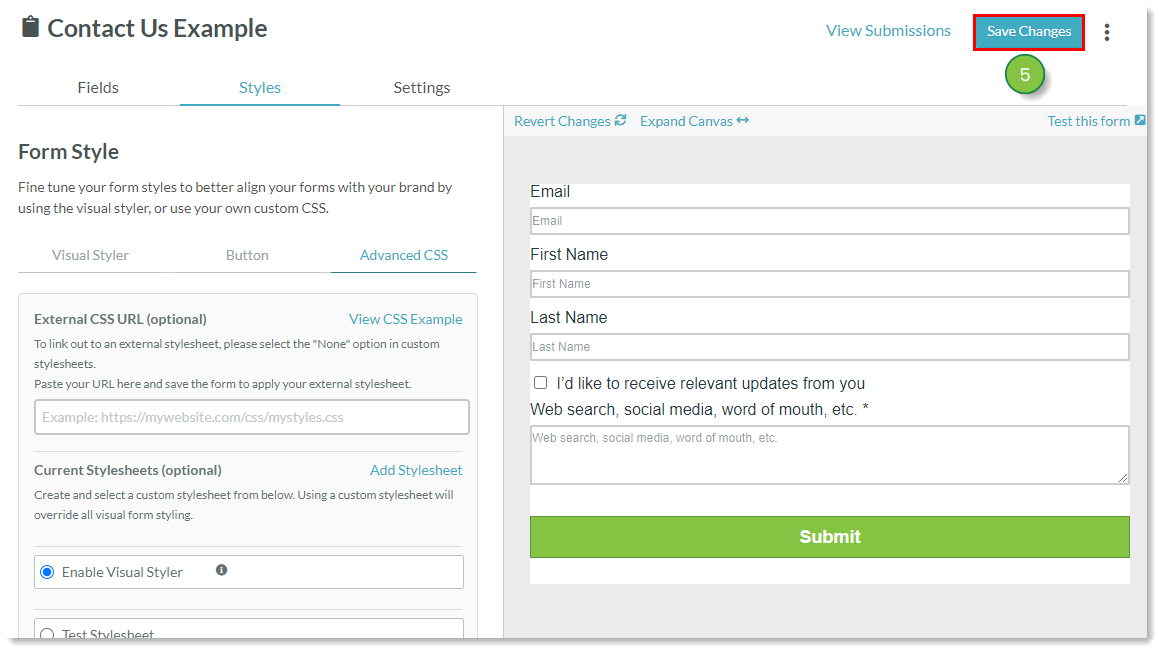
    To enable the Visual Form Styler for forms using custom stylesheets, within the form editor:

    1. Click the Styles tab.
    2. Click the Advanced CSS tab.
    3. Click Enable Visual Styler in the Select Current Stylesheets section. 

      Select "Enable Visual Styler option
       
    4. Click Enable.

      Enable the visual styler
       
    5. Click Save Changes.

      Visual Styler Enabled Save Form


    Frequently Asked Questions

    Q: Where can I learn about CSS?
    A: Refer to this external series of help documentation hosted by w3schools for information on editing CSS content.


    Q: How do I center the Submit button?
    A: Reference the paragraph container class=”clear” that holds the button and set it to align as centered in the frame.
    .clear {text-align: center !important;}


    Q: How do I change the label color?
    A: Reference the label element and modify the color. 
    label {color: #0000FF !important;}


    Q: How do I change the format of radio button to display vertically?
    A: Reference the element’s class (“radio-option”) and set it to display in a list rather than in a row. By default, radio buttons are set to display in a row.
    .radio-option {display: list-item !important;}


    Q: How do I hide labels?
    A: Reference the label element and set it to display nothing.
    label {display: none !important;}


    Q: How do I change the format of checkboxes to display vertically?
    A: Reference the element’s class (“checkbox-option”) and set it to display in a list rather than in a row. By default, checkboxes are displayed in a row.
    .checkbox-option {display: list-item !important;}


    Q: How do I hide labels (or something similar), but only for certain fields?
    A: Refer to this external documentation for a step-by-step process. 
    label[for="field_123456789"]{display: none !important;}


    Q: How do I change input for just a certain field type?
    A: Refer to this external documentation for a step-by-step process. 
    input[type="text"]{color: #0000FF !important;}
     

    Q: How do I accommodate users who may be using a screen reader due to visual impairment?
    A: In this case, Constant Contact does not recommend using display: none, because it will remove the element from the page completely. Constant Contact recommends using the following to ensure that it is still visible to a screen reader while being invisible to the human eye:

    label {
      border: 0; 
      clip: rect(0 0 0 0); 
      height: 1px; 
      margin: -1px;
      overflow: hidden;
      padding: 0;
      position: absolute;
      width: 1px;}


    Did this article answer your question?


    Constant Contact Logo

    Copyright © 2025 · All Rights Reserved · Constant Contact · Privacy Center