Lead Gen & CRM
How can we help you?
Search our help articles, video tutorials, and quickstart guides

You've got this. You've got us. Search our Knowledge Base to quickly find answers to your questions.

Importing Contacts from .CSV Files to Lists

Article: 000050373
Updated: October 6, 2023

Lead Gen & CRM enables you to import contacts or leads to a new list.

This article will detail how to upload contacts to new lists.


Article Contents

 
Users:
Administrators 
Company Managers 
Marketing Managers 
Sales Managers 
Salespersons  
Jr. Salespersons  


Important Information Regarding Imports

Sender Reputation: Evaluating Imported Lists

To protect your sender and domain reputation as well as ensure the long-term health and viability of the platform, when you import a new list Lead Gen & CRM evaluates the overall quality of the list based on a variety of factors including an evaluation done by a third-party verification service. If 45% or more of the list contains contacts with email addresses deemed invalid, toxic, or purchased, Lead Gen & CRM will not allow your import to continue since these lists would fall into the lowest 2.5% of list quality and have a high risk of damaging your sender reputation. 

In the rare case that a list is rejected due to low quality, Constant Contact's compliance team will be notified.

Refer to Using Email Engagement Tools for more information about the evaluation of imported or created contacts and list rejections.


File Requirements 

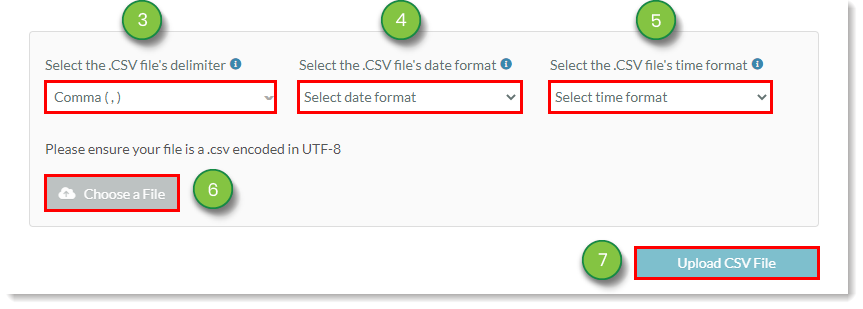
The Import Tool uses .CSV files to create contact lists, and any .CSV file that you import should be structured similar to the following:
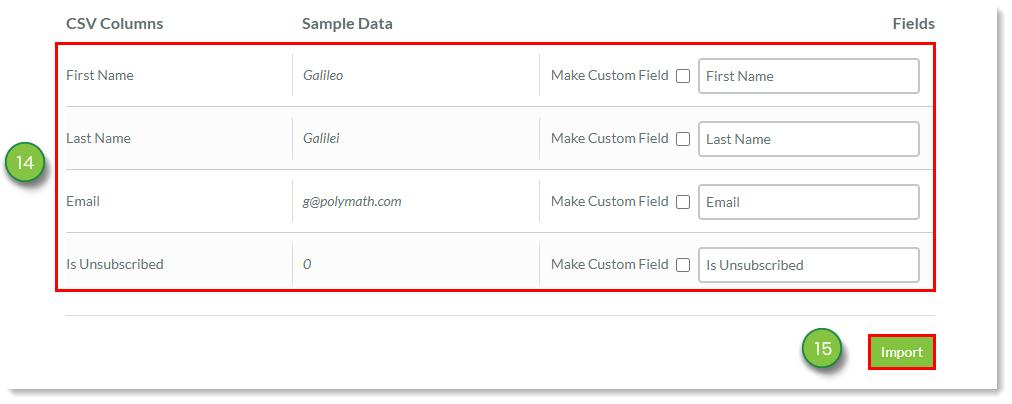
 

First NameLast NameEmailIs Unsubscribed
GalileoGalileig@polymath.com

0

Edwin Hubblespace@extragalatic.com

0

Hipparchus math@trig.com

1


When importing .CSV files, be aware:

  • Header rows are required. Header rows are necessary for mapping Lead Gen & CRM fields to imported fields.
  • Email fields are required. The Import Tool requires that your .CSV file contain a column mapped to the Email field. You will still need to include the Email column when a contact does not have an email address. 
  • Is Unsubscribed fields are required. For Lead Gen & CRM to successfully import a .CSV file, the file needs one column header that is labeled as Is Unsubscribed. The Is Unsubscribed field should be a boolean field, where 0 is for leads who are opted in, and 1 is for leads who are not opted in.
  • Utilize first and last names. For the import to be successful, a first and last name are suggested in the event that you do not have an email address for that contact. Use both as often as possible.
  • Values must match. When importing custom field values, ensure that they are formatted to match the custom field values. For example, picklist and checkbox values are case-sensitive.
  • When importing data with picklist and checkbox fields, the fields must be present in the file import in order to appear. Ensure that the picklist or checkbox fields in your file exist before importing. Otherwise, the data may not import properly.
  • When importing to a checkbox custom field, the data cannot have spaces between values and commas. An example of this would be value1,value2,value3. 

If you need additional help with how to structure .CSV files and their contents, check out the following help articles:


Importing Contacts to New or Existing Lists

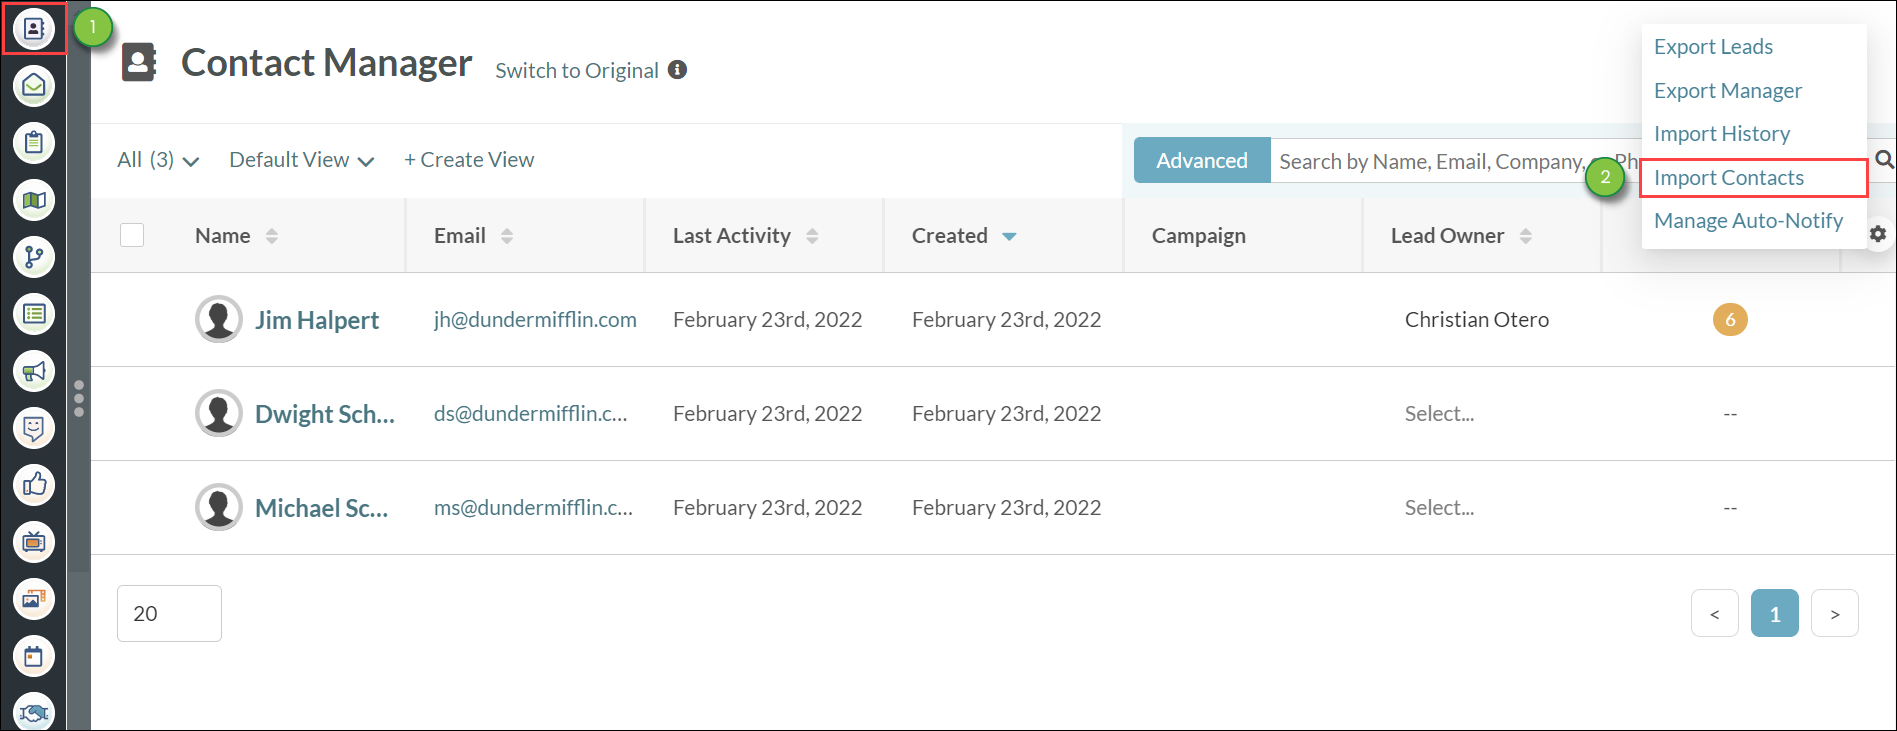
Once you have structured your .CSV file using the format above you can begin importing contacts to a new or existing list in your account.

  1. Click Contacts in the left toolbar.
  2. Click  Settings  Options > Import Contacts.

    Importing Contacts


  3. At the bottom of the Import Tool page, select the appropriate delimiter from the Select delimiter drop-down menu.
  4. Select the appropriate date format from the Select date format drop-down menu.
  5. Select the appropriate time format from the Select time format drop-down menu.
  6. Click Choose a File to select the applicable .CSV file from your computer. 
  7. Click Upload .CSV File.

    Importing_and_Mapping_Contacts_from_CSV_Files_3-4-5-6-7.png
     
  8. Select either New List or Use Existing List, under the List Settings section on the Import Contacts page that automatically opens. Depending on the list type you have chosen:
    • New lists: Enter a name for the list.
    • Existing lists: Enter the name of the desired existing list to add contacts to.
  9. In the How Should We Handle Duplicates? drop-down menu select one of the following:
    • Do not update: Duplicate fields and information are not updated.
    • Update only new: Adds information from a new column.
    • Update new and existing: Updates all fields and information in the record.
  10. In the Import Unassigned Leads in List As... drop-down menu select one of the following:
    • Open
    • Unqualified Leads
    • Qualified Leads
    • Contacts
    • Customers
  11. Optionally, if you have chosen to update duplicates in step 9, you can select the Overwrite Existing Lead Status? checkbox.
  12. Optionally, you can select the Assign to a campaign? checkbox and from the drop-down menu that appears, select the desired campaign.
  13. Optionally, you can select the Assign leads to a particular user? checkbox and from the drop-down menu that appears, select the desired user.

  14. In the Mappings section, confirm or edit the data that each CSV column is mapped to. For more information about mapping contact information correctly to fields, review our guide on Mapping fields for List Members
    • Important: Creating custom fields with the same name as system fields results in those system fields being rendered invisible and unusable in the platform. To restore system fields, contact Constant Contact Support. Refer to Available Lead Gen & CRM System Fields for more information on available system fields.
    • Note: Click the Make Custom Field box to import the column as a custom field.
  15. Click Import.

    Importing_and_Mapping_Contacts_from_CSV_Files_14-15.png

     
  16. Type Confirm in the pop-up window that appears.
  17. Click the I confirm that my unsubscribed contacts are mapped correctly and that this list is not purchased checkbox.
  18. Click Import.

    Importing_and_Mapping_Contacts_from_CSV_Files_16-17-18.png


Did this article answer your question?


Constant Contact Logo

Copyright © 2025 · All Rights Reserved · Constant Contact · Privacy Center