| Note: This article pertains to Starter Email customers. If you’re in our Lite, Standard, or Premium plans, please refer to this article instead. |
Whether you have an organized spreadsheet or a bowl full of business cards, it’s easy to add your contacts to your account so you can start emailing them. If you have just a handful of contacts to add, you can quickly type or paste their information. If you have more than 20 contacts to add, or if you collect a variety of contact information besides names and email addresses, we recommend uploading a spreadsheet instead.
Desktop instructions:
Add contacts:
Manage your contacts:
Mobile web instructions:
Add contacts to your account
Add a single contact
If you have just a single contact to add to your account, you can easily enter the new contact’s details manually.
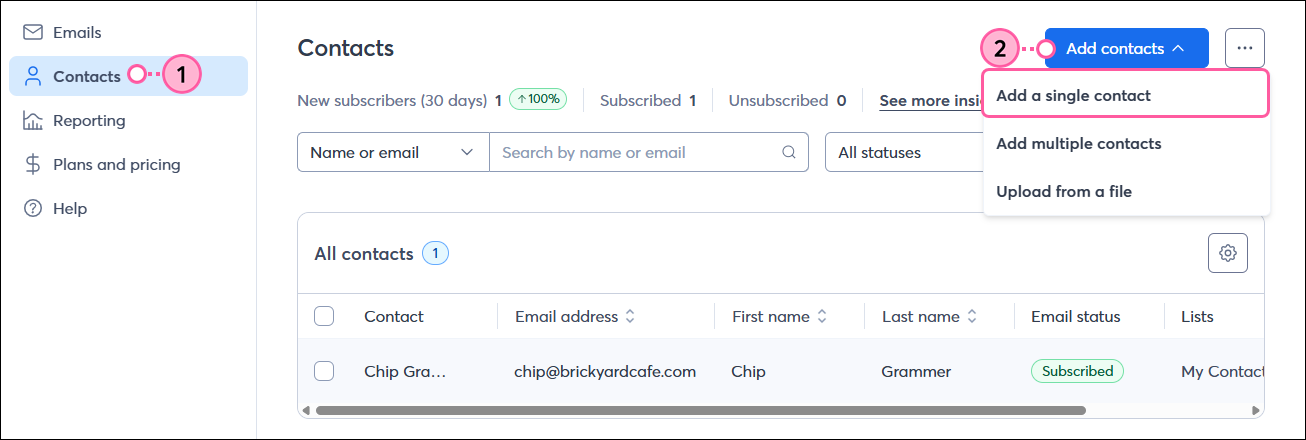
- From the left-hand navigation, click Contacts.
- Click Add contacts > Add a single contact.
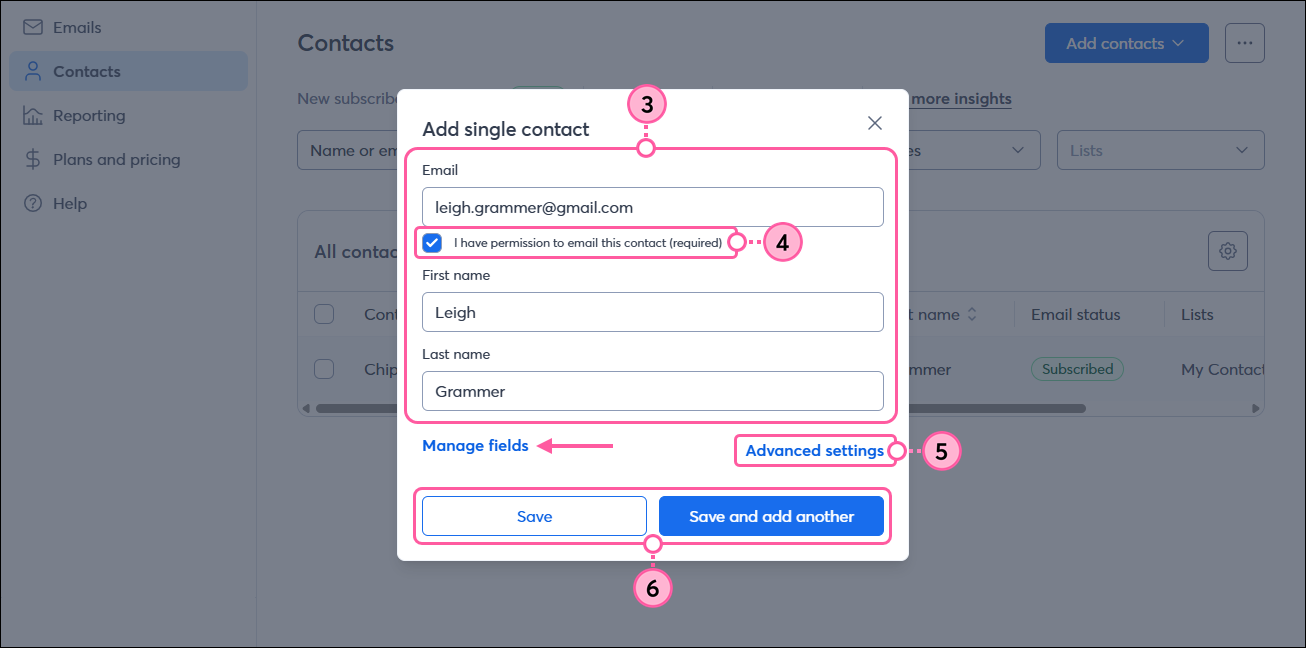
- Enter the contact’s email address and any other details you’ve collected from them. Click Manage fields to access more fields.
- Check the box to confirm you have permission to email this contact.
- (Optional) Click Advanced settings to select the list(s) you want to add the contact to. By default, a “My Contacts” list is already created for you, but you can create additional lists to add contacts to.
- When you’re finished, click Save. If you have more contacts to add, click Save and add another.
Add multiple contacts
You can add a small group of contacts to your account by typing them in individually or pasting them all at once.
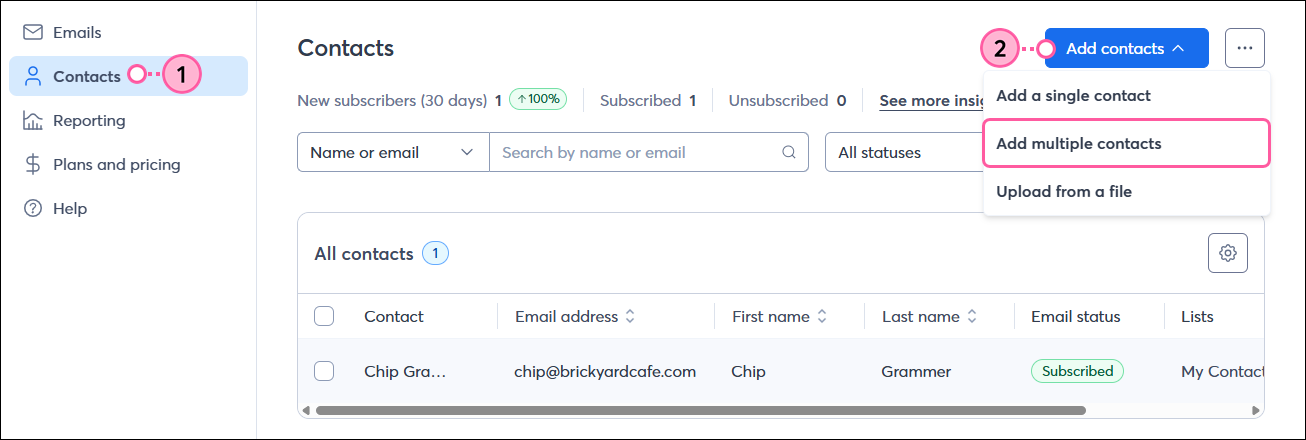
- From the left-hand navigation, click Contacts.
- Click Add contacts > Add multiple contacts.
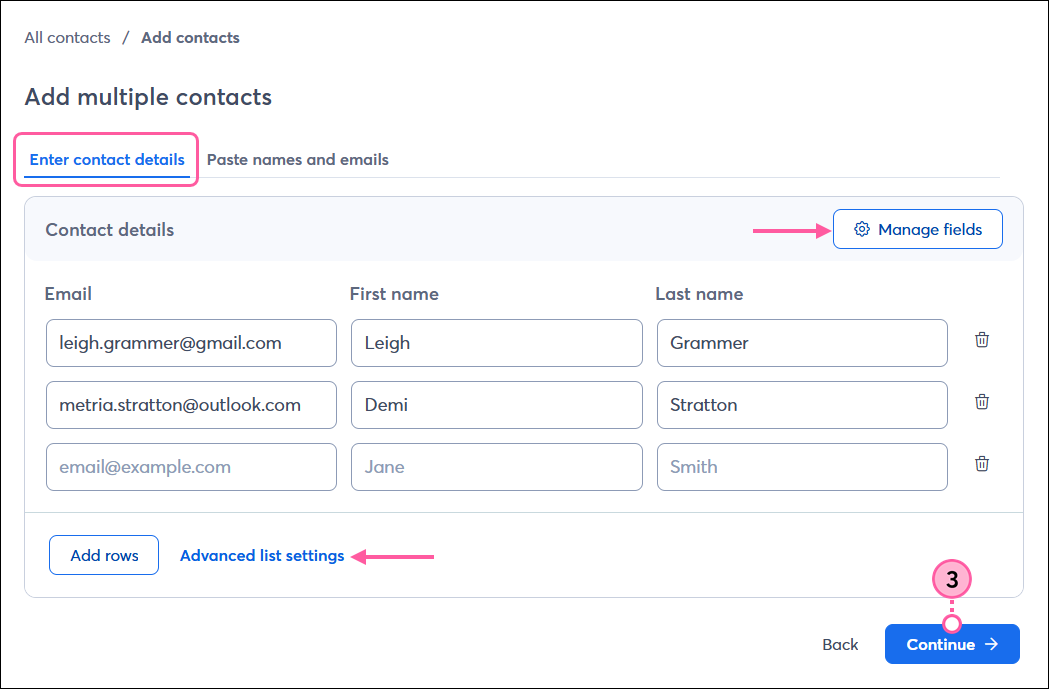
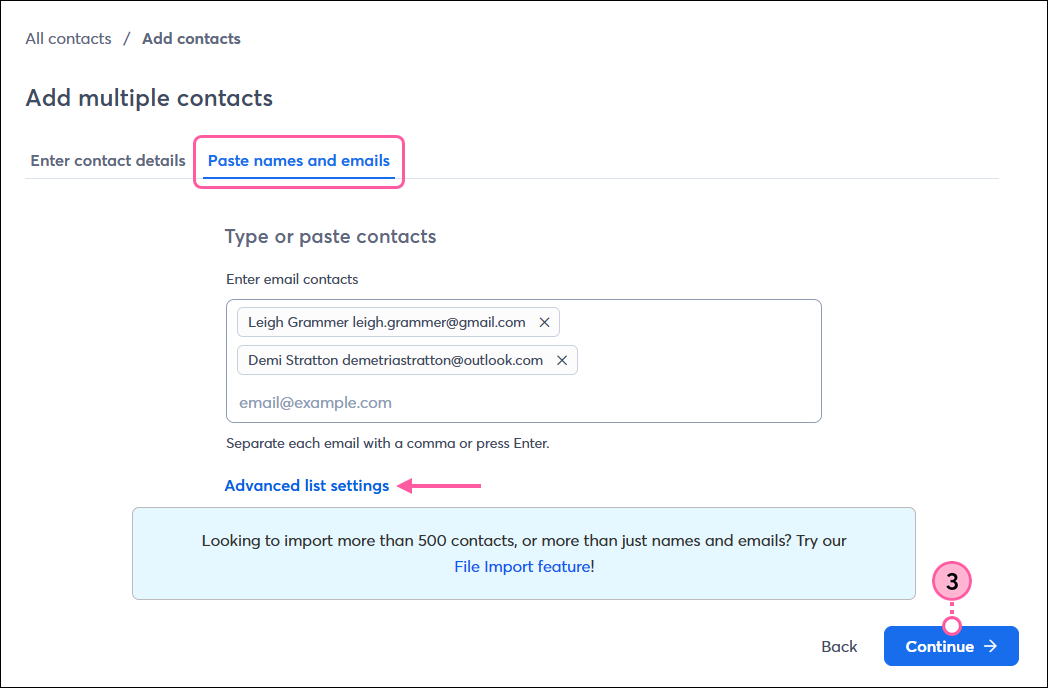
- Select one of the tabs to add your contact information and then click Continue:
Note: Clicking “Advanced list settings” lets you select the list(s) you want to add the contacts to. By default, a “My Contacts” list is already created for you, but you can create additional lists to add contacts to.
- Enter contact details - Enter the information for each contact field-by-field. Click Manage fields to add additional contact details, and click Add rows to add more contacts.
- Paste names and emails - Type or paste the email addresses and names of your contacts, adding a comma or pressing Enter after each one.
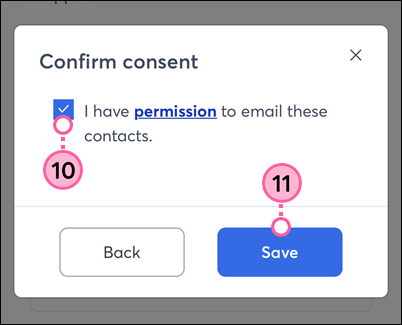
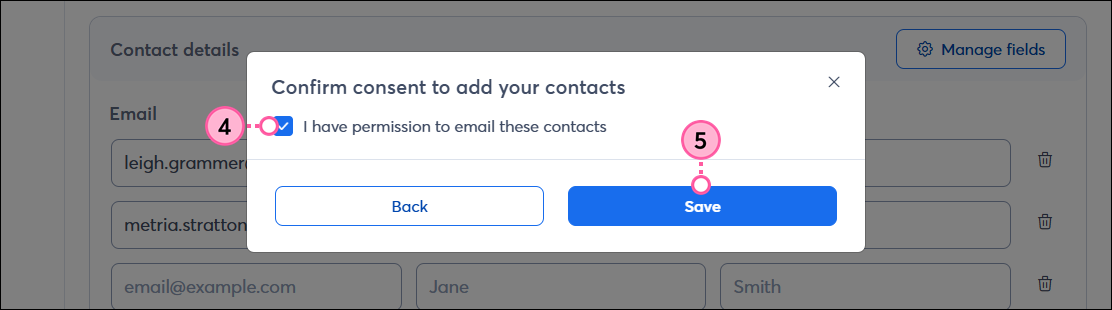
- Check the box to confirm you have permission to email these contacts.
- Click Save.
Upload a file of contacts
If your contacts are stored in a CSV, Excel, VCF, or plain text file, you can easily import them.
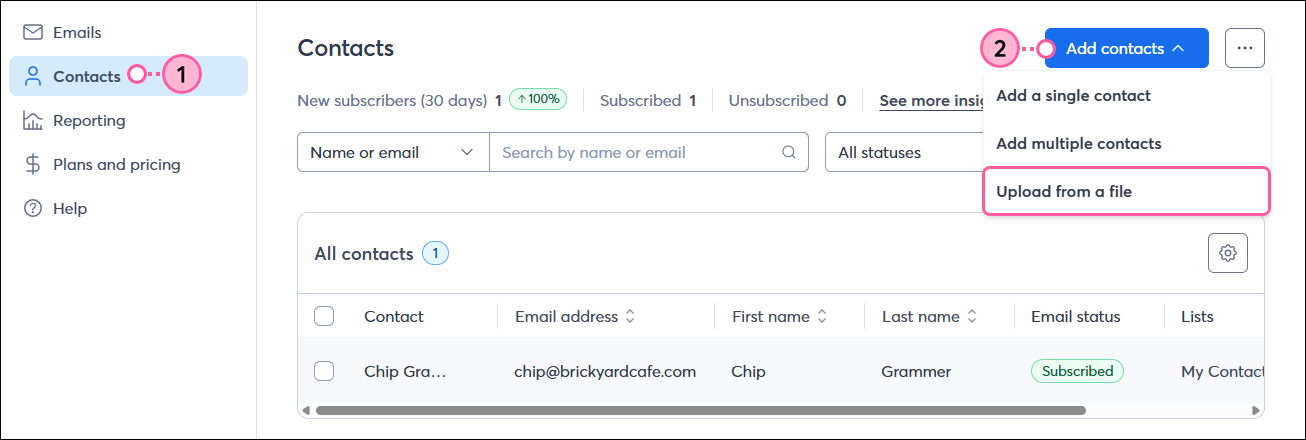
- From the left-hand navigation, click Contacts.
- Click Add contacts > Upload from a file.
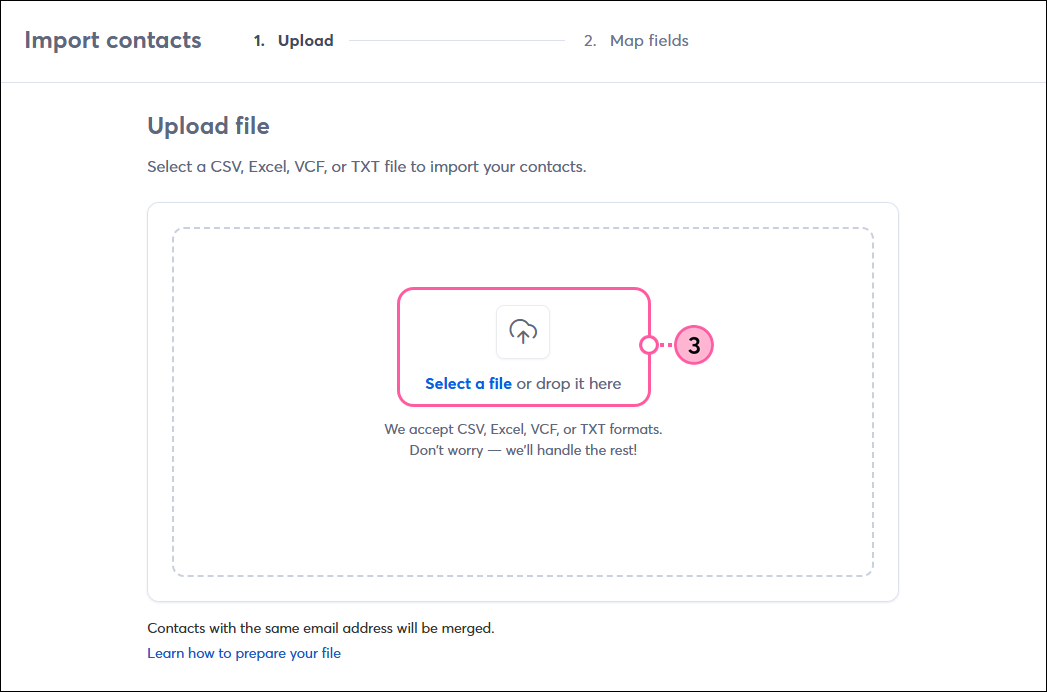
- Select the file from your computer.
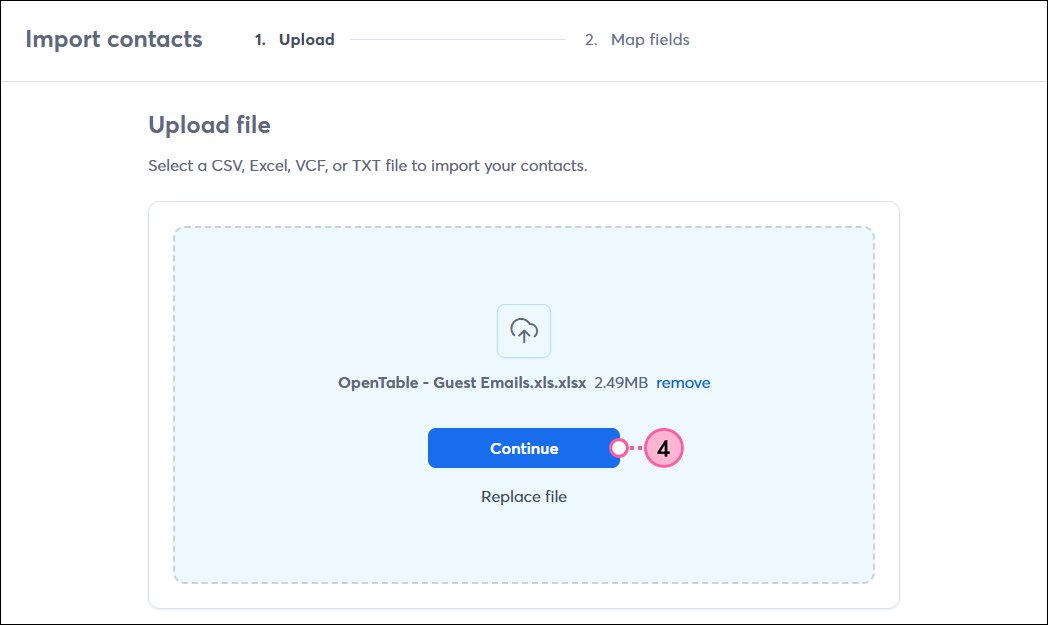
- Click Continue.
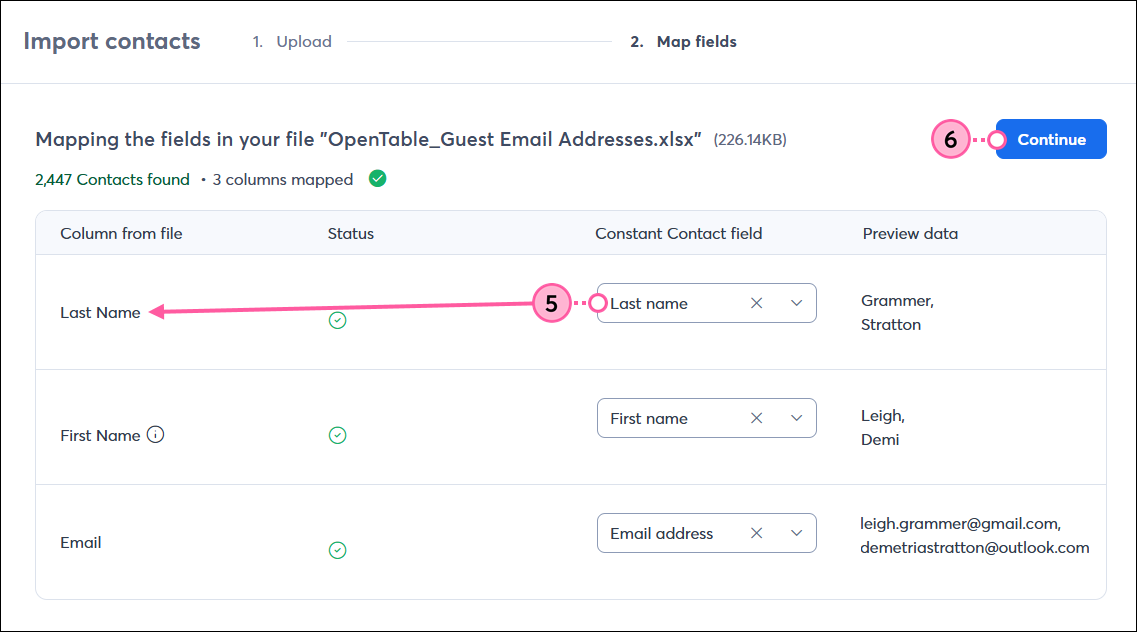
- Use the drop-downs to match the column headers from your file with the appropriate field names in Constant Contact.
- Click Continue.
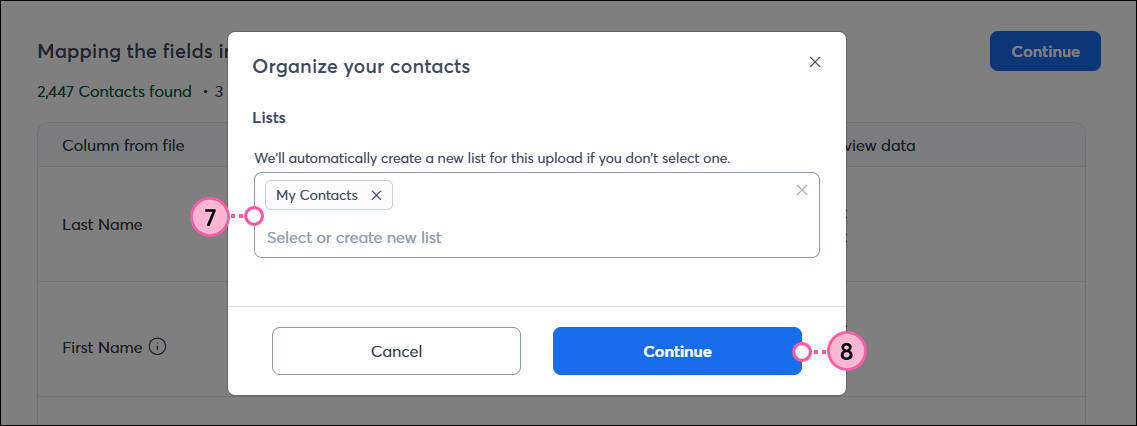
- Select the list(s) you want to add the contacts to. By default, a “My Contacts” list is already created for you, but you can create additional lists to add contacts to.
- Click Continue.
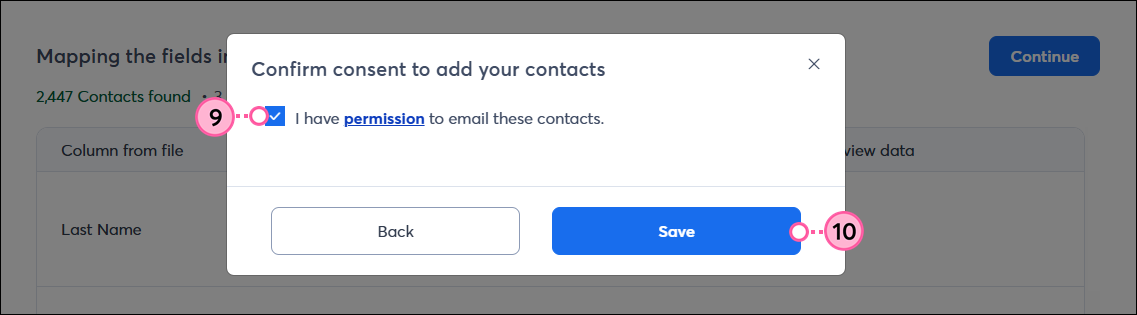
- Check the box to confirm you have permission to email these contacts.
- Click Save.
Manage your contacts
Search for a contact and view their details
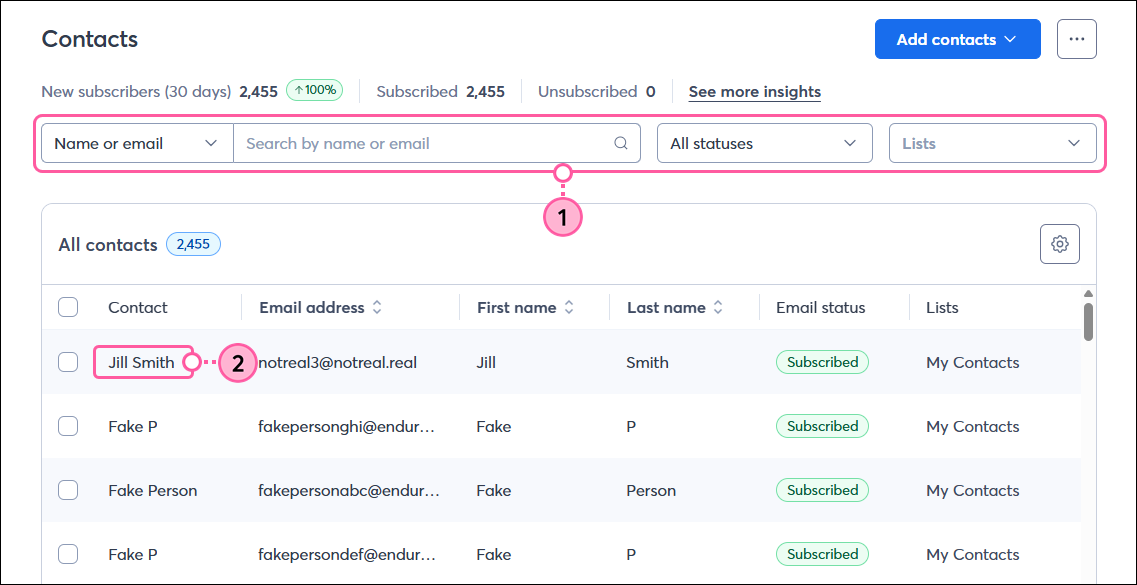
- On the Contacts page, you can see all the contacts added to your account. Use the filters and search field to find contacts based on a specific contact detail, permission status, or list.
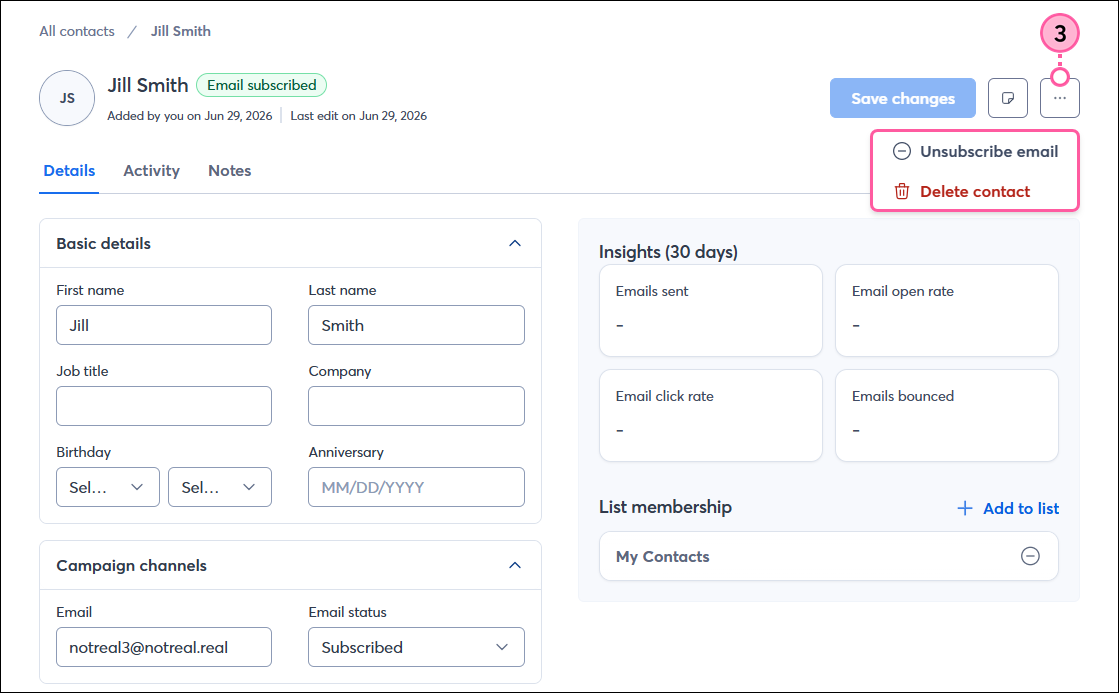
- Click on a contact’s name to view their details and email activity. You can edit their information if needed and add or remove them from lists.
- To remove a contact from your account, click the three dots in the upper-right and select:
- Unsubscribe email - to manually change the contact’s status to “Unsubscribed” and remove them from your lists.
- Delete contact - to remove the contact from your account. This action can’t be undone, but you can manually add the contacts back to your account at any time.
Create a contact list
To help you segment your contacts and send more targeted email content to different groups, you can create as many lists as you want.
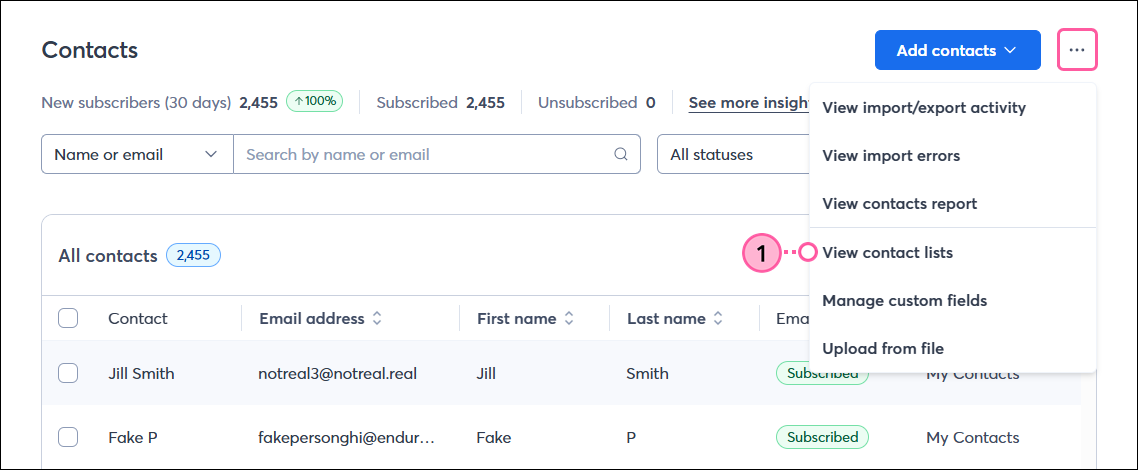
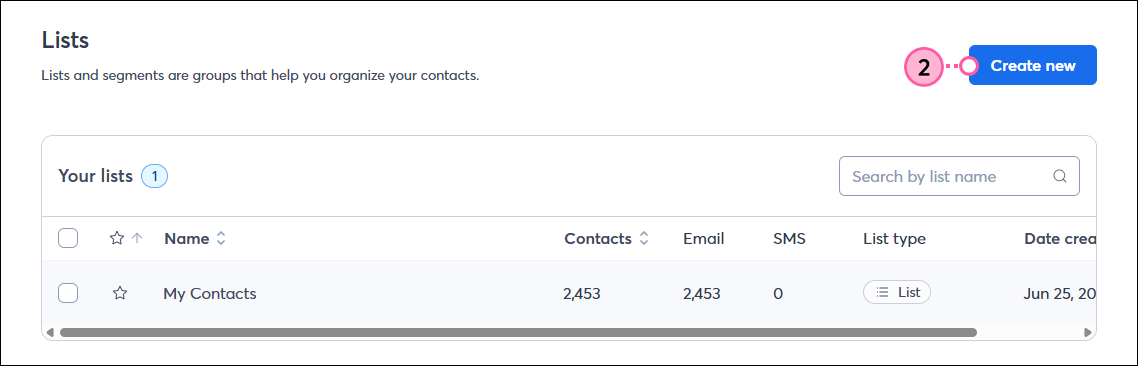
- From the Contacts page, click the three dots in the upper-right and select View contact lists.
- Click the Create new button.
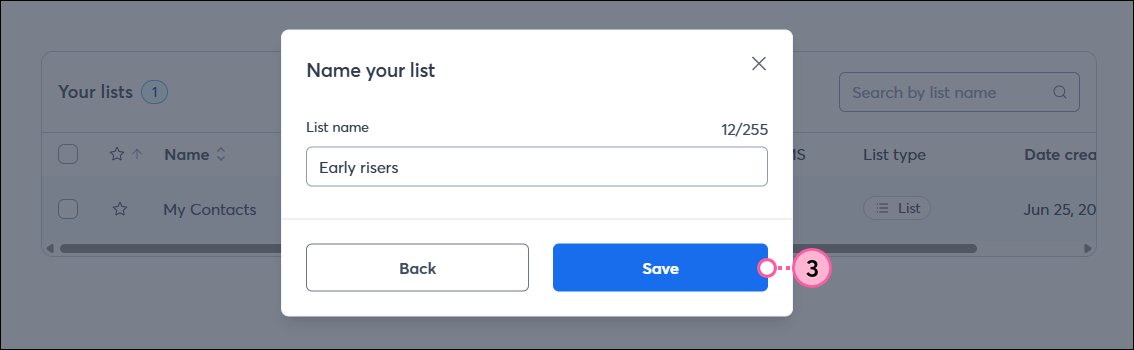
- Enter a name for the new list and click Save.
Add contacts (mobile web)
If you’re using Constant Contact on your mobile device's web browser (versus your desktop computer), it’s easy to add a single contact, a handful, or a file of contacts. You can only enter names and email addresses when manually adding contacts, but you can add additional details to the contact records later.
Add a single contact (mobile web)
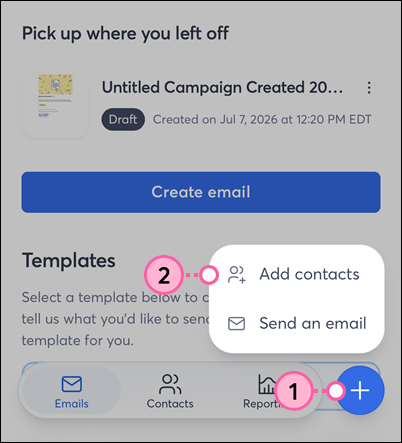
- From the bottom menu, tap the plus symbol.
- Tap Add contacts.
- Tap Add a single contact.
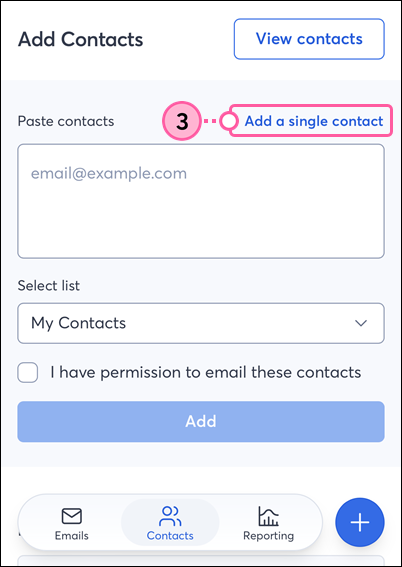
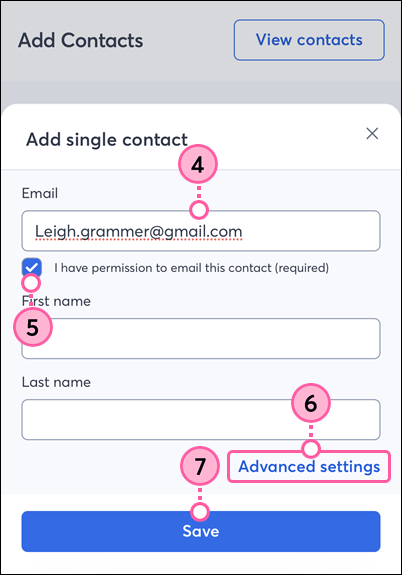
- Enter the contact’s email address and name, if you collected it.
- Check the box to confirm you have permission to email this contact.
- (Optional) Tap Advanced settings to select the list(s) you want to add the contact to. By default, a “My Contacts” list is already created for you, but you can create additional lists to add contacts to.
- Tap Save.
Add multiple contacts (mobile web)
- From the bottom menu, tap the plus symbol.
- Tap Add contacts.
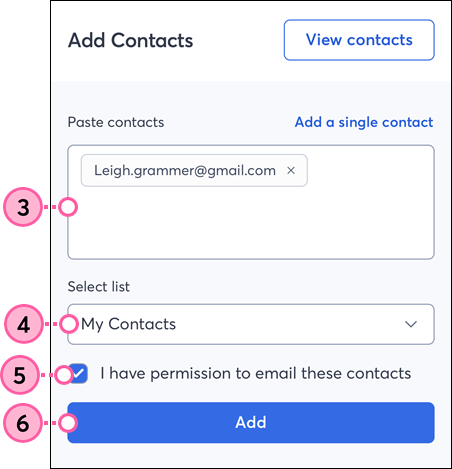
- Type or paste the contacts' email addresses and names, separating each contact with a comma or by hitting Enter.
- Select the contact list you want to add the contacts to.
- Check the box to confirm you have permission to email these contacts.
- Tap Add.
Upload a file of contacts (mobile web)
- From the bottom menu, tap the plus symbol.
- Tap Add contacts.
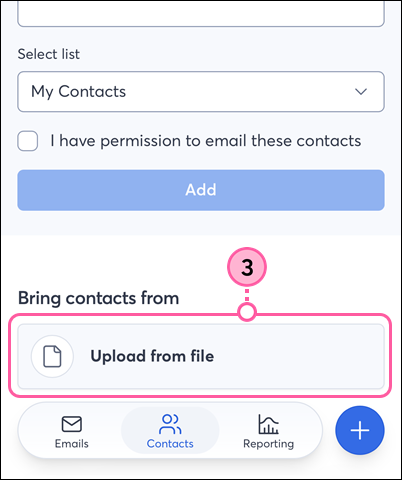
- Scroll down the page and tap Upload from file.
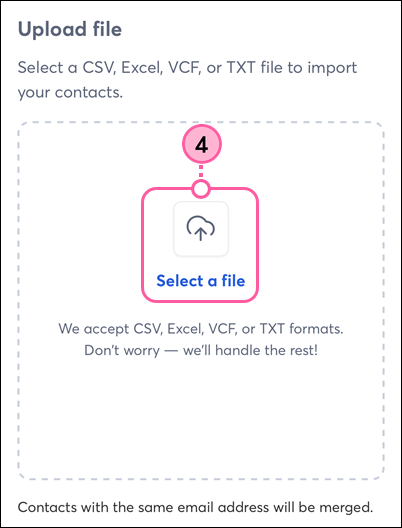
- Tap Select a file to choose a CSV, Excel, VCF, or TXT file from your device.
- Tap Continue.
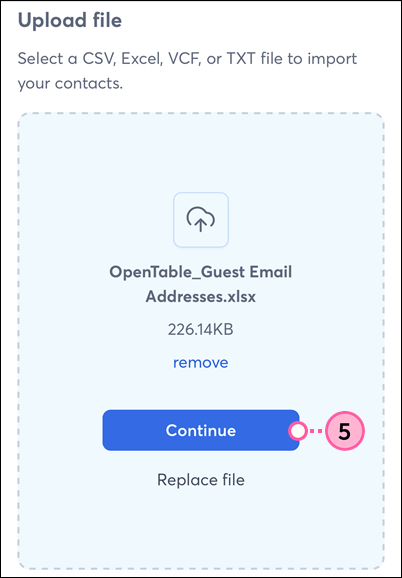
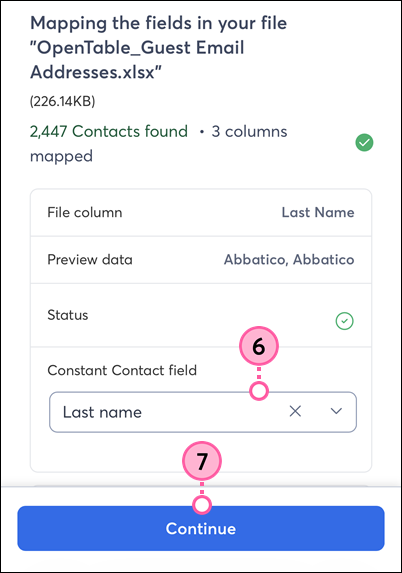
- Use the drop-downs to match the column headers from your file with the appropriate field names in Constant Contact. Scroll down the page to match all the columns.
- Tap Continue.
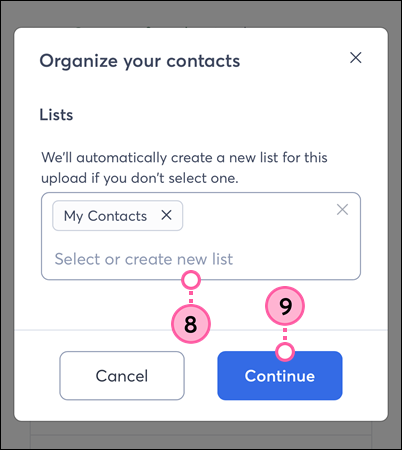
- Select the list(s) you want to add the contacts to. By default, a “My Contacts” list is already created for you, but you can create additional lists to add contacts to.
- Tap Continue.
- Check the box to confirm you have permission to email these contacts.
- Tap Save.