Email and Digital Marketing
How can we help you?
Search our help articles, video tutorials, and quickstart guides

You've got this. You've got us. Search our Knowledge Base to quickly find answers to your questions.

Use a contact filter to add contacts to an automation path

Article: 000053996
Updated: September 11, 2026

Customize the trigger for your automation by selecting additional contact filter criteria that your contacts must meet before they can trigger the automation

Email Plus IconUpgrade your plan: Not seeing this feature in your account? It may not be an available feature in your current email plan or trial account. Upgrading your email plan gives you access to additional features and products. Learn more.


When building an automation path, contact filters give you more control over the contacts that trigger your automation by combining the main trigger with additional criteria, such as email engagement, list membership, custom tags, or ecommerce, to ensure the right contacts receive the right content at the right time.


Light Bulb IconDid you know? If you want to specify when a contact automatically stops proceeding down an automation path, set up an auto-stop.


How does a contact filter work?

The trigger for your automation path lets you define who is eligible to start your path, like when they join your list, have a birthday, or abandon their shopping cart. Combining a trigger with a contact filter gives you even more control because your contacts must both trigger the path and satisfy the criteria in your filter before they can trigger your automation. You can select criteria based on things like email engagement, list membership, and shopping activity, and you can also use AND/OR logic to create more complex rules to add contacts to your path.


Here's an example: A retail shop has two store locations in different towns. Their sign-up form has a required field for a zip code that a contact must include when they opt in. The shop can set up two welcome automations, one for each zip code, that trigger when a contact subscribes. Using a contact filter, the store can specify the zip code for each automation, ensuring that each new contact receives more meaningful content about the store closest to them. The contact filter also uses AND/OR logic that allows the store to specify that contacts without one of the two zip codes trigger the automation for their flagship store.


Bar chart iconThe data shows: When your contacts are segmented, it gives you the ability to create more targeted and meaningful content for them, and when your content is more relevant, your contacts are more likely to engage with it!


How do I add contact filter criteria to my automation?

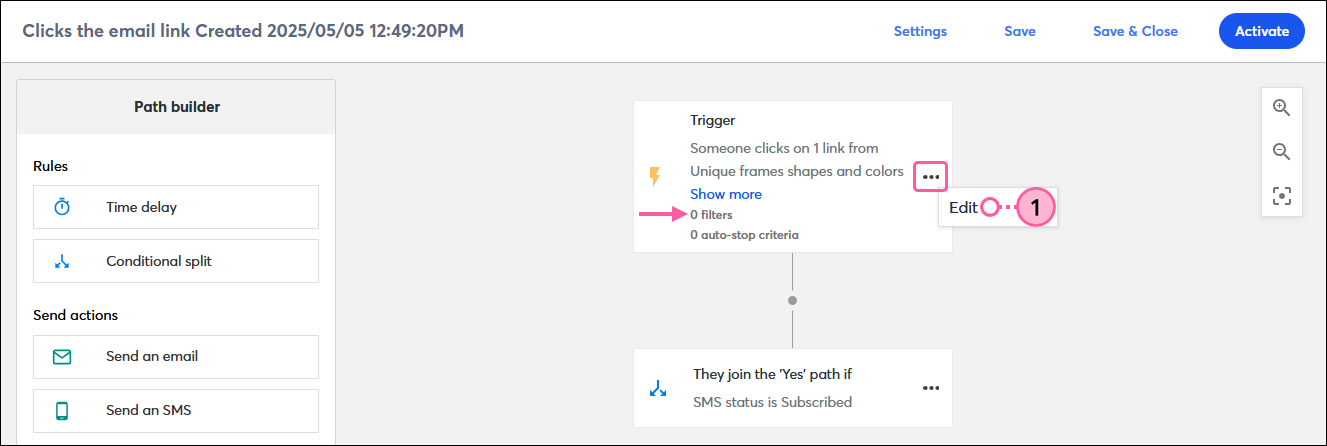
  1. On the Trigger step in your path click . . . > Edit.

    Automation path builder trigger step with 0 filters and menu expanded and Edit option selected

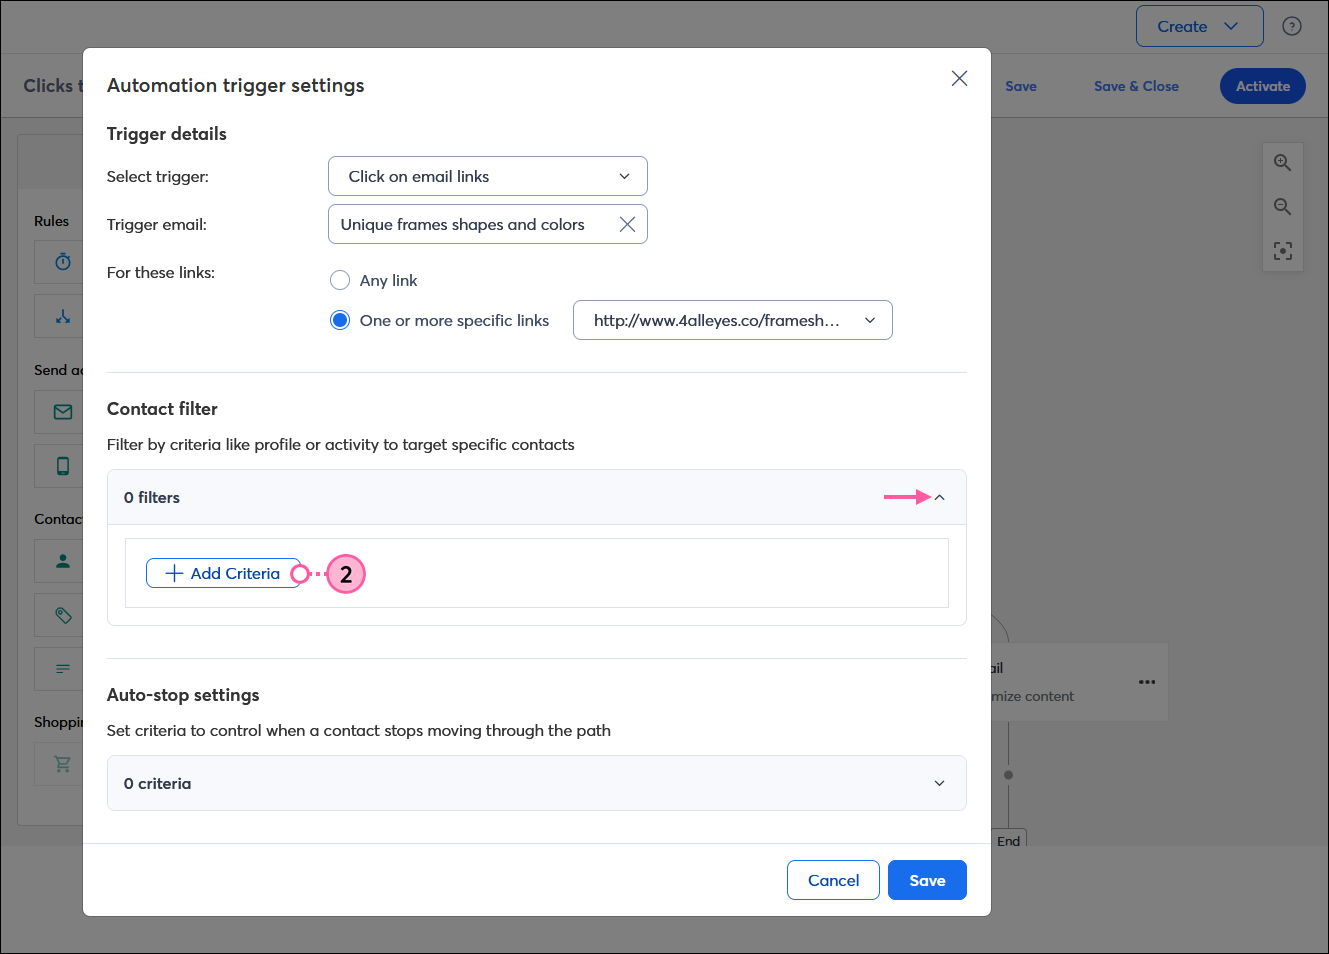
  2. In the Automation trigger settings overlay, click the 0 filters section within the Contact filter section to expand it, then click the +Add criteria button.

    Automation trigger settings overlay with Contact filter section, 0 filter section expanded with + Add Criteria button

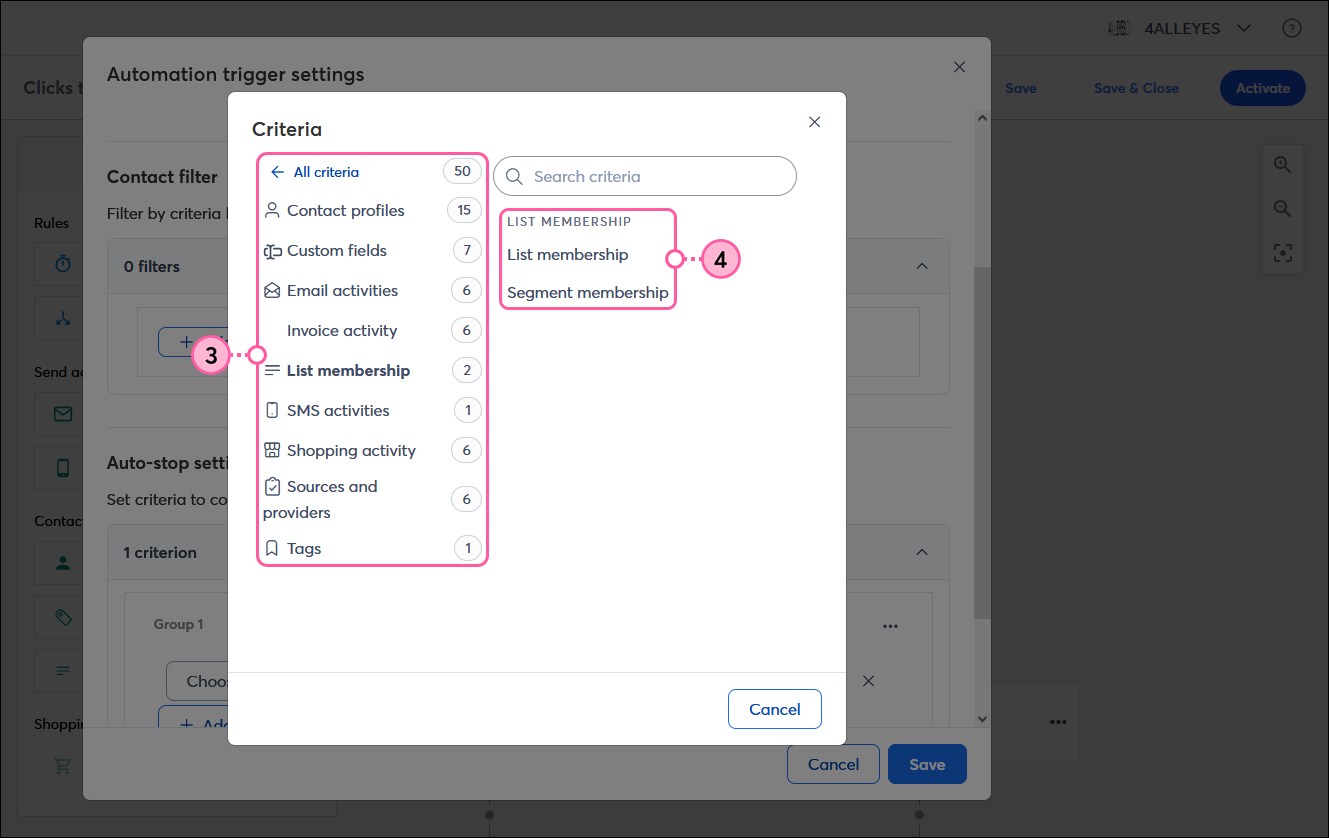
  3. Select the category of criteria you want to use.
  4. Click on a criterion to select it.

    Automation trigger settings overlay with Criteria overlay on top of it, All criteria options with List membership option selected, and List membership criteria options

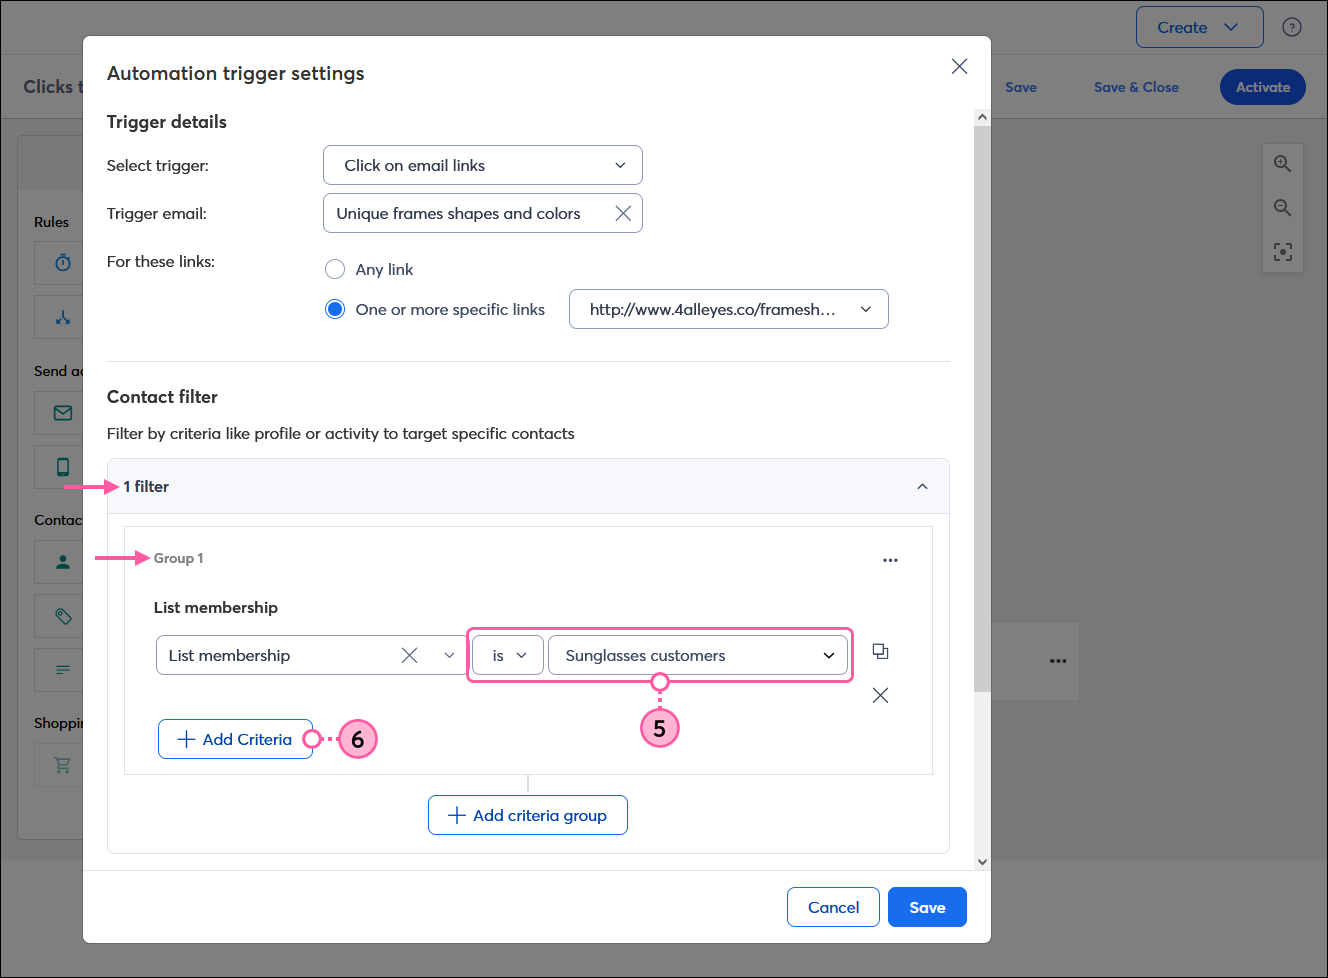
  5. Use the drop-down menus to select the operators for your filter. (See a full list of operators for contact profiles and behavior, engagement, and shopping activity.)
    Note: If you change your mind about which criterion you're using, you can always click on its drop-down menu to select a different one, or click the X to delete it and start again.
  6. (Optional) Click the + Add criteria button within the group to use AND/OR logic between the criteria within the group.

    Automation trigger settings overlay with Contact filter section and filter section expanded with List membership filter

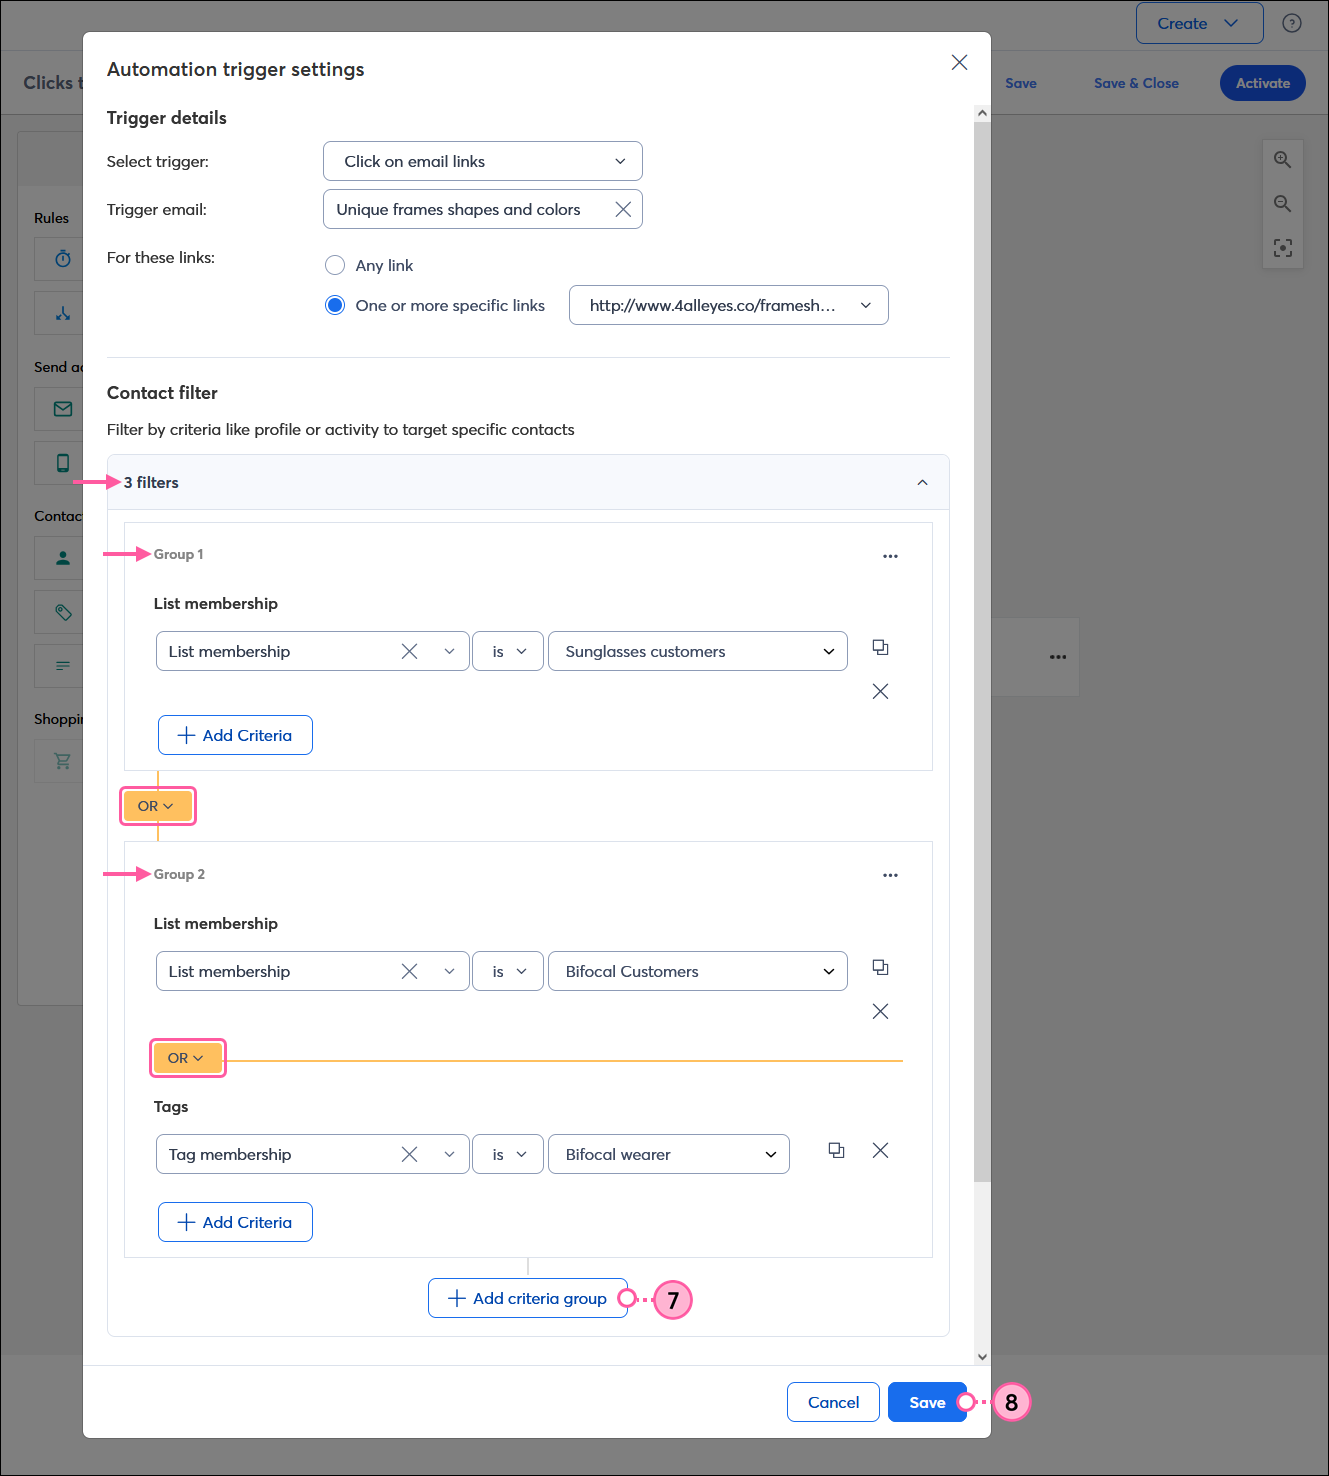
  7. (Optional) Click the + Add criteria group button to use AND/OR logic between groups of criteria. For example, in the image below, there is OR logic between Groups 1 and 2 so that a contact starts the automation path if they are either on the "Sunglasses customer" list OR if they are either on the "Bifocal Customers" list OR are tagged as a "Bifocal wearer."
  8. Click the Save button to continue building your automation path.

    Automation trigger settings with Contact filter section and filters expanded, Group 1 filter with OR logic and OR logic between Group 1 and Group 2 with Add criteria group button and Save button


Light Bulb IconDid you know? Your automation path, including the contact filter, can be edited at any time so you can make adjustments as needed, over time.


Questions?

Ask the Community

Did this article answer your question?


Constant Contact Logo

Copyright © 2026 · All Rights Reserved · Constant Contact · Privacy Center