Email and Digital Marketing
How can we help you?
Search our help articles, video tutorials, and quickstart guides

You've got this. You've got us. Search our Knowledge Base to quickly find answers to your questions.

Add a Meta Pixel ID or Google Tracking ID to a landing page

Article: 000048291
Updated: February 26, 2026

Track visits to your Sign-up or Custom Landing Page through Google or Meta by adding a Google Measurement ID or Meta Pixel to the page settings

Interested in tracking user activity from your Sign-up Landing Page or Custom Landing Page to help better understand your contacts and your marketing performance? Our landing pages are compatible with both Google Analytics 4 and the Meta Pixel. Here's how to add one or both to the page settings:


Add a Google tracking ID

Google Analytics anonymously tracks how visitors interact with a website or landing page and presents the information in an easy-to-read, visual report. It shows you geographic data for your site visitors so you can better allocate your marketing time and effort with Google Ads, and it shows you how well your page is performing so you can make content or design changes if needed.

  1. From the Google Analytics dashboard, find your unique Measurement ID for your landing page, then copy the entire ID from the "G-" on.

    Google Analytics Home page with Measurement ID

  2. While creating or editing your landing page, click Continue (for Sign-up Landing Pages, click twice from the Sign-up editor, or once from the Thank you editor) to get to the Page settings.

    Sign-up Landing Page editor with Sign up tab selected and Continue button

  3. Expand the Advanced section and check the "Add third-party analytics" box.
  4. Paste the Measurement ID into the Google tracking ID field.
  5. Click the Activate or Save and reactivate button in the upper-right corner of the page.

    Sign-up Landing Page Page Settings with Advanced section expanded and Add third-party analytics option selected, and Google tracking ID field

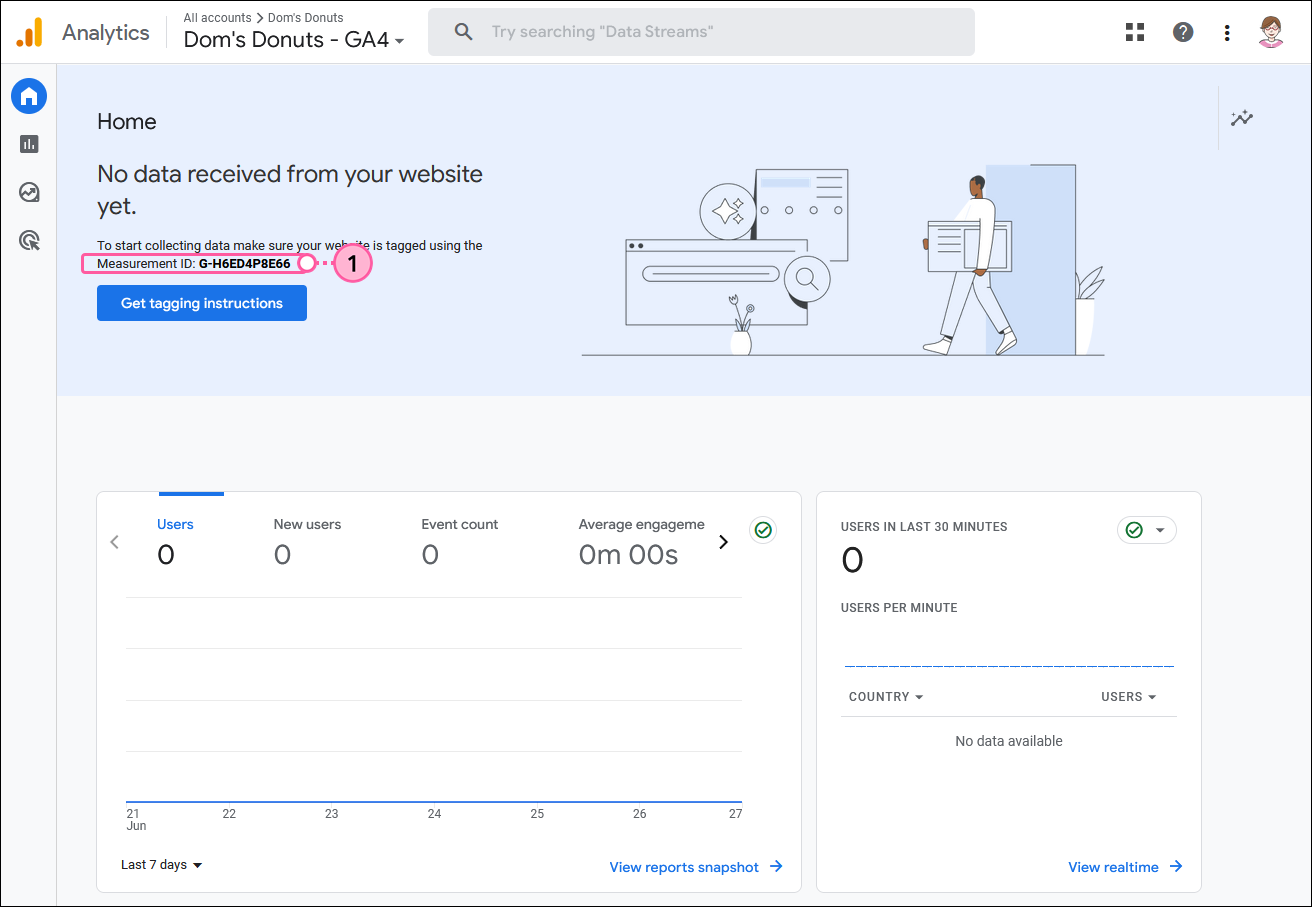
For more information about the Google Tracking ID, please see Google's support.


Add a Meta Pixel

The Meta Pixel is a tracking pixel that can be added to a webpage or landing page. Once the pixel is installed on your page, Meta can track your page visitors and match them to their Facebook pages so that you can target them with Facebook and Instagram Ads. In your Facebook Ads Manager, you can then use the data to track conversions, create custom audiences, or set up dynamic ads.

  1. From the Meta Business Suite, create a Meta Pixel and copy the pixel ID.

    Meta Business settings with Data sources menu and Pixels option selected, with pixel ID

  2. While creating or editing your landing page, click Continue (for Sign-up Landing Pages, click twice from the Sign-up editor, or once from the Thank you editor) to get to the Page settings.

    Sign-up Landing Page editor with Sign up tab selected and Continue button

  3. Expand the Advanced section and check the "Add third-party analytics" box.
  4. Paste the Meta Pixel ID into the field.
  5. Click the Activate or Save and reactivate button in the upper-right corner of the page.

    Sign-up Landing Page Page Settings with Advanced section expanded and Add third-party analytics option selected, and Meta Pixel ID field

For more information about the Meta Pixel, please see Meta's support.


Any links we provide from non-Constant Contact sites or information about non-Constant Contact products or services are provided as a courtesy and should not be construed as an endorsement by Constant Contact.


Questions?

Ask the Community

Did this article answer your question?


Constant Contact Logo

Copyright © 2026 · All Rights Reserved · Constant Contact · Privacy Center