We're making it easier to get around Constant Contact with a brand new left navigation. Not all accounts have that change yet, so if your navigation looks different from our articles, that's why–but everything from the top can now be found on the left!

Email and Digital Marketing
How can we help you?
Search our help articles, video tutorials, and quickstart guides

You've got this. You've got us. Search our Knowledge Base to quickly find answers to your questions.

Embed the email archive widget on your website

Article: 000008759
Updated: January 14, 2025

Add the HTML code for the email archive widget to your website's source code and choose the number of emails you want to display

Email Plus IconReview your plan: This feature is not available in all Constant Contact plans. If you don’t have full access, you may need to upgrade your plan.


The embeddable email archive widget lets you host the links for up to 100 of your previously sent emails on your website. Visitors to your website can catch up on any emails they may have missed, and if you put the widget close to the sign-up form on your website, you may even get a few new subscribers to your email list.
 

Exclamation Point IconImportant: This article requires you to use HTML code. If you work with a webmaster, they can help you install the code on your website. If you're using a website builder, please contact their support for help with placing the code.


To get started, copy the HTML code for the widget and then add the HTML code to your website so your emails can be seen there:


You only need to add the code to your website once, and then you can add and remove emails from your widget on the Campaigns tab. The most recent emails to be archived appear at the top of the list on your website.


Get the code for the email archive widget

  1. Click Marketing channels > All campaigns.
  2. Click the Settings button.

    All Campaigns Tab and Settings Button 
     
  3. Click the Email Archive tab.
  4. Use the arrows to select the maximum number of emails you want to display on your website.
    Note: If you archive more emails than the number you set here, only the emails most recently archived will show up on your website.
  5. Click "Copy to clipboard" to copy the code for the widget.
  6. When you're finished, click Close.

    Settings overlay, Email Archive tab, Up and Down arrows, Copy to Clipboard link, and Close button


Add the code to your website

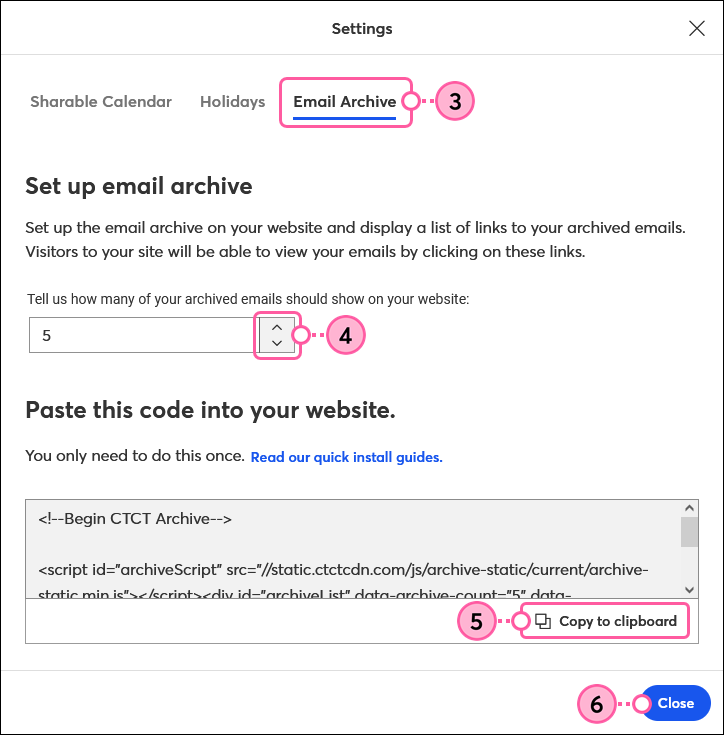
Now you need to paste the code into the HTML portion of your website's source code. The code can be added to display in any area of your website and can even be customized with CSS to match the look and feel of your website. Please refer to your webmaster for help or contact the support for your website builder.
 

Light bulb iconTip: Encourage your website visitors to sign up for your email list by placing the widget near the inline sign-up form on your website!


BigCommerce

  1. Copy the code for the widget.
  2. Open BigCommerce and click Storefront Content > Web Pages.
  3. Click on the page where you want the widget to display.
  4. Click the HTML button.
  5. Paste the code into the editor and click Update.

For help adding the code to your BigCommerce website, please contact your webmaster or view BigCommerce's support.


Dreamweaver

  1. Copy the code for the widget.
  2. Open your HTML file in Dreamweaver.
  3. Decide where you want your widget to display and paste the code into your HTML source code.

For help adding the code to your Dreamweaver website, please contact your webmaster or view Dreamweaver's support.


GoDaddy Website Builder

  1. Copy the code for the widget.
  2. Edit your GoDaddy site.
  3. Drag an HTML block into your webpage.
  4. Paste the code into the panel and click Save.

For help adding the code to your BigCommerce website, please contact your webmaster or GoDaddy's support.


iPage WebsiteBuilder

  1. Copy the code for the widget.
  2. Drag an Embed HTML element into your webpage.
  3. Click "Insert HTML."
  4. Paste the code into the Body HTML section.
  5. Click OK to save the code.

For help adding the code to your iPage website, please contact your webmaster or view iPage's support.


Shopify

  1. Copy the code for the widget.
  2. In your Shopify account, click Online Store and click the Customize button.
  3. Click Theme actions > Edit Code.
  4. Click Sections and click on the content block where you want to add the widget. For example, hero.liquid adds the widget after your main image, and slideshow.liquid adds the widget after the slideshow block.
  5.  Paste the code after the last line of existing code and click Save.

For help adding the code to your Shopify website, please contact your webmaster or view Shopify's support.


SiteBuilder

  1. Copy the code for the widget.
  2. In the Sitebuilder website editor dashboard, click Elements.
  3. Paste the code into the HTML block.
  4. Drag the HTML block to the desired page and location on your webpage.

For help adding the code to your SiteBuilder website, please contact your webmaster or view SiteBuilder's support.


Squarespace

  1. Copy the code for the widget.
  2. In Squarespace, select the desired page where you want your sign-up form to display and click Edit.
  3. Click the Add Block button in the top right corner of the content editor.
  4. Scroll through the options and select Code.
  5. Paste the code into the block and click Apply.
  6. Drag the code block to the desired location on the page.
  7. Click Save.

For help adding the code to your Squarespace website, please contact your webmaster or view Squarespace's support.


Website.com

  1. Copy the code for the widget.
  2. Click the + button to add new content to your webpage.
  3. Select "Other."
  4. In the Custom HTML section, click HTML.
  5. Click in the Custom HTML container and click EDIT HTML CODE.
  6. Paste the code in the HTML field.

For help adding the code to your website.com website, please contact your webmaster or view website.com's support.


Weebly

  1. Copy the code for the widget.
  2. In the Weebly website editor dashboard, select the "Embed code" option on the left hand toolbar.
  3. Click and drag the block to the desired page and location on your webpage.
  4. Paste the code into the block.
  5. Save and Publish.

For help adding the code to your Weebly website, please contact your webmaster or view Weebly's support.


Wix

  1. Copy the code for the widget.
  2. Edit your webpage in Wix.
  3. Click Add > More.
  4. Click HTML Code.
  5. Drag the block to the desired page and location on your webpage.
  6. Click Enter Code.
  7. Paste your code and click Update.

For help adding the code to your Wix website, please contact your webmaster or view Wix's support.


Wordpress.org

  1. Copy the code for the widget.
  2. From the Dashboard on the left-hand side, select Pages > All Pages.
  3. Click on the name of the page where you want to add the code.
  4. Click the Text tab on the right-hand side.
  5. Paste the code into the text block where you want the form to display.
  6. In the Publish section, click Update.

For help adding the code to your Wordpress.org website, please contact your webmaster or view Wordpress.org's support.


Wordpress.com

Wordpress.com is not the same as Wordpress.org. Wordpress.com doesn't support 3rd party Javascript or plugins of any kind. If you're using Wordpress.com, you can create your own email archive by copying the permanent URLs for your sent emails and using them to create text links in your wordpress.com webpage.

For help adding text links to your Wordpress.com website, please contact your webmaster or view Wordpress.com's support.


View examples of the email archive widget

Using the same fonts and colors for your email archive widget that you use in the branding of your website ties everything together. You can apply CSS styles to the code of the widget to change the way the list of emails looks on your website. When website visitors click to view one of your archived emails, they'll be taken to the email's permanent URL.


Standard email archive widgetEmail archive widget with styles applied to the code
Archive Widget Out-of-the-boxArchive Widget Styled With Border
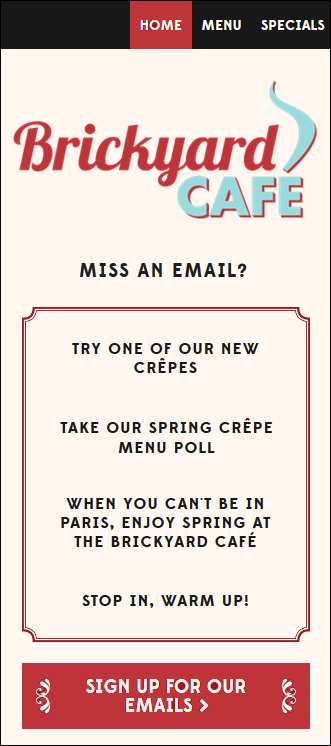
The standard email archive widget is a simple bulleted list. The links underline when you place
your mouse over them.
In this example, the font has been changed to match the website, the bullets have been centered and turned the same color as the background to make them disappear, and a border-image property has been applied.


Any links we provide from non-Constant Contact sites or information about non-Constant Contact products or services are provided as a courtesy and should not be construed as an endorsement by Constant Contact.


Questions?

Ask the Community

Did this article answer your question?


Constant Contact Logo

Copyright © 2025 · All Rights Reserved · Constant Contact · Privacy Center