This article will detail how to create and configure chatbots in Lead Gen & CRM.
| Administrators | ✓ | |
| Company Managers | ✓ | |
| Marketing Managers | ✓ | |
| Sales Managers | ✓ | |
| Salespersons | ||
| Jr. Salespersons |
Chatbots are an automated communication service. They allow users to search for answers about your content, and they provide a series of answers and means of collecting data. With this, chatbots can quickly and effectively navigate users to the solutions for their problems. Failing that, they can automate the process of contacting you for additional support.
Conversations through chatbots use a specific logic path. A chatbot workflow starts with a welcome message, progresses to an initial question, provides specific answers, allows the user to respond, collects any necessary information, and then displays a message that ends the conversation. This logic path best emulates person-to-person communication.
Chatbots require information on where it will be placed, who will be able to interact with it, and how it will appear. Chatbots cannot be created unless all of this information is entered and configured. Once chatbots have been created, you will be able to configure their workflows.
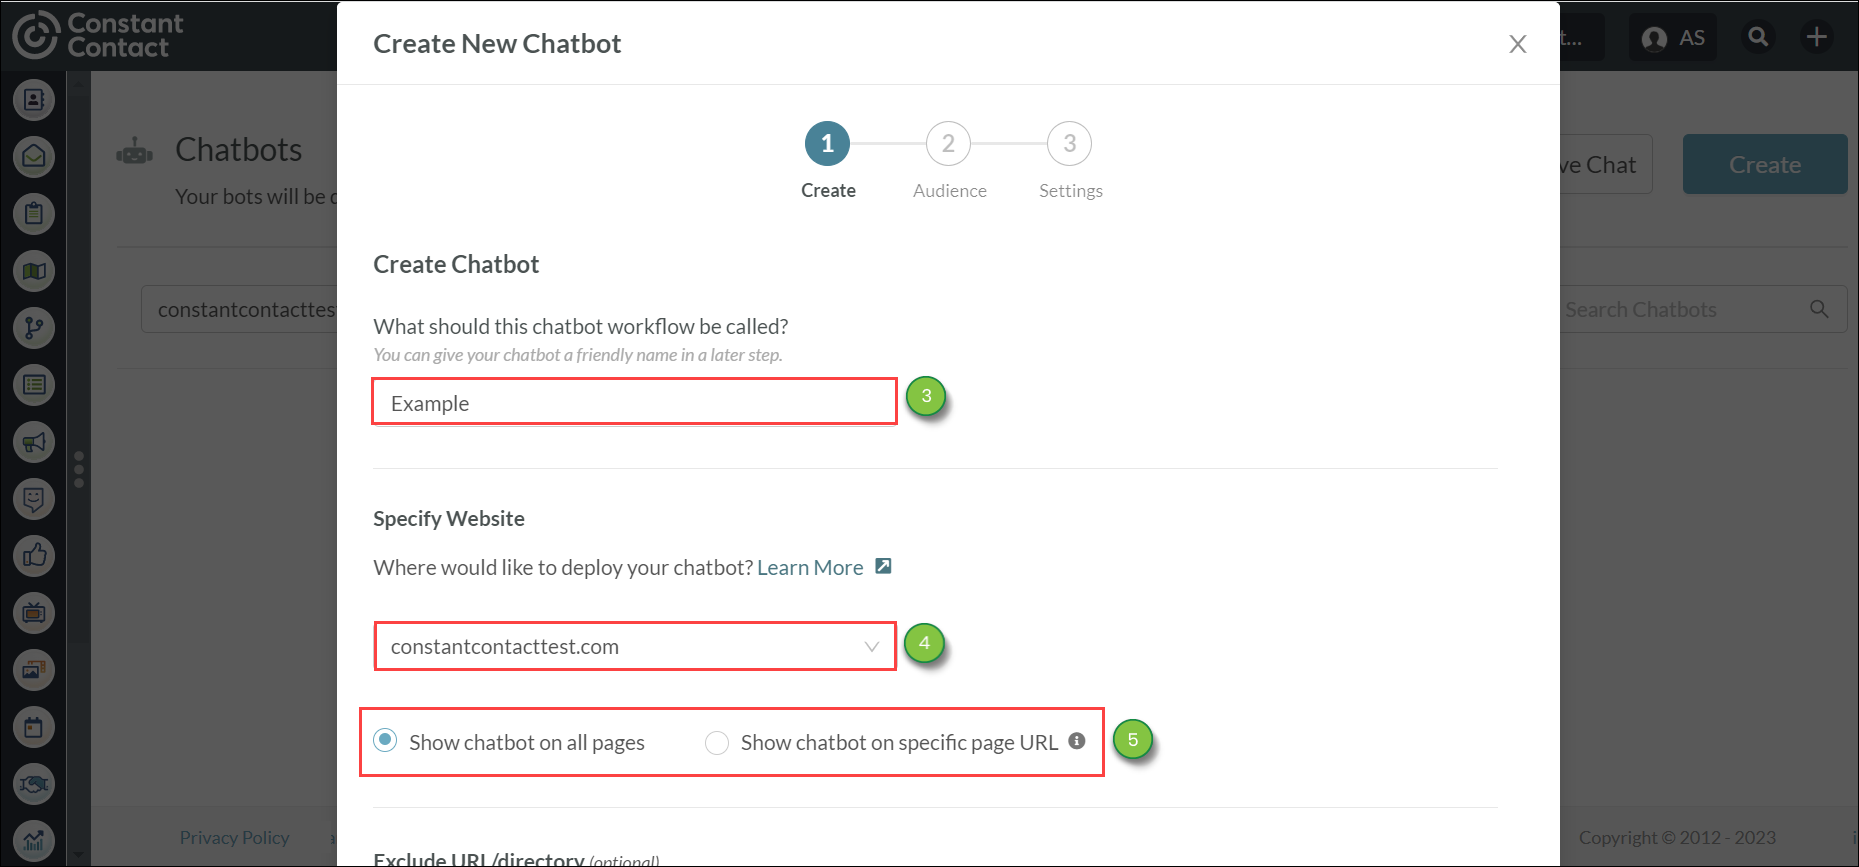
To create a chatbot, you will need to enter basic chatbot data. This includes what name you give it and where it will be located on a website.
Important: You must have a tracking code enabled on your site to activate your chatbot.
To enter and configure chatbot data, do the following:
| Option | Description | |||
|
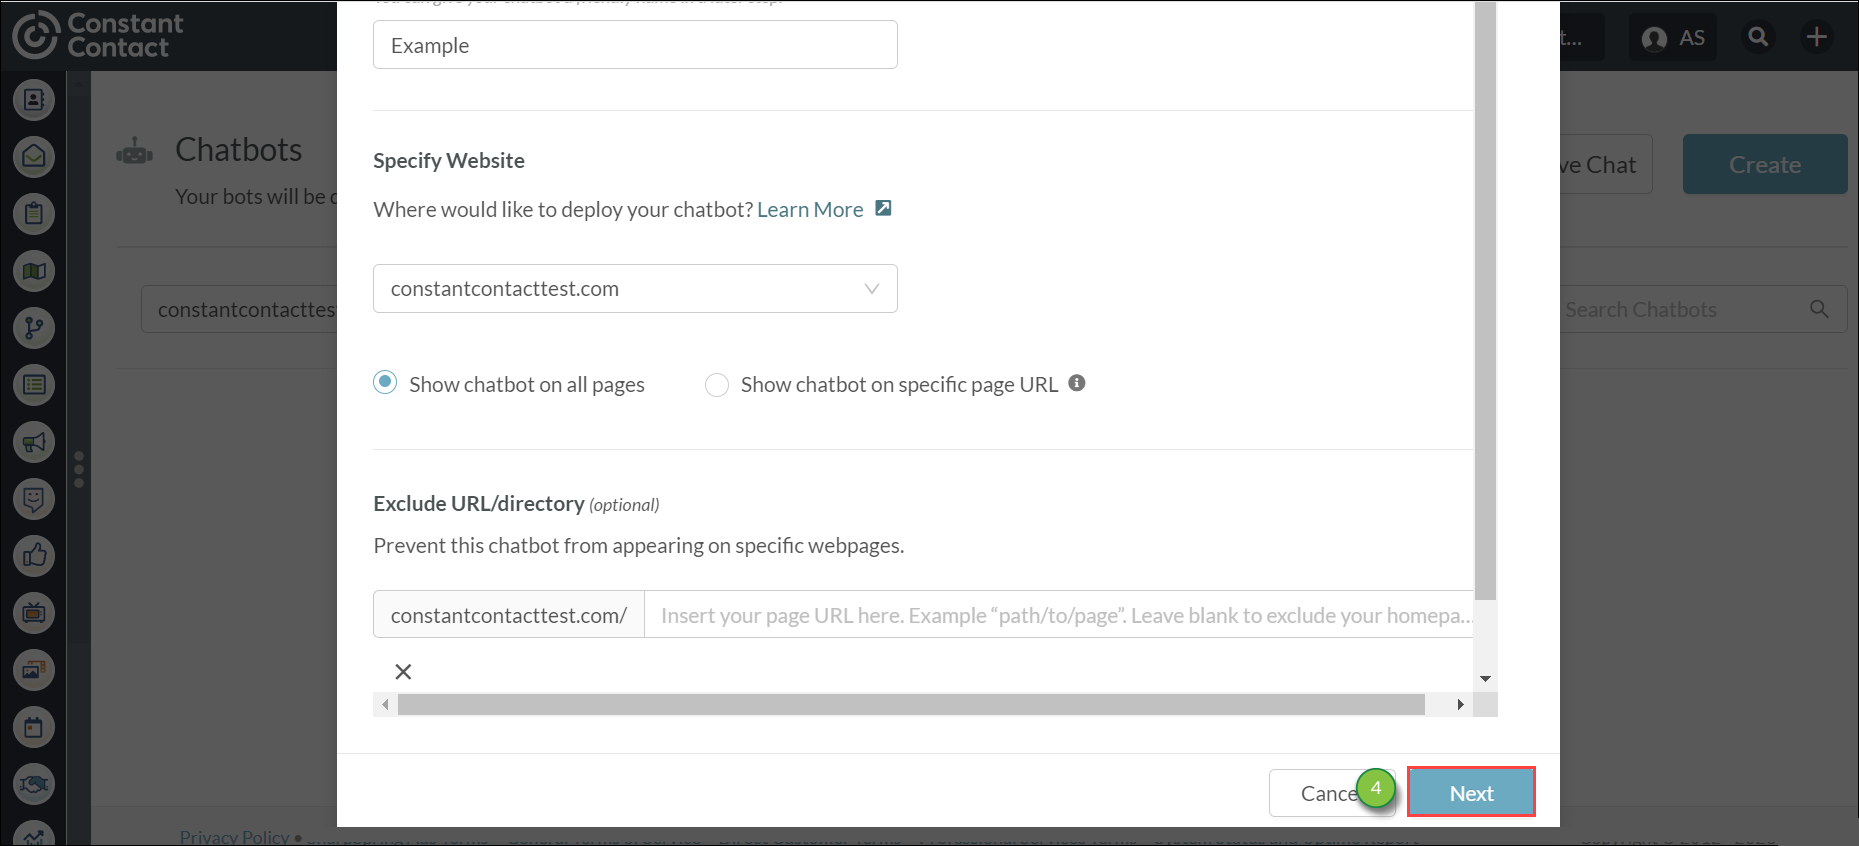
Show chatbot | Displays the chatbot on every page that is part of the website. | | ||
|
Show chatbot on |
Displays the chatbot only on certain specified website pages. Enter the specific page URL in the field. The URL must include a trailing / forward slash if there is one in the live URL.
Note: If you select this option, but leave the field blank, the chatbot will appear on only the homepage of the website. |
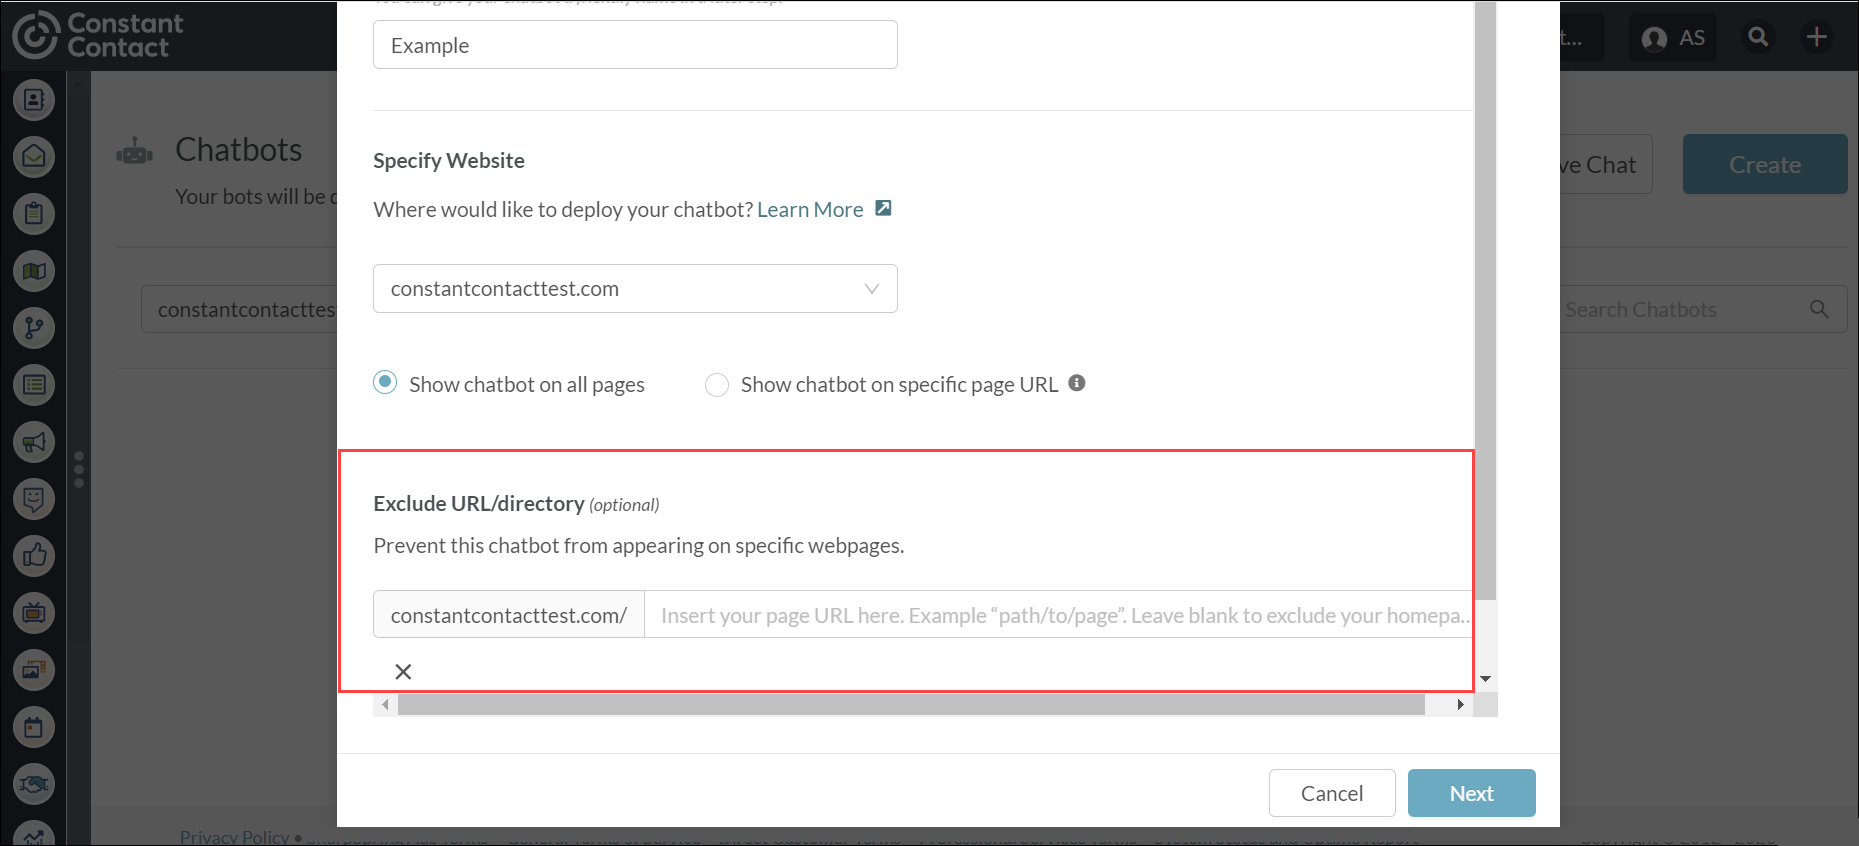
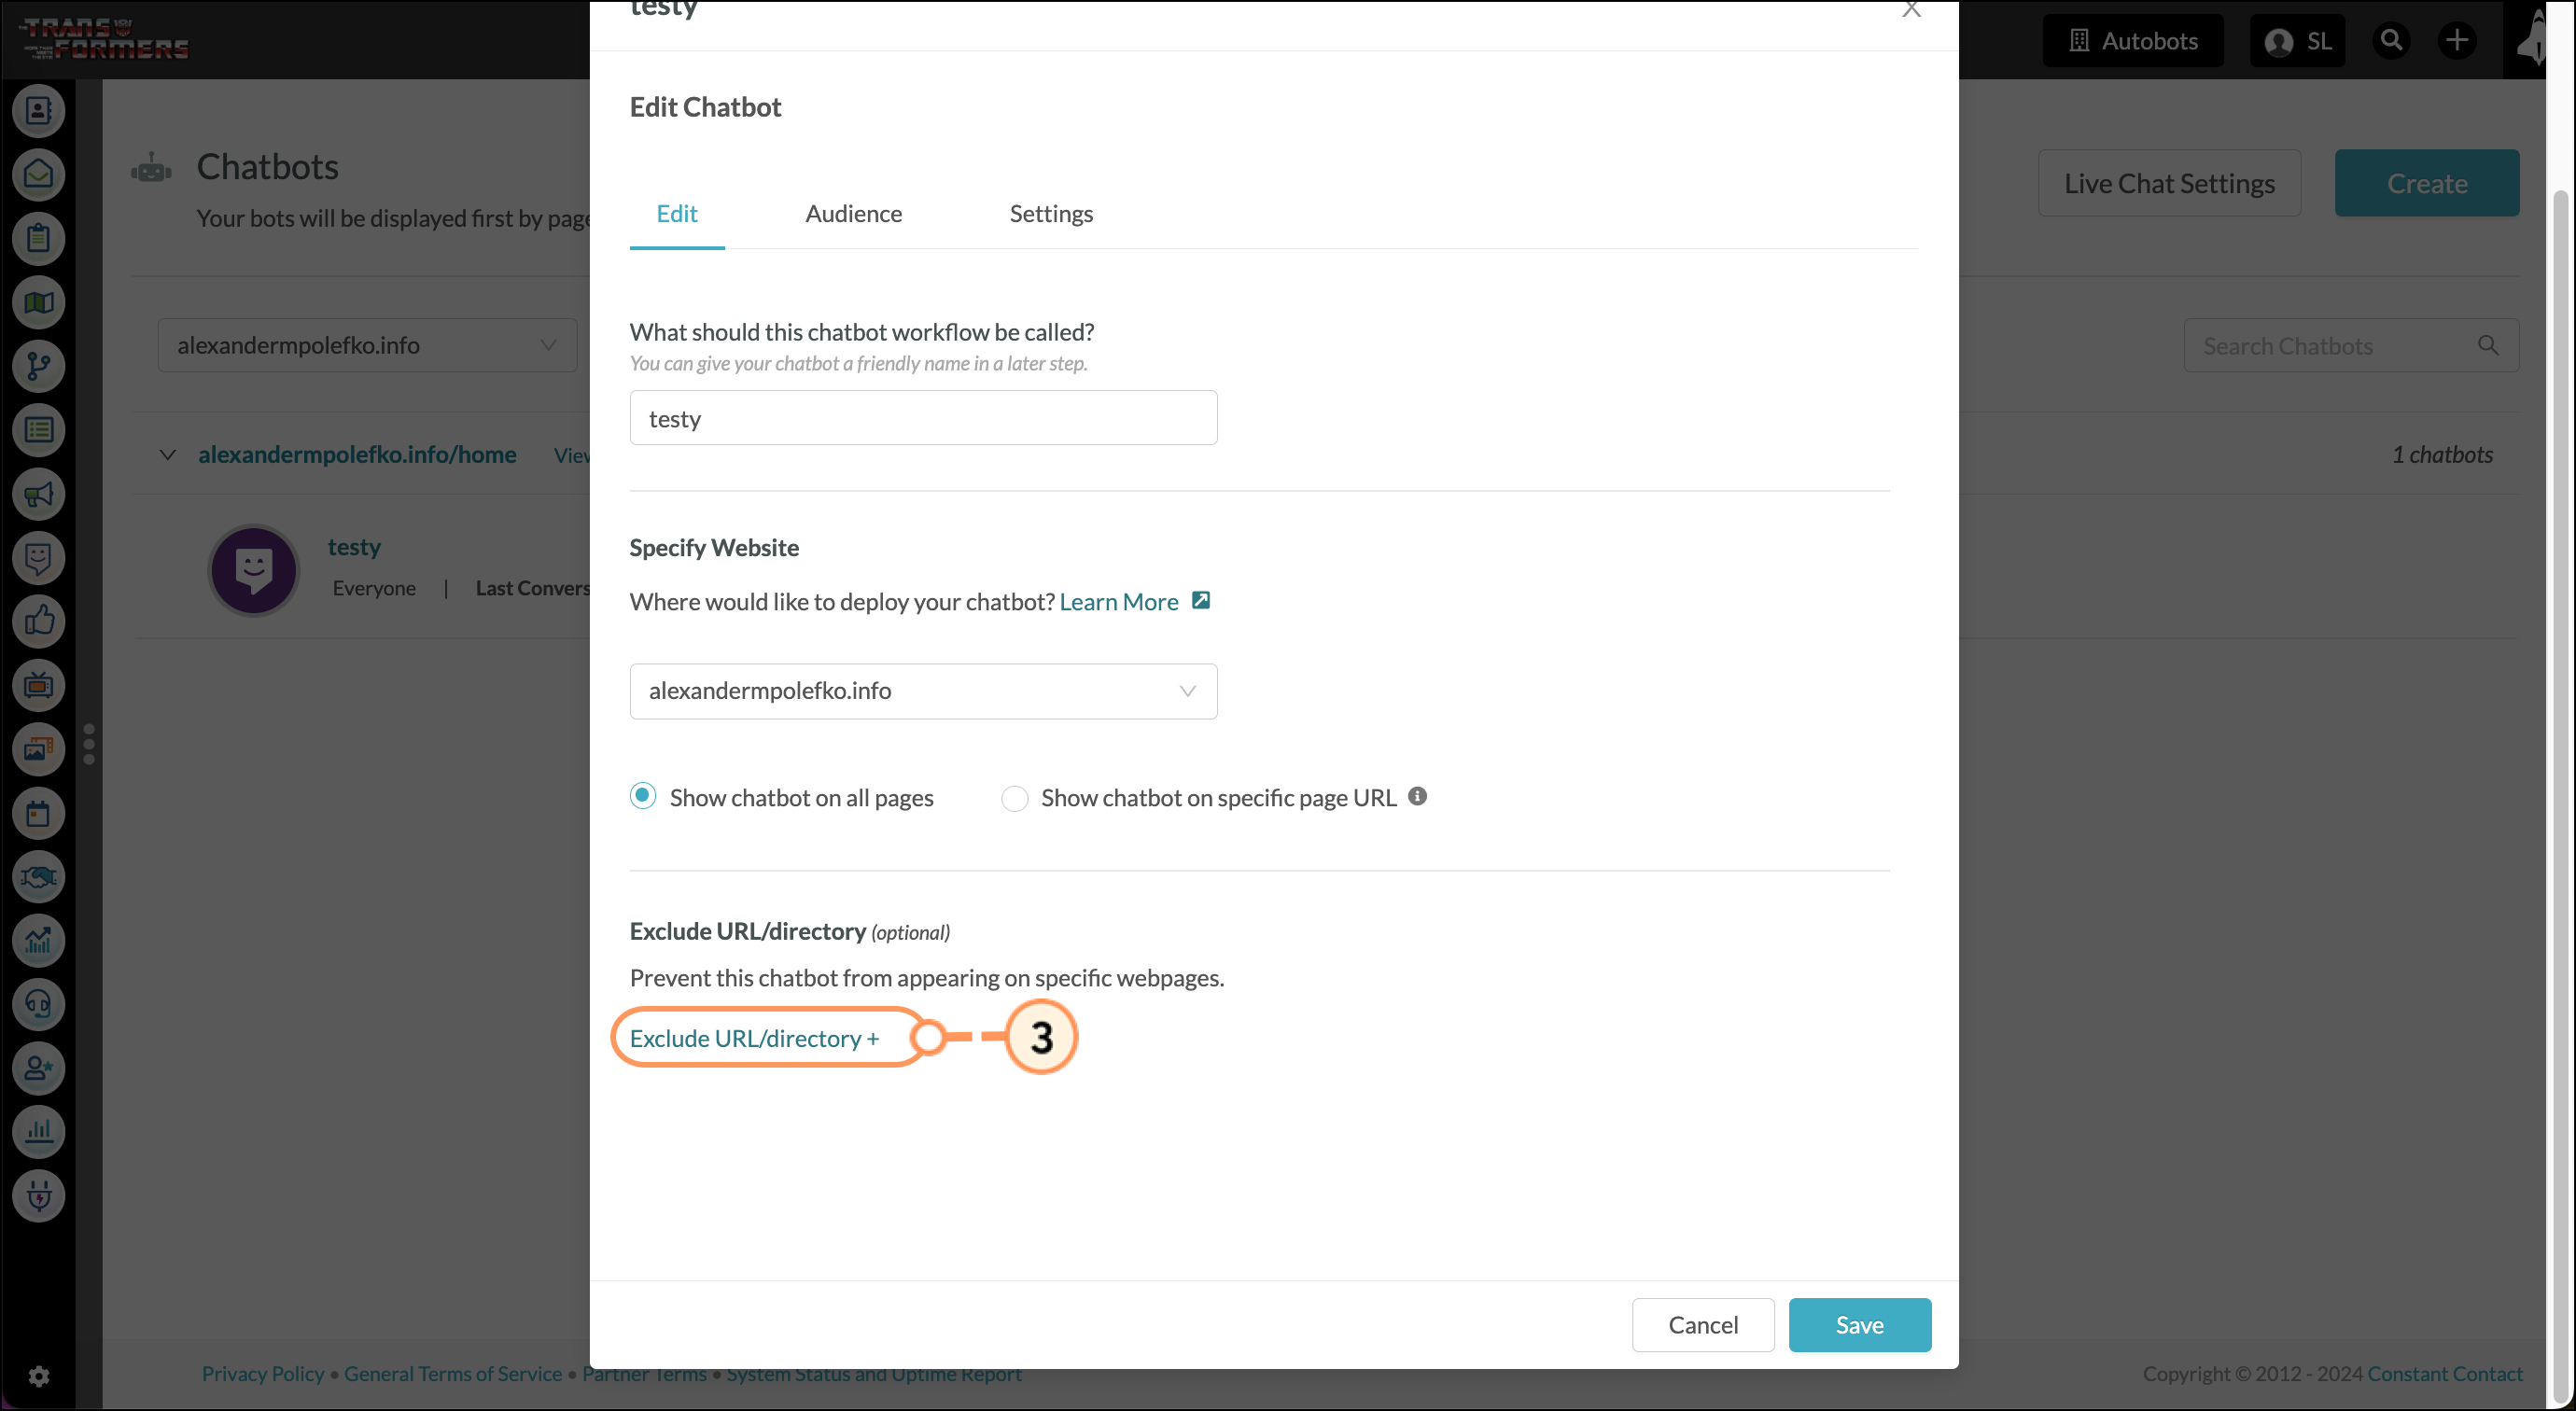
Optionally, to prevent the chatbot from appearing on specific web pages, do the following:
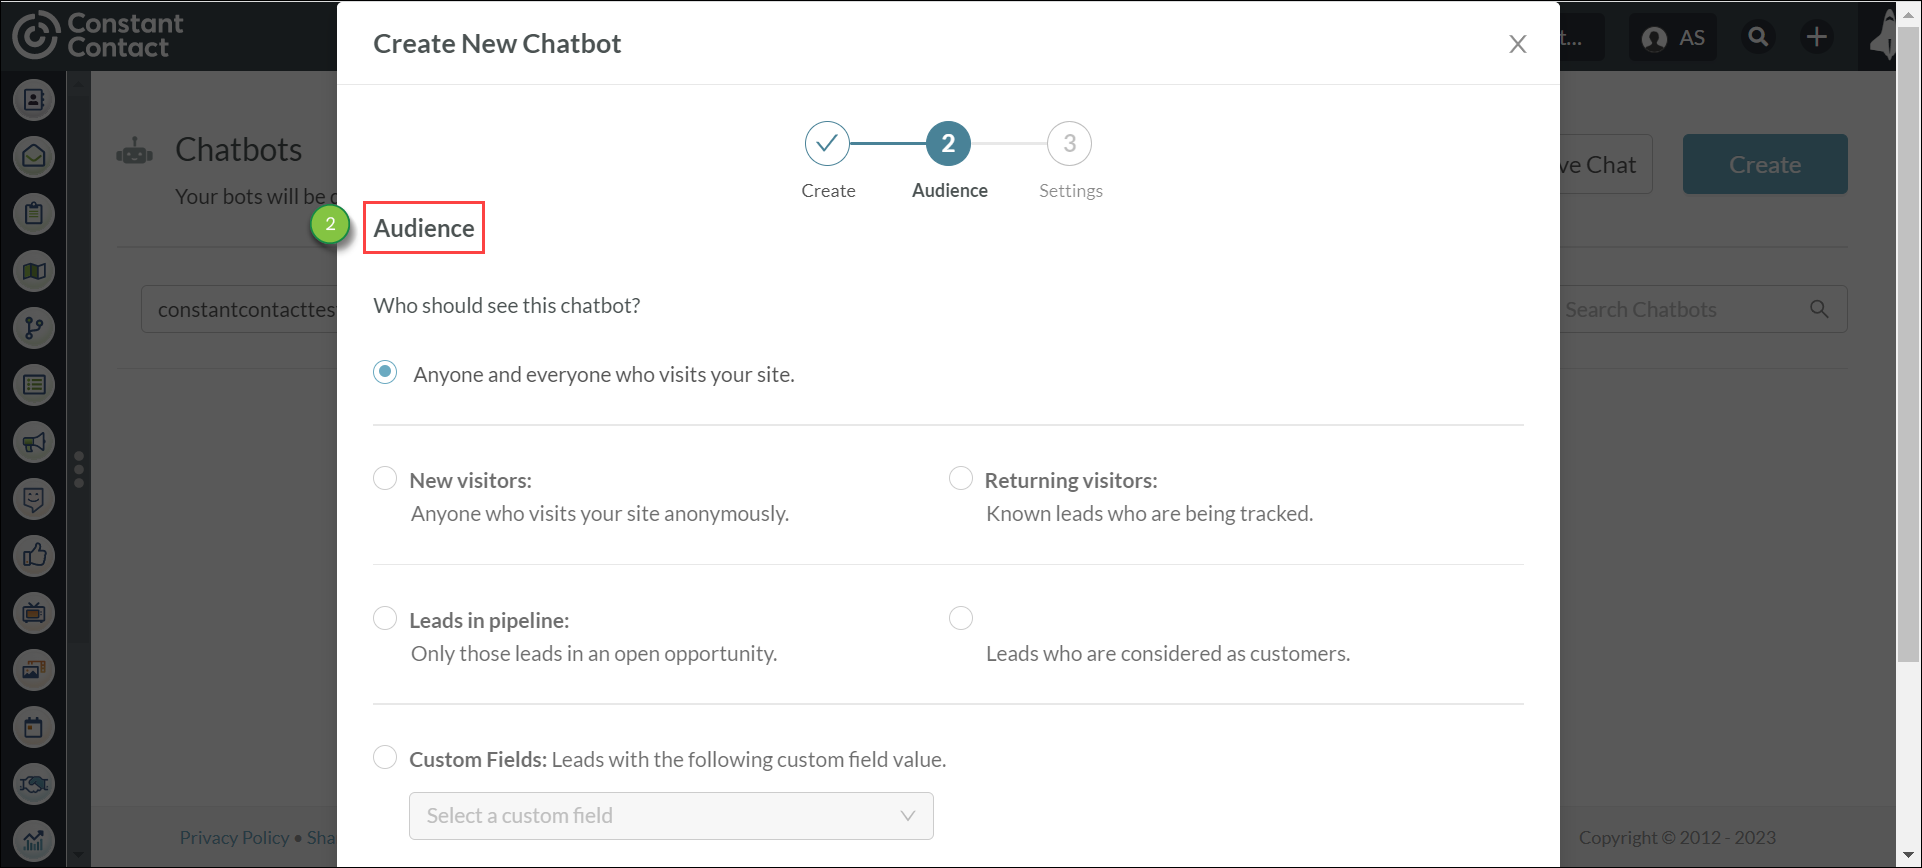
Once you have entered and configured basic information, you can determine who will be interacting with this chatbot.
This is based on the various types of lead attributions available in Lead Gen & CRM.
Important: You can only have one active bot of each audience type per page, unless the audience type is set to a custom field.
To configure chatbot audience settings, do the following:

| Audience | Description | ||||||
|
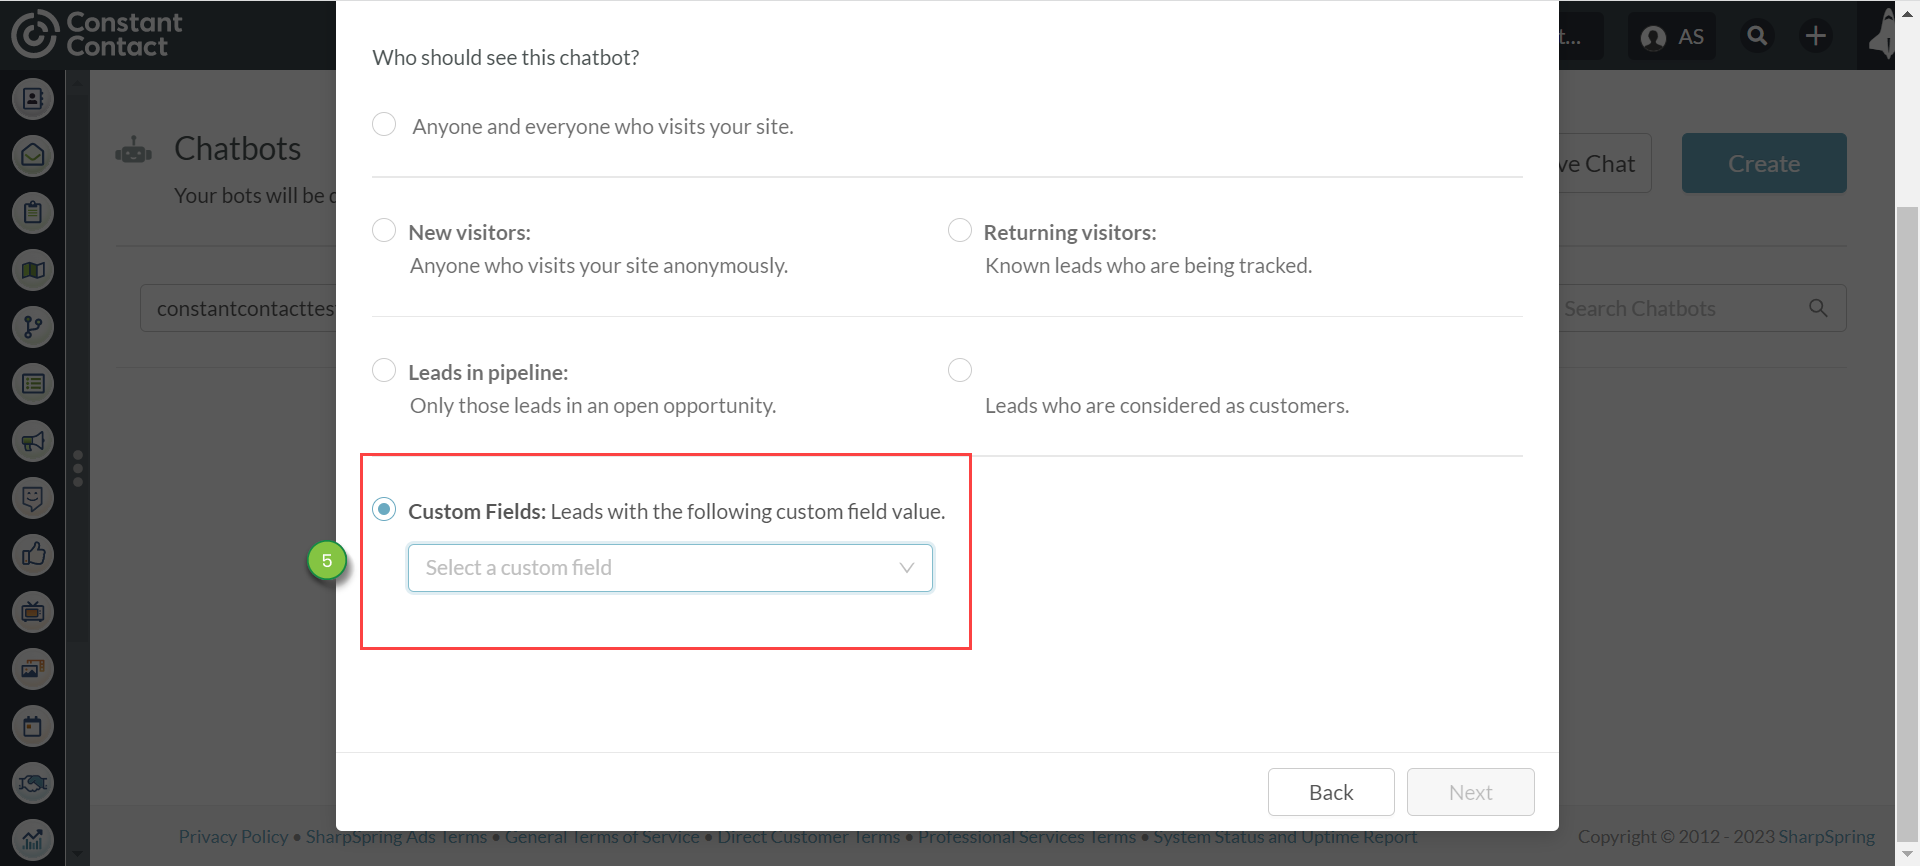
Everyone | This chatbot will be shown to everyone who visits your site. | ||||||
|
New visitors | This chatbot will be shown to anyone who visits your site anonymously. | ||||||
|
Returning visitors | This chatbot will be shown only to known leads who are being tracked. | ||||||
|
Leads in pipeline | This chatbot will be shown only to leads in an open opportunity. | ||||||
|
Customers | This chatbot will be shown only to customers. | ||||||
|
Custom fields |
This chatbot will be shown only to leads with this custom field value. The available custom field types available for use with audiences are as follows:
|
Once you have entered and configured chatbot name, location, and audience settings, you can modify its appearance.
To configure chatbot appearance settings, do the following:
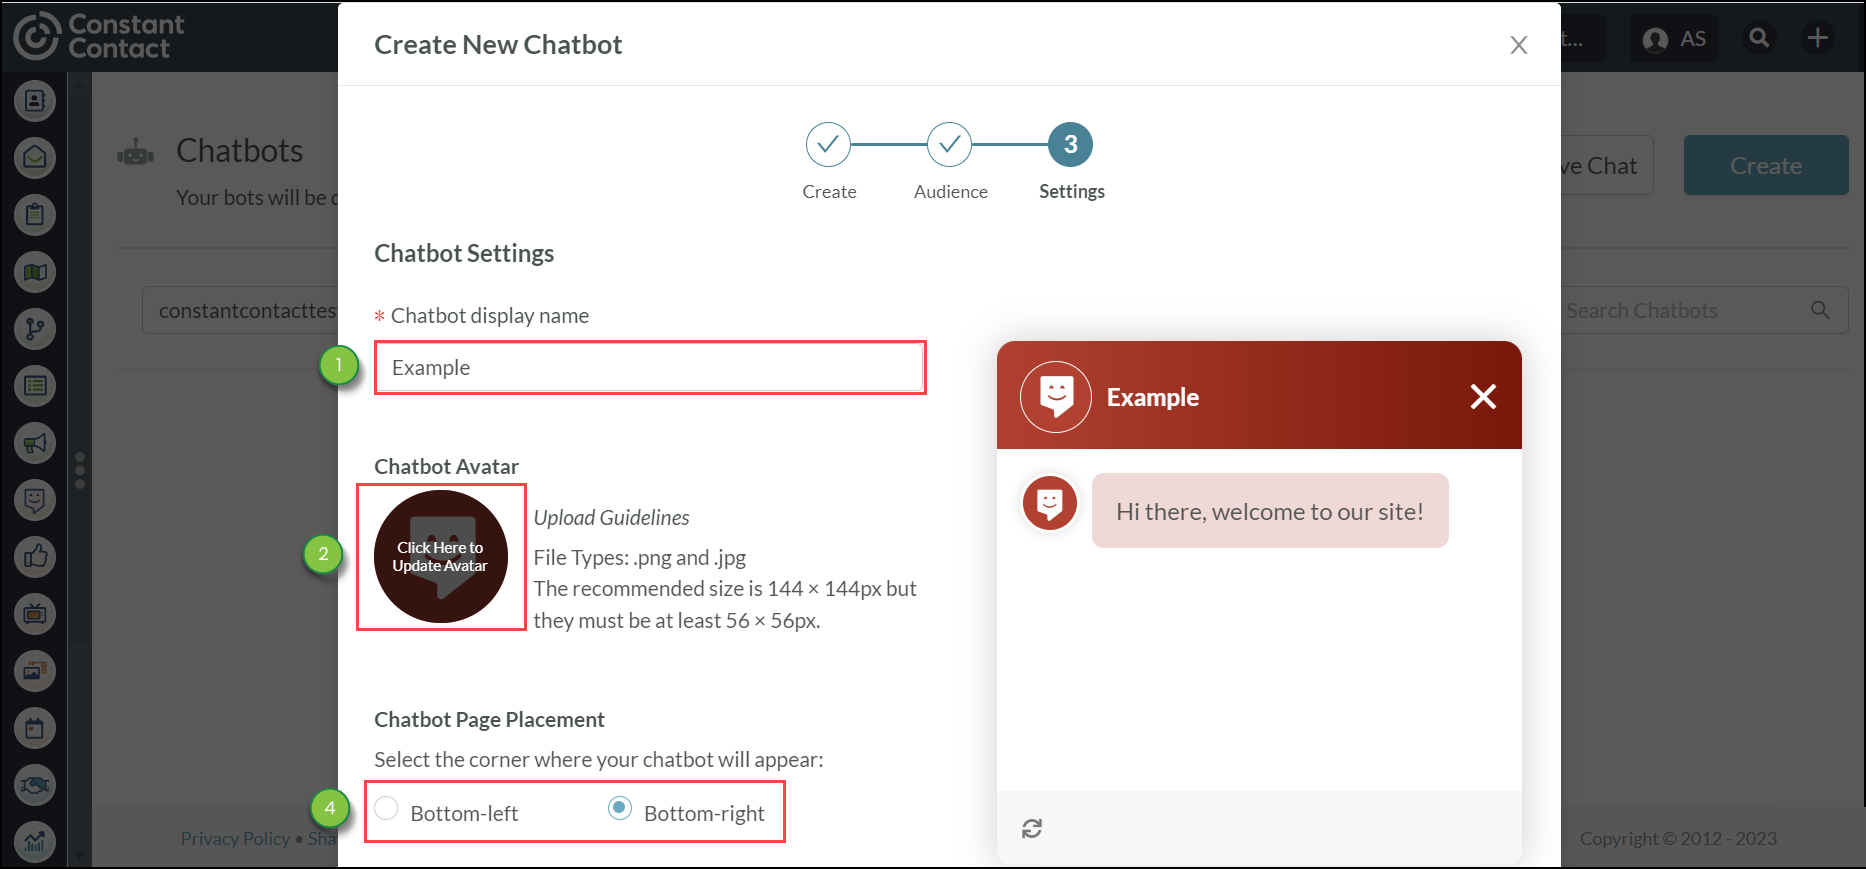

Important: By default, created chatbots will be branded with Powered by Lead Gen & CRM. Agencies have the option to configure this setting.
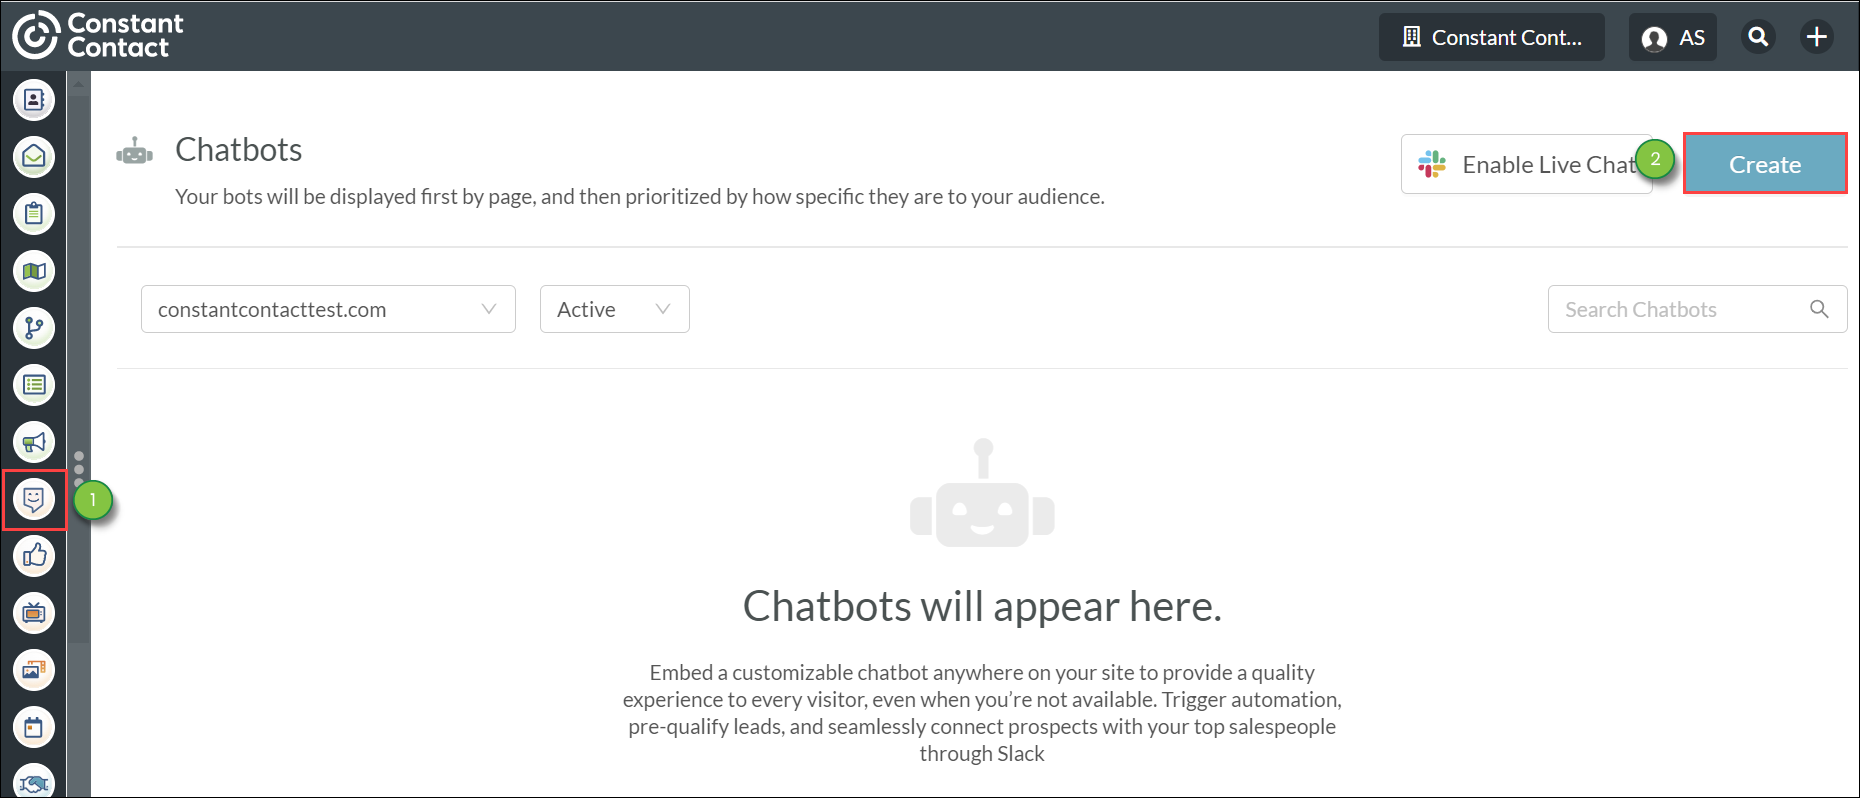
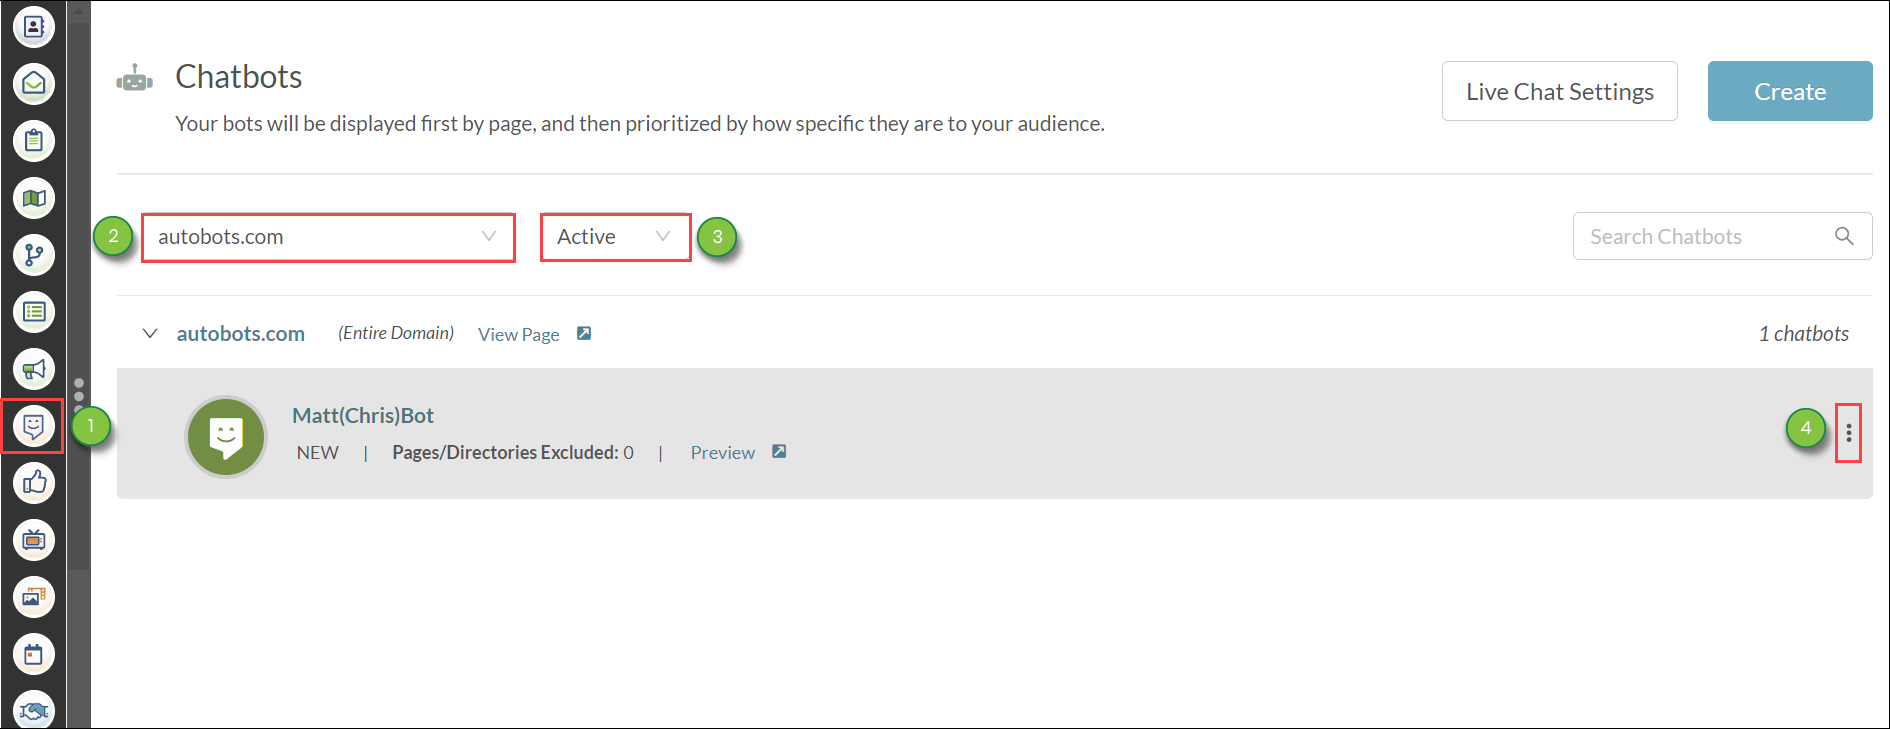
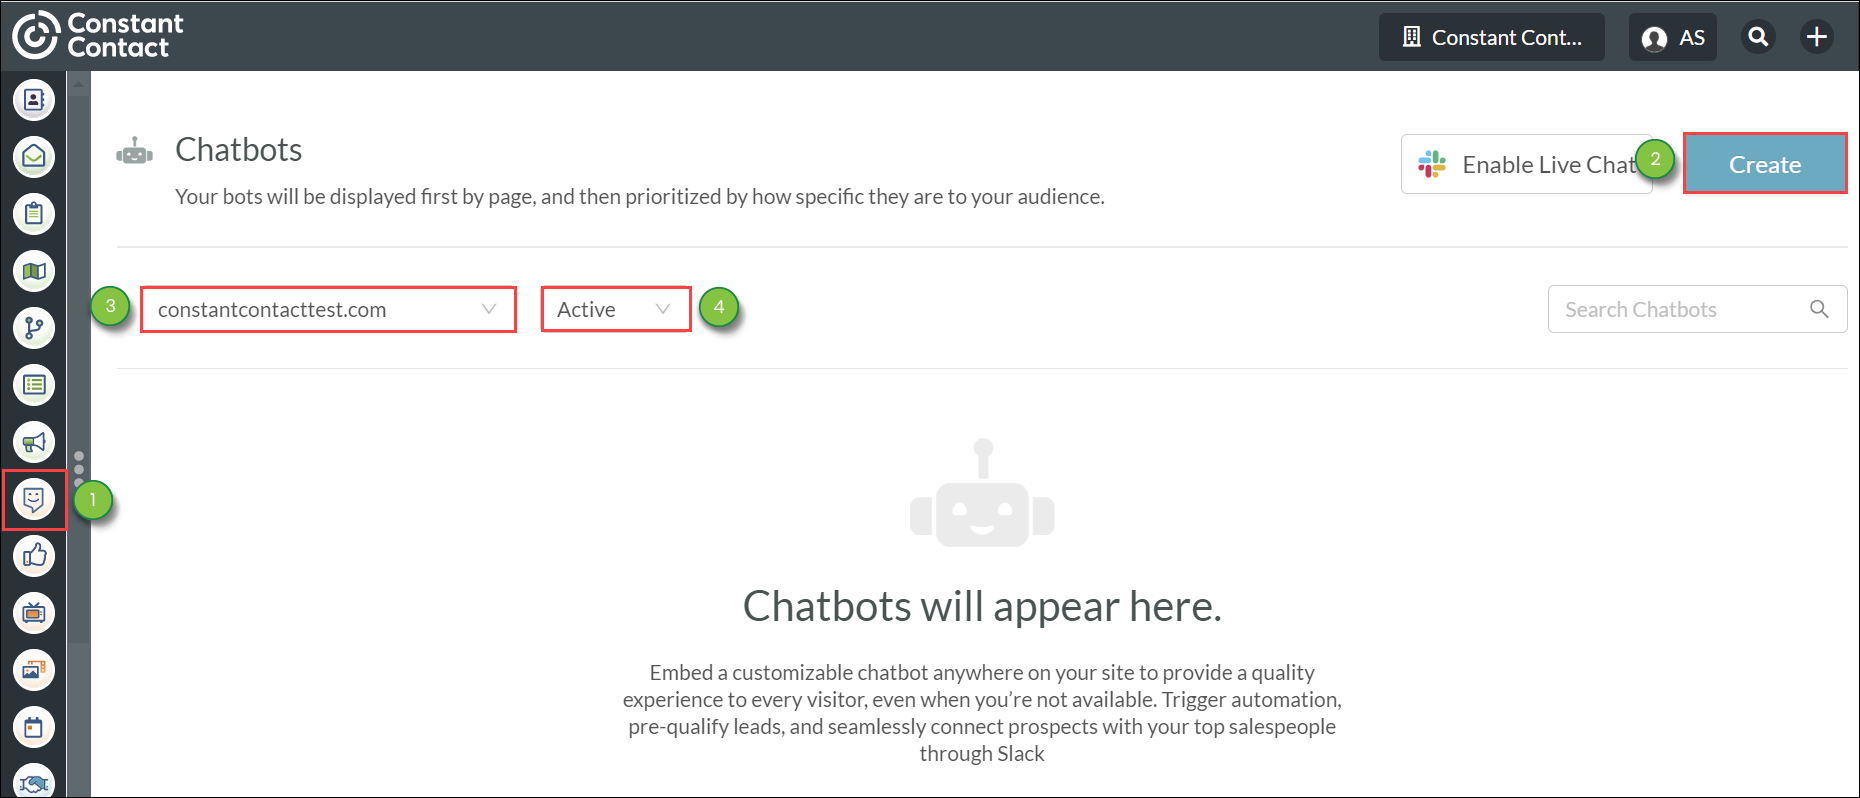
The Chatbots page is where all your created chatbot workflows are located. Click Chatbot in the left toolbar to access the Chatbots page.
Once a chatbot is saved, it will be nested under the site it is associated with. If there are multiple chatbots that have an audience set to custom fields, they will be placed at the bottom of the chatbot list for that site.
At any time in the main chatbots page, you can:
The main Chatbots page displays certain information about your available chatbots:
| Information | Description | |||
|
Name | The chatbot's name. Can be modified in the chatbot's settings. | |||
|
Audience | The audience the chatbot is meant to best interact with. | |||
|
Last Run | The last time the chatbot had a conversation. | |||
|
Run Total | The number of times that the chatbot has had conversations. | |||
|
Exclusions |
The number of pages or directories that the chatbot is excluded from. | |||
|
Preview |
Opens a webpage with the chatbot. All interactions will be in offline mode. Interactions in preview mode will not push to Lead Gen & CRM or send Live Chat requests. Pop-up blockers will prevent the chatbot from loading. |
Note: The Search Chatbots function will only display matching chatbot names for the selected Activity status. You may need to select Active or Inactive to view relevant search results.
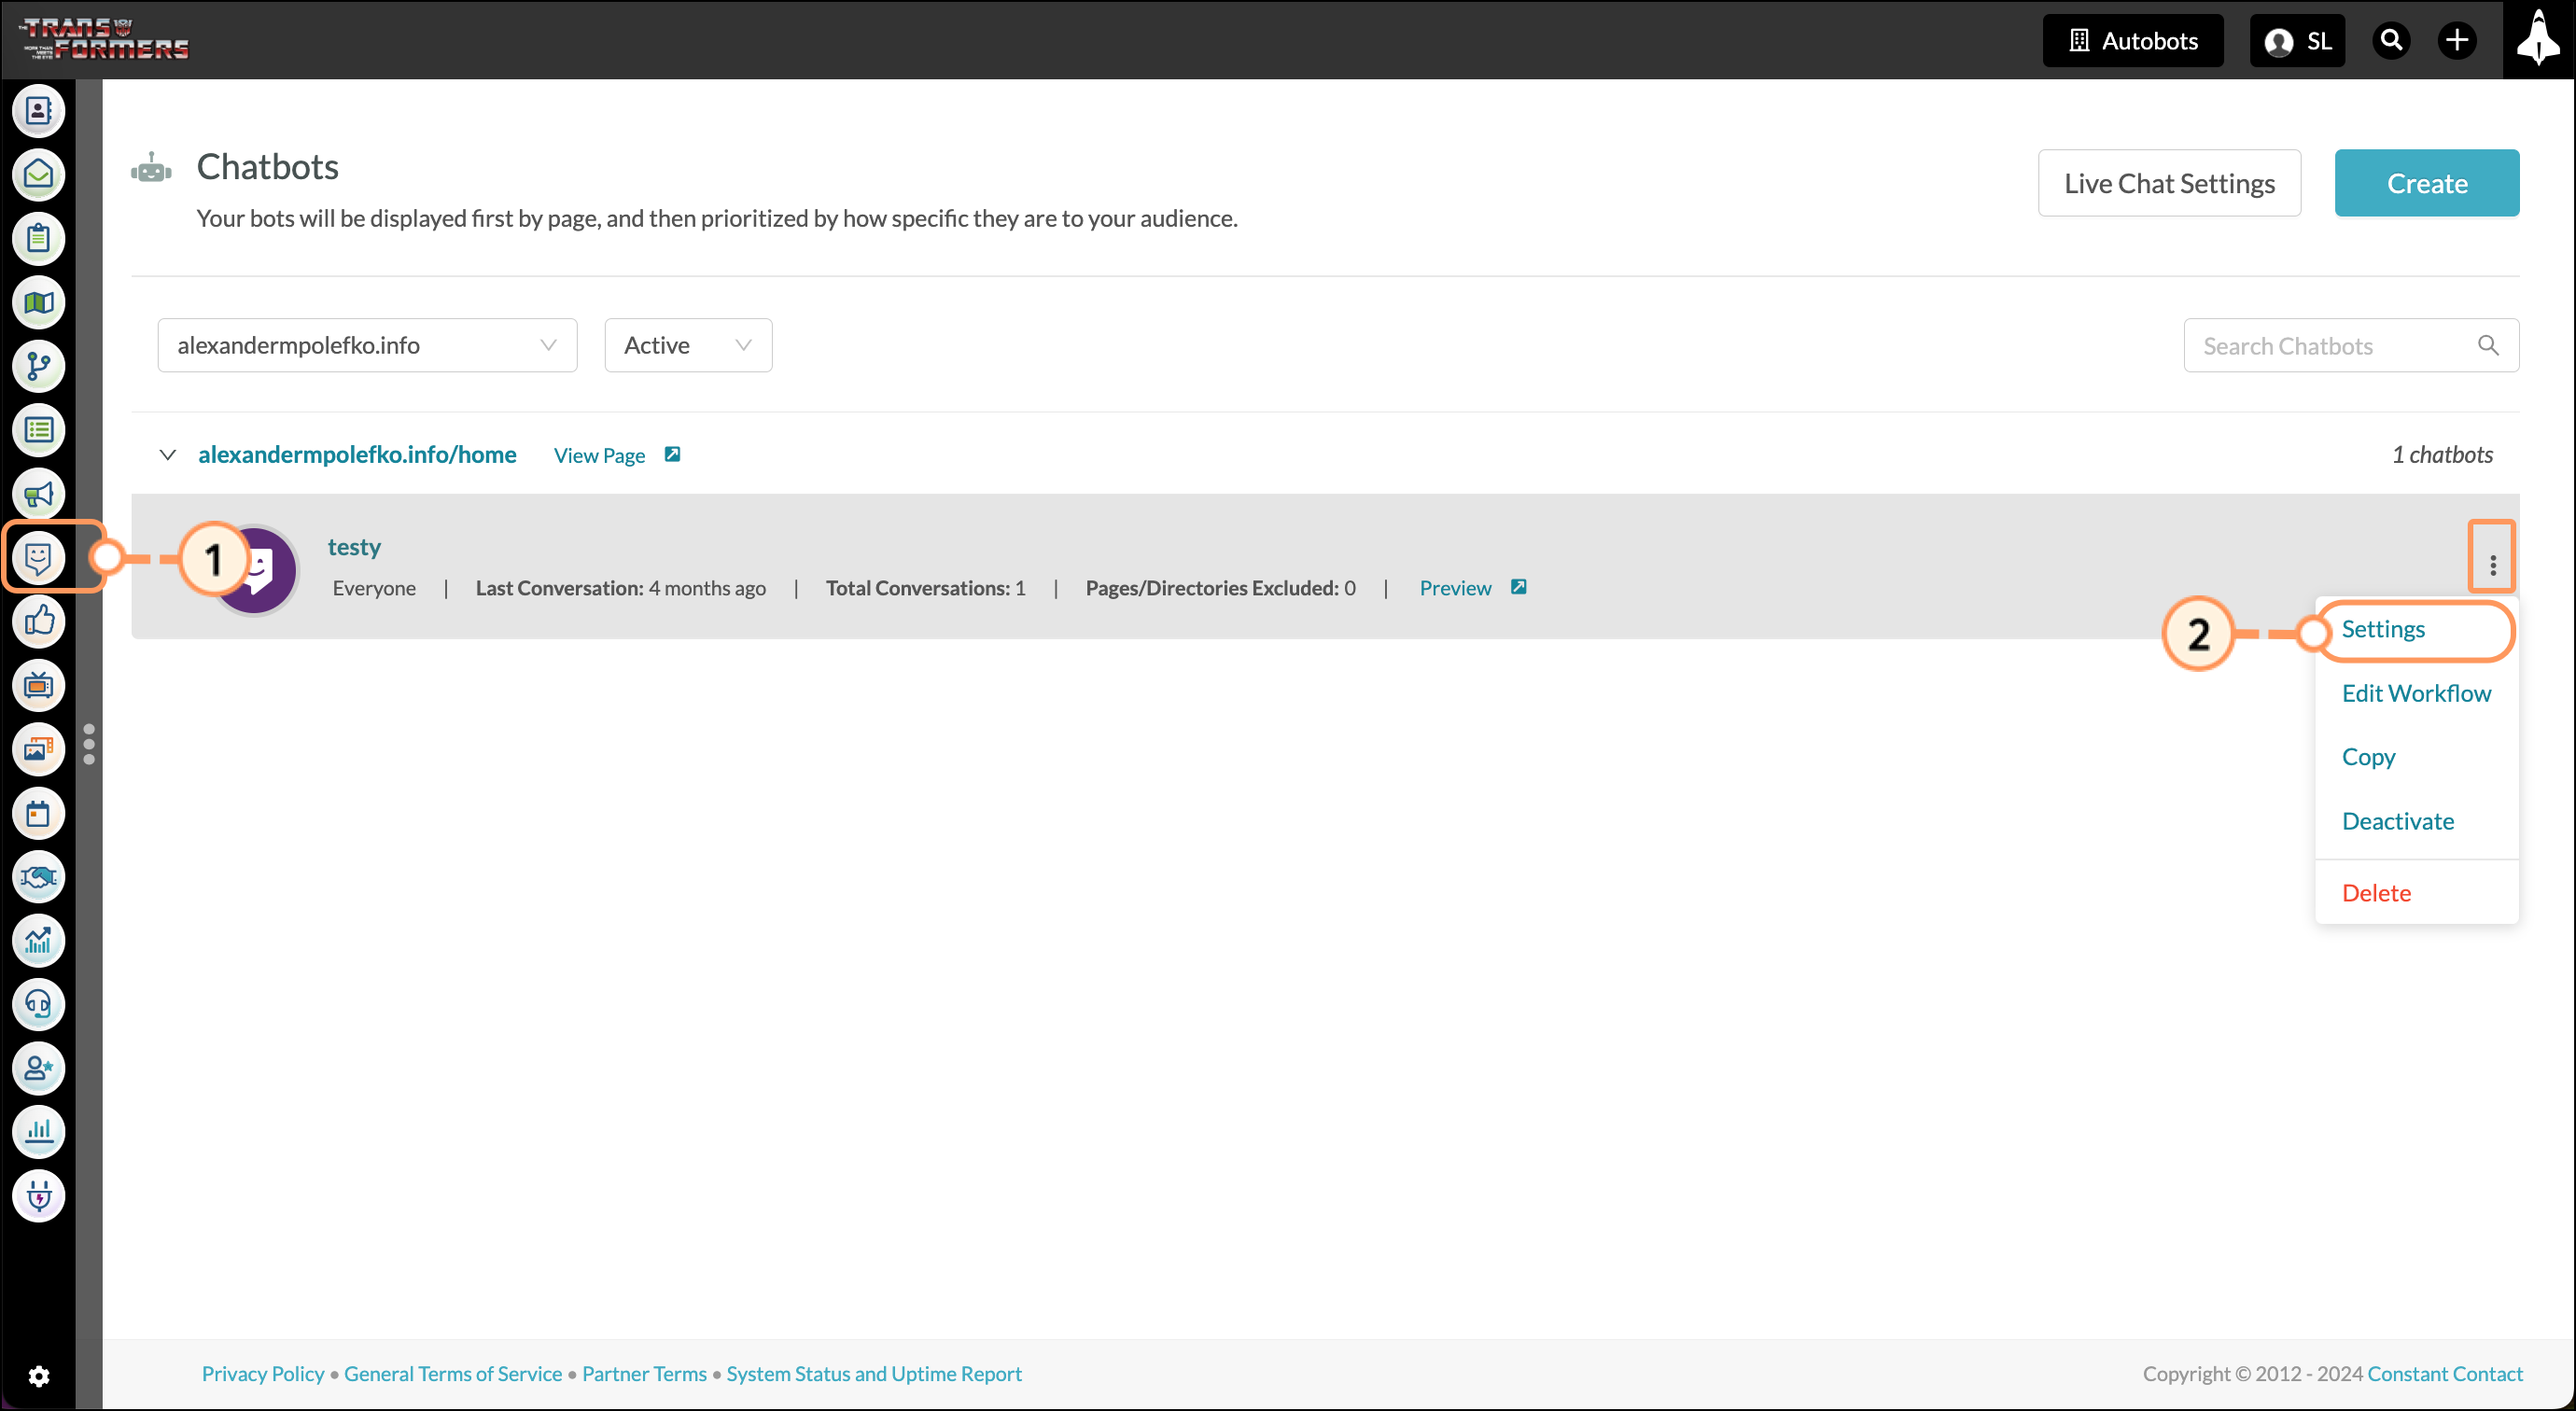
There are chatbot options that are available on the main Chatbots page. These options provide different ways for you make certain changes to the chatbot.
To access chatbot options, do the following:
| Option | Description | |||
|
Settings | Changes the chatbot's name, domain, audience, and design settings. | |||
|
Edit Workflow | Edits the visual workflow logic that the chatbot operates on. | |||
|
Copy | Makes a copy of the selected chatbot. | |||
|
Activate/Deactivate | Activates or deactivates the chatbot. | |||
|
Delete | Deletes the chatbot. This action is permanent. |
When creating chatbots, you have the option to create chatbots that interact with and gather information on users who meet the criteria for specific custom fields. This means that you can create chatbots that are custom-tailored for those specific interests.
To create chatbots that utilize custom fields, do the following:


Important: The following custom field formats are available for use with chatbot audiences:
• Bit
• Boolean
• Checkbox Group
• Country
• Drop-Down
• Radio
• State
You can create many different chatbots that utilize custom fields. However, there might be times where a user with specific custom field information on their Contact Record meets the criteria for all of those different custom fields. To prevent users from interacting with the incorrect chatbot—or interacting with many at once—Lead Gen & CRM prioritizes the way in which users interact with chatbots with custom fields.
Chatbots with custom fields can be set in an order to determine their priority. This priority system allows users to be filtered down through different chatbots with custom fields until they meet the criteria for a chatbot with a specific custom field. This way, custom field information that you deem more important can be prioritized, and users will interact with those chatbots before any others.
To prioritize chatbots with custom fields, do the following:

Important: Custom field chatbot prioritization requires at least two chatbots with the Custom Field audience type.
You can delete the chatbot entirely, exclude it from specific pages, display the chatbot on only one page, or use custom settings to keep the chatbot on your website but hide it from visitors.
Delete Chatbot
To delete an entire chatbot, start from the Chatbot section in the left toolbar.

Exclude Chatbot From Specific Pages
To exclude a chatbot from a specific page, or many specific pages, go to Chatbot Settings and enter the URL in the Exclude URL/directory (optional) section.

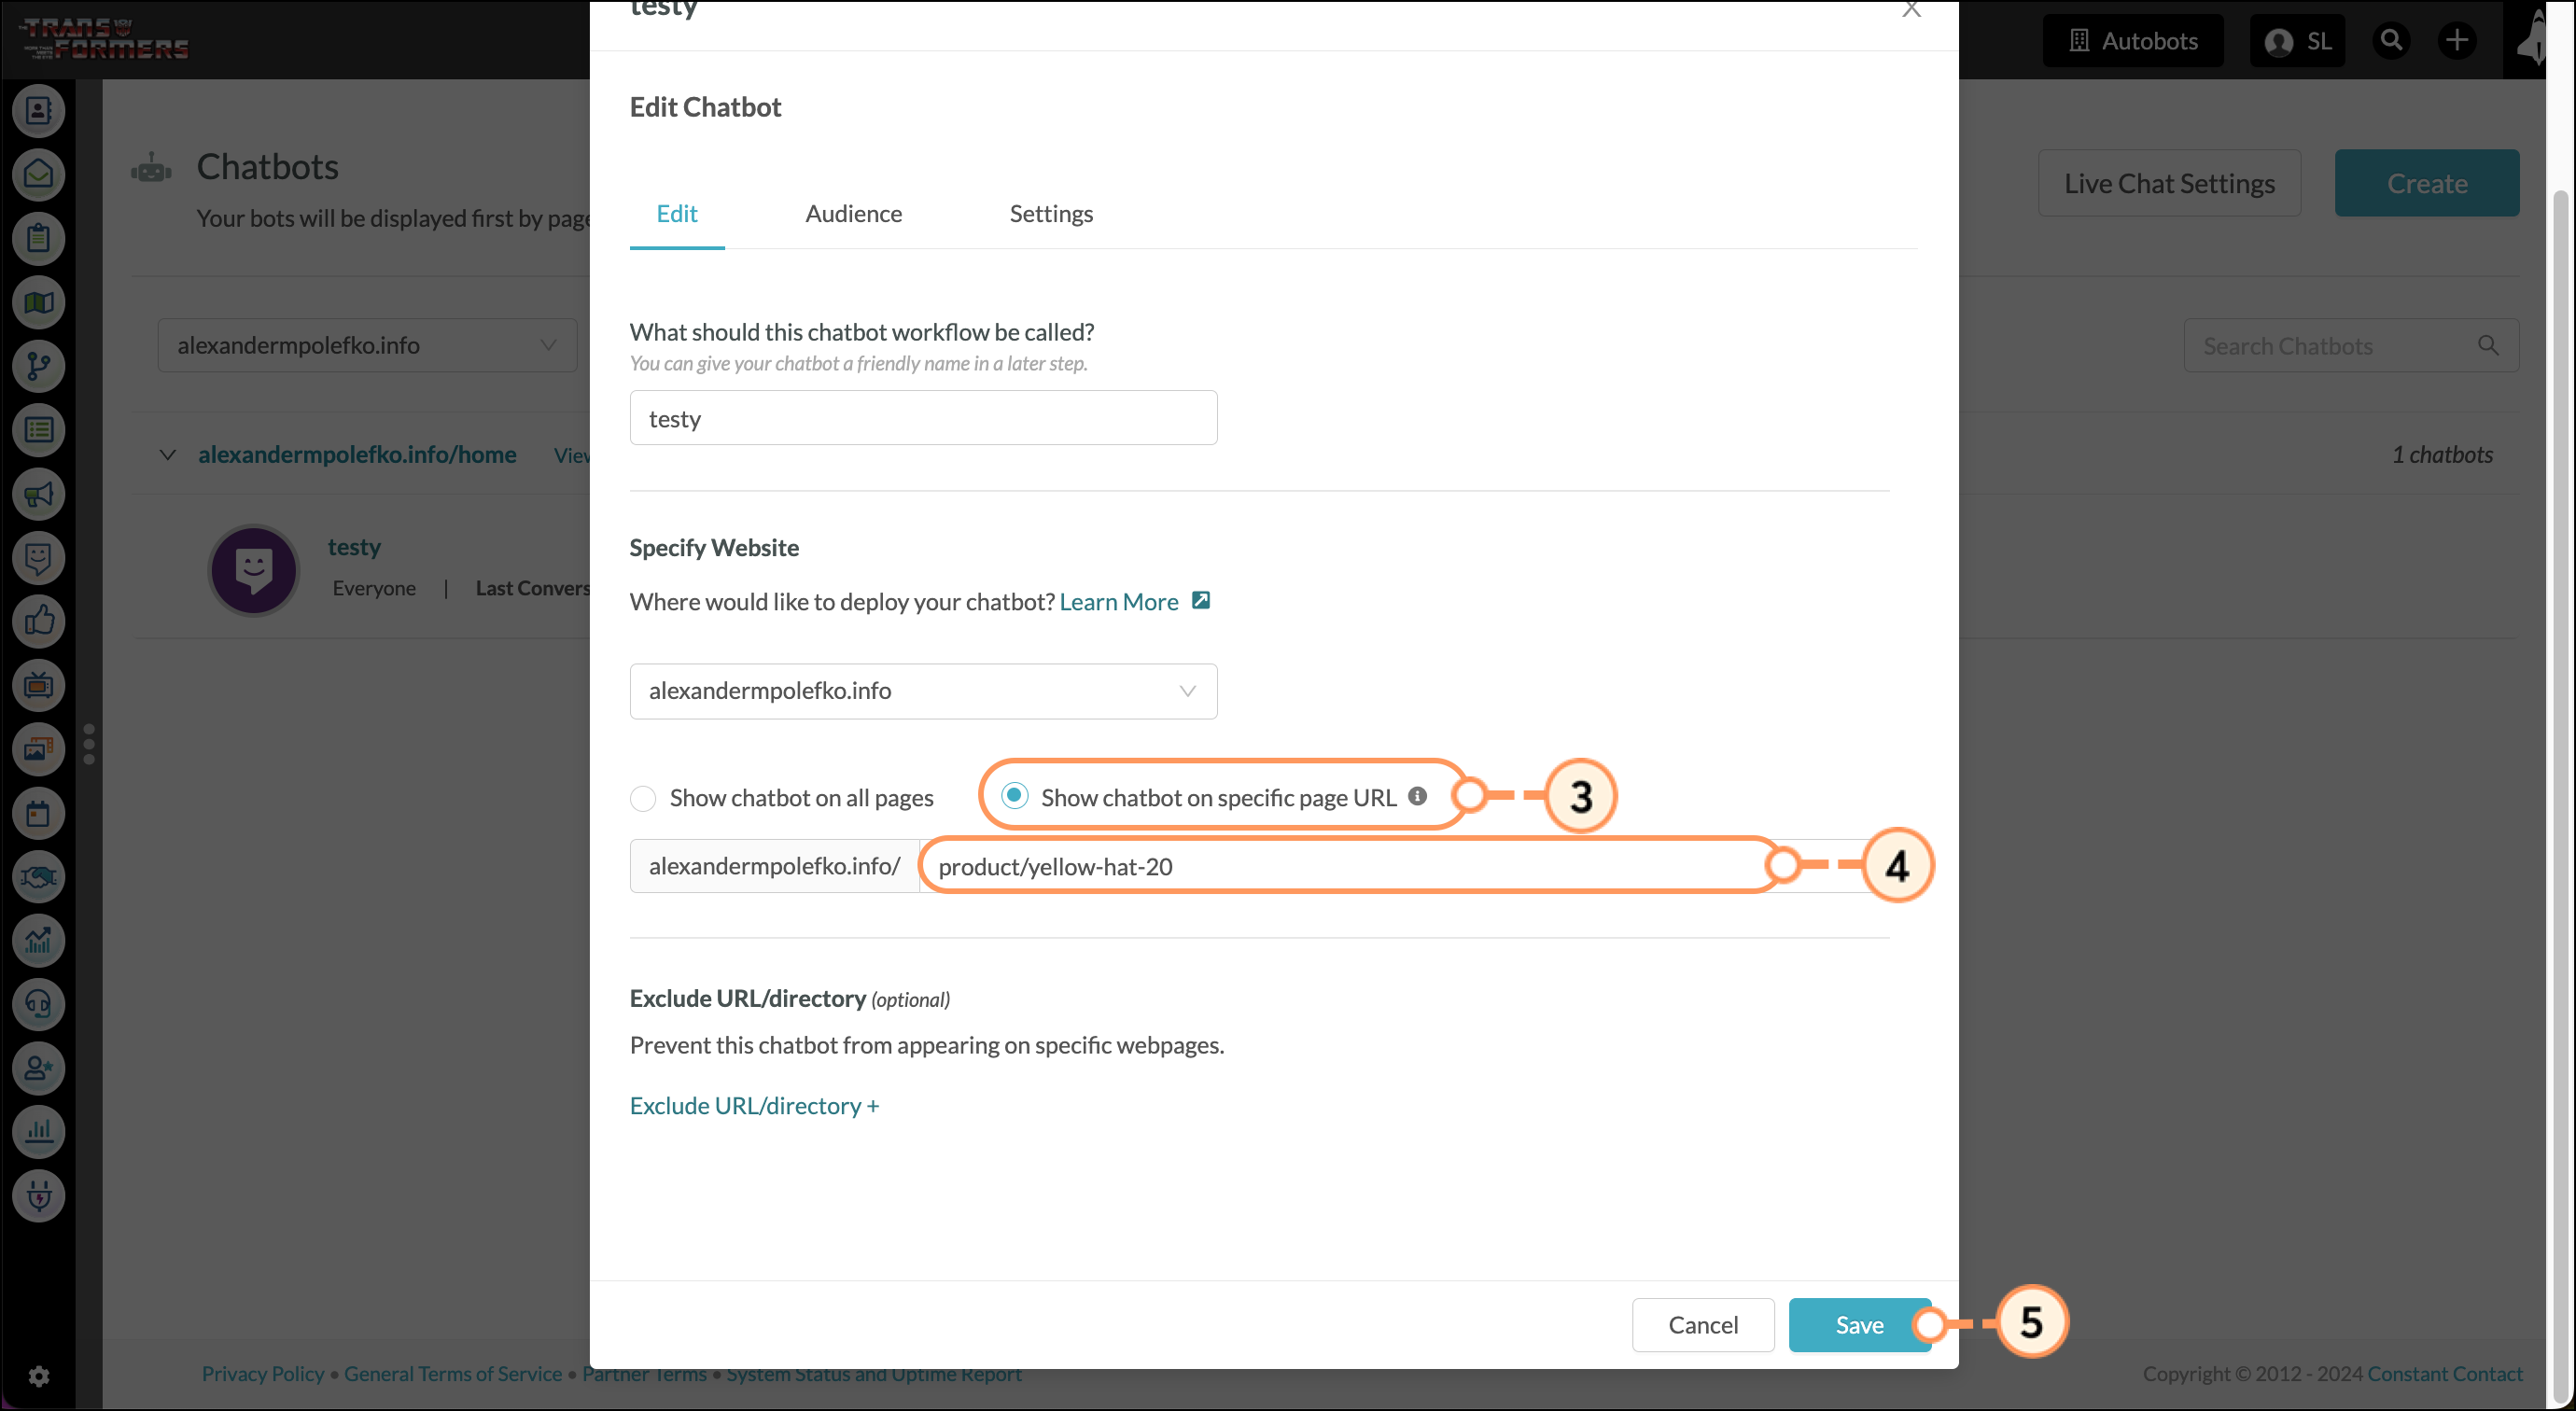
Display Chatbot on One Page
You can select Show chatbot on all pages or Show chatbot on specific page URL. To display the chatbot on specific pages only, select Show chatbot on specific page URL and enter the URL. This will hide the chatbot from all other pages. With this method, only one page URL can be entered. To display the chatbot on many pages but not all pages, select Show chatbot on all pages instead, and then exclude the pages where you want it hidden.
When adding chatbots to a webpage, be aware of the potential size constraints of the page on certain computer monitors or screens. In certain cases, such as users viewing your website on a tablet computer, the chatbot might not be able to completely display due to webpage features.
Most often, the chatbot will be unable to display ![]() Close in its header bar. This is usually due to how the CSS style is set on these web pages. On these webpages, the floating header's
Close in its header bar. This is usually due to how the CSS style is set on these web pages. On these webpages, the floating header's z-index value set to a value higher than that of the chatbot's z-index value.
The chatbot's z-index value is 9999, which means that it will be placed underneath header bars with a z-index value of 10000. In order for the chatbot's header bar to display properly, all elements on that webpage must be set to a z-index value of 9998 or less.
For more information on configuring your webpage's CSS theme, contact your administrator.
Note: Constant Contact offers Professional Services to assist with custom coding.
Copyright © 2026 · All Rights Reserved · Constant Contact · Privacy Center