Lead Gen & CRM
How can we help you?
Search our help articles, video tutorials, and quickstart guides

You've got this. You've got us. Search our Knowledge Base to quickly find answers to your questions.

Integrating Lead Gen & CRM with Leadpages

Article: 000050308
Updated: October 4, 2023

Sync your account with Leadpages to capture leads

Lead Gen & CRM accounts have the ability to integrate with and capture leads from Leadpages.


Article Contents

 
Users:
Administrators 
Company Managers  
Marketing Managers  
Sales Managers  
Salespersons  
Jr. Salespersons  


Obtaining Lead Gen & CRM Tracking Information

You will need site tracking code in order to integrate.

To develop and obtain tracking information for integration, do the following:

  1. Open a new tab in your web browser and log in to Lead Gen & CRM in that browser tab.
  2. Click  plus3.png  New > Site in the top toolbar on the far right side.
  3. Create a new site tracking code using the Leadpages domain as the tracked domain.
    Note: Leadpages domains normally read as companyname.lpages.co.
  4. Open another new tab in your web browser.
  5. Navigate to Lead Gen & CRM in that browser tab.
  6. Click Forms in the left toolbar.
  7. Create or edit a native form.
  8. Click  12more.png  Actions > Embed Code.

Keep both browser tabs open. Both the tracking code and form code will need to be copied.


Syncing Tracking Codes in Leadpages

You will need to sync tracking code information.

To sync tracking information with Leadpages, do the following:

  1. Open another new tab in your web browser.
  2. Log in to Leadpages in that browser tab.
  3. Create a Leadpages form, or find the Leadpages form you want to sync a tracking code to.
  4. Click  pencil.png  Edit to edit the Leadpages form.
  5. Click Page Tracking in the left menu.
  6. Click the Analytics tab.
  7. Copy the created Lead Gen & CRM site tracking code in the site tracking code browser tab.
  8. Paste the Lead Gen & CRM site tracking code into the Head Section Tracking Code box.
  9. Click Save


Syncing Forms in Leadpages

You will need to sync forms to complete integration.

Note: Constant Contact offers Professional Services to assist with custom coding.

To sync forms in Leadpages, do the following:
  1. Return to the Leadpages browser tab.
  2. Go to the form that you would like to sync to Lead Gen & CRM.
  3. Click the call-to-action button on that form.
  4. Click the link option in the pop-up menu that appears.
  5. Click View/Edit in the menu that appears.
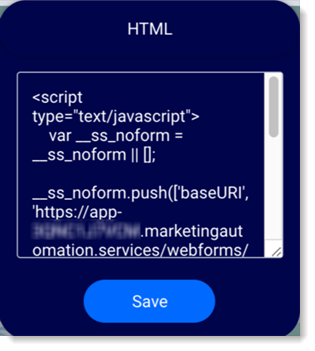
  6. Click-and-hold the HTML box in the widgets menu on the left.
  7. Drag the HTML box underneath the form.
  8. Click on the newly created HTML box to edit it.
  9. Return to the Lead Gen & CRM native form embed code browser tab.
  10. Copy the created Lead Gen & CRM native form embed code.
  11. Paste the Lead Gen & CRM native form script into the HTML box.
  12. Click Save.


  13. Update the page.
    Note: When updating, make sure you are not previewing the page and are on the live page.
  14. Go to the form's live page.
  15. Fill out the form.
  16. Map the form fields in Lead Gen & CRM.
Note: If you change your Native Form, you will need to repeat this mapping process again.


Did this article answer your question?


Constant Contact Logo

Copyright © 2025 · All Rights Reserved · Constant Contact · Privacy Center