| Important: It's a violation of our Terms of Service to store Sensitive Information, which includes, among other things: social security numbers; national insurance number; credit card numbers; passwords; security credentials; protected health information; and nonpublic personal information of any kind (e.g., race, gender, age, sexual orientation, religion, political and philosophical beliefs, union membership) in a custom field. Please see the Terms of Service for additional information on Sensitive Information. |
Custom fields are commonly used for collecting contact information through a sign-up form, adding personalized information to the subject line and body of your emails, and for segmenting your contact list. Constant Contact recognizes standard contact details, like an address, company name, or birthday, but custom fields let you get creative and collect your own contact details based on the unique marketing needs of your organization. Here's everything you need to know to create and manage custom fields so you can send the right content to the right contacts at the right time:
Understand the different types of custom fields
There are a few different types of custom fields that you can mix and match based on your organizational needs. You can use custom fields to manually add detailed information for your contacts, or your contacts can provide the extra details when they see the field options on a sign-up form or the Update Profile form in your email footer.
Text fields
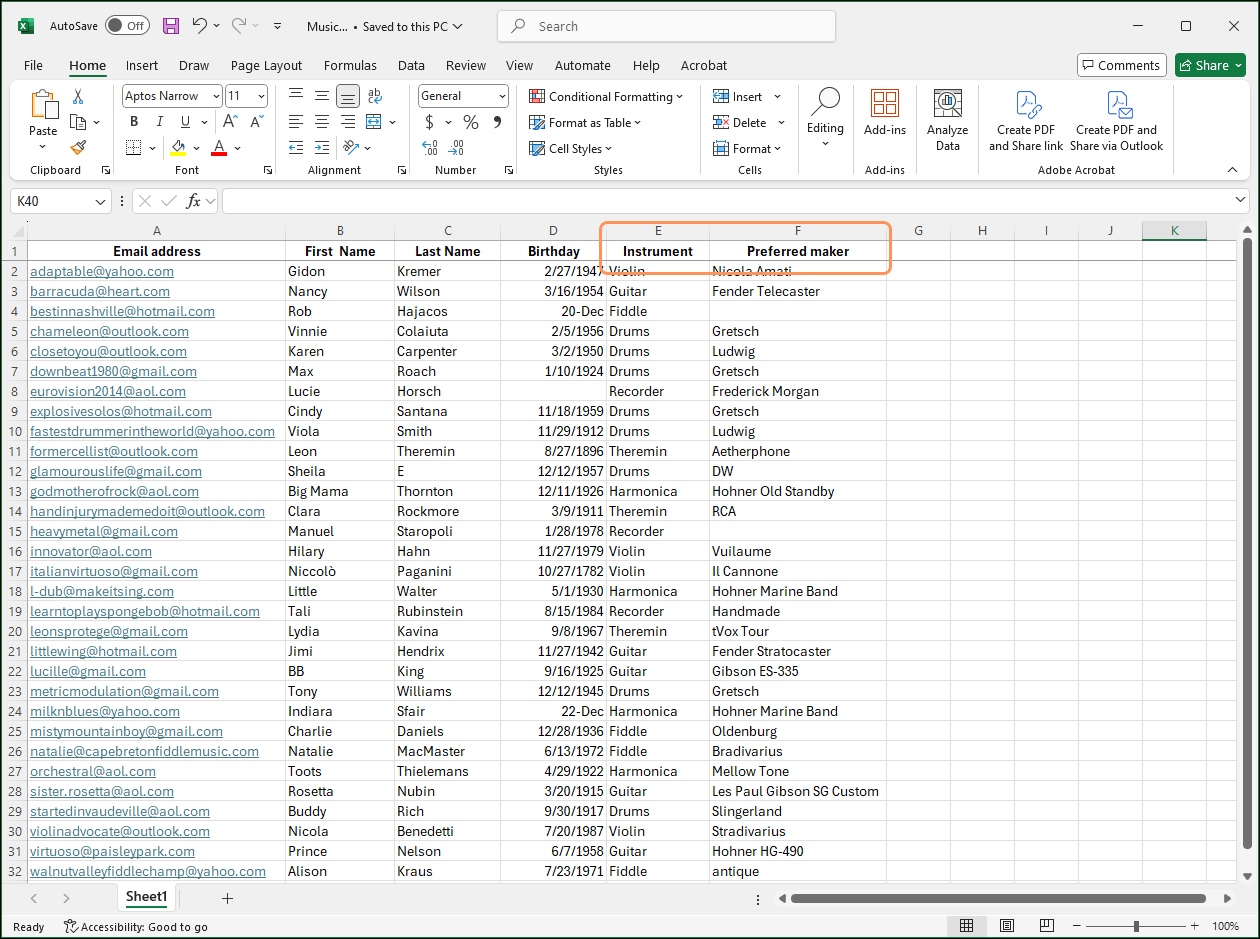
Text fields are perfect for open-ended questions where the answers require some flexibility. For example, if you need to track a personal preference, like a favorite color or flavor, or if you want to allow some room for a more detailed explanation.
- Multi-line text - This custom field allows up to 3,000 characters to be entered into the field.
- Single line text - This custom field allows up to 250 characters to be entered into the field.
Choice fields
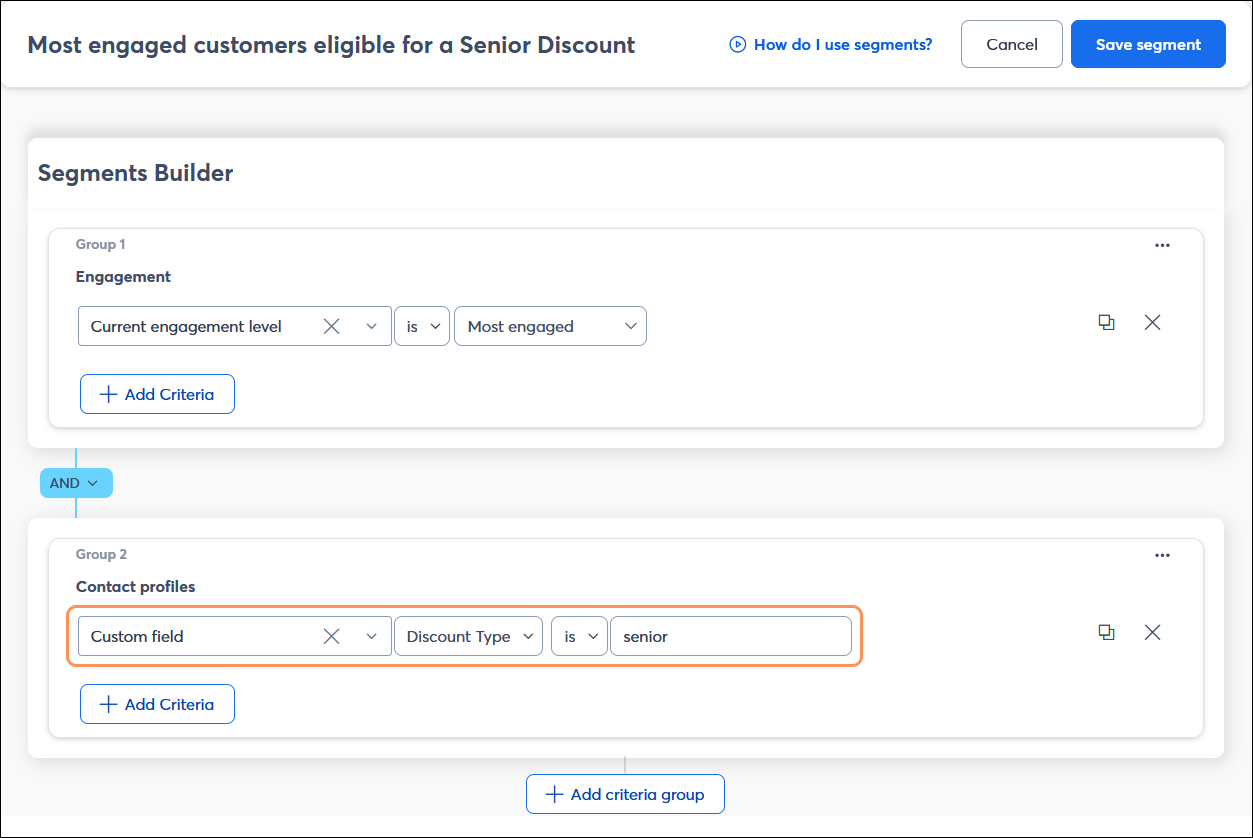
Choice fields are all about options, and they give you the most flexibility! Your custom field can be a simple true/false or yes/no, or you can get elaborate. For example, you can create a field to keep track of where customers are in the buying or selling process, if your supporter is a donor, a volunteer, or both, or if your customer is eligible for a senior or military discount. They're also great for keeping track of personal preferences, like the t-shirt size your volunteers prefer, or if your diners prefer chocolate desserts over fruit desserts.
- Multi-select - This custom field provides a drop-down menu of options, and one or more can be selected. You can have up to 100 options.
- Single-select - This custom field provides a drop-down menu of options, and only one can be selected. You can have up to 100 options.
- True / False - This custom field provides "true" and "false" options with radio buttons, and only one can be selected.
Values fields
Values fields are built to accommodate the different formatting options for numbers. Dates are the most common formatting, but value fields can also be used to store membership numbers, track donation amounts, or dues owed.
- Currency - This custom field lets you select a type of currency, and you can type the value into the field with the correct formatting for the currency. Currency formatting allows for positive integers with up to two decimal places. For example, 1.23 or 12345.67. (If you need to use negative integers, use the Number field instead.) Currency options include:
- USD ($) - United States Dollar
- AUD ($) - Australian Dollar
- BRL (R$) - Brazilian Real
- CAD ($) - Canadian Dollar
- CHF (Fr) - French Franc
- CZK (Kčs) - Czech Koruna
- DKK (kr) - Danish Krone
- EUR (€) - European Union Euros
- GBP (£) - Great British Pound
- HKD (HK$) - Hong Kong Dollar
- HUF (Ft) - Hungarian Forint
- ILS (₪) - Israeli Shekel
- JPY (¥) - Japanese Yen
- MXN ($) - Mexican Pesos
- MYR (RM) - Malaysian Ringgit
- NOK (kr) - Norwegian Krone
- NZD ($) - New Zealand Dollar
- PHP (₱) - Filipino Peso
- PLN (zł) - Polish Zioty
- RUB (₽) - Russian Ruble
- SEK (kr) - Swedish Krone
- SGD ($) - Singapore Dollar
- THB (฿) - Thai Baht
- TWD (NT$) - Taiwanese Dollar
- TRY (₺) - Turkish Lira
- Date - This custom field gives you two date formats to choose from: MM/DD/YYYY or DD/MM/YYYY. You can use a date field to document when a customer started your loyalty program, the last time a donor made a contribution, a volunteer participated in an activity, or the last time maintenance was performed for a client.
- Date & Time - This custom field gives you two date formats to select from that include the time: MM/DD/YYYY HH:MM AM/PM and DD/MM/YYYY HH:MM AM/PM. A date and time can be typed into the field or chosen from a calendar. If a time is not specified, it defaults to midnight UTC.
- Number - This custom field is only compatible with integers and lets you specify how many decimals are included in the formatting, up to four. You can choose to allow negative numbers as well. For example, 123.1234 OR -123.1234.
Access the custom fields manager
Custom fields can be created and managed through both the Contacts page and the Settings page. Here's how to find them so you can create new custom fields, rename or delete existing custom fields, and view custom fields that were created during the contact file import process, while customizing a sign-up form, or through an automation path:
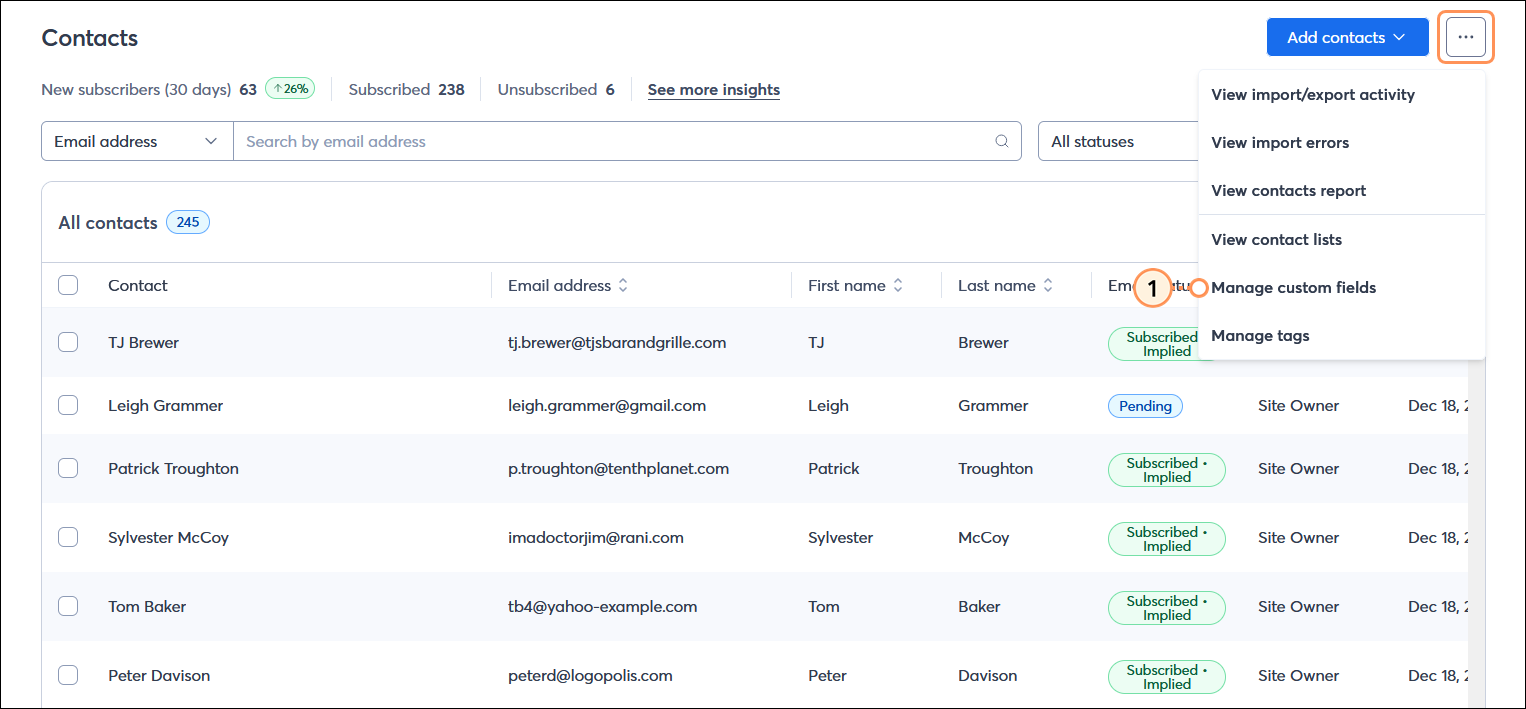
Managing custom fields through the Contacts page
- From the Contacts page, click the three dots in the upper right-hand corner and select the "Manage Custom Fields" option.
Manage custom fields through your account settings
- From your account settings, click the Advanced settings tab.
- In the Custom fields section, click the Manage button.

 | Important: Business-related custom fields are not automatically created when you select your industry type through your account settings. The industry type allows us to provide you with email stats and suggest email templates for your chosen industry. |
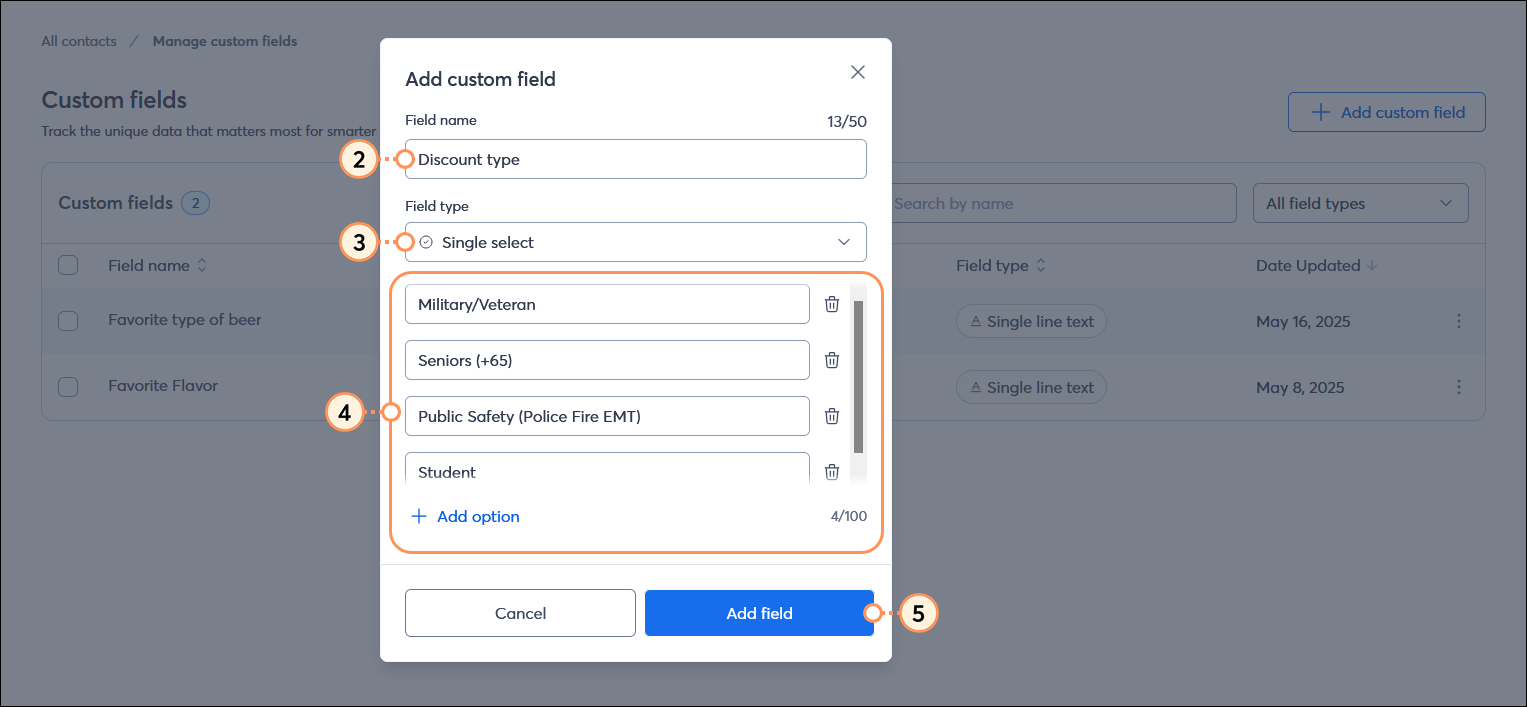
Create new custom fields
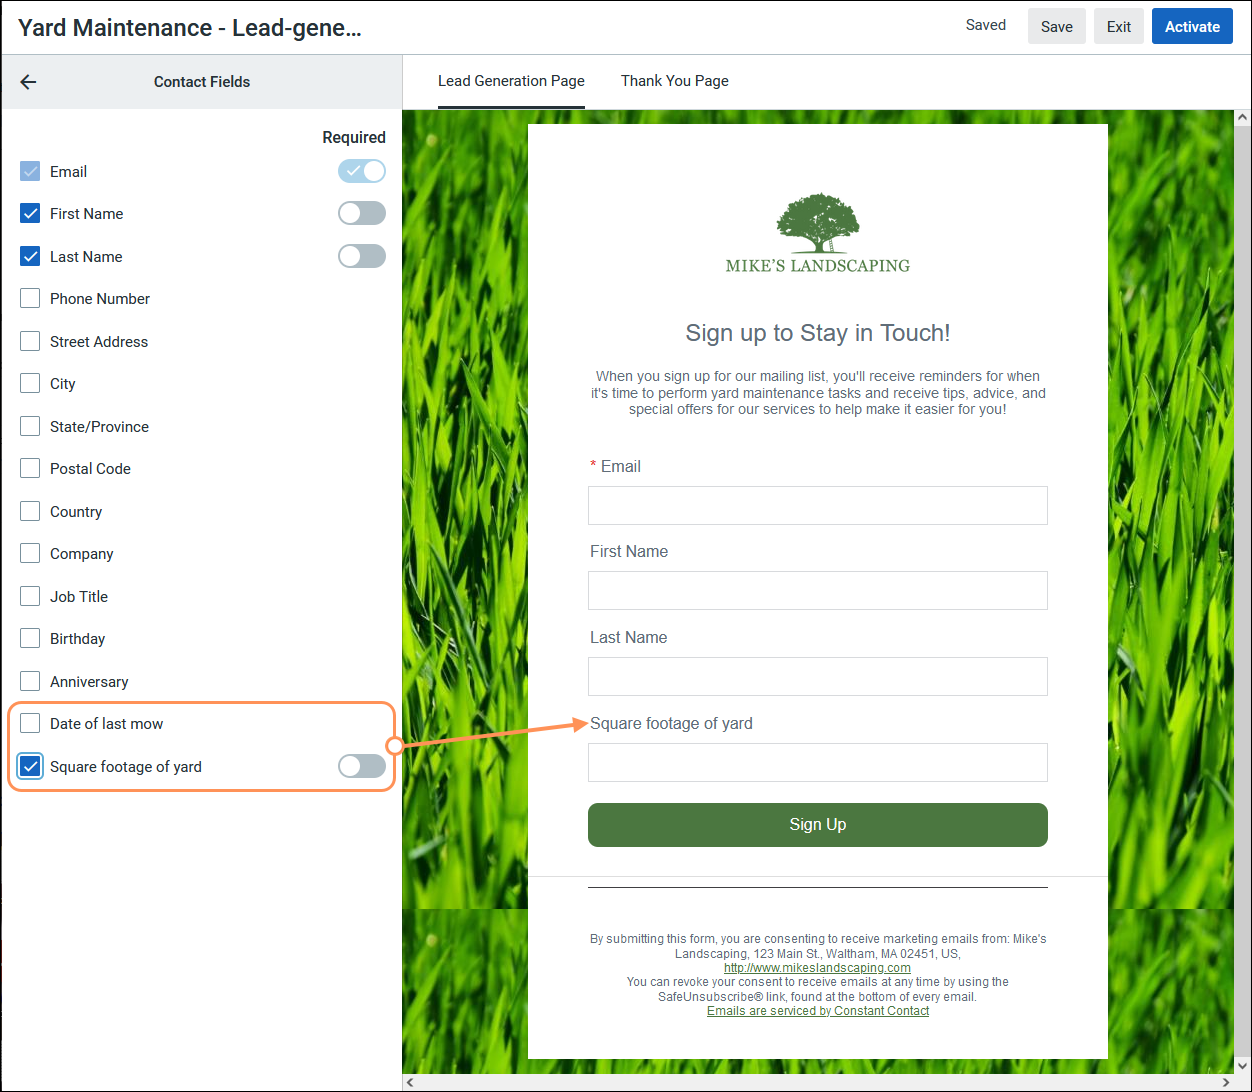
Custom fields can be created for so many different reasons! You can use them to track the start date of a loyalty program or the date of a donation, or you can keep track of customer preferences, or even a service level, discount type, or donor tier. There can be up to 100 unique custom fields in your account, and keep in mind that any custom field you create is available for all of your contacts, even if they're not applicable to all of your contacts. It's totally fine to have blank custom fields in a contact record!
- After accessing through the Contacts page or Settings page, click the + Add custom field button.

- Give your custom field a unique name. Even if you choose a different field type, the name can only be used once unless you first delete the duplicate field. Each field name has a 50-character limit.
- Select the type of field you want to create.
- (Optional) Depending on the type of field, you can choose the applicable formatting options or add custom options.
- Click the Add field button.
Once you've added your new custom contact fields, you can edit the individual contact records for each of your contacts to add the latest information, or if you have a large number of contacts that need an update, upload a spreadsheet with the matching column heading to update them in bulk.
 | Did you know? There are other ways to create new custom fields, too! You can create them when creating a new Inline or Pop-up Sign-up Form, by editing an individual contact, by importing a spreadsheet with column headers that don't match the recognized contact details, and while building out an automation path. No matter how the custom fields are created, they all show up in the custom fields manager. |
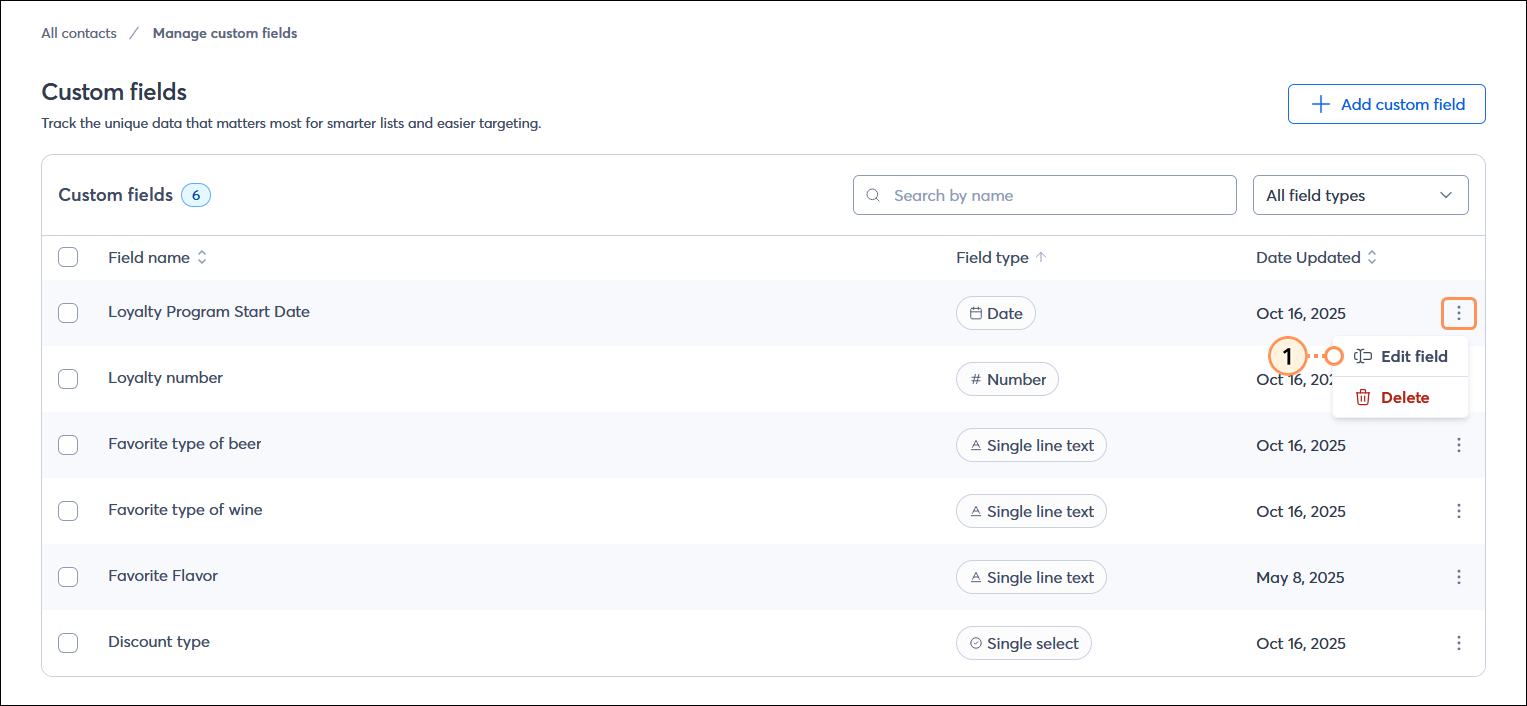
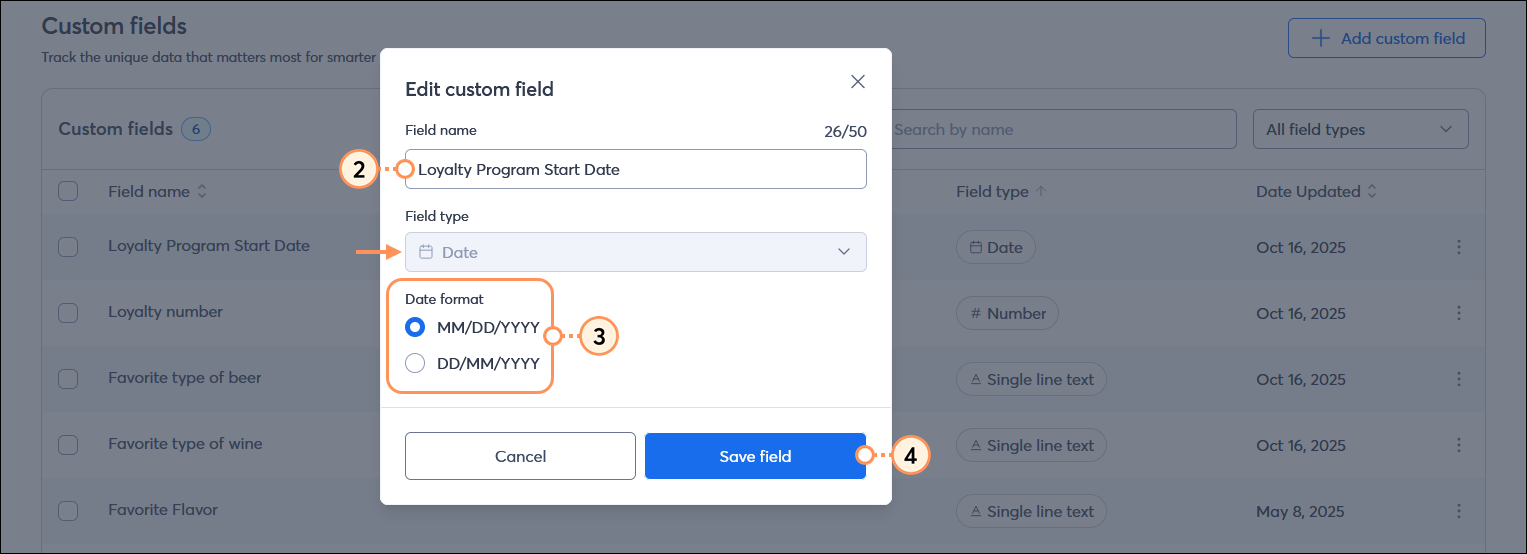
Rename or edit existing custom fields
If you have a custom field and its name isn't quite right, you can change it at any time. The change automatically applies to any contacts already assigned to the field. Renaming a custom field doesn't remove it from any contacts!
- After accessing your custom fields through the Contacts tab or My Account, click the three dots next to the custom field you want to rename and select the "Edit" option.
- Enter the new name for your custom field. The field name has a 50 character limit and must be unique.
- (Optional) If your custom field type allows it, you can make updates. For example, you can choose a different date or date and time format or add/remove options from a single-select or multiple-select field. In the image below, the field options are not editable.
Note: The field type can't be changed. - Click the Save field button.
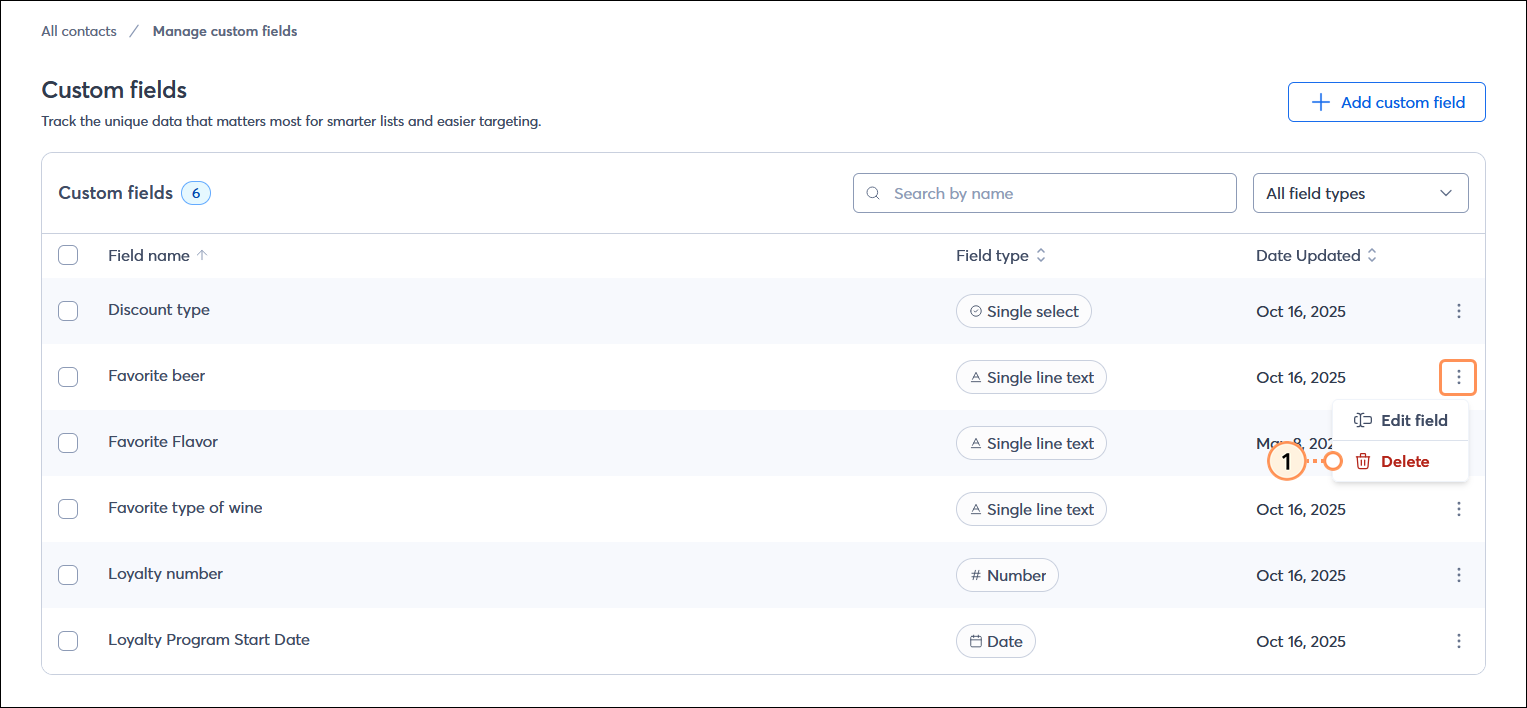
Delete outdated custom fields
You can delete the custom fields you aren't using when they become irrelevant to free up space for new custom fields. When you delete a field, all of the information associated with it for each contact is removed from your account; it's a good idea to export your contact information before you delete the field if you want to keep a back-up record of it.
Deleting individual custom fields
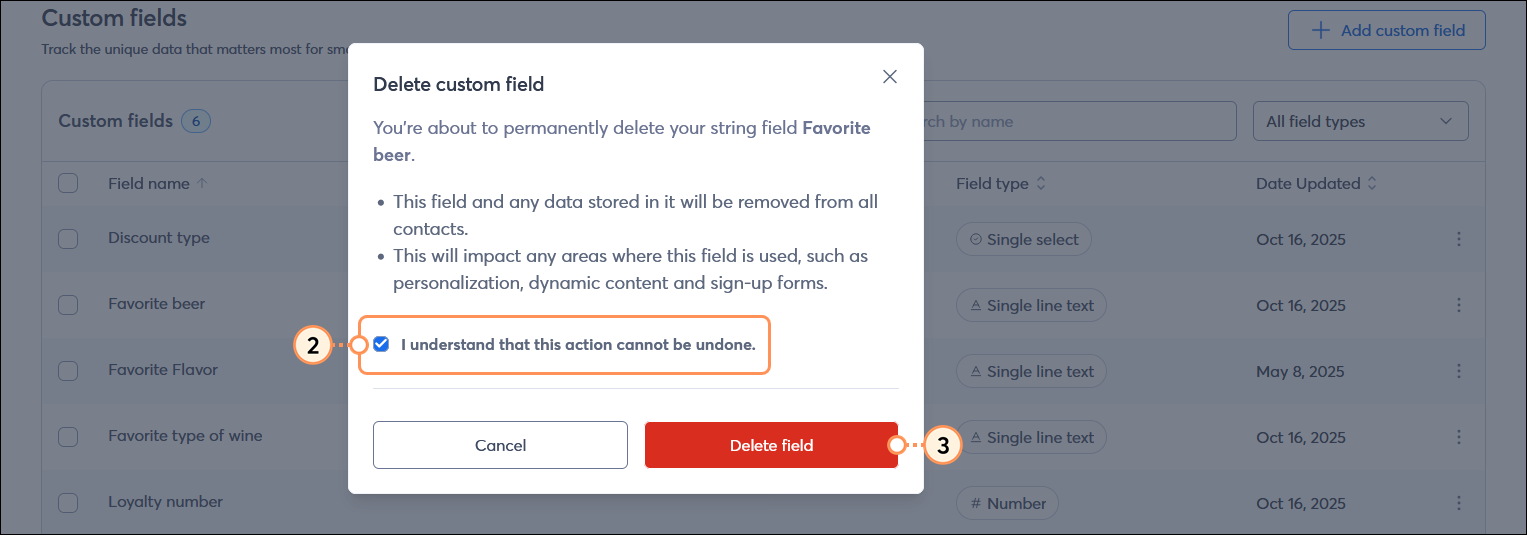
- After accessing through the Contacts tab or My Account, click . . . > Delete next to the field you want to remove.
- Check the box to confirm you understand that deleting a custom field can't be undone.
- Click Delete field.
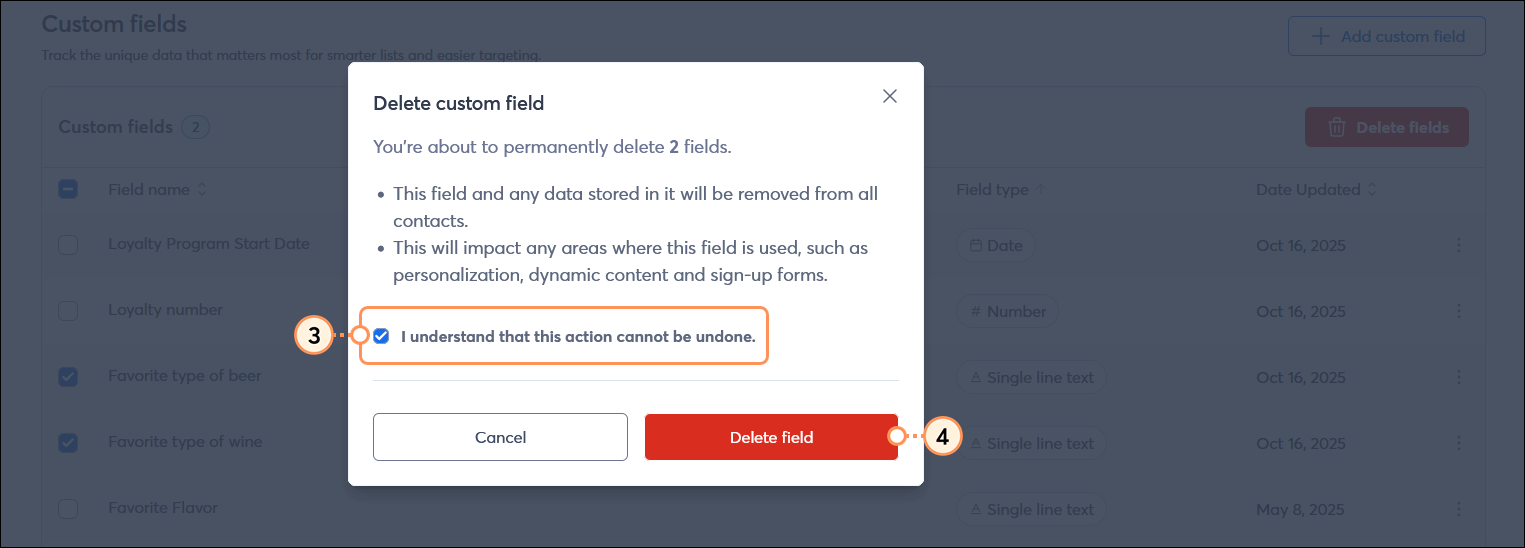
Delete multiple custom fields
- After accessing the page through the Contacts tab or My Account, select the custom fields you want to delete.
- Click the Delete button in the upper right-hand corner of the Custom fields table.

- Check the box to confirm you understand that deleting a custom field can't be undone.
- Click the Delete field button.
After you delete your custom fields, the information is available on the Import and Export Activity page for 7 days.
Use custom fields to create and send more targeted content
Our tools help you collect custom field information from your contacts and keep your contacts updated, so that you can use that information to personalize your email content and better segment your list:
- Include custom fields in a spreadsheet for importing or updating contacts - If you are importing new contacts, you can include a column heading for a custom field in your spreadsheet, and during the import process, you're able to create custom fields that match your unique column headers. If you already have contacts in your account and want to update them with custom fields in bulk, you can export all of your contacts, then add the custom field columns to the spreadsheet, and then import them back into your account. Your existing contacts are updated without accidentally creating duplicates.
- Collect custom information through your sign-up form - When you use any of our sign-up tools, you can ask your new sign-ups to provide the contact information you need for more successful emails. For email marketing, an email address is always a required field, but you can choose a mix of standard contact details, like name, address, or company name, and custom fields for the unique needs of your organization. You can even make custom fields required!
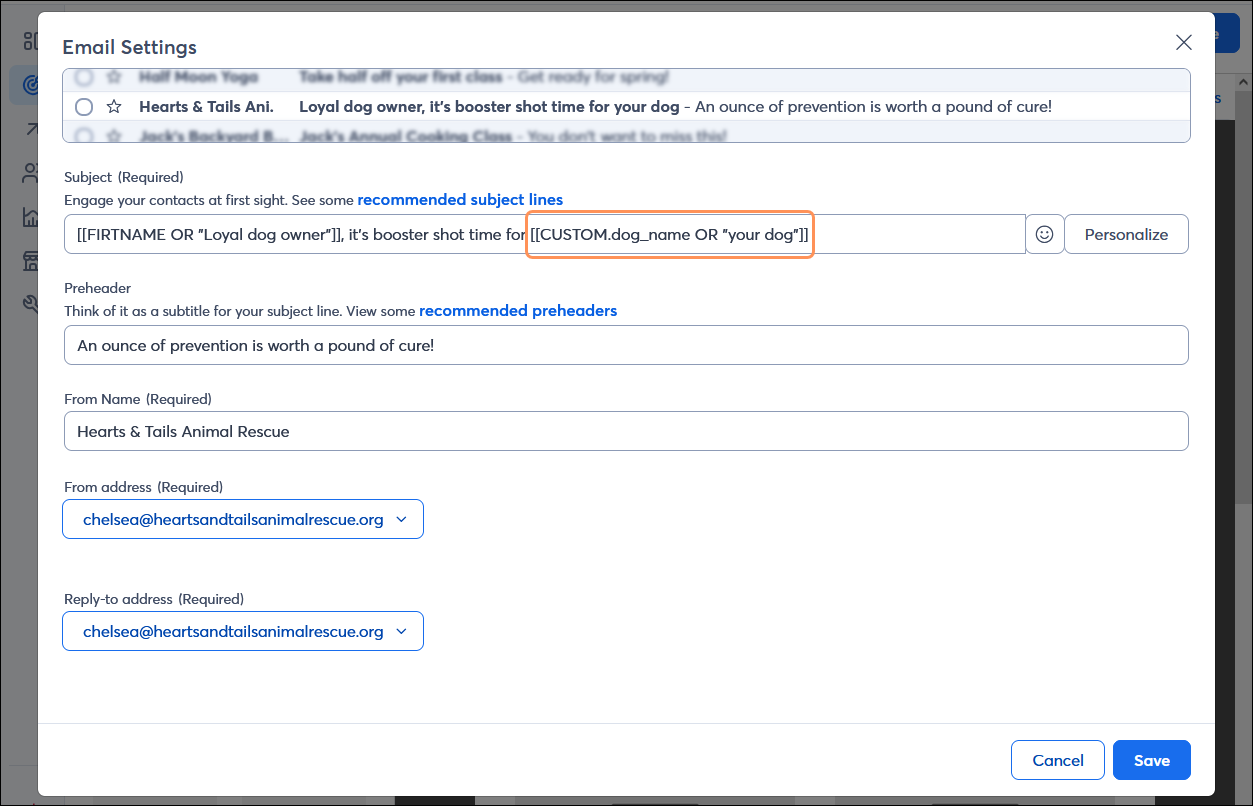
- Personalize your subject line - Adding contact details and custom fields to your subject line helps you stand out in the inbox while keeping your subject line uniform for all of your contacts. As long as the custom field is already created, you can select it from the drop-down menu when you click the Personalize button.
- Personalize your email content - Peppering your email content with contact details and custom fields makes your email feel like it was written for each contact. As long as the custom field is already created, you can select it from the drop-down menu.

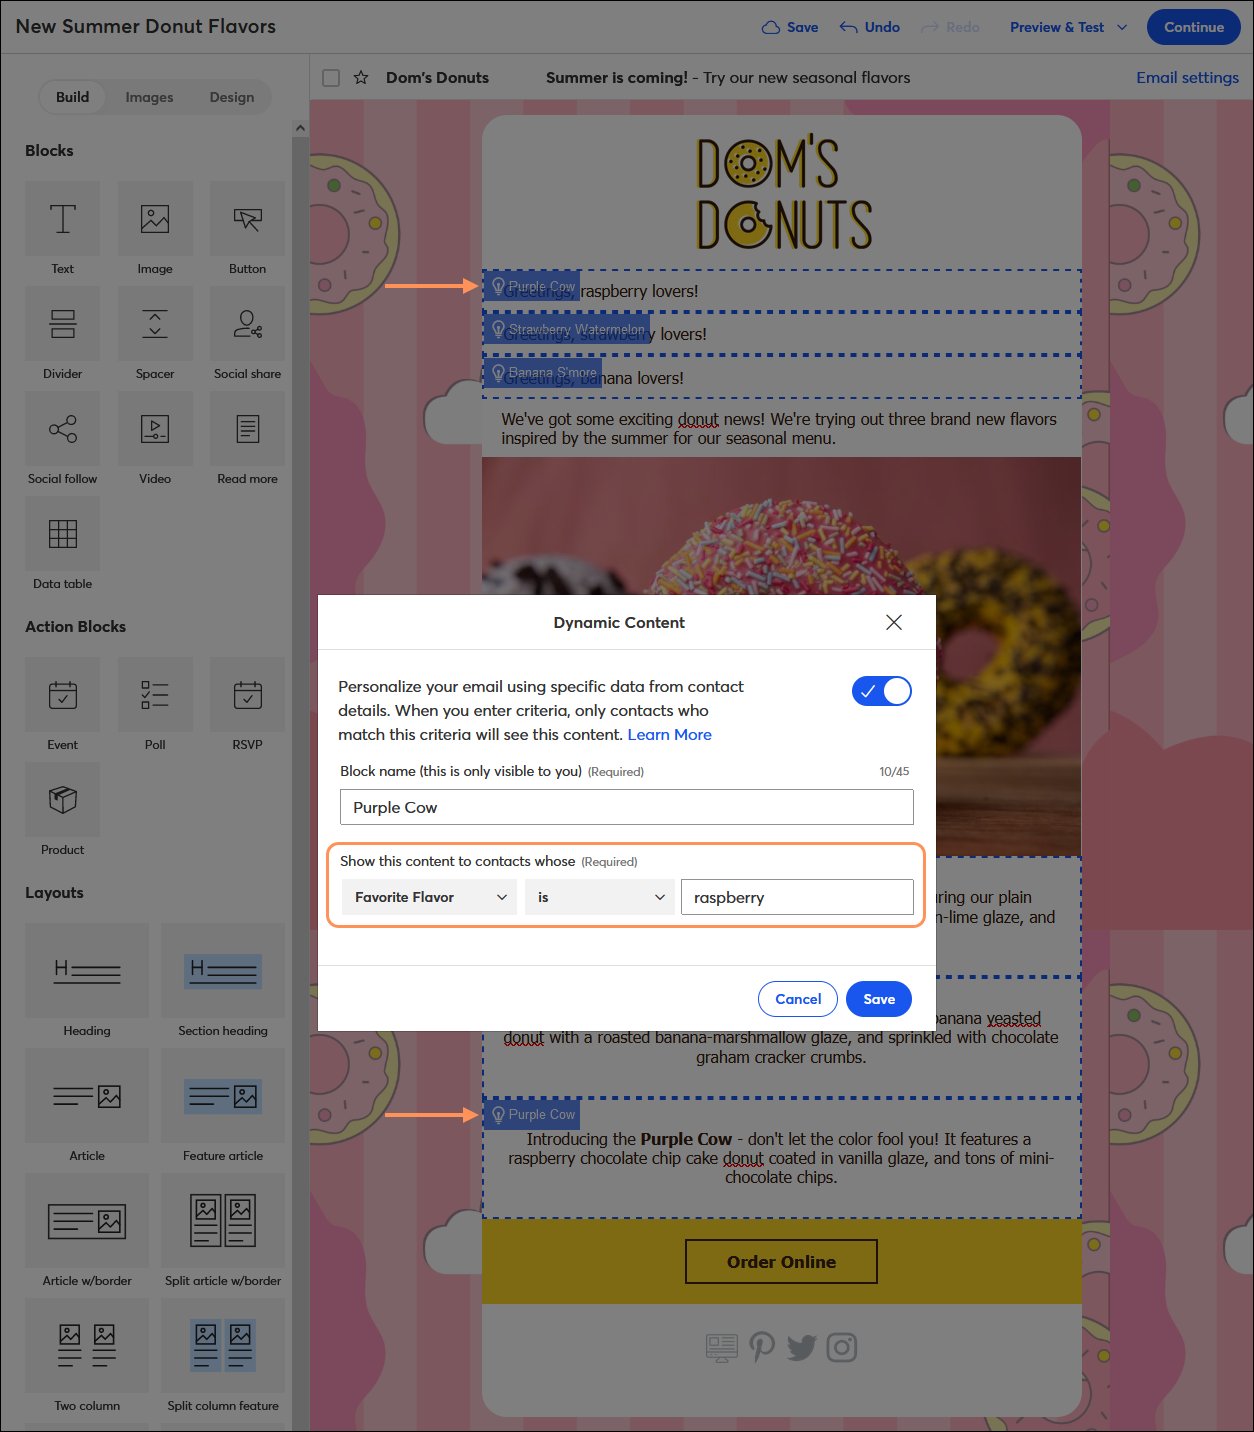
- Create dynamic content in your emails - Create one email for multiple audiences with Dynamic Content Blocks. You can choose the contact details and custom fields you want to display in each block. As long as the custom field is already created, you can select it from the drop-down menu.
- Segment your list based on custom fields - Create a segment of contacts using contact details and custom fields to define a targeted audience. Create an email that is catered just to the segment, and when you're ready, send it only to that segment. As long as the custom field is already created, you can select it from the drop-down menu.
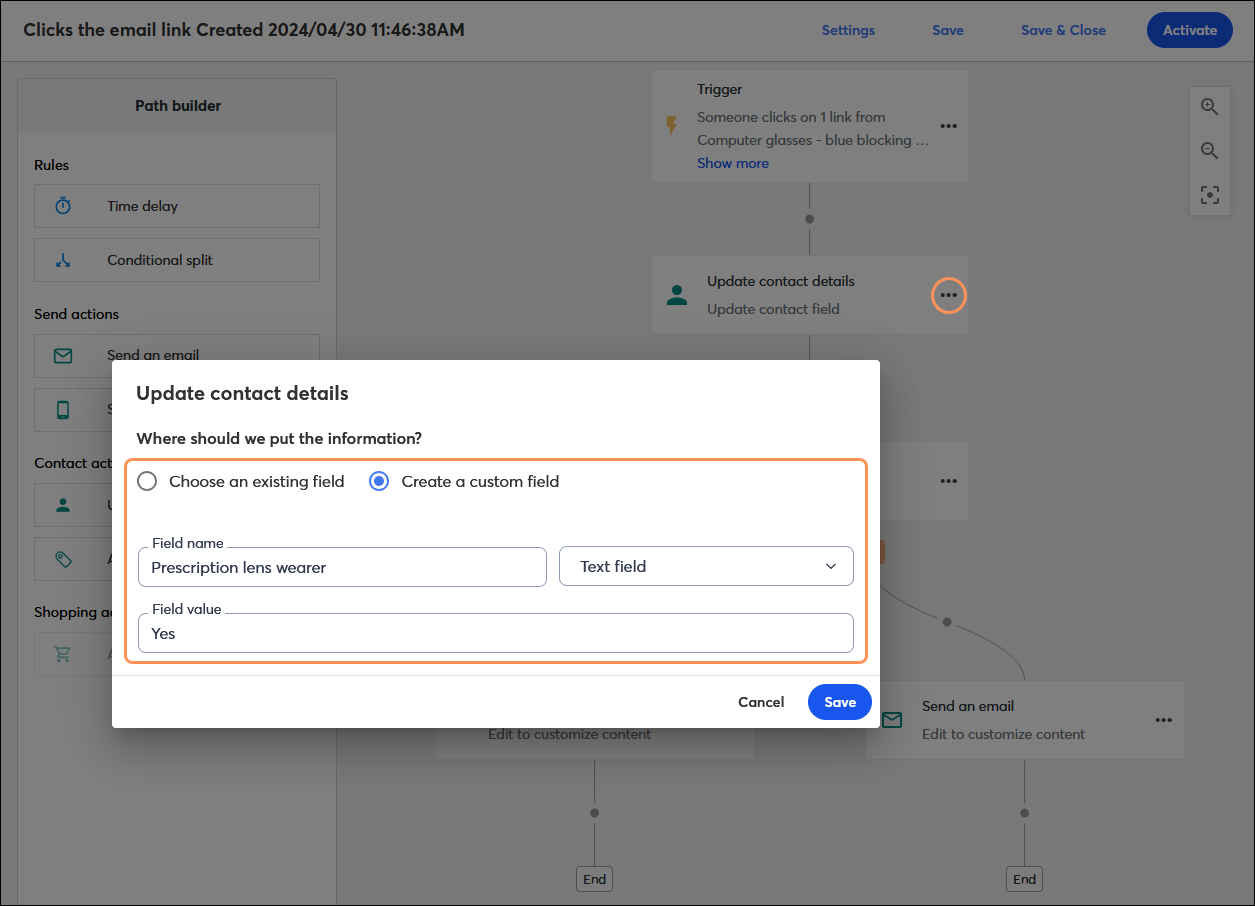
- Use an automation path to add or remove custom fields from your contacts - The Automation Path Builder lets you send automated email and SMS messages based on different triggers and also gives you the option to automatically add contact details and custom fields, or remove them, based on a contact's behavior earlier in the path. When you create a path, just drag an Update contact field step into your path to get started. You can choose existing custom fields or create new ones from within the path!