In this article, you'll learn how to add and manage client accounts in Lead Gen & CRM.
| This article applies only to Agency Partners and their clients. For individual accounts, please return to the knowledge base. |
Users:
| Administrators | ✓ | |
| Company Managers | ||
| Marketing Managers | ||
| Sales Managers | ||
| Salespersons | ||
| Jr. Salespersons |
To add new clients, from within your Agency account, click the ![]() Settings icon at the bottom of the left toolbar.
Settings icon at the bottom of the left toolbar.

Enter the information in the initial screen to set the first associated user for the new client instance, as well as the name, address, website, and phone number of the new client.
Important: This information will be added under the Company Profile automatically and is required by the CAN-SPAM Act to send emails.
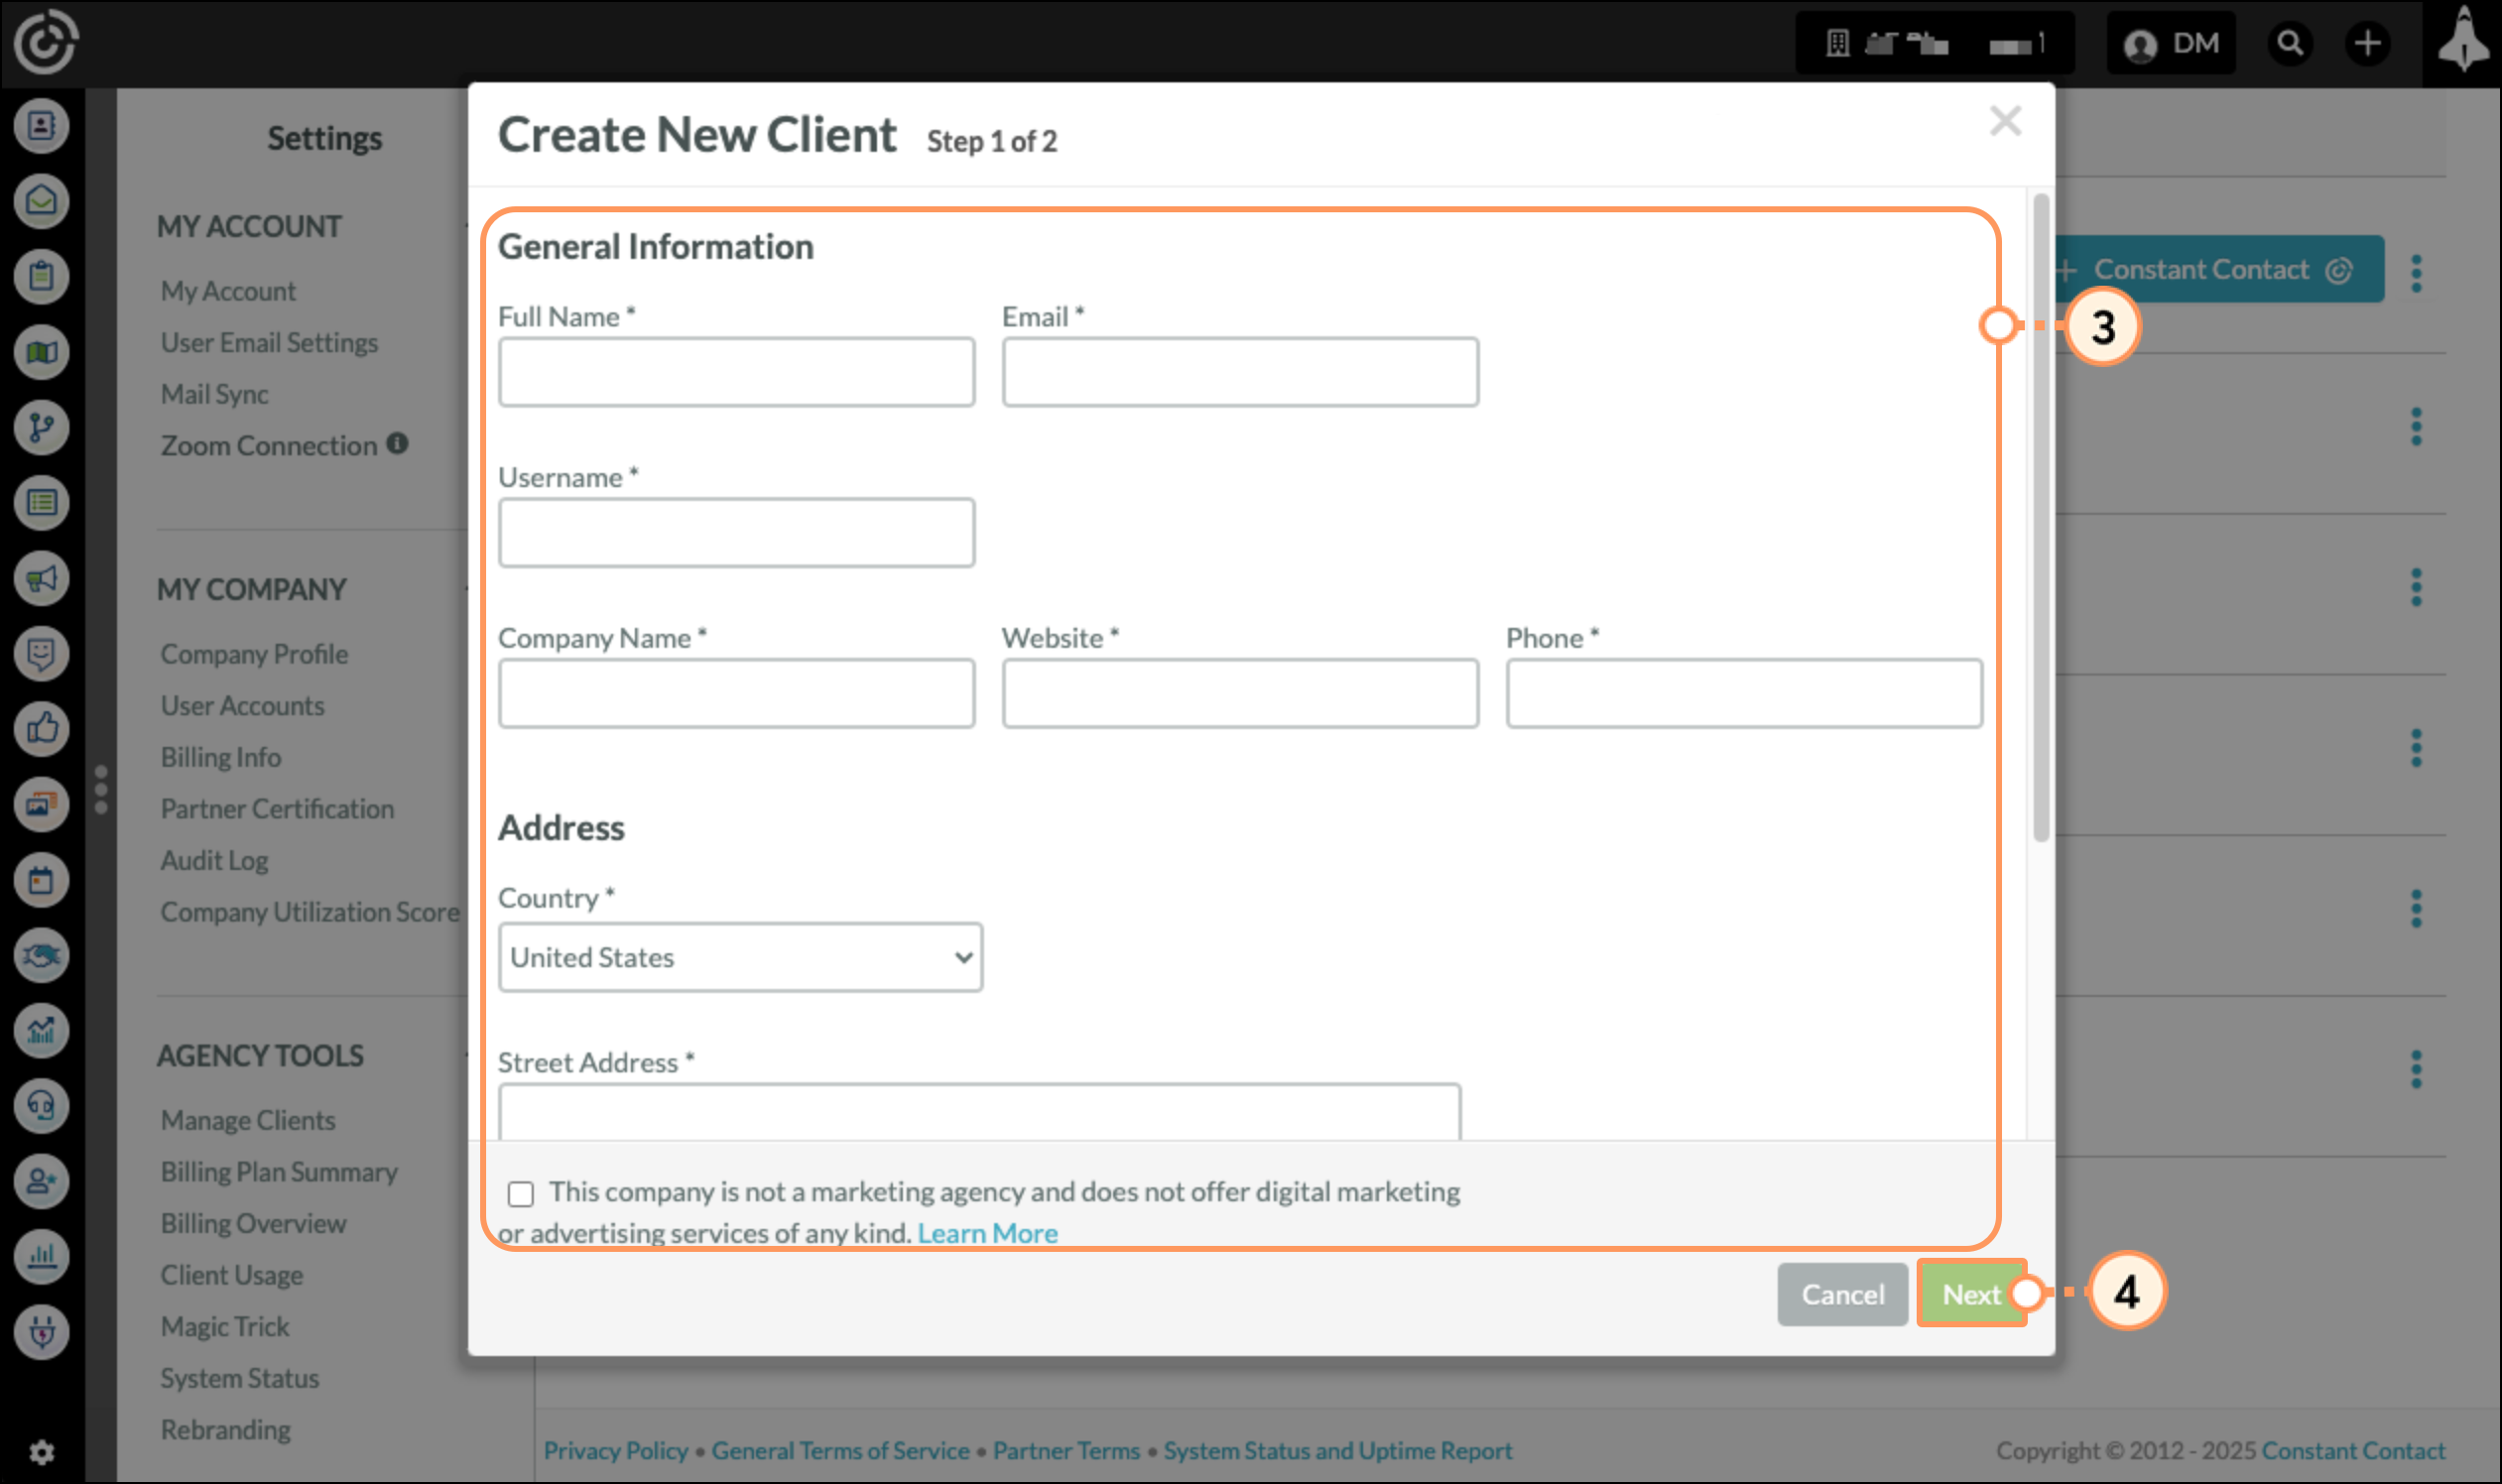
Once your new client is created, you will be taken to the Client Configuration page.
Note The client configuration is not valid until you also complete the required fields on the Client Configuration page, and the charges you incur may be different than expected until it is done.
On the Client Configuration screen that appears, enter desired client account settings based on the client's location, following the guides available below. Be sure to click Save to save your new client changes.
Once the page reloads, the new client will appear under the Managed Clients section.
To navigate to your Manage Clients page, from within your Agency account, click the ![]() Settings icon at the bottom of the left toolbar, then click Manage Clients in the Settings menu on the left.
Settings icon at the bottom of the left toolbar, then click Manage Clients in the Settings menu on the left.
The Manage Clients page provides access to information regarding the status of your client instances. You will see various tags next to the client names, indicating different things:
Under the client’s name, you will also see information regarding the number of users on the client account, when the last client user was logged in, and the number of emails sent during the current month.
To edit client options, from within your Agency account click the ![]() Settings icon at the bottom of the left toolbar.
Settings icon at the bottom of the left toolbar.
Click Manage Clients, located under Agency Tools in the left panel.
Click the ![]() Three-Dot options menu in a client's profile row to view the following options:
Three-Dot options menu in a client's profile row to view the following options: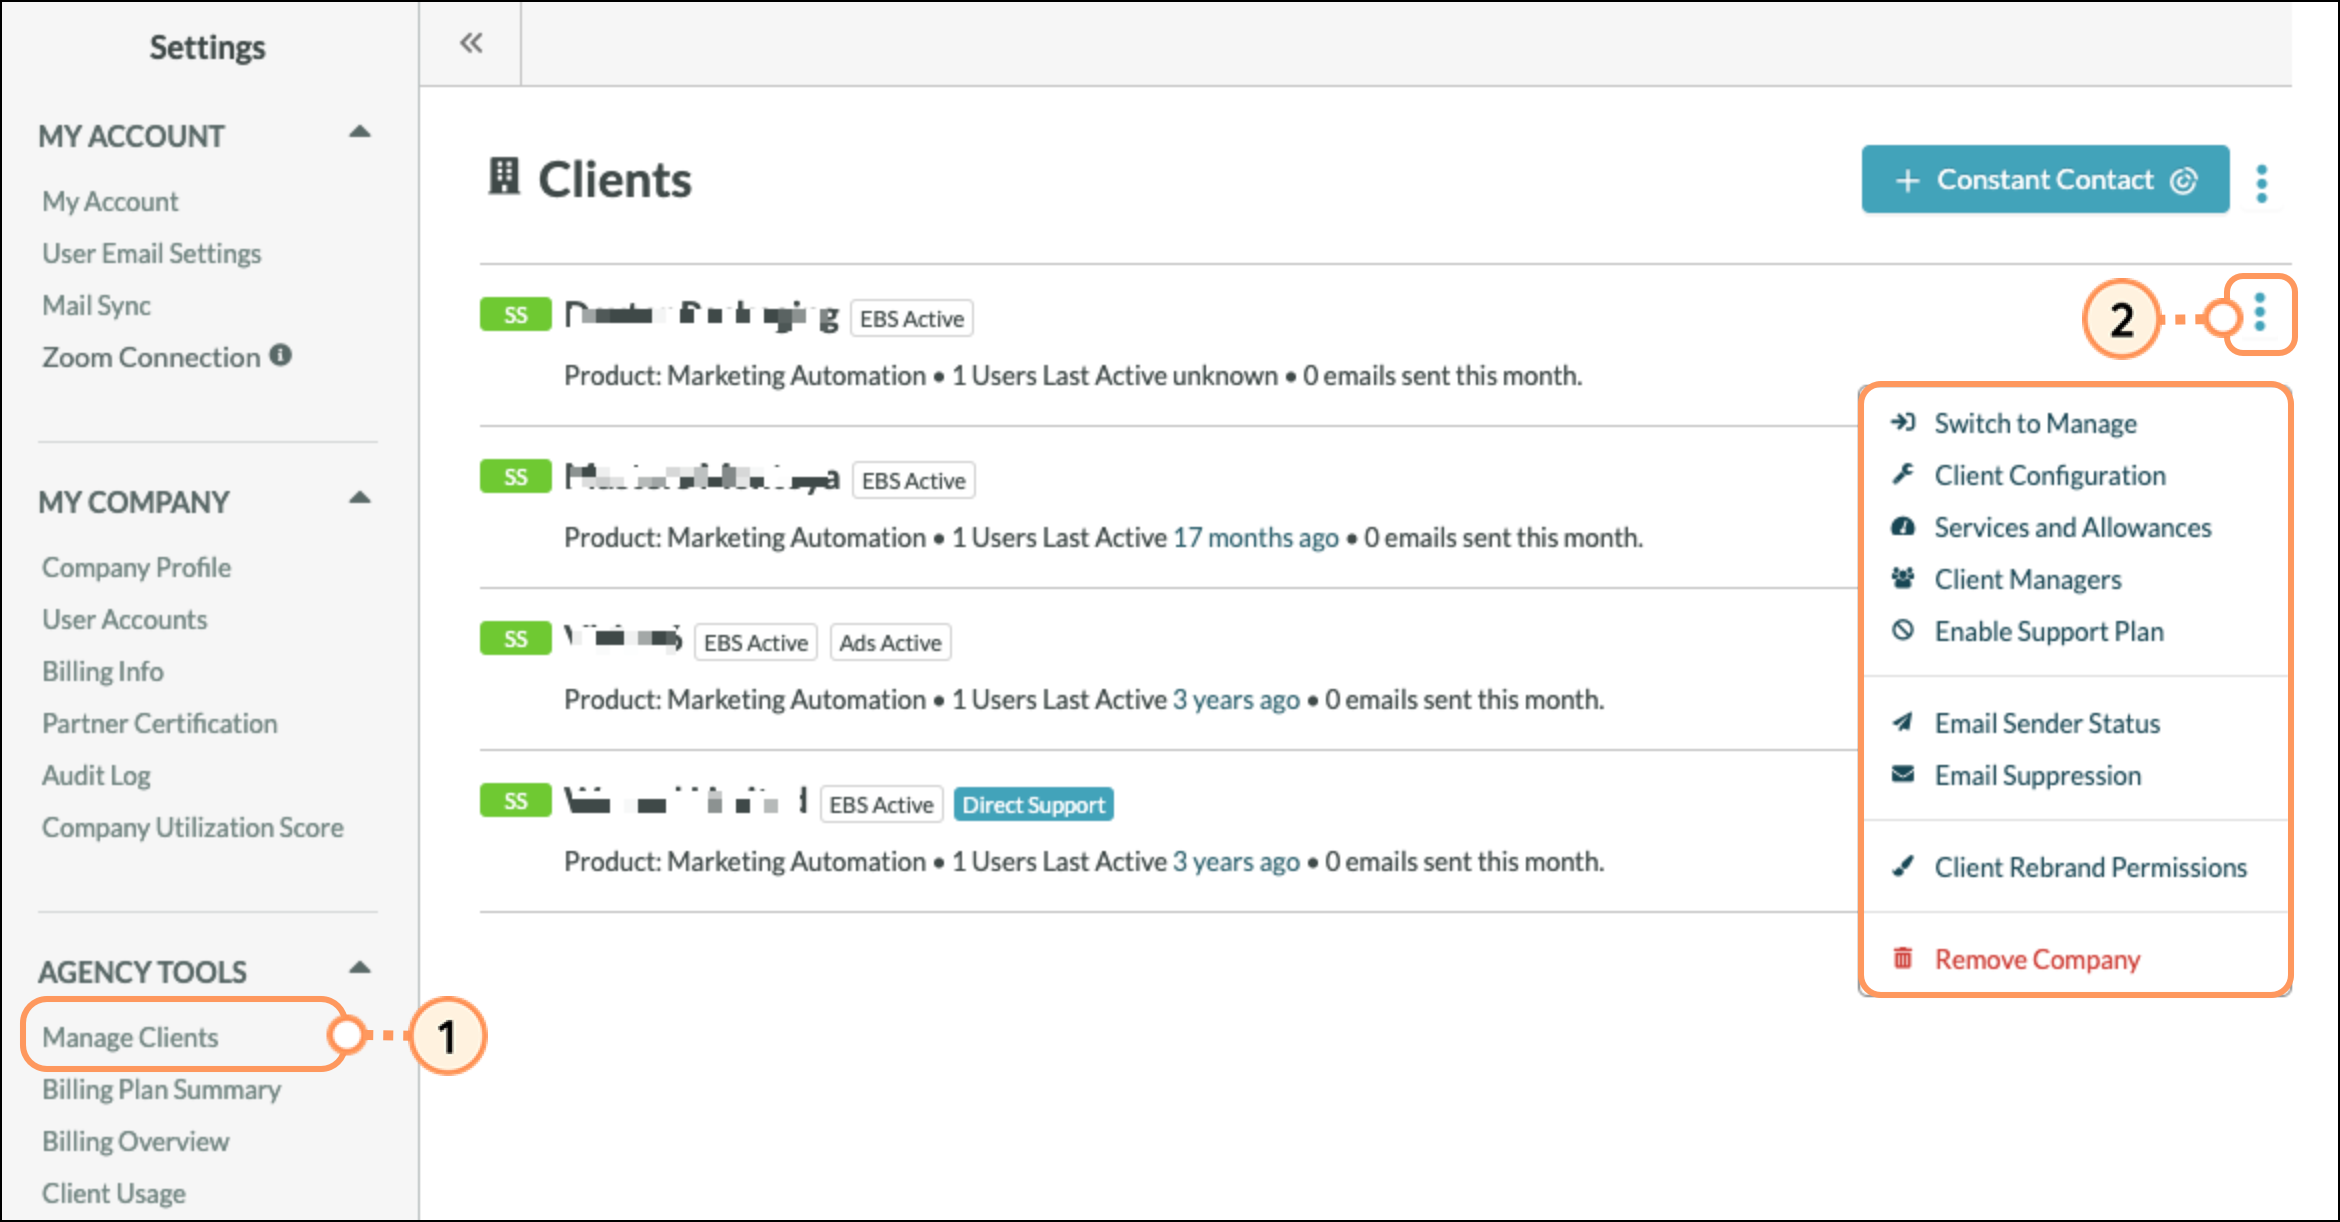
|
Option |
Description | |||
|
|
Switch to Manage |
|
Logs you into the selected client as an administrator to manage their account and use the services on their behalf. |
|
|
|
Client Configuration |
|
Accesses the Client Configuration page for setting license term and billing information. |
|
|
|
Services and |
|
Displays pricing and accesses limit controls for add-on services. |
|
|
|
Client Managers |
|
Adds or removes users who can access and manage the client. |
|
|
Enable/Disable |
Turns on or off Direct Support service (paid add-on that lets you transfer support obligations from your agency to us). | |||
|
|
Email Sender |
|
Displays the client's current sender status and provides a breakdown of different sender statistics. |
|
|
|
Email Suppression |
|
Determines whether engagement-based suppression is enabled for the client. Also displays the client's current sender status. |
|
|
|
Client Rebrand |
|
Prevents a client from uploading their own logos to rebrand Lead Gen & CRM. Restrict permissions here if you would like them to use your own logo instead. |
|
|
|
Remove Company |
|
Deletes client accounts and prohibits access by any users. (Only available for month-to-month clients or during the pre-renewal period for annual-term clients.) |
At the top of the Manage Clients page, there is a three-dot menu icon next to the “+ Constant Contact” button. Clicking that gives you access to:
|
|
Email Limits |
|
Provides the ability to place limits on the number of emails that a client can send each billing cycle. The system automatically calculates the number of emails already sent, along with any email jobs that are scheduled, and will prevent emails that exceed the limits set. By default, client instances are NOT limited. |
|
|
|
Client Usage |
|
Links to the Client Usage page, which shows the historical data on client email, contacts, and page impressions in a consolidated view (only updated after the end of the billing cycle). Prior months can be viewed by using the “Previous Month” button at the top of this page. |
The Services and Allowances Manager lets the agency set the allowance for add-on and paid services, to limit a client's monthly usage and the costs incurred.
You can configure support, billing, and service limit settings for a particular client on this consolidated page. Clients cannot override these settings, but if an allowance is adjusted lower than the amount of services already active, then billing will continue to charge based on active services used until the active services are removed.
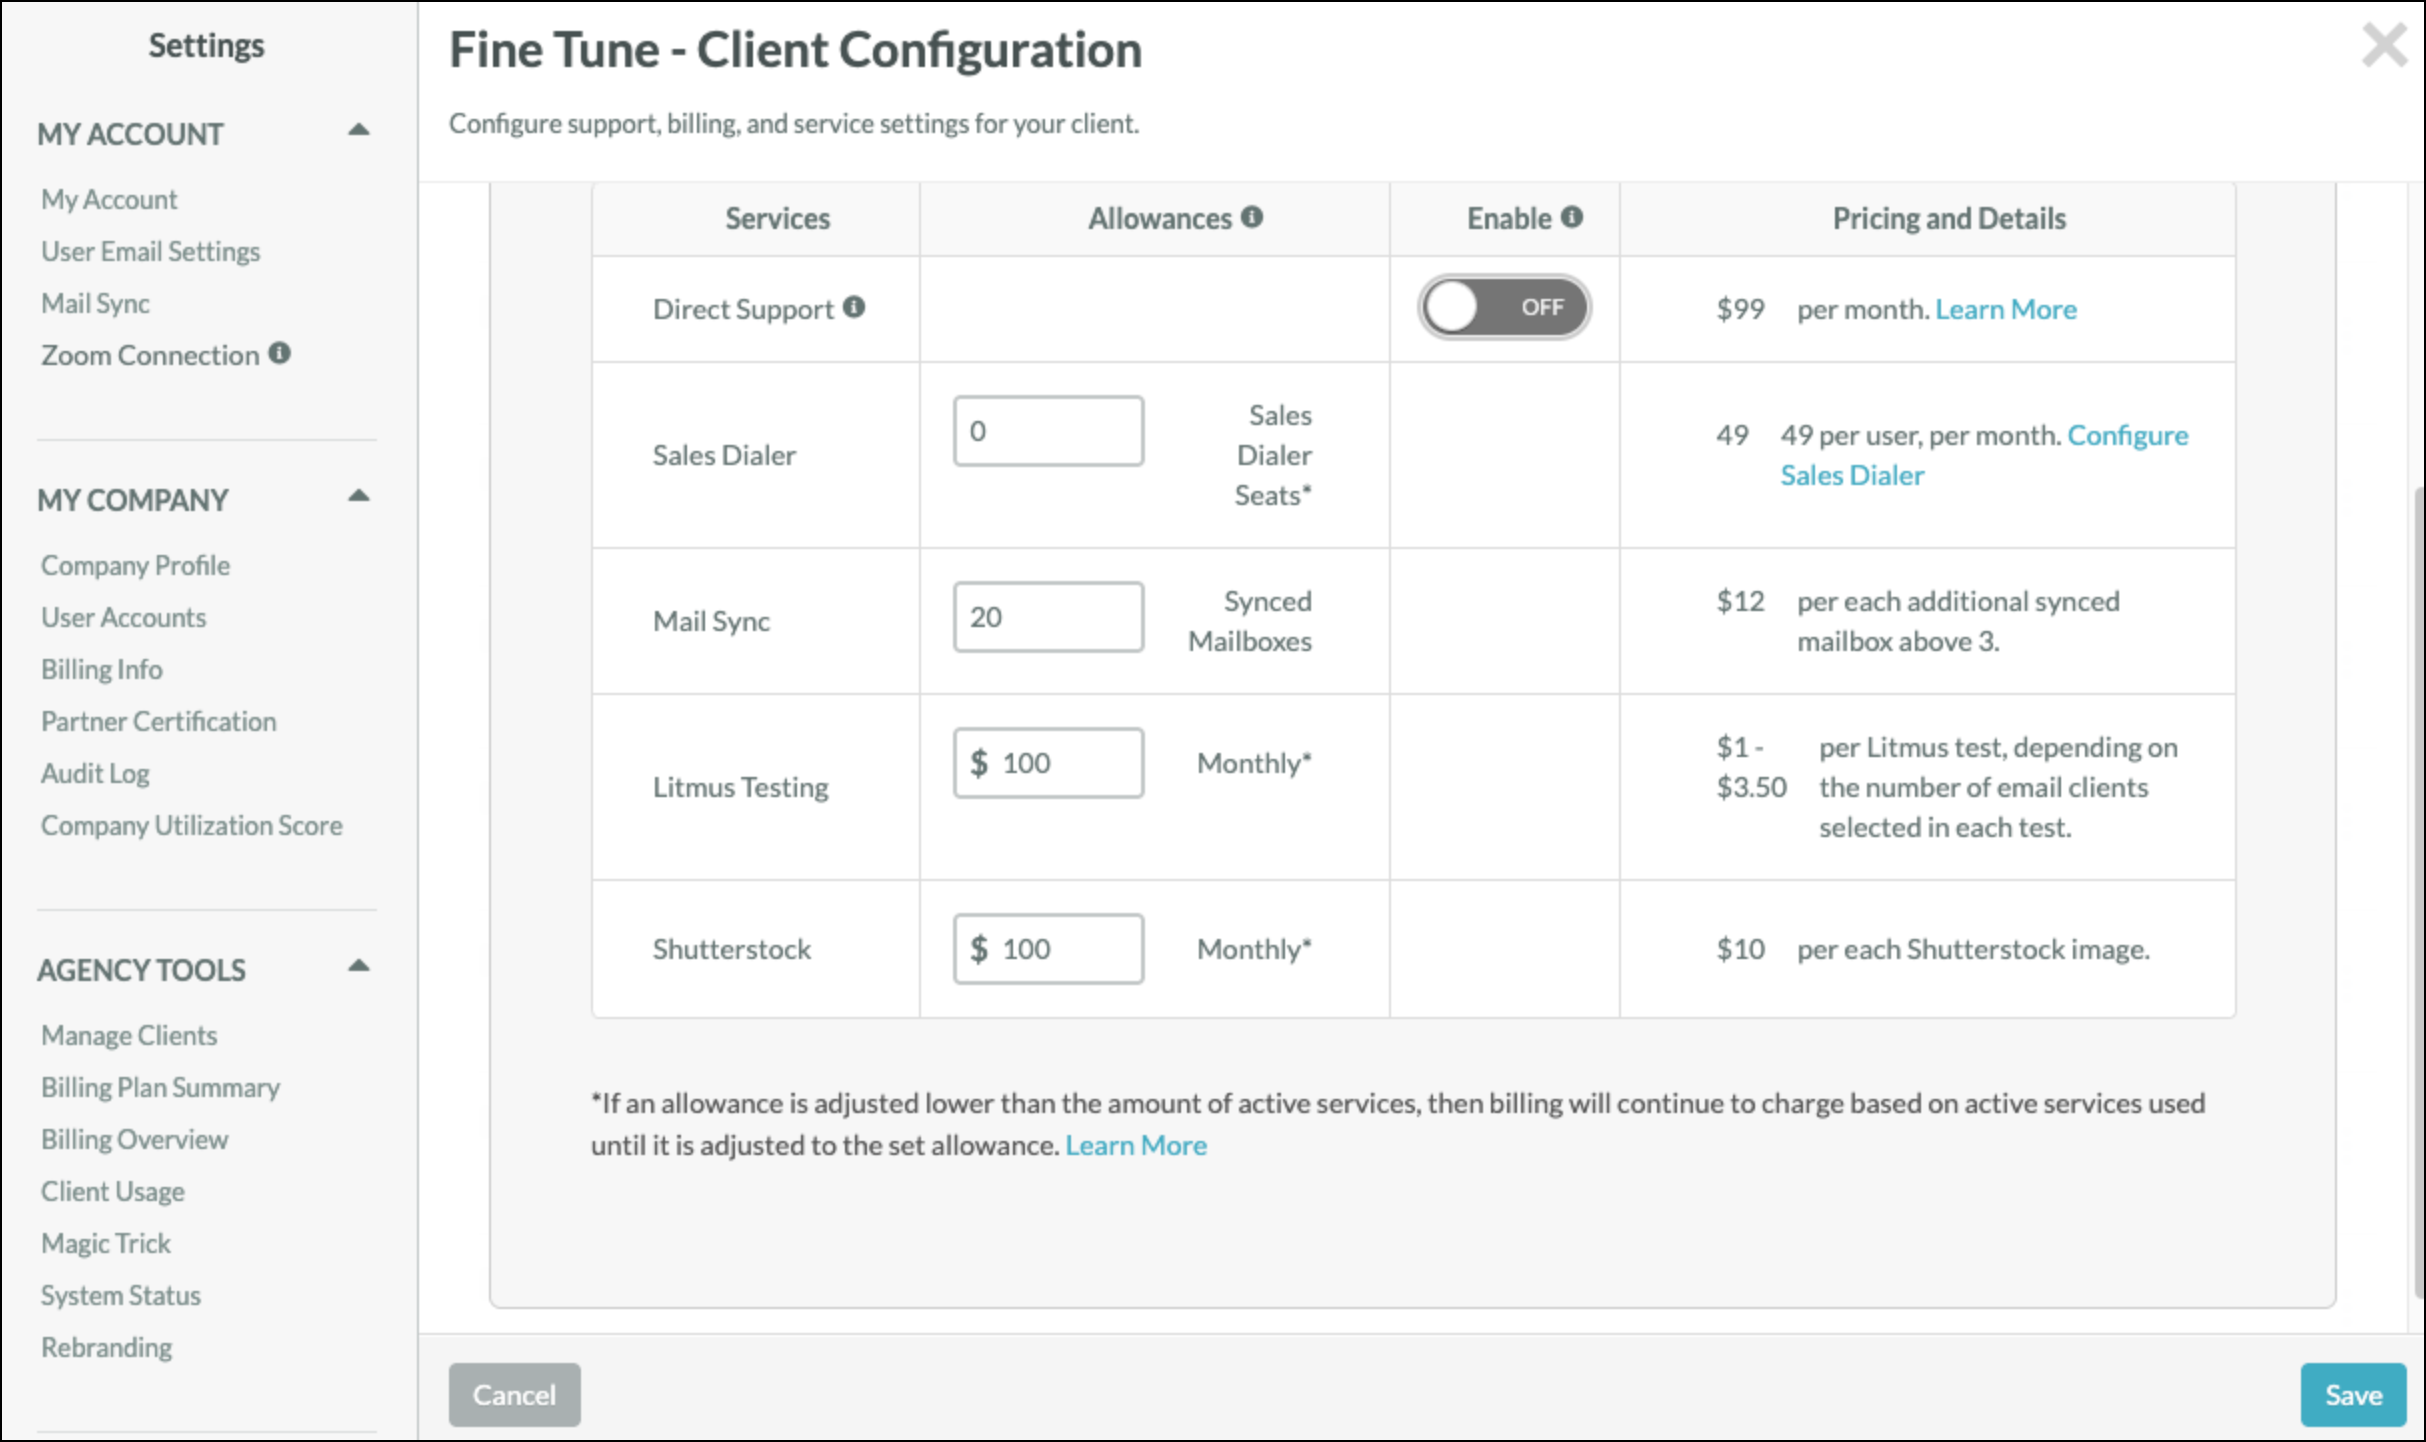
This control screen applies to add-on services only. For control of client email usage and overages, see Managing Client Email Limits.
Users in an instance can be set to be able to access certain clients. To configure the clients a user can access, start from ![]() User Menu > Settings in Lead Gen & CRM's top toolbar or click the
User Menu > Settings in Lead Gen & CRM's top toolbar or click the ![]() Settings icon at the bottom of the left toolbar.
Settings icon at the bottom of the left toolbar.


You can set the number of emails a client can send. To manage client email limits, start from ![]() User Menu > Settings in Lead Gen & CRM's top toolbar or click the
User Menu > Settings in Lead Gen & CRM's top toolbar or click the ![]() Settings icon at the bottom of the left toolbar.
Settings icon at the bottom of the left toolbar.
Click Manage Clients, located under Agency Tools in the left panel.
Click the ![]() Three-Dot Options menu > Edit Email Limits in the Clients title row.
Three-Dot Options menu > Edit Email Limits in the Clients title row.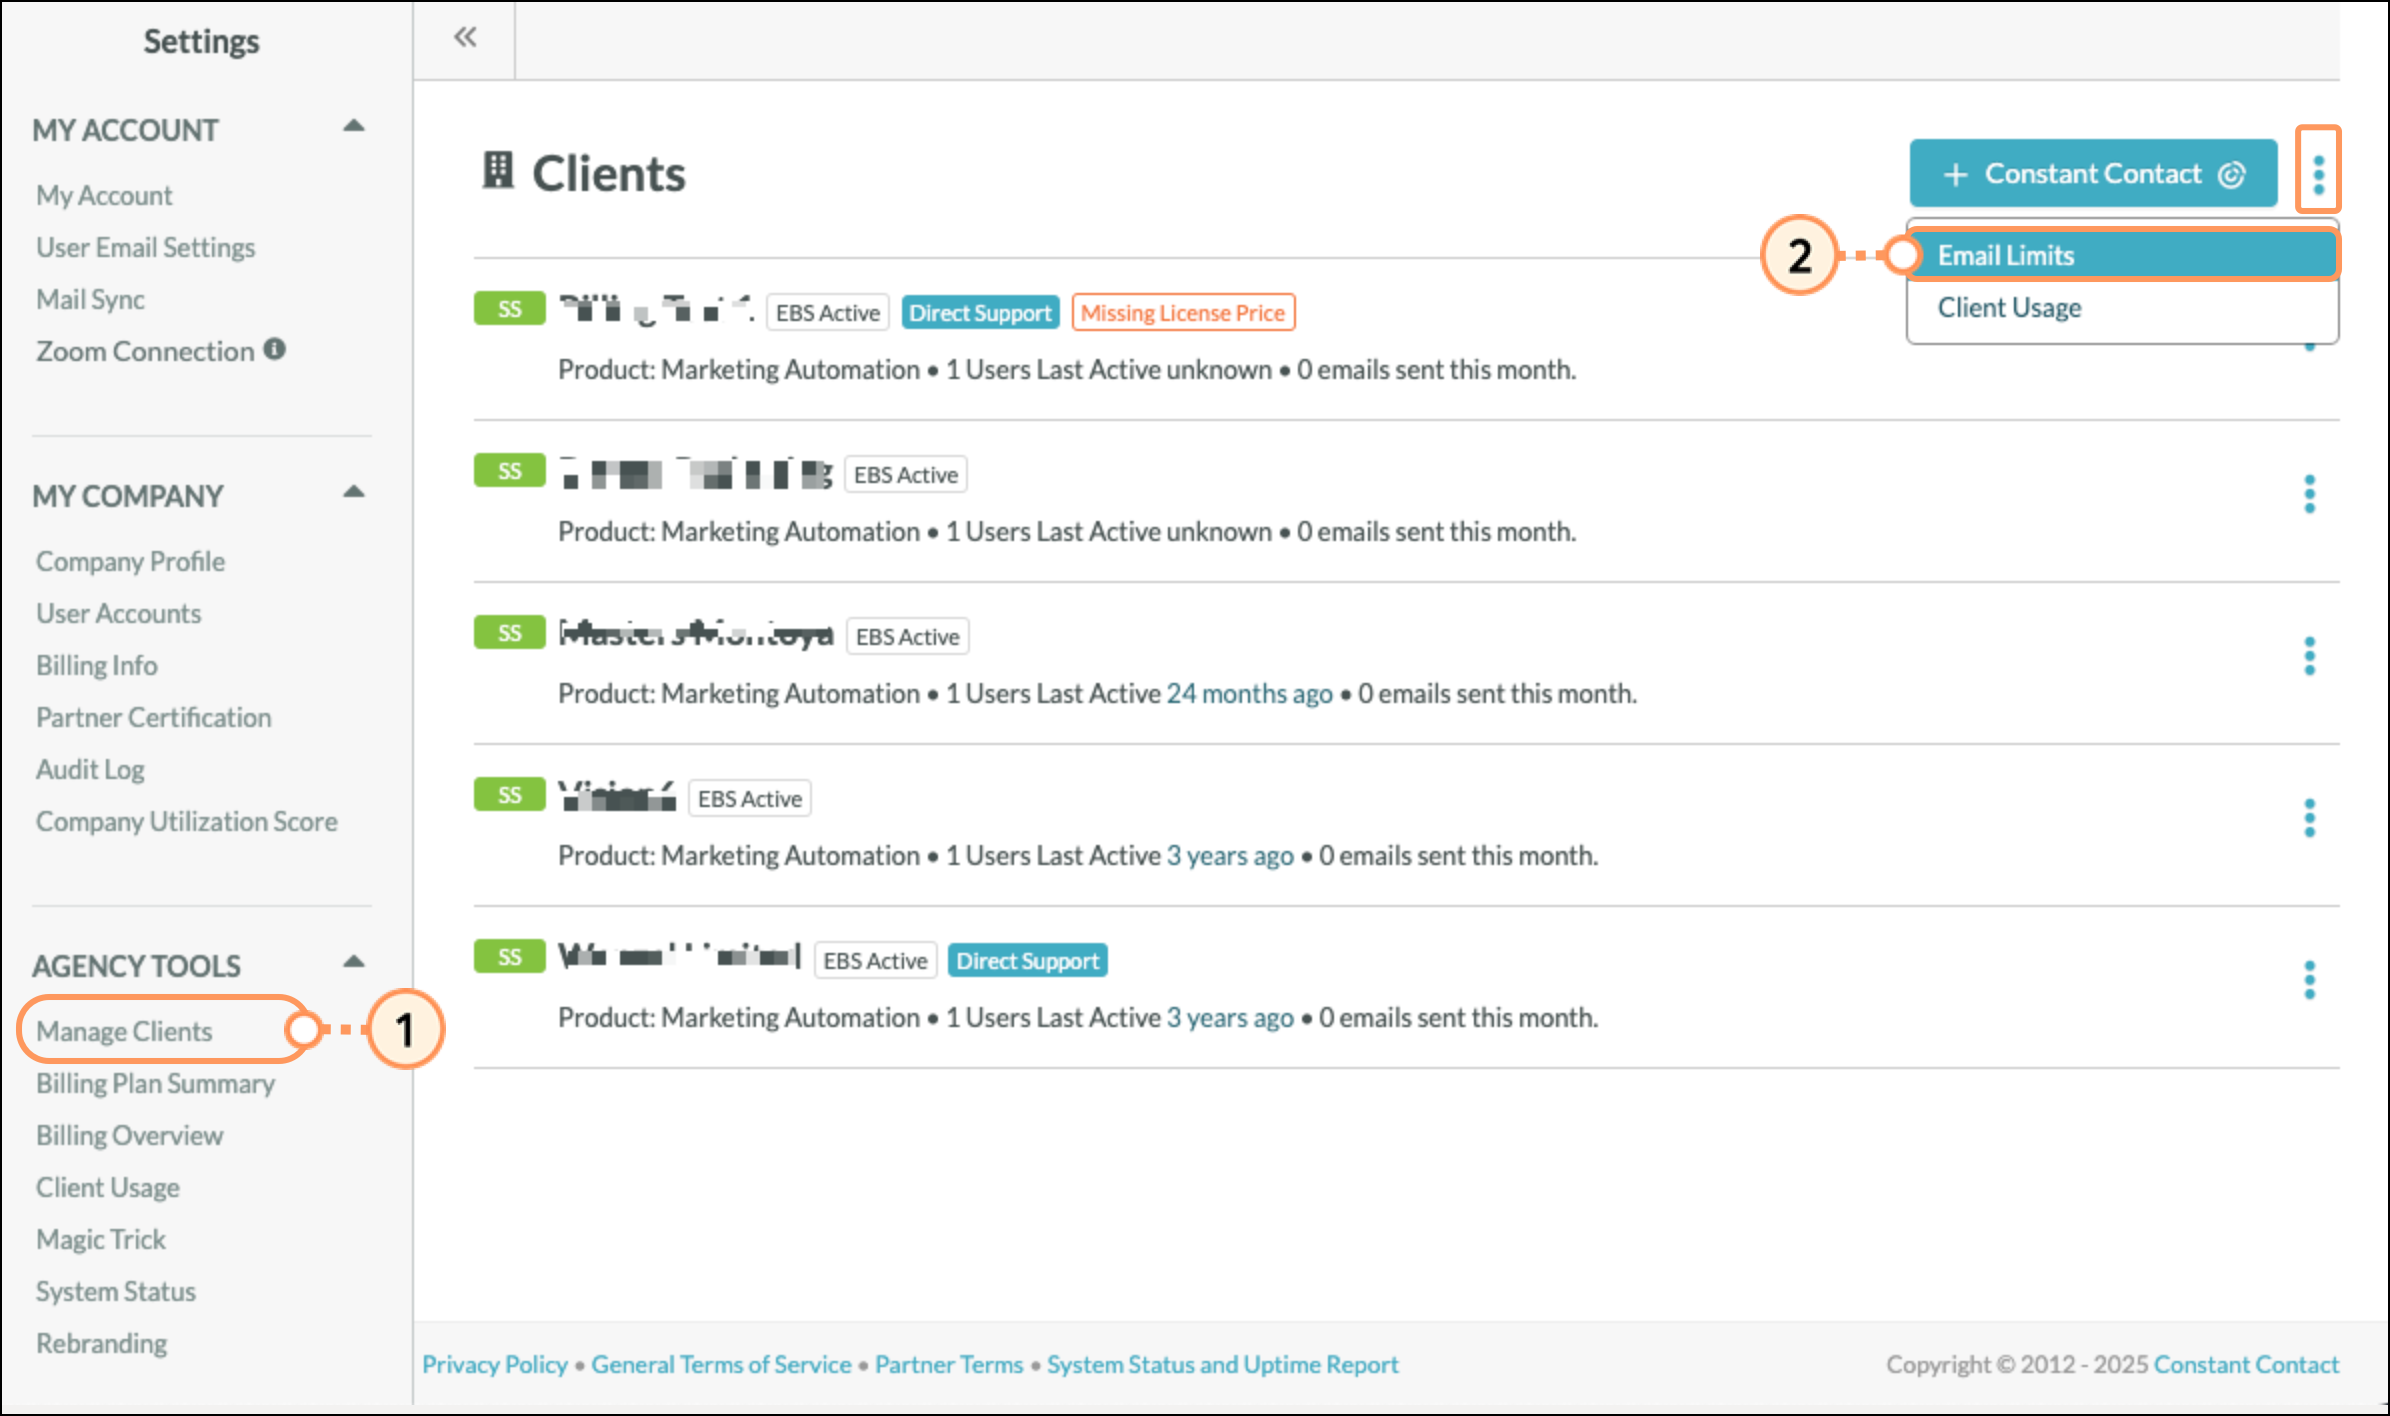
Enter the maximum number of emails you want each client to send.
Note: If left blank, the limit field will be treated as though the client can send an unlimited amount of emails.
Click Save Email Limits.
Consult your Billing Plan Summary page to determine the threshold of emails that are included with each of your licenses before overage charges apply, and the applicable overage pricing on your account.
The email limit can be more than the threshold included in the license if you wish to allow your client to incur some overage charges, but limit their ability to incur unlimited overages.
If the client attempts to schedule or send more emails than the limit you have set, they will receive a notification that they have exceeded the email limit.
Agencies can turn off engagement-based suppression for their clients who have a sender status of Healthy or At Risk. To manage suppression, start from ![]() User Menu > Settings in Lead Gen & CRM's top toolbar or click the
User Menu > Settings in Lead Gen & CRM's top toolbar or click the ![]() Settings icon at the bottom of the left toolbar.
Settings icon at the bottom of the left toolbar.
Important: Make sure your Lead Gen & CRM account has access to the client accounts you plan to edit.

Check the Require Engagement-Based Suppression checkbox and click Save Changes.
Note: Clients with active engagement-based suppression settings will have the EBS Active tag next to their names in the Manage Clients window.
When engagement-based suppression is not required, your client will be able to send to unengaged leads. If your client's sender status is downgraded based on this, then they will not be able to have their engagement-based suppression turned off until they return to the Healthy or At Risk sender status.
It takes 60 days after a client becomes a Healthy sender before you can remove suppression. Also, time-based suppressions remain in place, regardless of whether you turn off engagement-based suppression.
Direct Support allows your clients to submit tickets directly to Lead Gen & CRM's support team, so you do not have to be involved in that process.
Be aware that, if you are not using the billing platform, Direct Support is enabled by default when you add a new client. It will stay enabled until you manually disable it. In this case, be sure to disable Direct Support for clients if you do not want to be charged.
If you are using the billing platform, then Direct Support is disabled by default when you add a new client. Refer to Direct Support Package for Clients for more information regarding Direct Support features.
Copyright © 2026 · All Rights Reserved · Constant Contact · Privacy Center