Users:
| Administrators | ✓ | |
| Company Managers | ✓ | |
| Marketing Managers | ✓ | |
| Sales Managers | ✓ | |
| Salespersons | | |
| Jr. Salespersons | | |
 | Tip: Are you looking for information about Constant Contact’s Email and Digital Marketing product? This article is for Constant Contact’s Lead Gen & CRM product. Head on over to the Email and Digital Marketing articles by clicking here. Not sure what the difference is? Read this article. |
Important Information Regarding Imports
The Import Tool uses information from .CSV files and creates contact lists from this information. These files contain only alphanumeric data and are presented in a table format.
Any .CSV file that you import should be structured similar to the following:
| First Name | Last Name | Email | Is Unsubscribed |
| Galileo | Galilei | g@polymath.com |
0
|
| Edwin | Hubble | space@extragalatic.com |
0
|
| Hipparchus | | math@trig.com |
1
|
When importing .CSV files, be aware of the following:
- Header rows are required. Header rows are necessary for mapping Lead Gen & CRM fields to imported fields.
- Email fields are required. The Import Tool requires that your .CSV file contain a column mapped to the Email field. You will still need to include the Email column when a contact does not have an email address.
- Is Unsubscribed fields are required. For Lead Gen & CRM to successfully import a .CSV file, the file needs one column header that is labeled as Is Unsubscribed. The Is Unsubscribed field should be a boolean field, where 0 is for leads who are opted in, and 1 is for leads who are not opted in.
- Utilize first and last names. For the import to be successful, a first and last name are suggested in the event that you do not have an email address for that contact. Use both as often as possible.
- Values must match. When importing custom field values, ensure that they are formatted to match the custom field values. For example, picklist and checkbox values are case-sensitive.
- When importing data with picklist and checkbox fields, the fields must be present in the file import in order to appear. Ensure that the picklist or checkbox fields in your file exist before importing. Otherwise, the data may not import properly.
- When importing to a checkbox custom field, the data cannot have spaces between values and commas. An example of this would be value1,value2,value3.
Creating Files
Double opt-in lists require .CSV files.
To create a double opt-in list .CSV file, do the following:
- Create a .CSV file in Unicode with all of your contacts.
- Include a column titled isOptedIn in your .CSV file.
- Set the isOptedIn field value for list members.
- Enter relevant contact information in the .CSV file.
- Save your .CSV file.

Note: The isOptedIn field should be a boolean field, where 1 is for leads who are opted in, and 0 is for leads who are not opted in.
Importing Lists
Once you have created the .CSV file, you can import the list.
To import a double opt-in list, do the following:
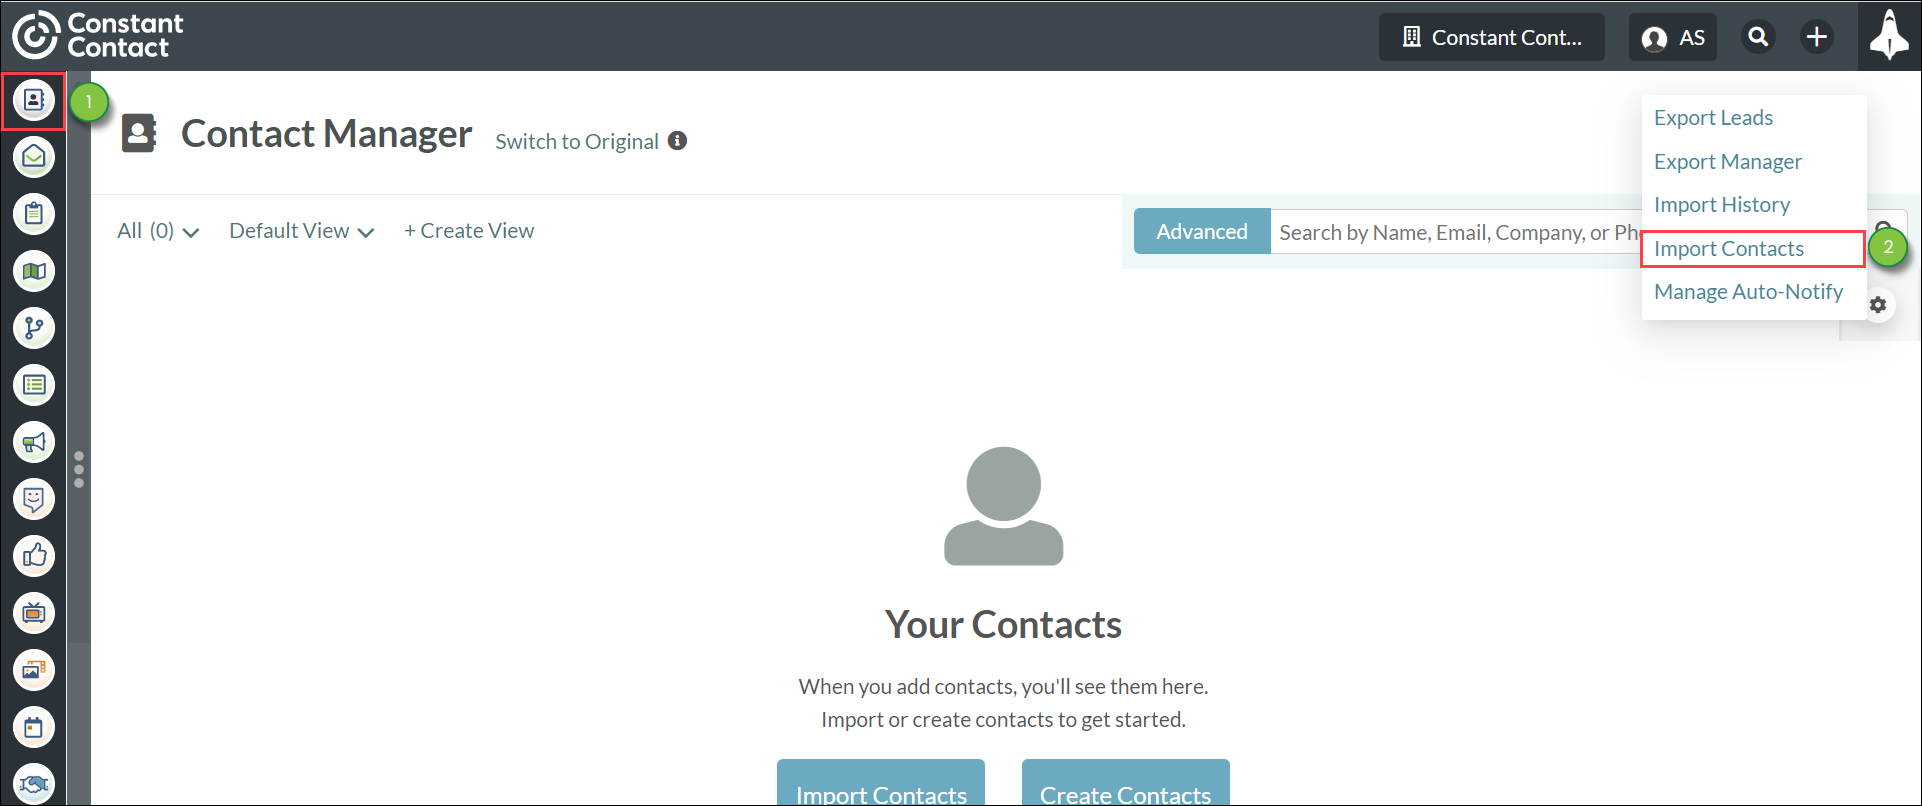
- Click Contacts in the left toolbar.
- Click
 Options > Import Contacts.
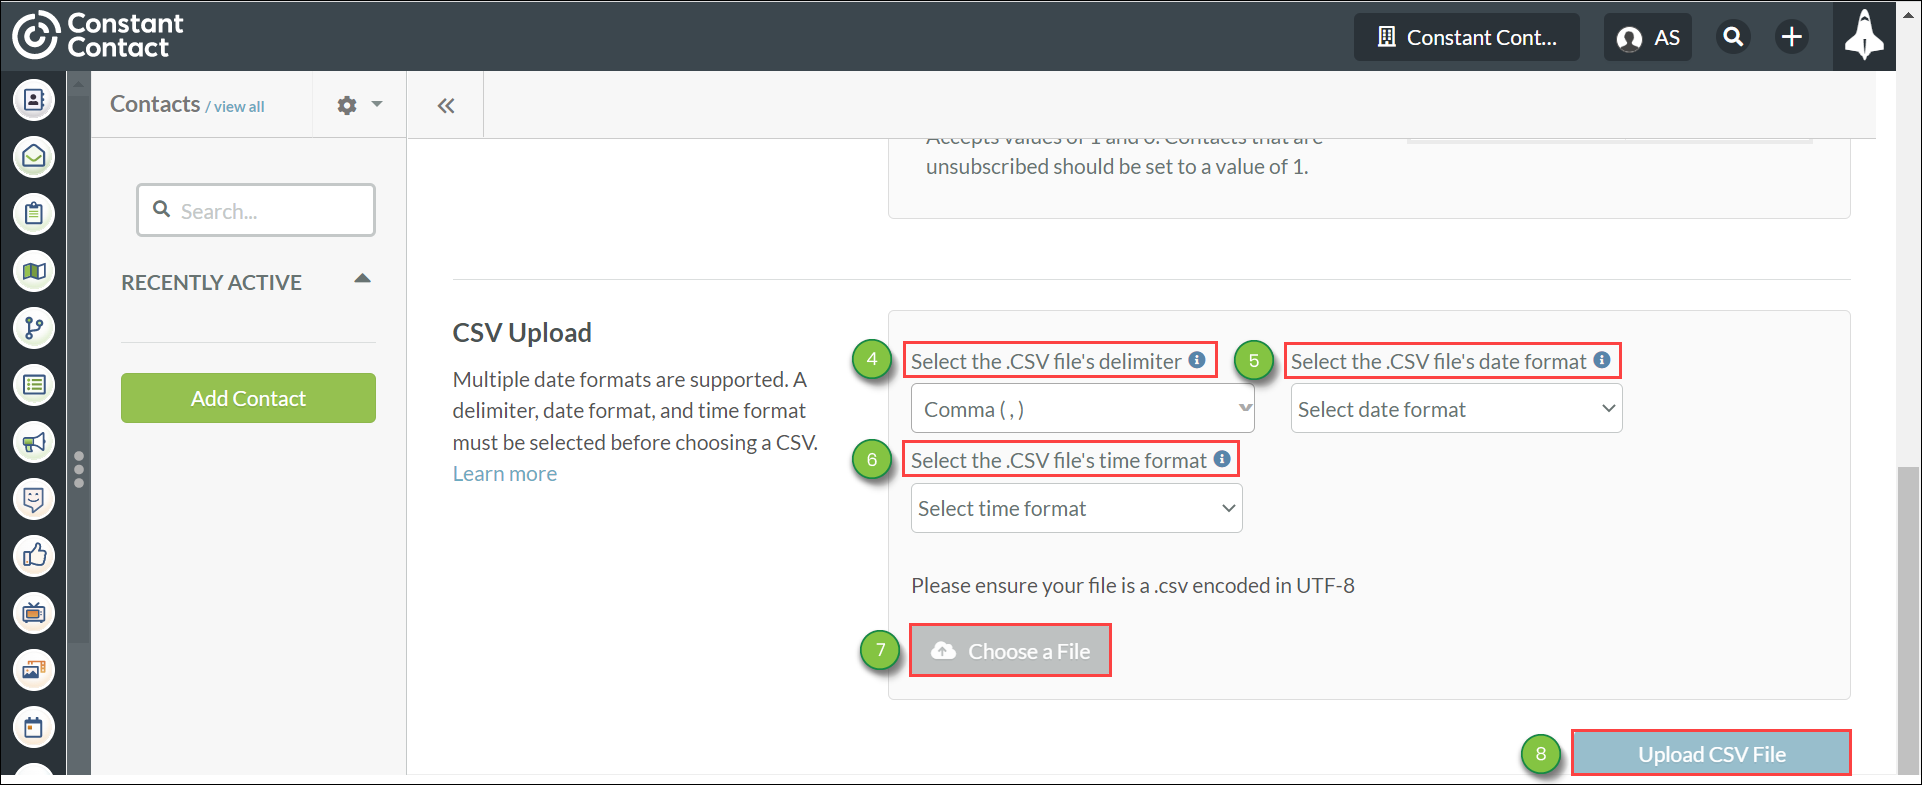
- Scroll to the bottom of the Import Tool page.
- Select the appropriate delimiter from the Select delimiter drop-down menu.
- Select the appropriate date format from the Select date format drop-down menu.
- Select the appropriate time format from the Select time format drop-down menu.
- Click Choose a File. Choose the applicable .CSV file.
- Click Upload .CSV File.
Creating New Lists
You can create double opt-in lists from imported .CSV files.
To create new lists, Import a double opt-in .CSV file and do the following:
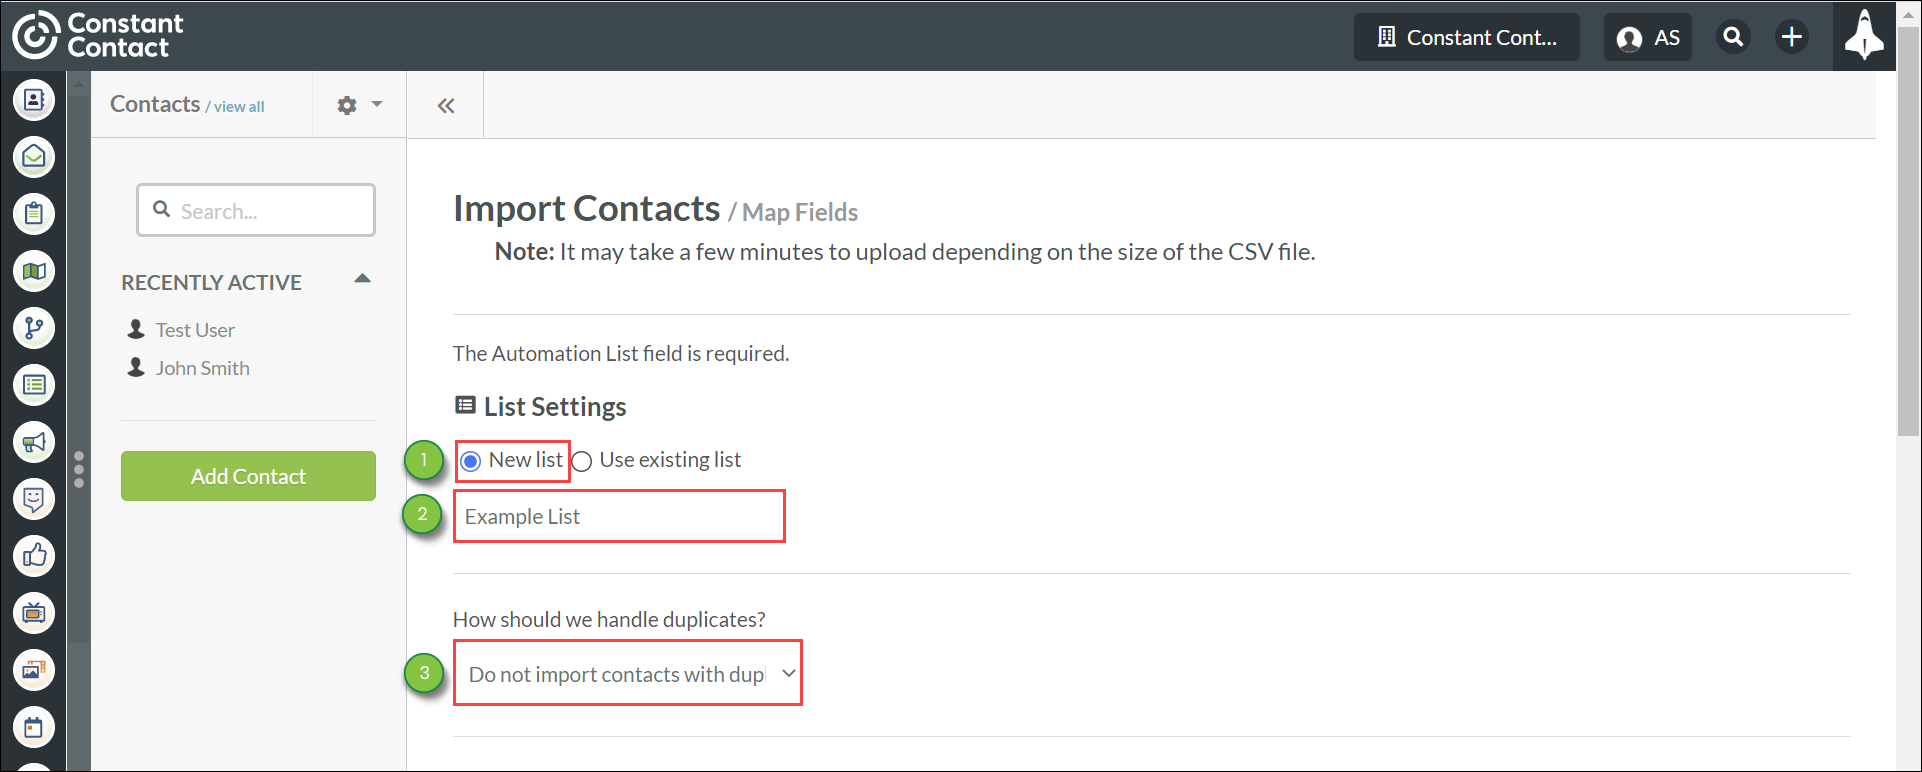
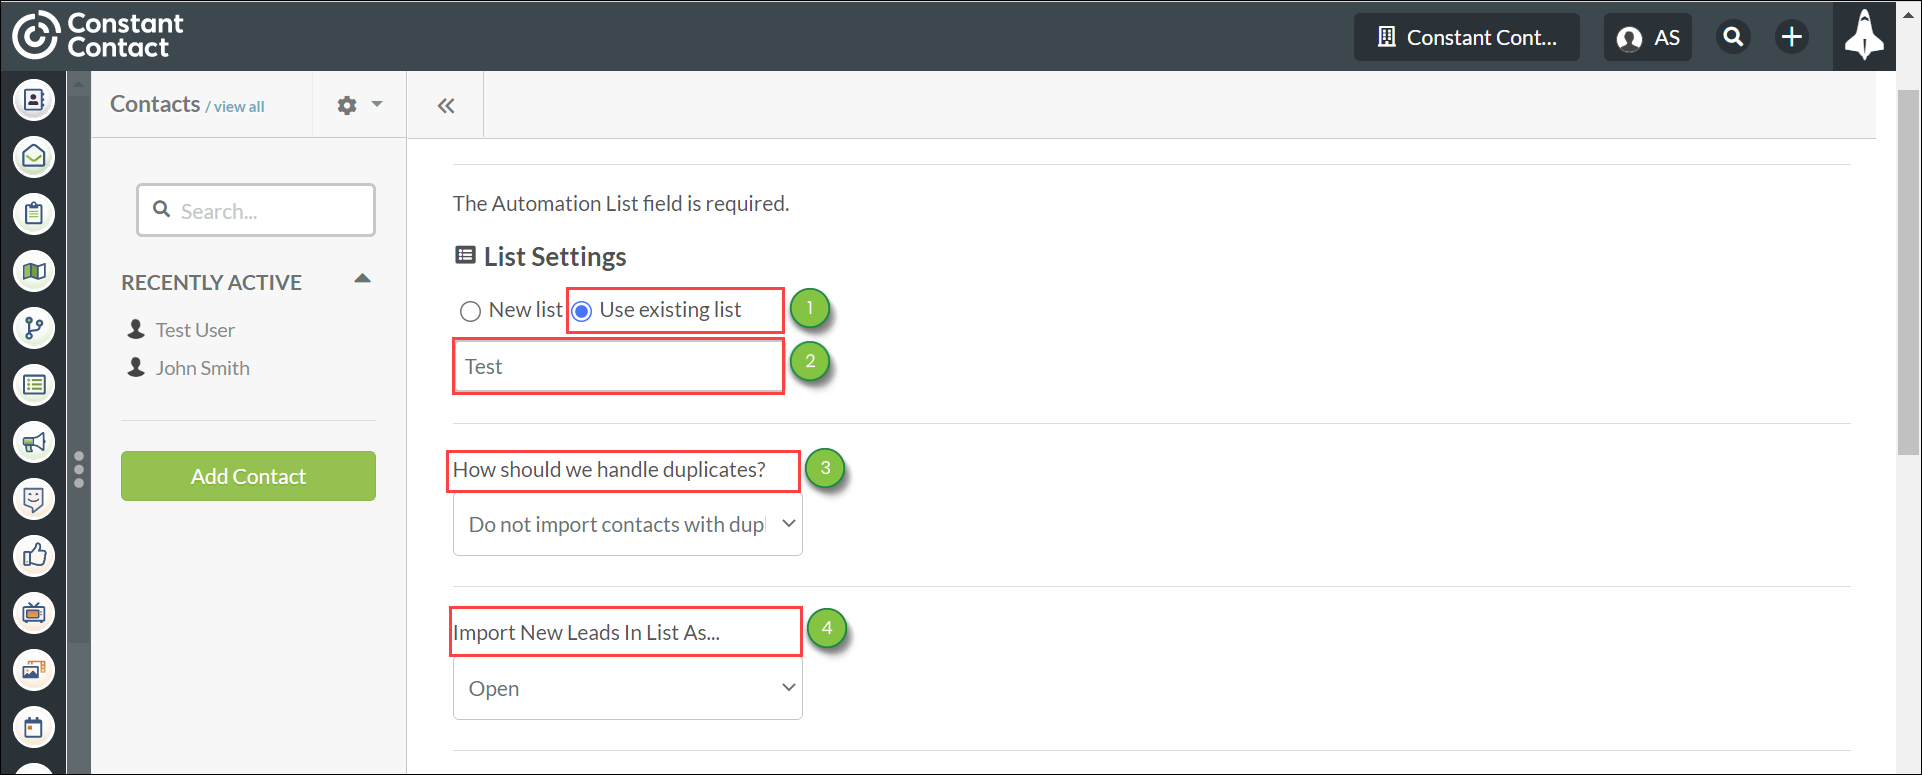
- Select the New List radio button in Import Contacts List Settings.
- Enter a list name.
- Select the appropriate option from the drop-down menu in the How Should We Handle Duplicates? section.
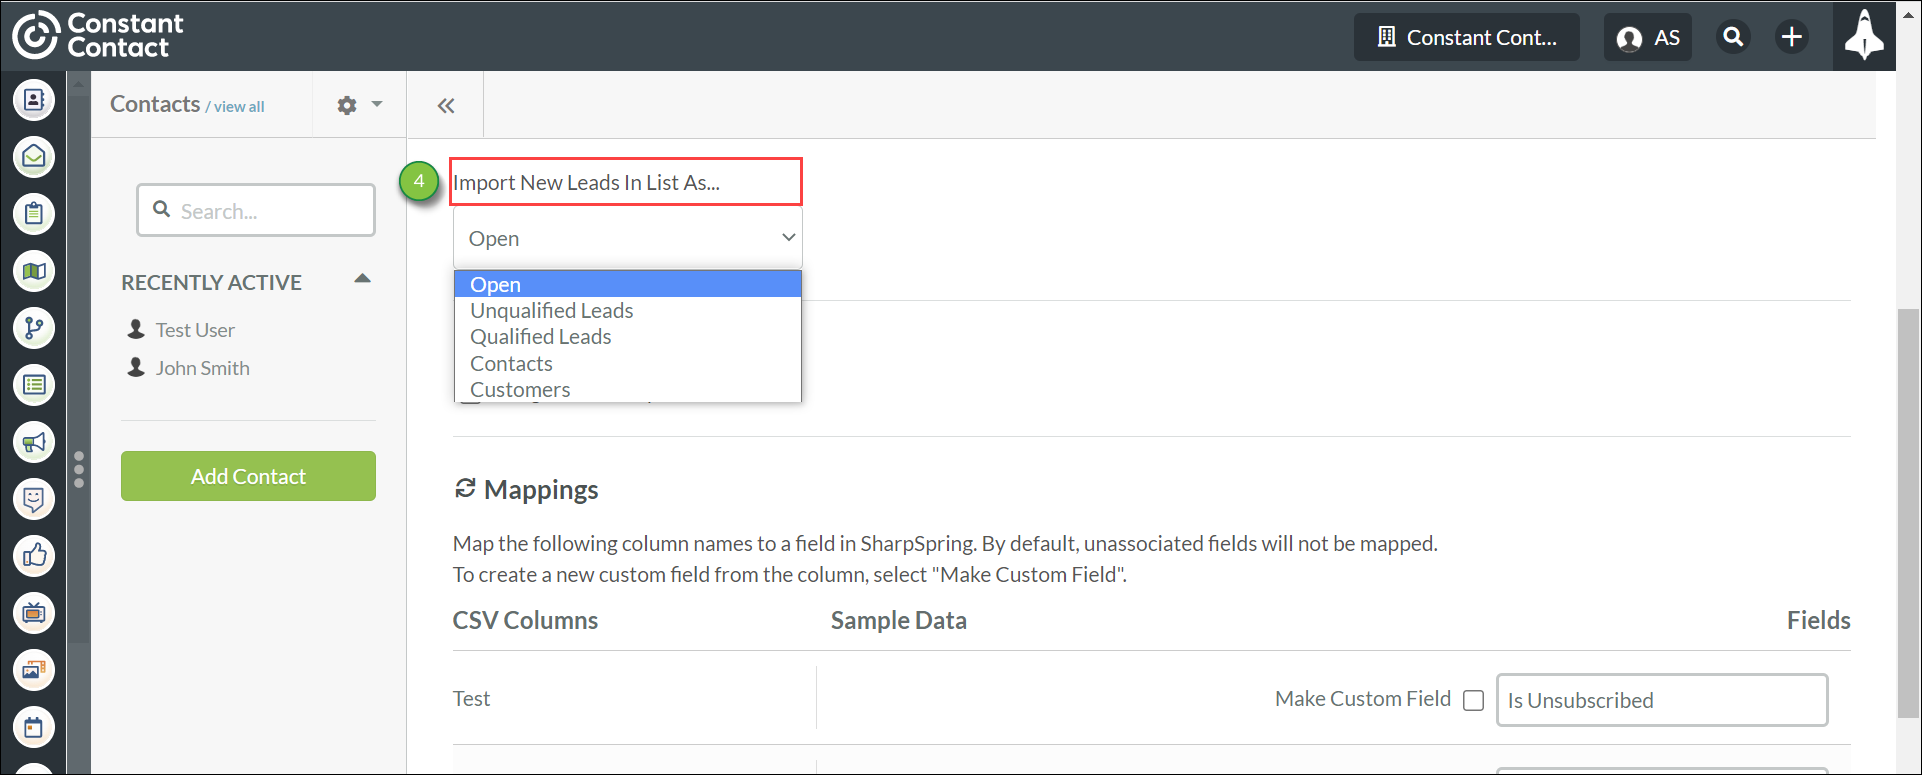
- Select one of the following in the
Import New Leads in List As... drop-down menu:
- Open
- Unqualified Leads
- Qualified Leads
- Contacts
- Customers
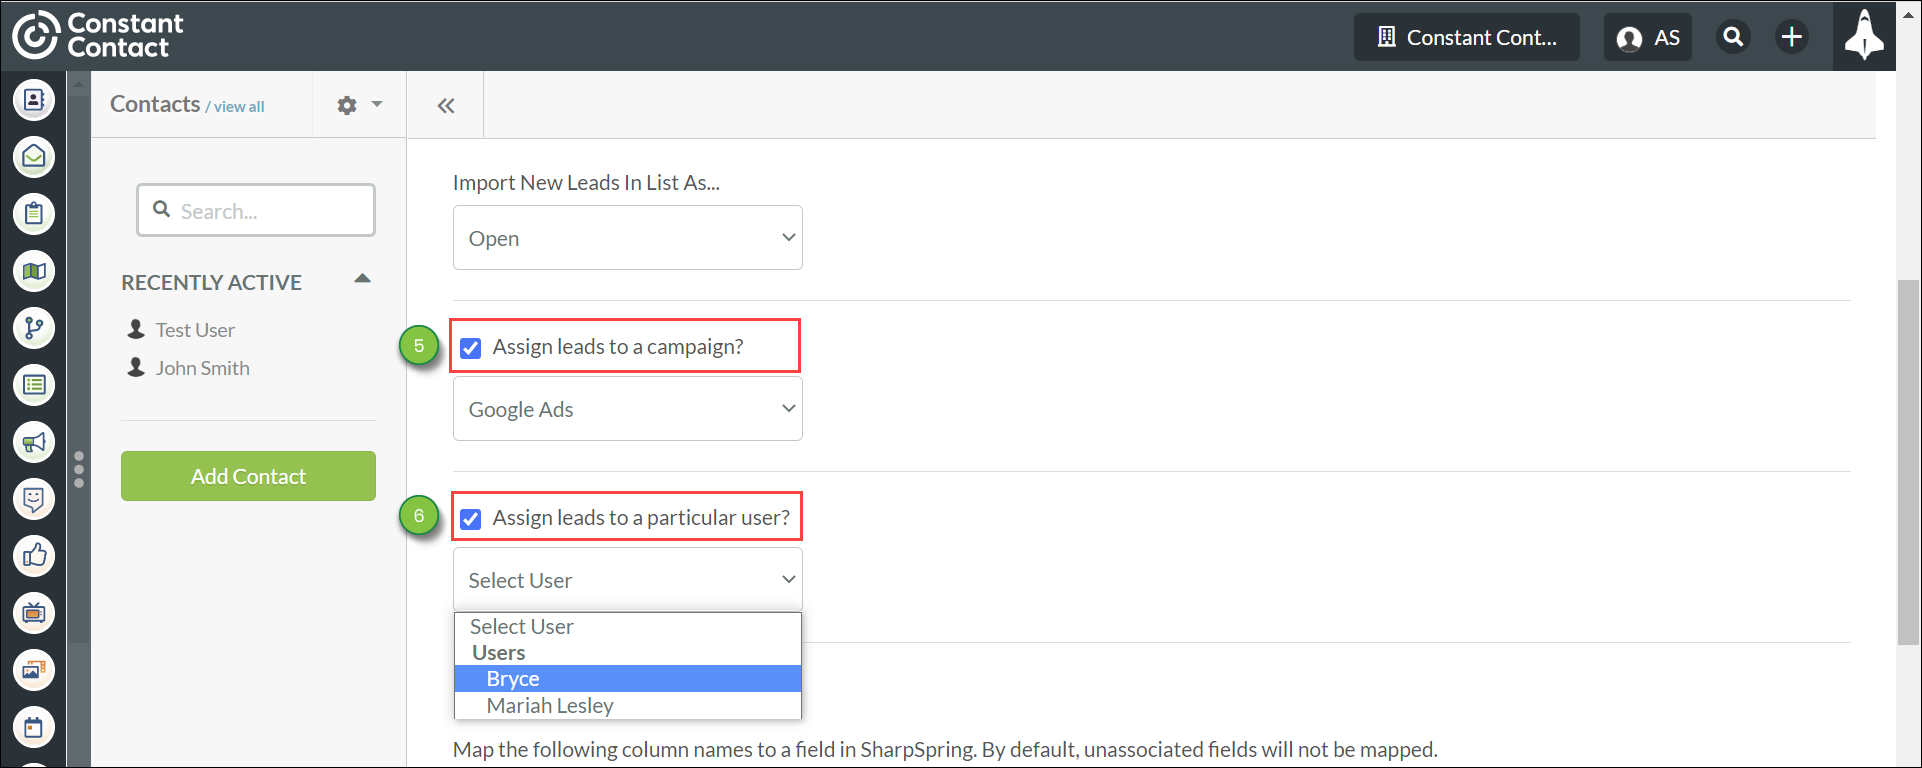
- Optionally, do the following:
- Click the Assign to a campaign? box
- In the drop-down menu that appears, select the desired campaign
- Optionally, do the following:
- Click the Assign leads to a particular user? box
- In the drop-down menu that appears, select the desired user
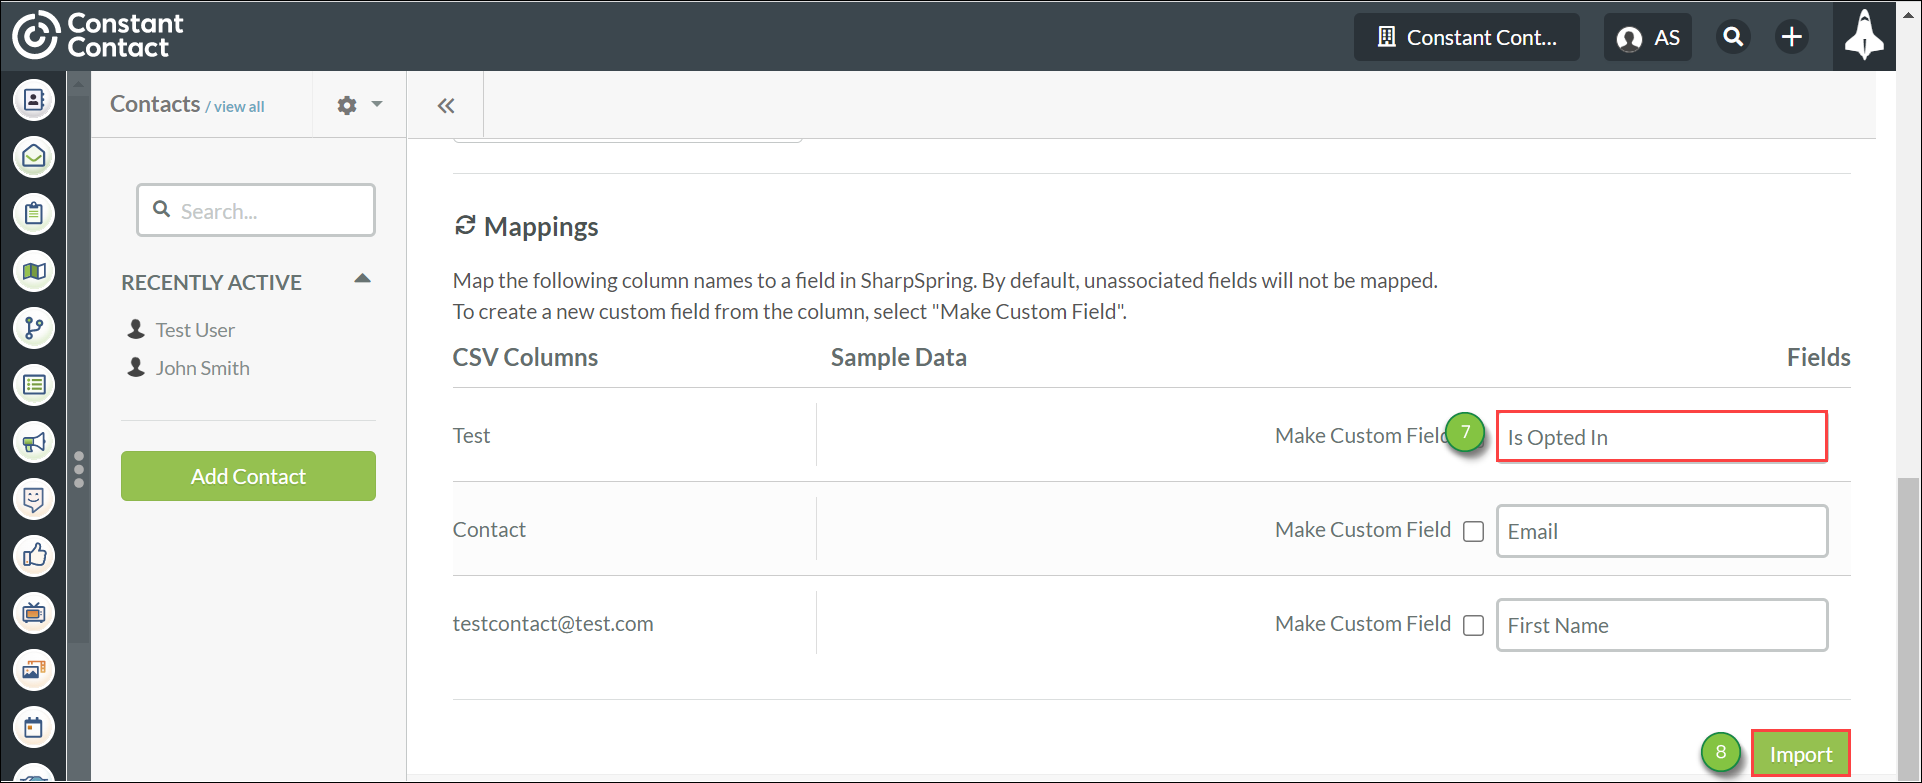
- Locate Opted-In in .CSV Columns. Type Is Opted In into the text box.
- Click Import.
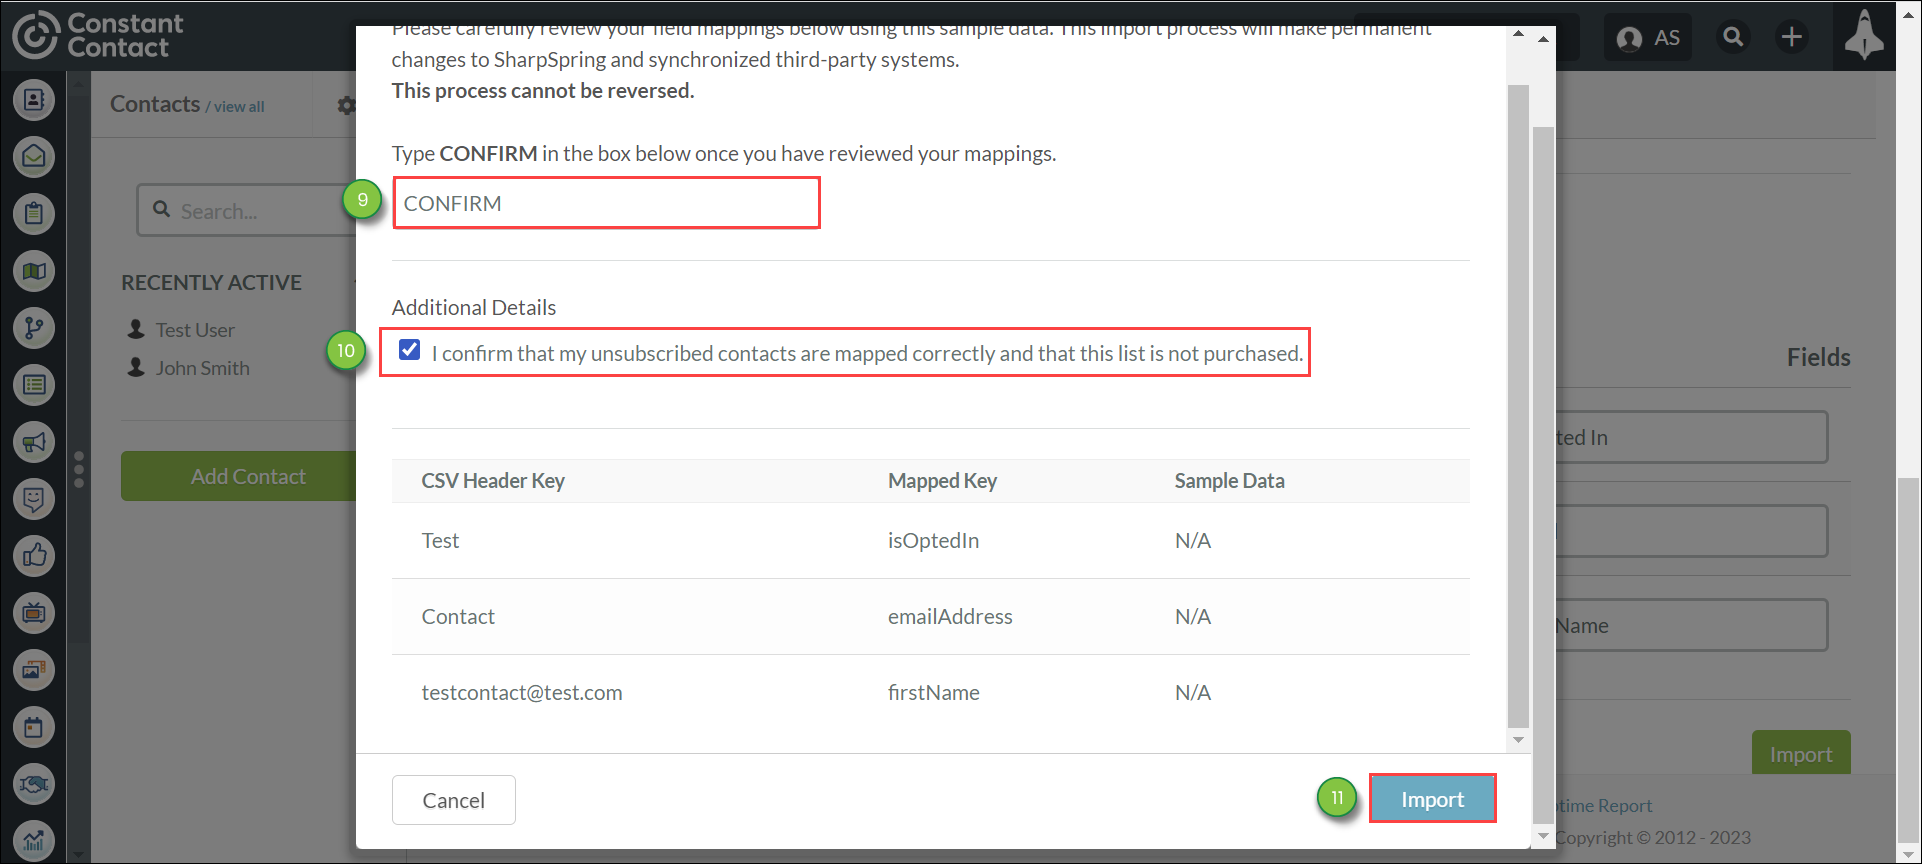
- Type Confirm.
- Click the I confirm that my unsubscribed contacts are mapped correctly and that this list is not purchased checkbox.
- Click Import.
Note: Do not click the Make Custom Field checkbox.
The import may take a few minutes to process, depending on size.
Updating Existing Lists
You can update an existing list to include double opt-in data from a .CSV file.
To update lists, Import a double opt-in .CSV file and do the following:
- Select the Use Existing List radio button in Import Contacts List Settings.
- Select an existing list.
- Select the appropriate option from the drop-down menu in the How Should We Handle Duplicates? section.
- Select one of the following in the Import New Leads in List As... drop-down menu:
- Open
- Unqualified Leads
- Qualified Leads
- Contacts
- Customers
- Optionally, do the following:
- Click the Assign to a campaign? box
- In the drop-down menu that appears, select the desired campaign
- Optionally, do the following:
- Click the Assign leads to a particular user? box
- In the drop-down menu that appears, select the desired user
- Locate Opted-In in .CSV Columns. Type Is Opted In into the text box.
- Click Import.
- Type Confirm.
- Click the I confirm that my unsubscribed contacts are mapped correctly and that this list is not purchased checkbox.
- Click Import.
Note: Do not click the Make Custom Field checkbox. The import may take a few minutes to process, depending on size.
Import Completion Statuses
When the import is completed, the following will occur:
 When the import has completed, any lead that had isOptedIn =1 will have a green checkmark under the Explicitly Opted-In column.
 The Opt-in Status will also display on the contact or lead record to the right of the name.
 The opt-in event will display on the Life of the Lead.