We're making it easier to get around Constant Contact with a brand new left navigation. Not all accounts have that change yet, so if your navigation looks different from our articles, that's why–but everything from the top can now be found on the left!

Email and Digital Marketing
How can we help you?
Search our help articles, video tutorials, and quickstart guides

You've got this. You've got us. Search our Knowledge Base to quickly find answers to your questions.

Customize your event registration form

Article: 000049184
Updated: March 7, 2025

Choose which information to collect from your contacts when they register for your event

Your registration form allows you to collect information from your contacts when they register for your event. By customizing this form, you can choose the specific information you'd like to collect, at the ticket-holder level.


Build your form

What your contacts see when filling out your form


Light Bulb IconLearn More: If you'd like to allow your registrants to bring guests to your event and you'd like to collect specific information from those guests, you have several options. Review each to decide which will work best for you, and then follow the instructions for setting up your tickets and registration form.

Build your form


On the "Form setup" step within the Event builder:

  1. Checkmark the "Limit to one registration per email address" box to prevent registrants from registering multiple times with the same email address.
  2. The "Allow registrants to opt in to marketing communications" box will be checked by default, and registrants will be added to an "Event Registrants" list. If you choose, you can change the list registrants are added to if they opt in and enter a label to be used in your form, or you can unselect this option entirely to not give registrants the option to opt in.
    Note: A new contact will be created in your account only if they do not already exist. Additionally, if the contact already exists in your account, it will not be overwritten with any information entered by the contact during registration.

    Checkboxes to limit registrations to a single email and allow registrants to opt in to marketing    
     
  3. To add fields and/or elements to your form, click + Add form element.
    Note: By default, the first name, last name, and email address will be collected from the primary registrant.
     
    Add new form element to registration form  
     
  4. Select an element to add to your form. Choose either a standard field, custom field, or form element.

    Exclamation Point IconImportant: If you choose to collect an email address from each ticket holder, it does not give you or Constant Contact explicit permission to mail these users. Only the primary registrant can be sent event-related email. If you plan on adding the email addresses collected from each ticket holder to a list, you must have explicitly received this request from each email address holder. 


    Update Standard Field
     
  5. If you chose a:
    • Standard field - Update the field name, if desired. Additionally:
      • If you'd like the field to be required, switch the toggle to the right.
      • Select which ticket(s) this field applies to. Checkmark the "Primary registrant" box, if desired, and then select the appropriate tickets from the dropdown. Keep in mind that the first name, last name, and email address fields are automatically collected by the primary registrant.

        Update Standard Field   
         
    • Custom field - Enter the field name and the field type (text, text area, single-select, multi-select, or date). Additionally:
      • If you'd like the field to be required, switch the toggle to the right.
      • Select which ticket(s) this field applies to. Checkmark the "Primary registrant" box, if desired, and then select the appropriate tickets from the dropdown.

        Update Custom Field  
         
    • Form Element - Depending on the element you've selected, enter header text, static text, or select a divider line type (solid, dotted, or dashed).

      Make Form Element Selection  
       
  1. Click Confirm to save the field.

    Save form fields  
     
  2. To rearrange fields, click the drag handle on the left side and drag the field up or down.

    Rearrange fields on form up or down
     
  3. To edit or delete a field, click the three dots on the right side and click Edit or Delete.

    Rearrange, Edit, or Delete fields   
     
  4. When you have completed building your registration form, click Continue.

    Continue button  

As you're building your registration form, you can see a preview of it on the right side of the screen. Click the "View full screen preview" to see what your form will look like on desktop and mobile.

Note: If you uploaded an image on the Event Basics tab, that's the image that will display on your registration form.

Preview your form

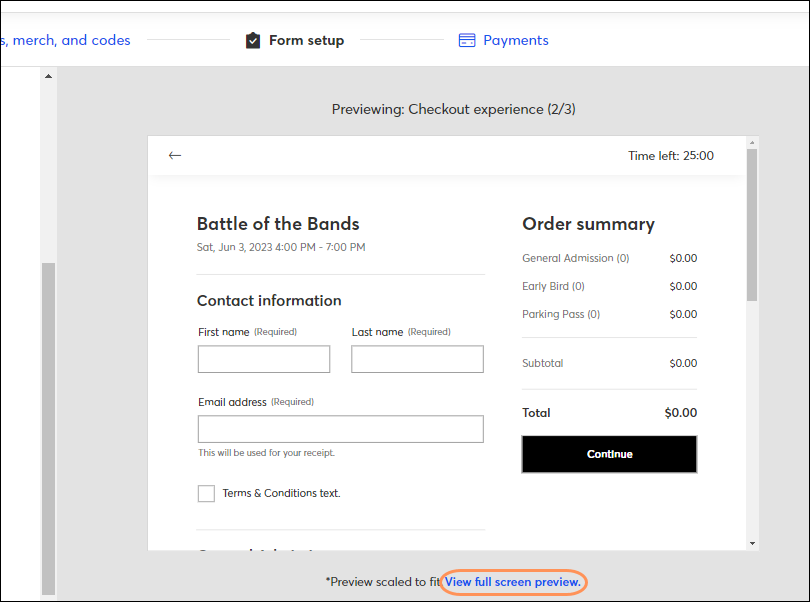
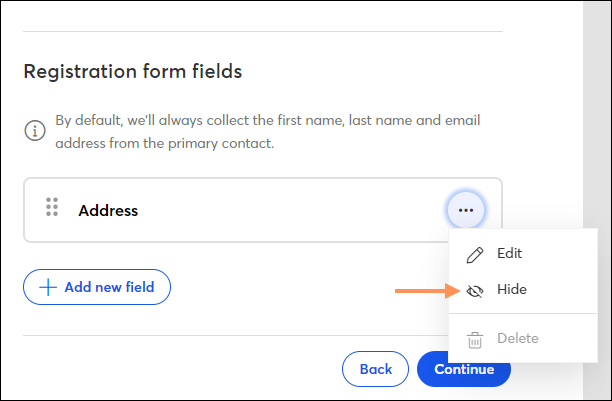
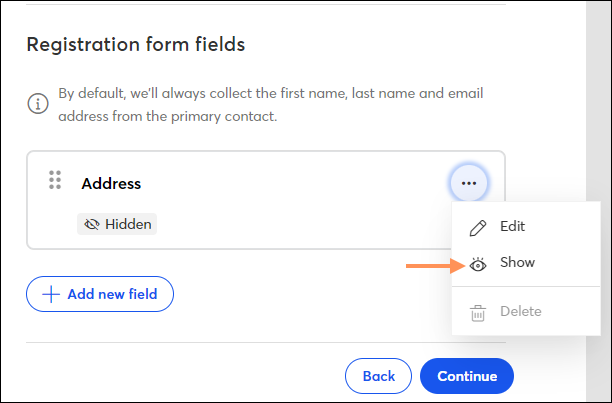
If you need to return to the form setup page to make changes, you can do so at any time—even once your event is active! If you would like to remove fields from your form after your event is active, you'll have the option to hide the field. If you would like to add a hidden field back to your form, you have the option to show.
 

Active Event - Hide FieldActive Event - Show Field
Hide field from form for active eventShow field on form for active event


What your contacts see when filling out your form


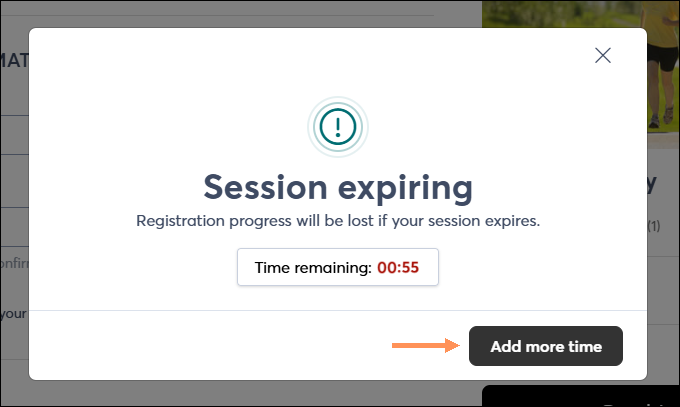
After making their ticket selection, your registrants are brought to your customized registration form. The appropriate fields will be displayed based on the ticket selection(s) they made. When filling out the registration form, your contacts have 25 minutes to do so. However, if your form is longer and more complex, they can add more time at the 1-minute mark in order to complete it.


The timer turns red at the 5-minute mark, and at the 3-minute mark, the registrant can click a button next to the timer to add additional time. If they choose to, 10 more minutes are added to their session.


Add Time Button

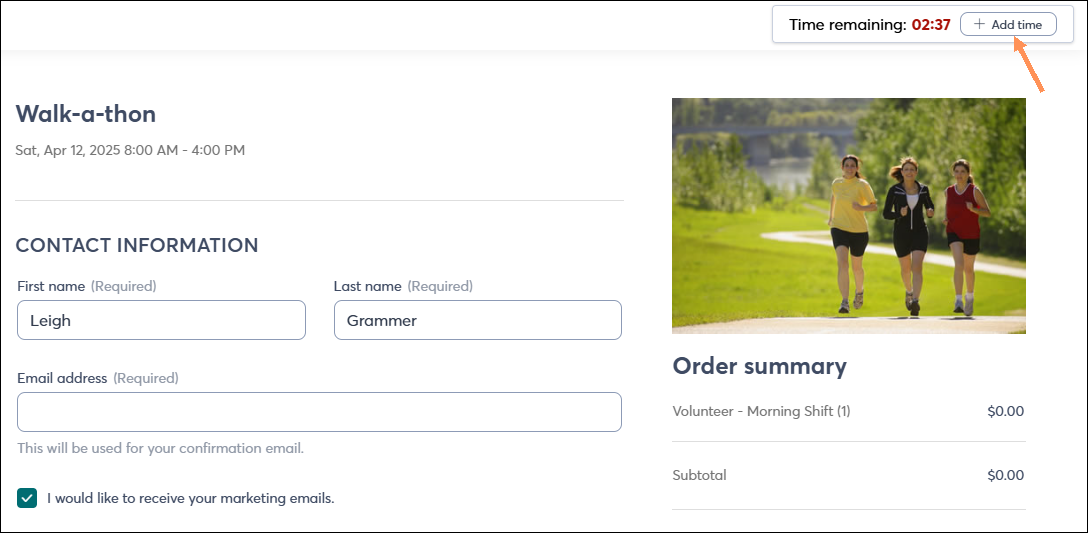
At the 1-minute mark, a pop-up dialogue appears, giving the registrant the option to add 10 more minutes to the session.


Session Expiring Pop up Dialogue


Questions?

Ask the Community

Did this article answer your question?


Constant Contact Logo

Copyright © 2025 · All Rights Reserved · Constant Contact · Privacy Center