| Administrators | ✓ | |
| Company Managers | ||
| Marketing Managers | ||
| Sales Managers | ||
| Salespersons | ||
| Jr. Salespersons |
| Tip: Are you looking for information about Constant Contact’s Email and Digital Marketing product? This article is for Constant Contact’s Lead Gen & CRM product. Head on over to the Email and Digital Marketing articles by clicking here. Not sure what the difference is? Read this article. |
As browsers, email providers, and security software are becoming more sophisticated, they may prevent users from accessing insecure links (http://) embedded within emails. Enabling secure links (https://) ensures that your emails maintain the highest delivery rates possible and can increase engagement with your emails.
By default, links within your emails will be tracked using our internal tracking format (ex. link.mta3.com). Rebranding your links changes the formats of these links to match your sending domain, giving a clear indication to your contacts that the links in your email are trusted and safe. When you rebrand your links, the link tracking will appear as link.yourdomainhere.com.
All marketers should follow the steps below to ensure their email links are secure.
Before you begin, you should make sure you know who is responsible for making changes to your DNS (Domain Name System). This could be someone internal to your company or you may have a third-party responsible for managing your DNS. If you do not have direct access to the DNS, you’ll need to share the instructions below, along with the information in your account, with that team to update your DNS.
If you have already completed DKIM set-up but have not installed your Link and Owner CNAME records to set up Link Rebranding and Secure links, you’ll need to complete the steps below. If you have not completed a DKIM set-up, please set up your DKIM and DMARC policies first.
Installation Steps for Link and Owner CNAME Records:
Log in and navigate to Settings > Company Email Settings > Sending Domains & DNS.
Next to your domain, click “Setup DNS.”
Copy the Link and Owner CNAME information.
Add these records to your DNS.
Once you have added the records with the value of “sendgrid.net” return to the Setup DNS modal.
Press “Verify.”
Once verified, you’ll see check marks in the “Step 1” column.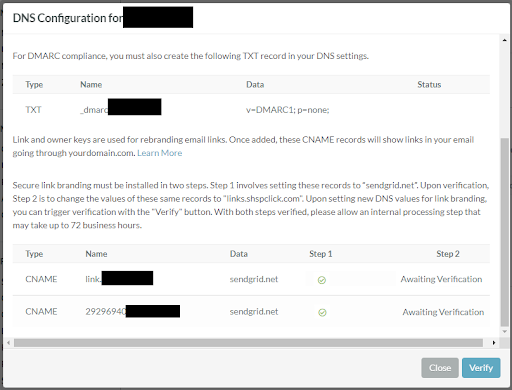
Next, copy the NEW data values (links.shspclick.com) from the modal, and modify the Data values of the Link and Owner CNAMEs on your DNS.
Return to the Setup DNS modal and click “Verify”.
That’s it! Once fully verified, the Set-up DNS modal should look like this:
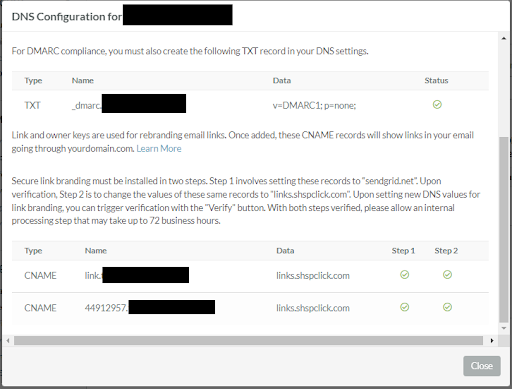
If the DNS modal shows the checkmarks like above, your account is set to send emails with secure (https://) tracking links that are rebranded to match your domain (link.yourdomain.com).
You can also review our articles for help setting up DKIM and understanding CNAME records.
Copyright © 2026 · All Rights Reserved · Constant Contact · Privacy Center