| This article applies only to Agency partners. For individual accounts, please return to the knowledge base. |
| Administrators | ✓ | |
| Company Managers | ||
| Marketing Managers | ||
| Sales Managers | ||
| Salespersons | ||
| Jr. Salespersons |
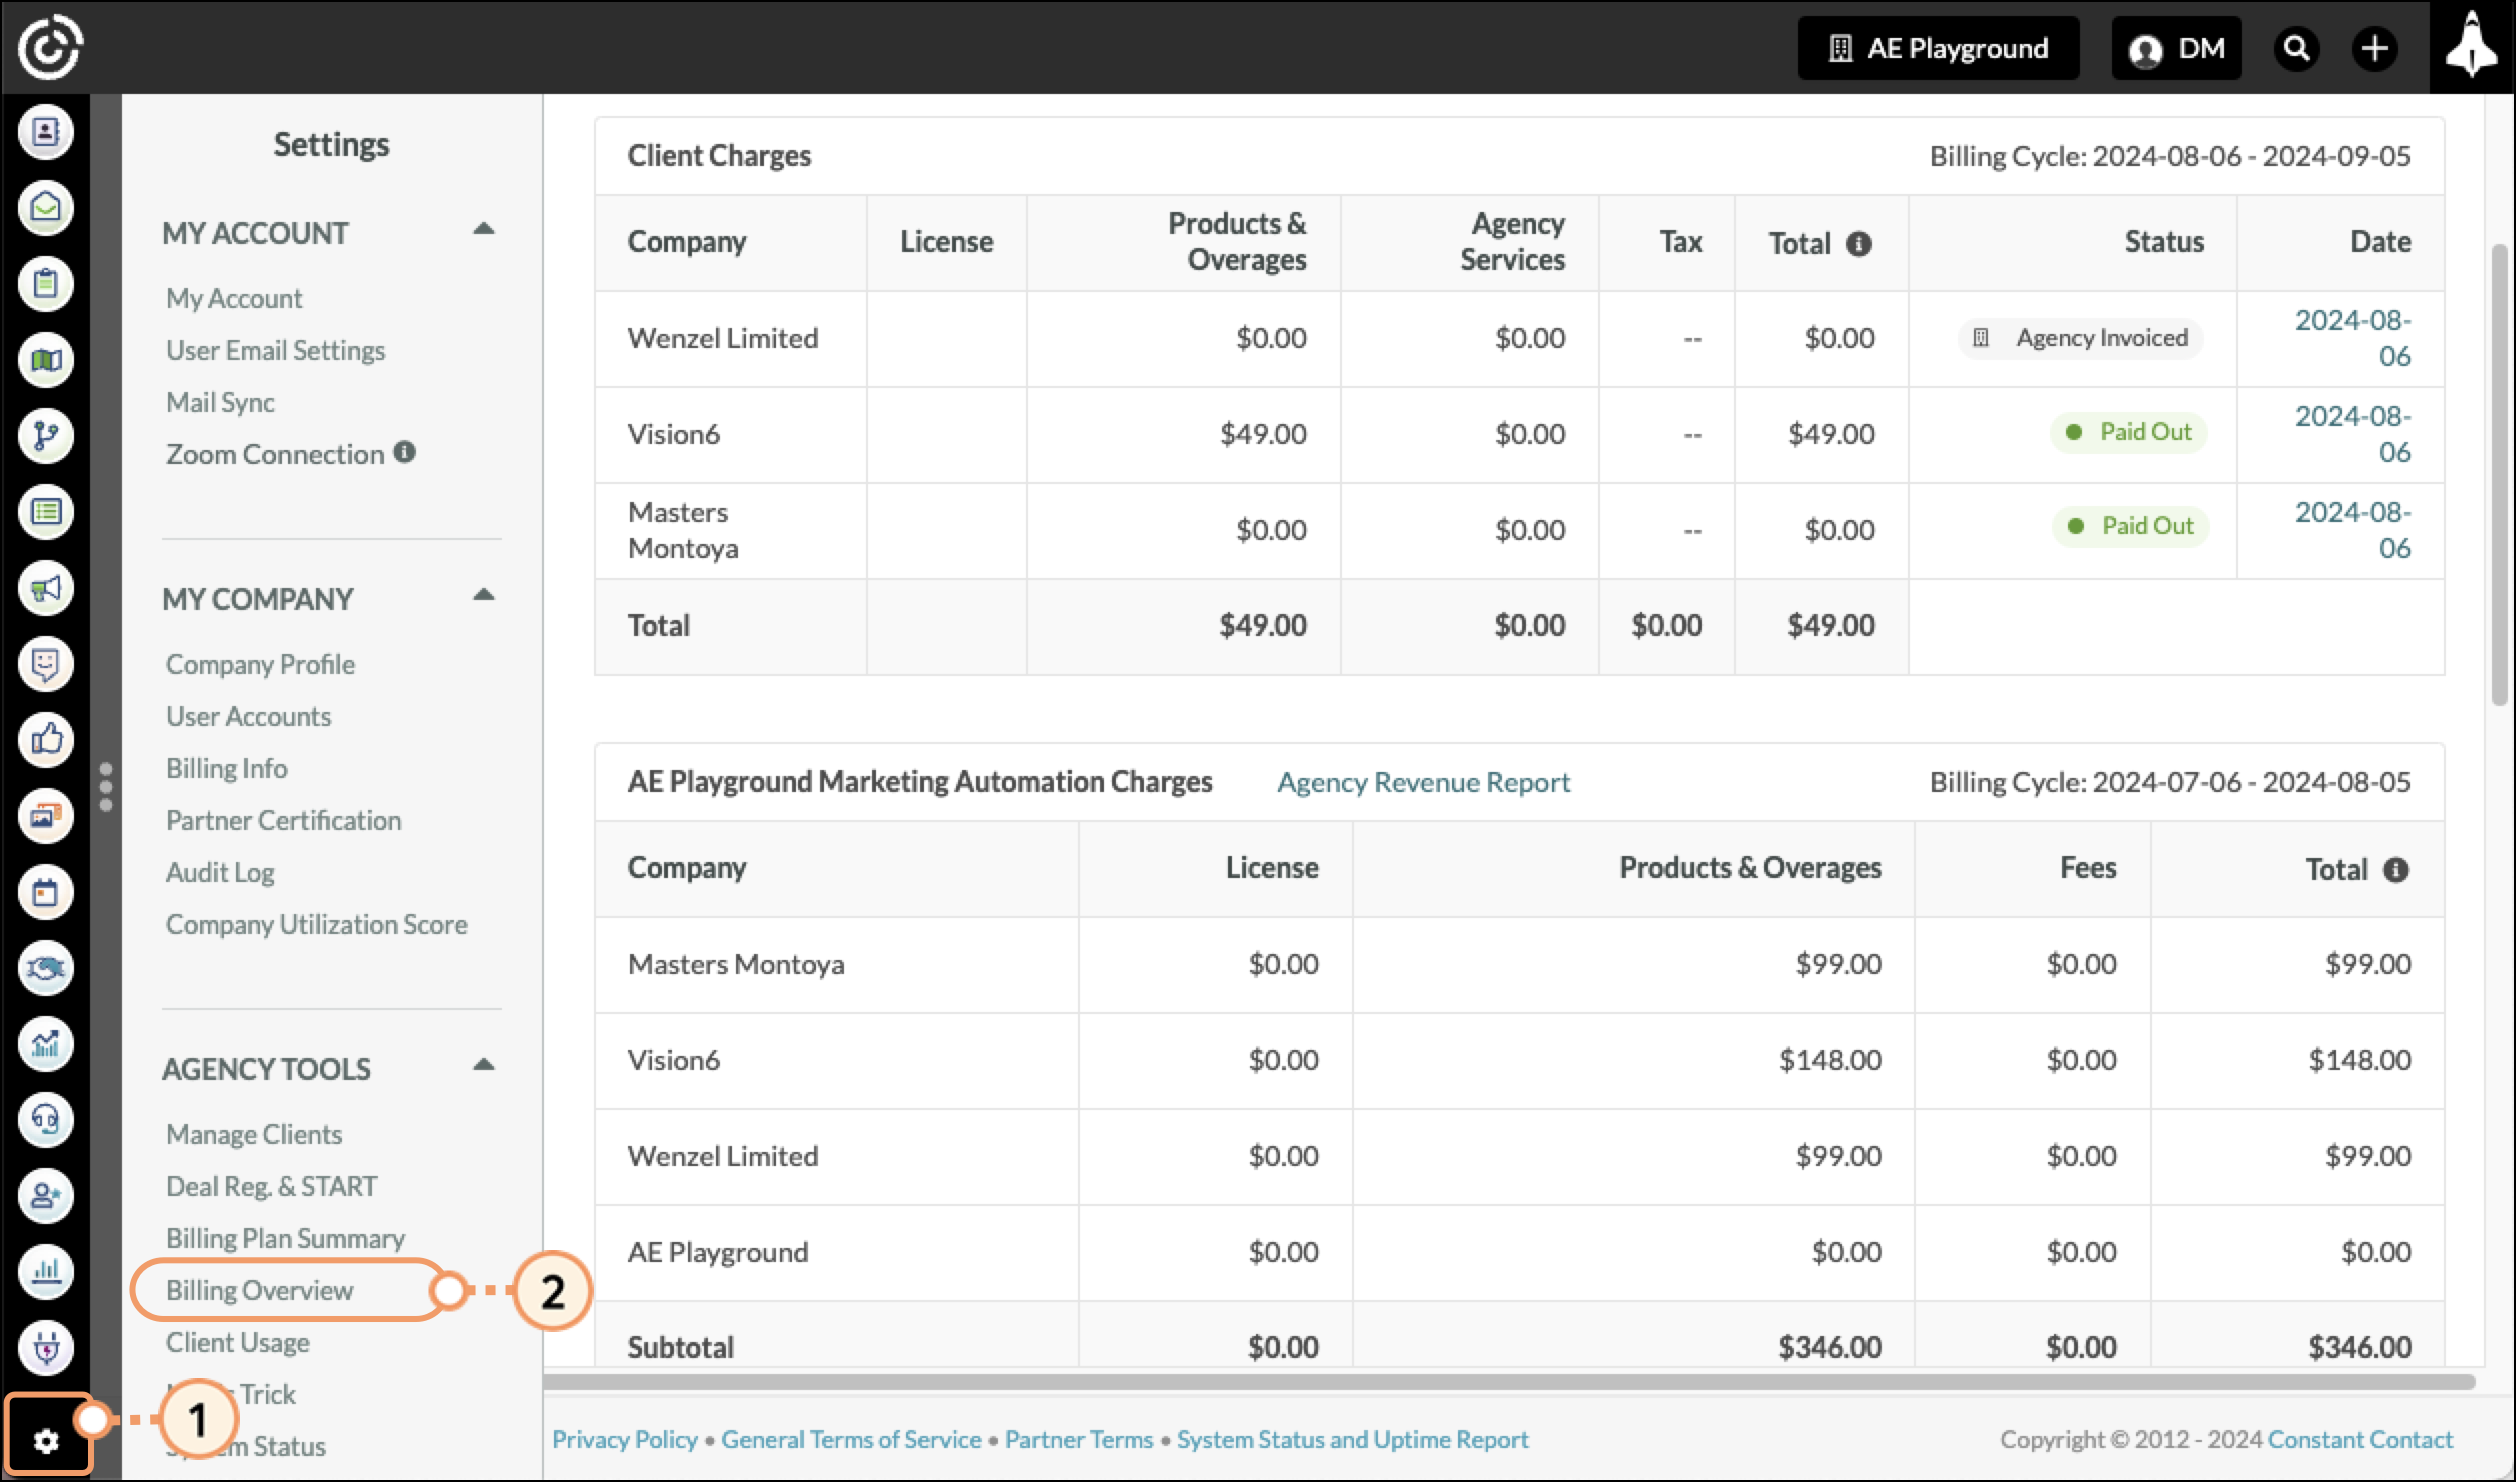
To access the Billing Overview page, log in to your Agency account and do the following:
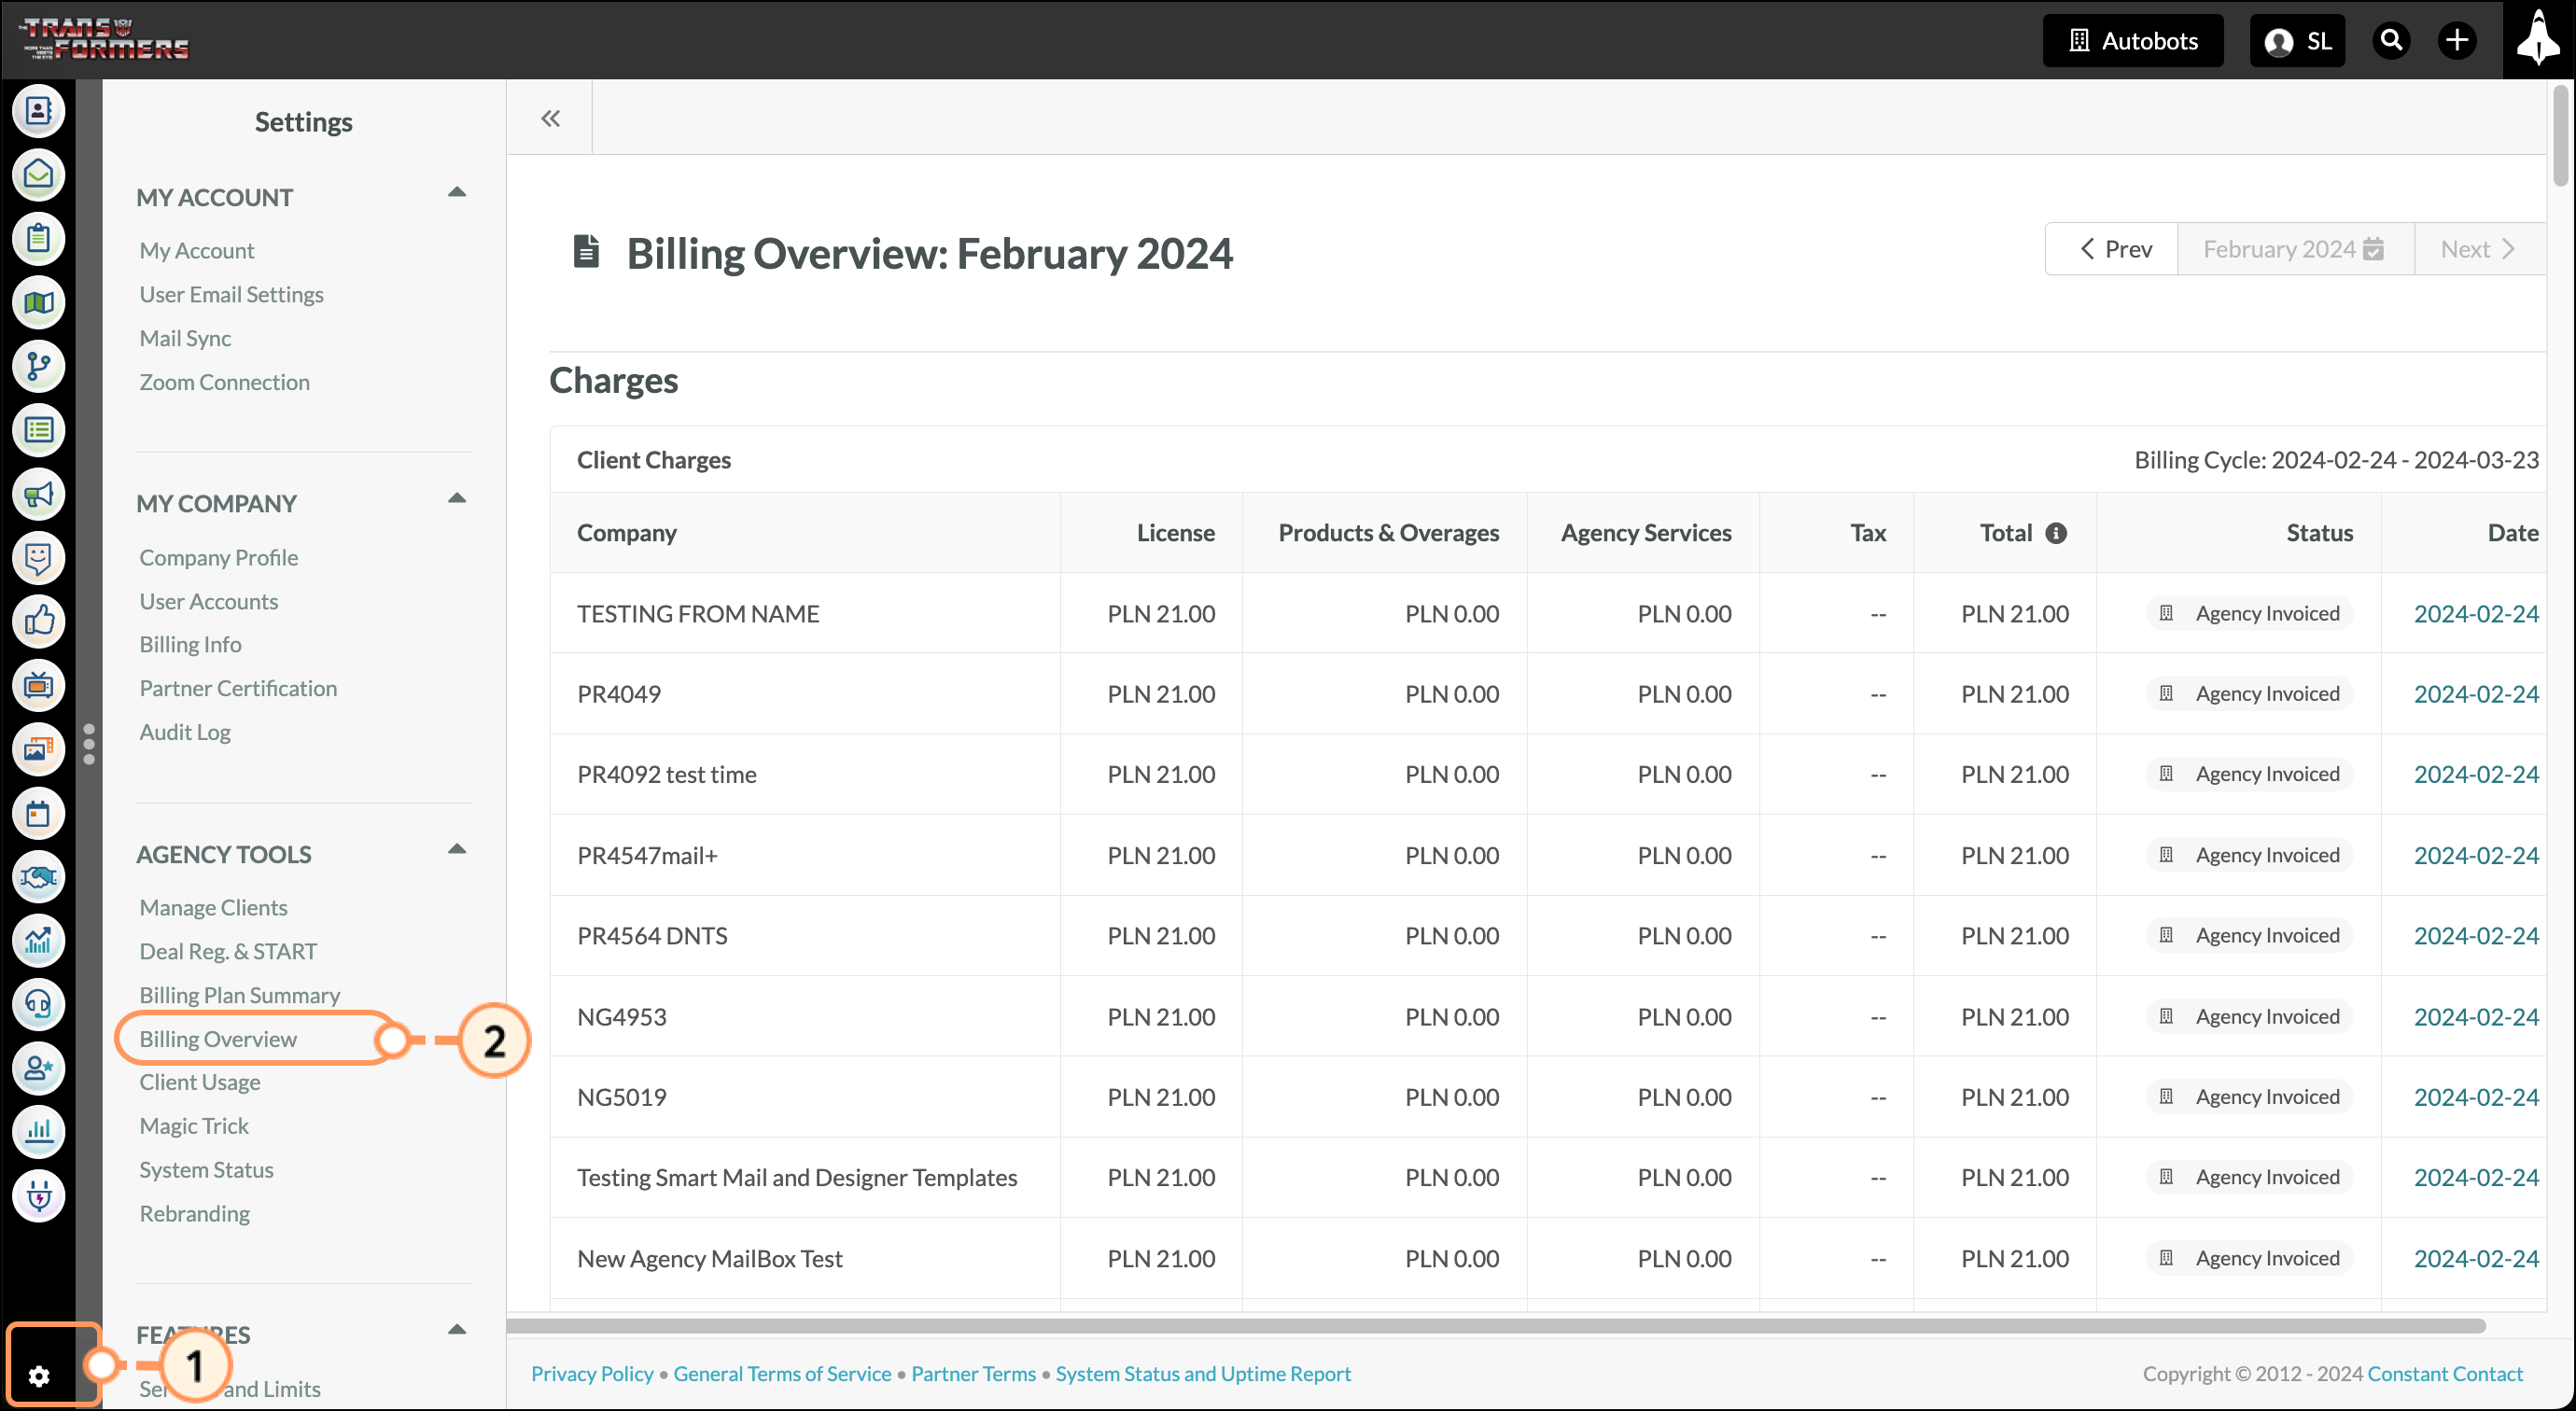
On the Billing Overview page, information is broken down first by client billing, then by agency costs. The Billing Overview will display:
You can navigate from the current month to view other billing cycles by clicking the left and right arrows at the top right of the Billing Overview page.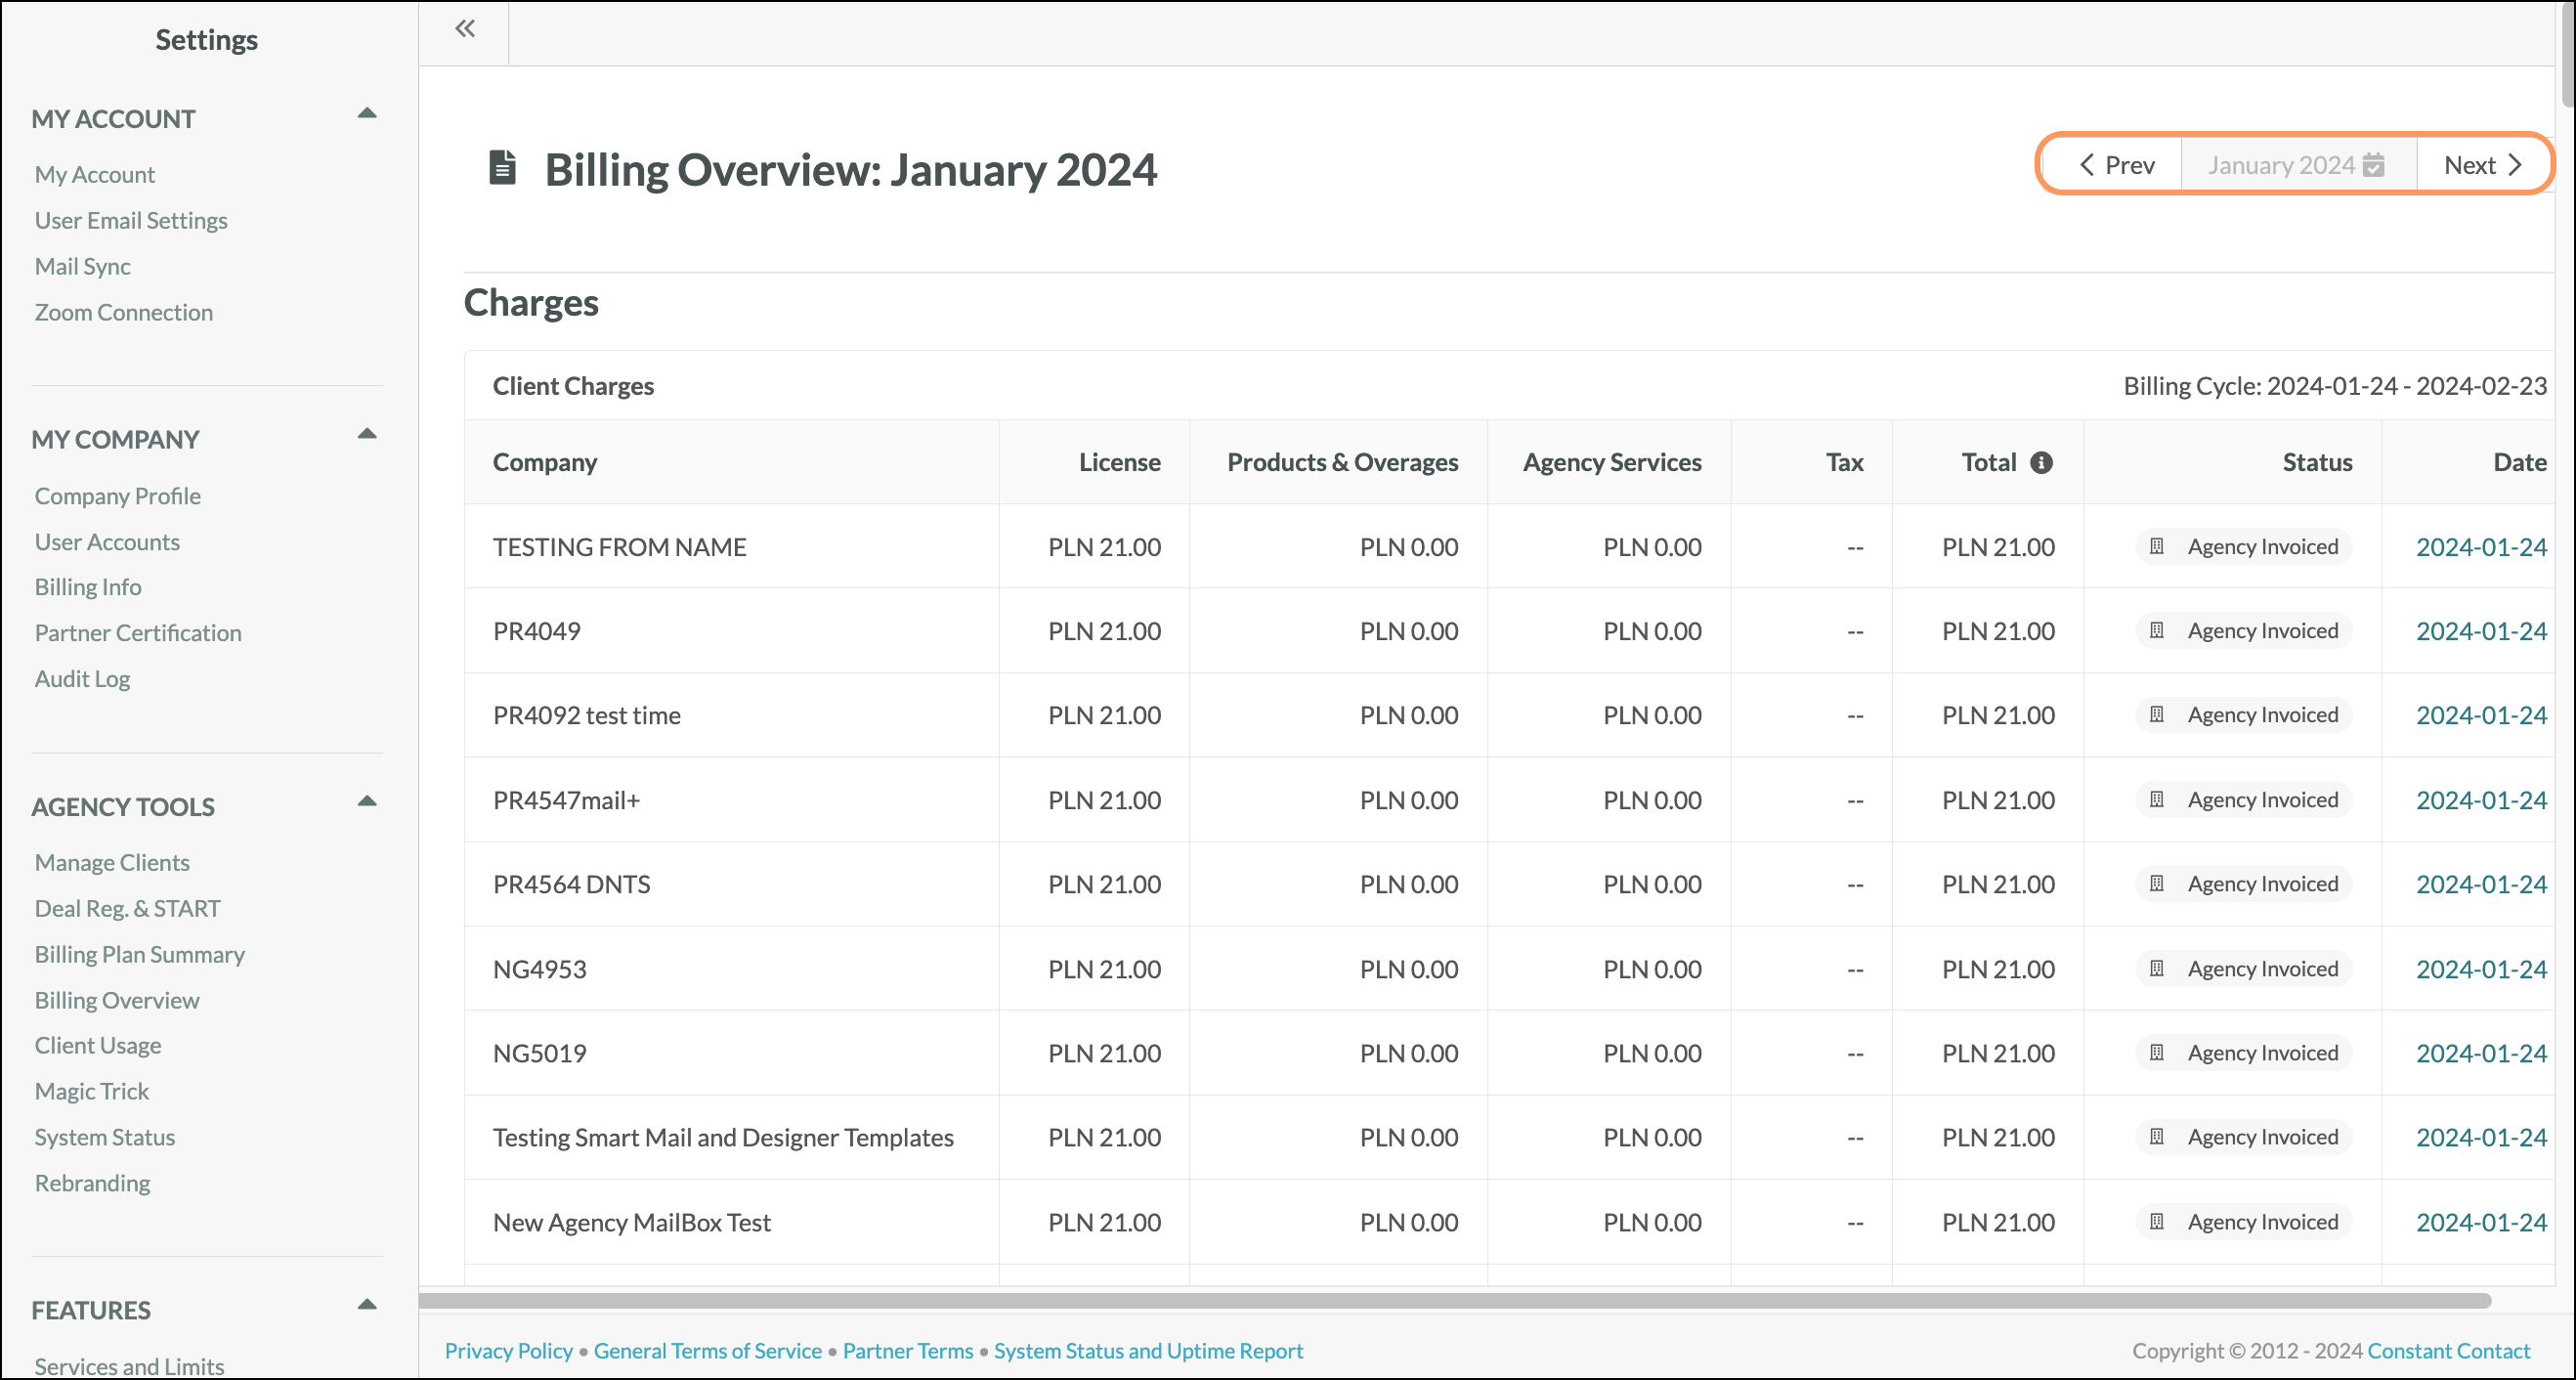
The Client Charges table displays billing information for clients, tying together how and why clients are being charged the amount they are.
The Client Charges section will reflect this information even if your Agency is not billing your clients through our billing platform. If the Status of a client is set to “Agency Invoiced”, then no charges were actually processed to the client(s). But you can still download these invoices if needed for your recordkeeping or to provide to clients.
The billing cycle information is contained in the following columns in the Client Charges table: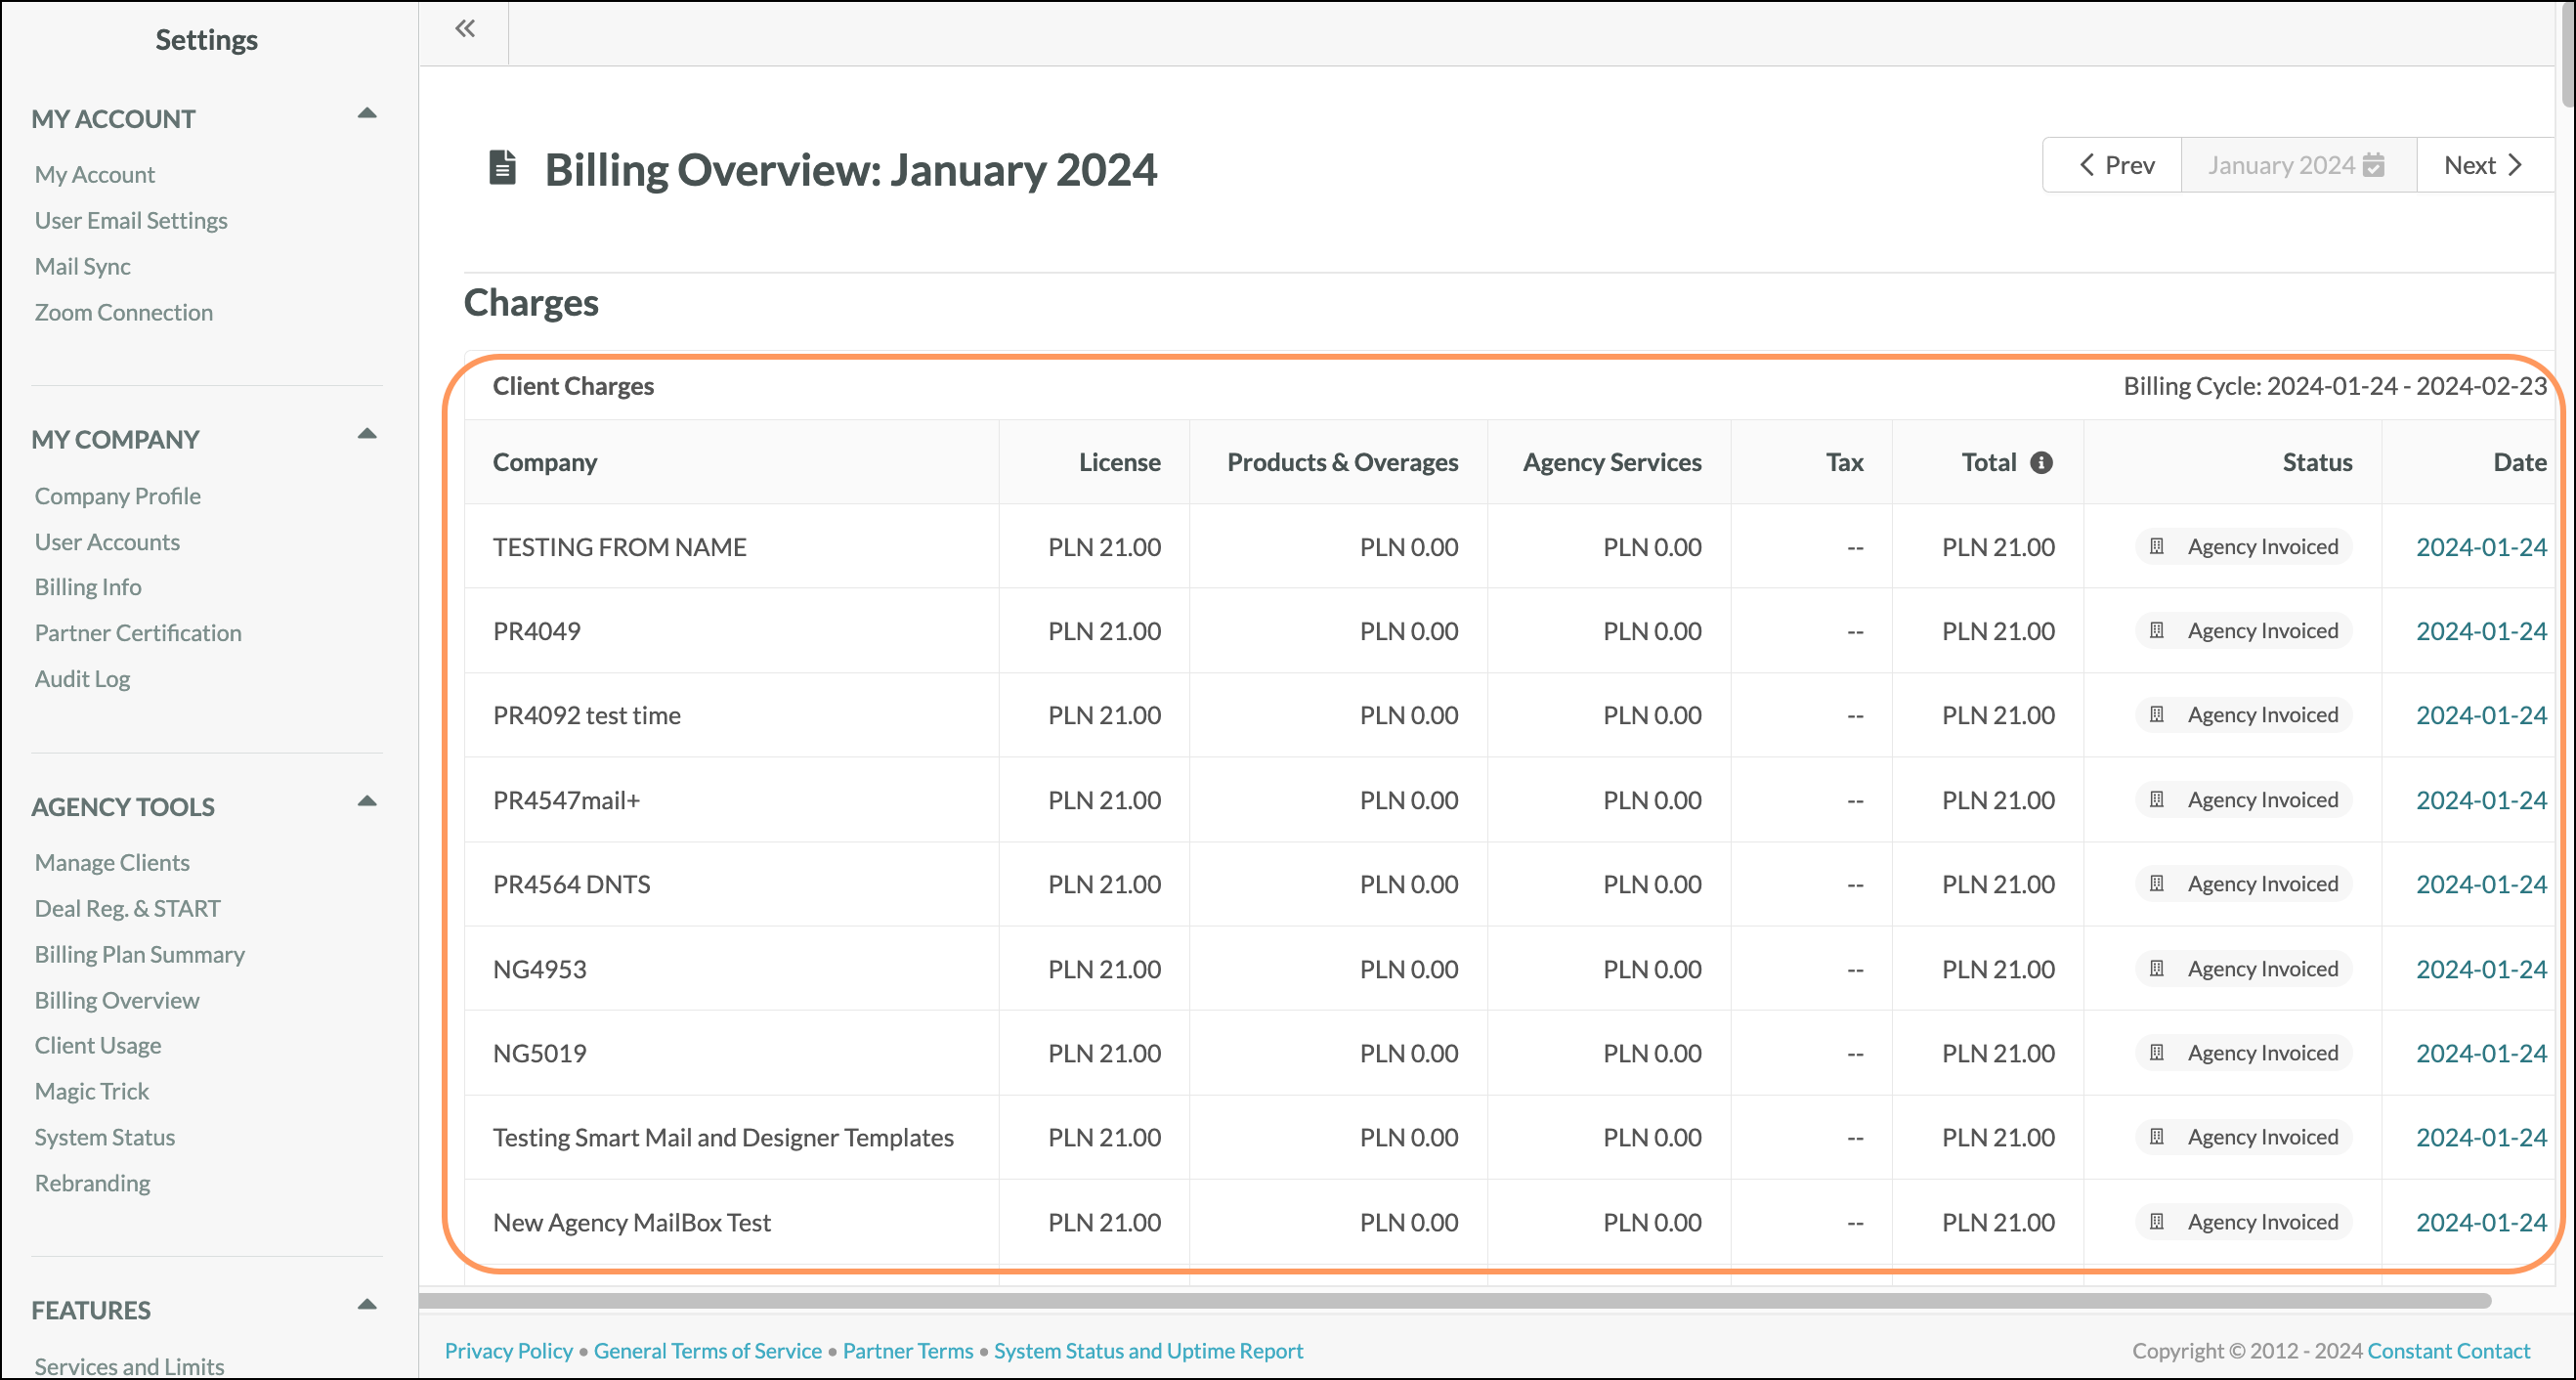
| Column | Description | |||
| Company | The name of the client's company. | |||
| License | The license price set by your agency for the client. License prices are determined in the Client Configuration settings page. | |||
| Product and Overages | The charged cost for any enabled add-on products, as well as any incurred overages. | |||
| Agency Services | The charged cost for any services provided by the agency. Service prices are determined in the Client Configuration settings page. | |||
| Tax | The taxes collected from the client. Tax rates are determined by the Agency based upon the relevant jurisdictions, and entered on the Client Configuration page. All taxes are paid out to the Agency to be remitted to the appropriate taxing authority. | |||
| Total | The client's total charge for the given billing cycle. The total charge is calculated as the sum of what is owed subtracted by any available credits. | |||
| Status | Contains the invoice status for each bill. | |||
| Date | The date when the corresponding invoice status occurred. |
Be aware that Lead Gen & CRM and Perfect Audience (our retired Ads platform) charges were billed separately. If the client was using Lead Gen & CRM and was also using Perfect Audience, their Perfect Audience bill will have its own row. The rows displaying the company name for said client will be vertically merged.
Please note that, unlike the billing to our Agency Partners, the billing from an Agency to their Clients occurs at the beginning of the billing cycle. This allows your agency to receive the funds before the services are provided.
The Billing Overview page offers insights into the various charges being applied to your bill. Like the Client Charges table, the Agency “Marketing Automation Charges” table lists the various charges being applied to agencies.
This information is contained in the following columns in the Marketing Automation Charges table: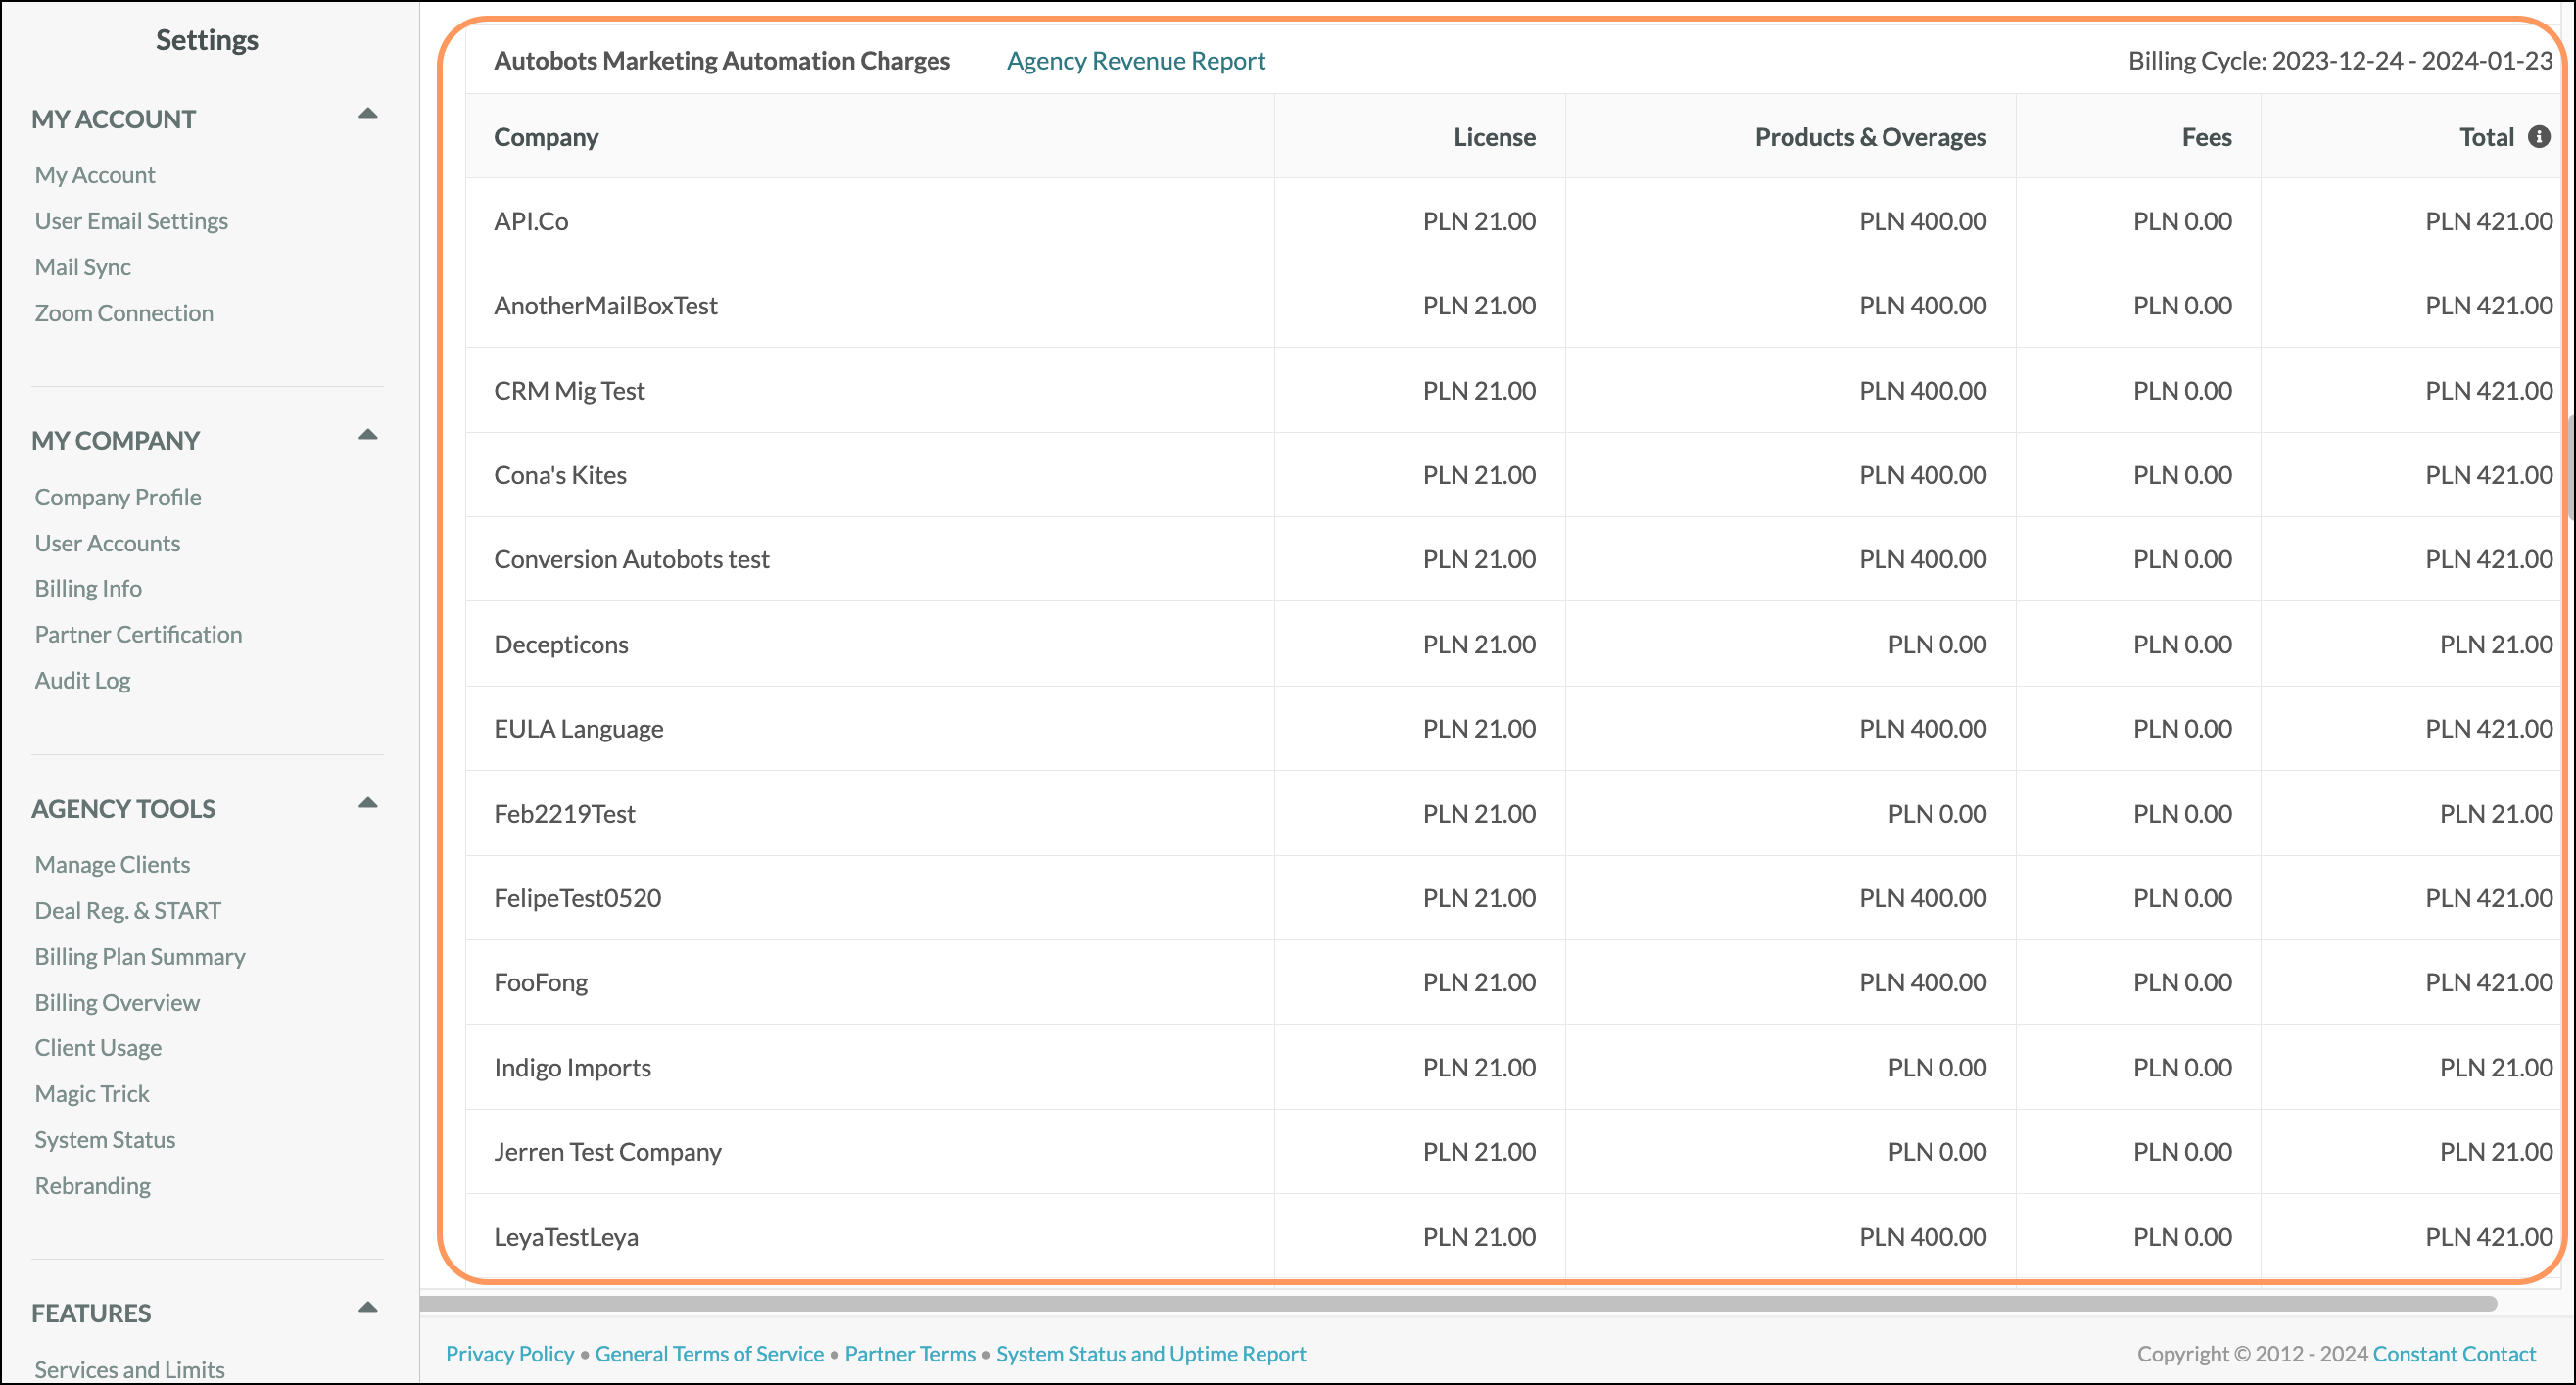
| Column | Description | |||
| Company Name | The company names of all clients attributed to the agency, and the Agency itself. Clients are listed alphabetically, and the Agency is always the last item above the Subtotal. | |||
| License Price | The amount the agency owes for each license. | |||
| Products and Overages | The amount due for the agency and their clients if they have incurred overages or enabled add-on products for the given billing cycle. | |||
| Fees | The payment processor fees that are being charged. | |||
| Total | The total due for each client, as well as the total due for the agency. The total charge is calculated as the sum of what is owed, including any sales taxes required, and subtracting any available credits. |
The Client Transactions table provides information on what clients are being billed for during a given month.
This information is contained in the following columns in the Client Transactions table:![]()
| Column | Description | |||
| Date | The date the charge was marked as successful or uncollectible. | |||
| Company | The name of the client's company. | |||
| Description | A short description of the charge, including any credits that were applied. | |||
| Transaction ID | The Transaction ID for a given charge. Transaction IDs help in identifying the charge in Stripe. | |||
| Charge | The total amount that the client is being charged. This amount equals the total amount of the client's bill minus any credits that were applied. | |||
| Note | A short note describing the nature of the client's charge. |
The Agency Transactions table provides information on what an agency is being billed for during a given month.
This information is contained in the following columns in the Agency Transactions table: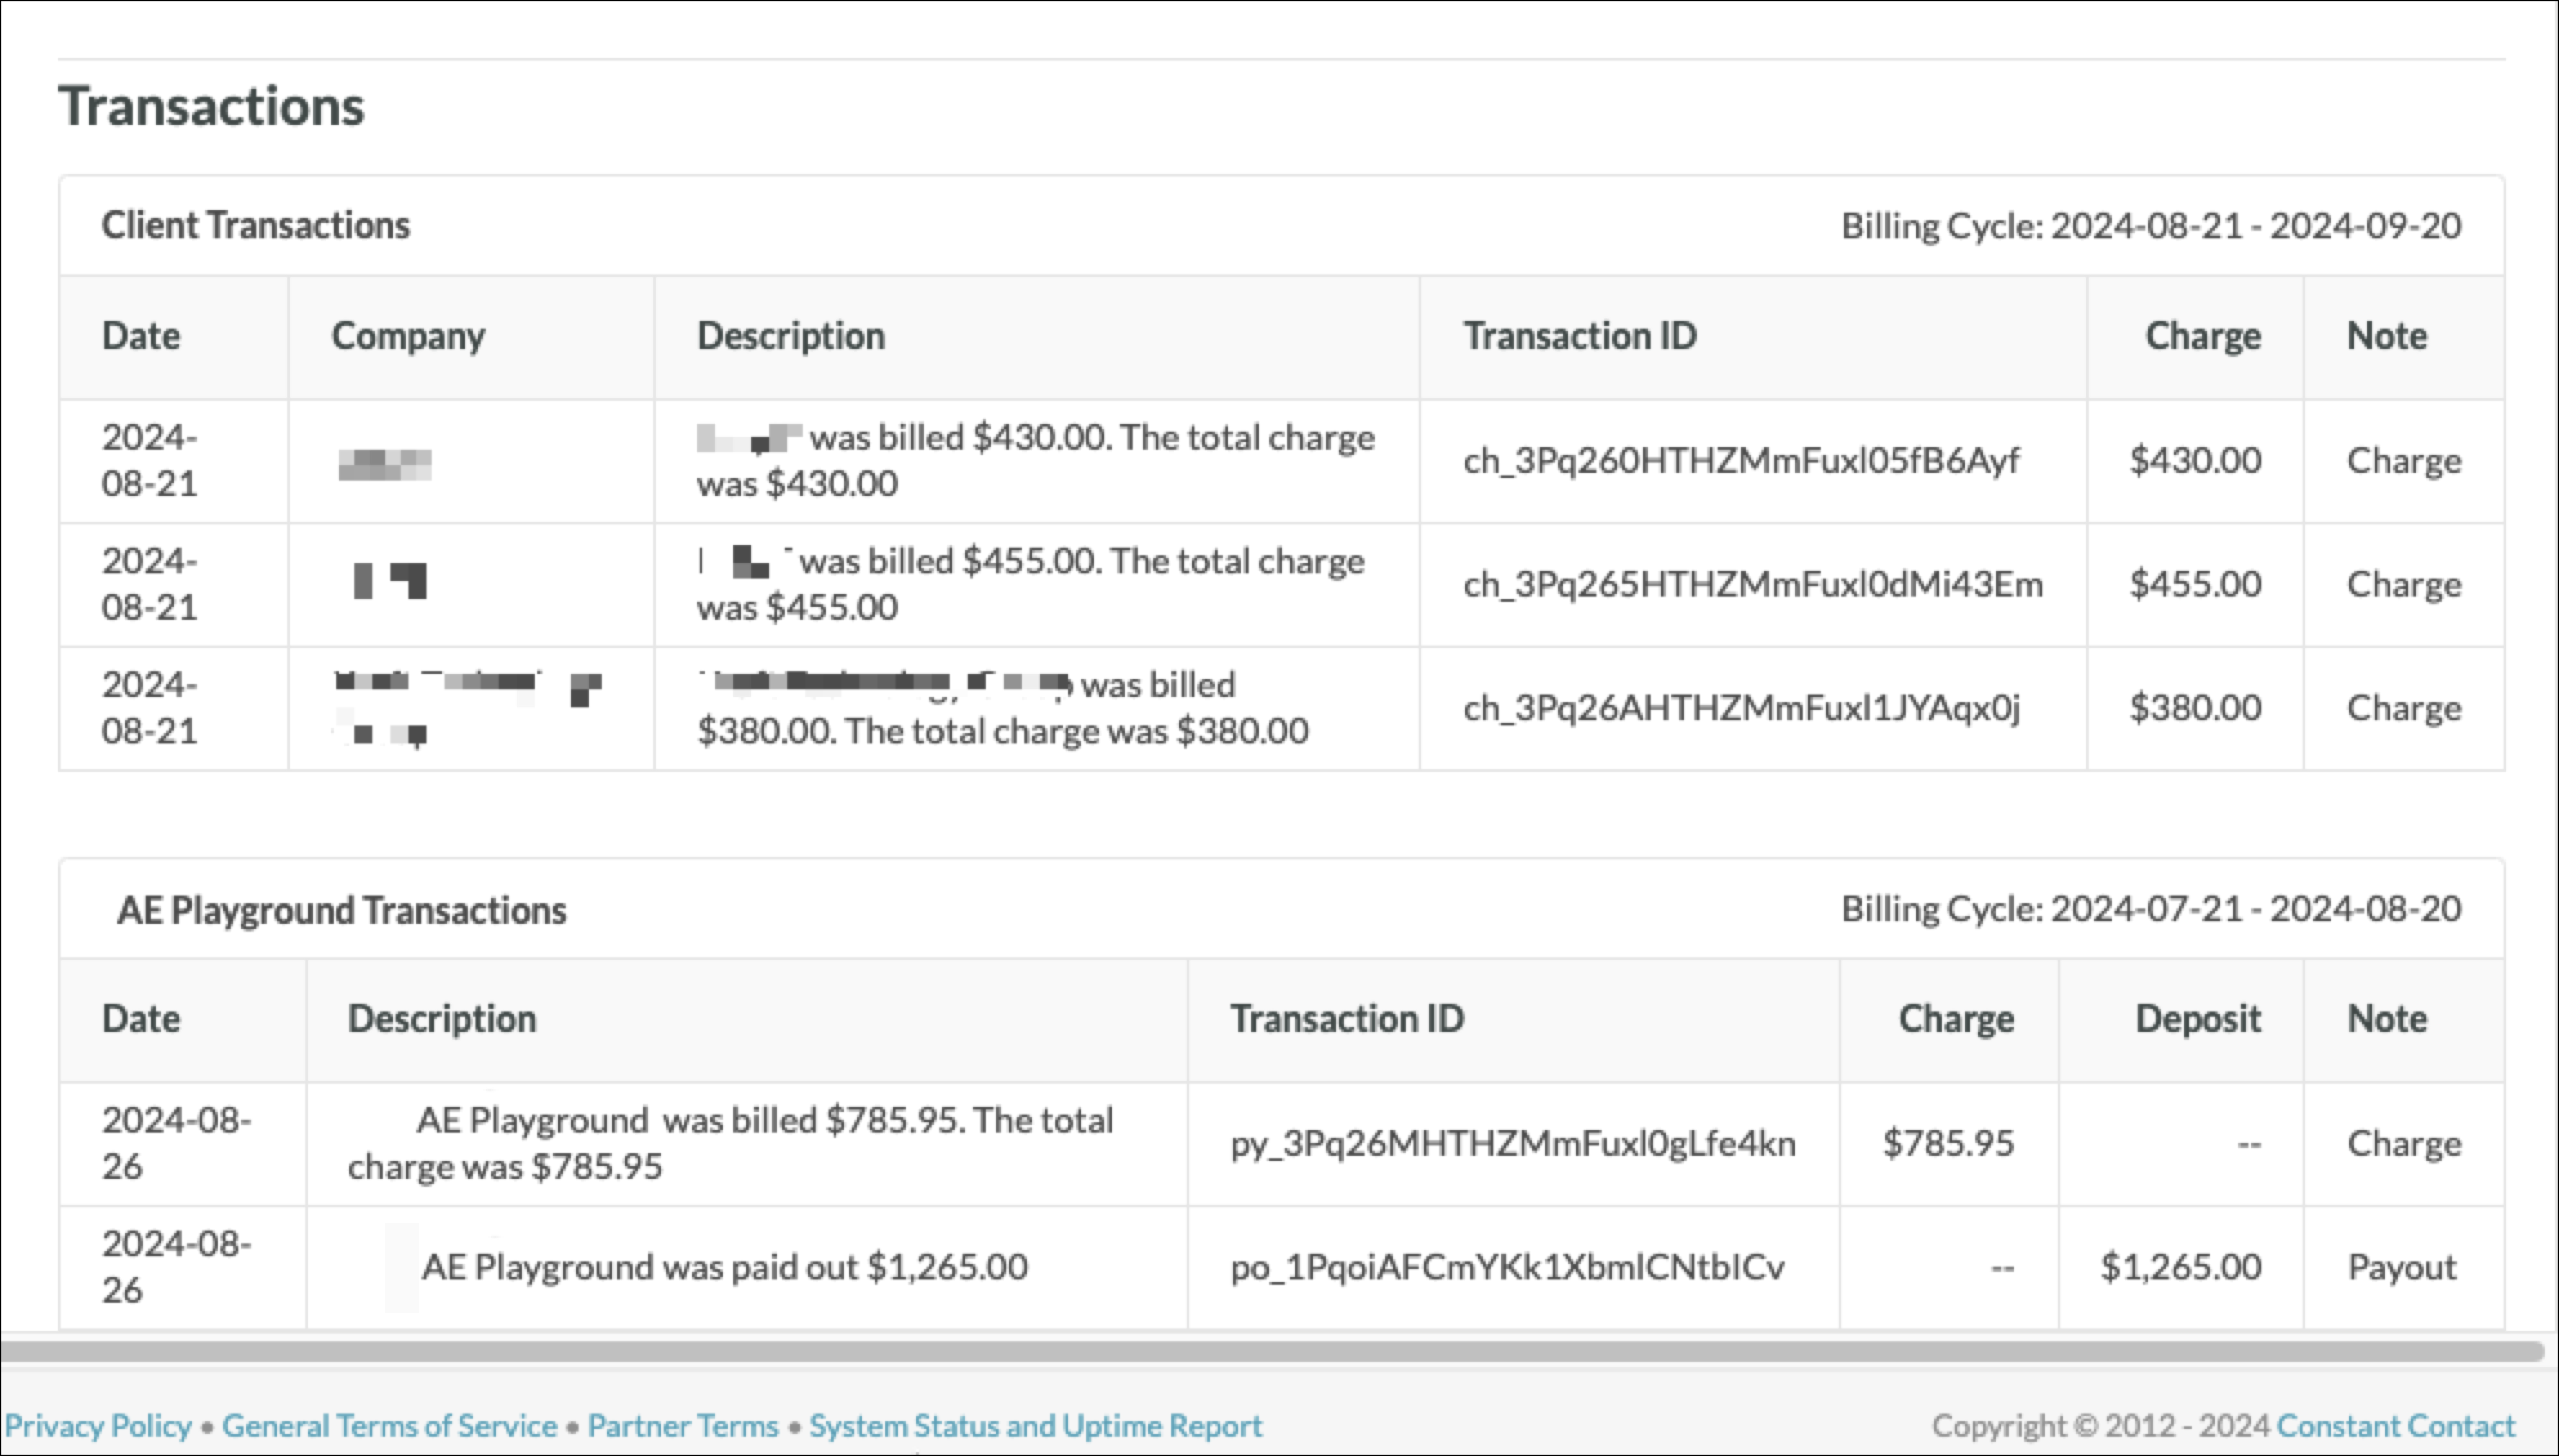
| Column | Description | |||
| Date | The date the charge was successful, marked uncollectible, or the date of a refund. | |||
| Description | A short description of the charge, payout, or refund. This includes any credits that were applied. | |||
| Transaction ID | The Transaction ID for a given charge. Transaction IDs help in identifying the charge in Stripe. | |||
| Charge | The total amount that the agency is being charged. This amount equals the total amount of the agency's bill minus any credits that were applied. | |||
| Deposit | The amount paid out to the agency. | |||
| Note | A short note describing the nature of the agency's charge. |
Client invoices can have many different statuses attached to them, each being quite different from one another in what they mean for you. Some invoice statuses state that all is well, and others signal that there are problems with invoice collection.
These statuses are as follows: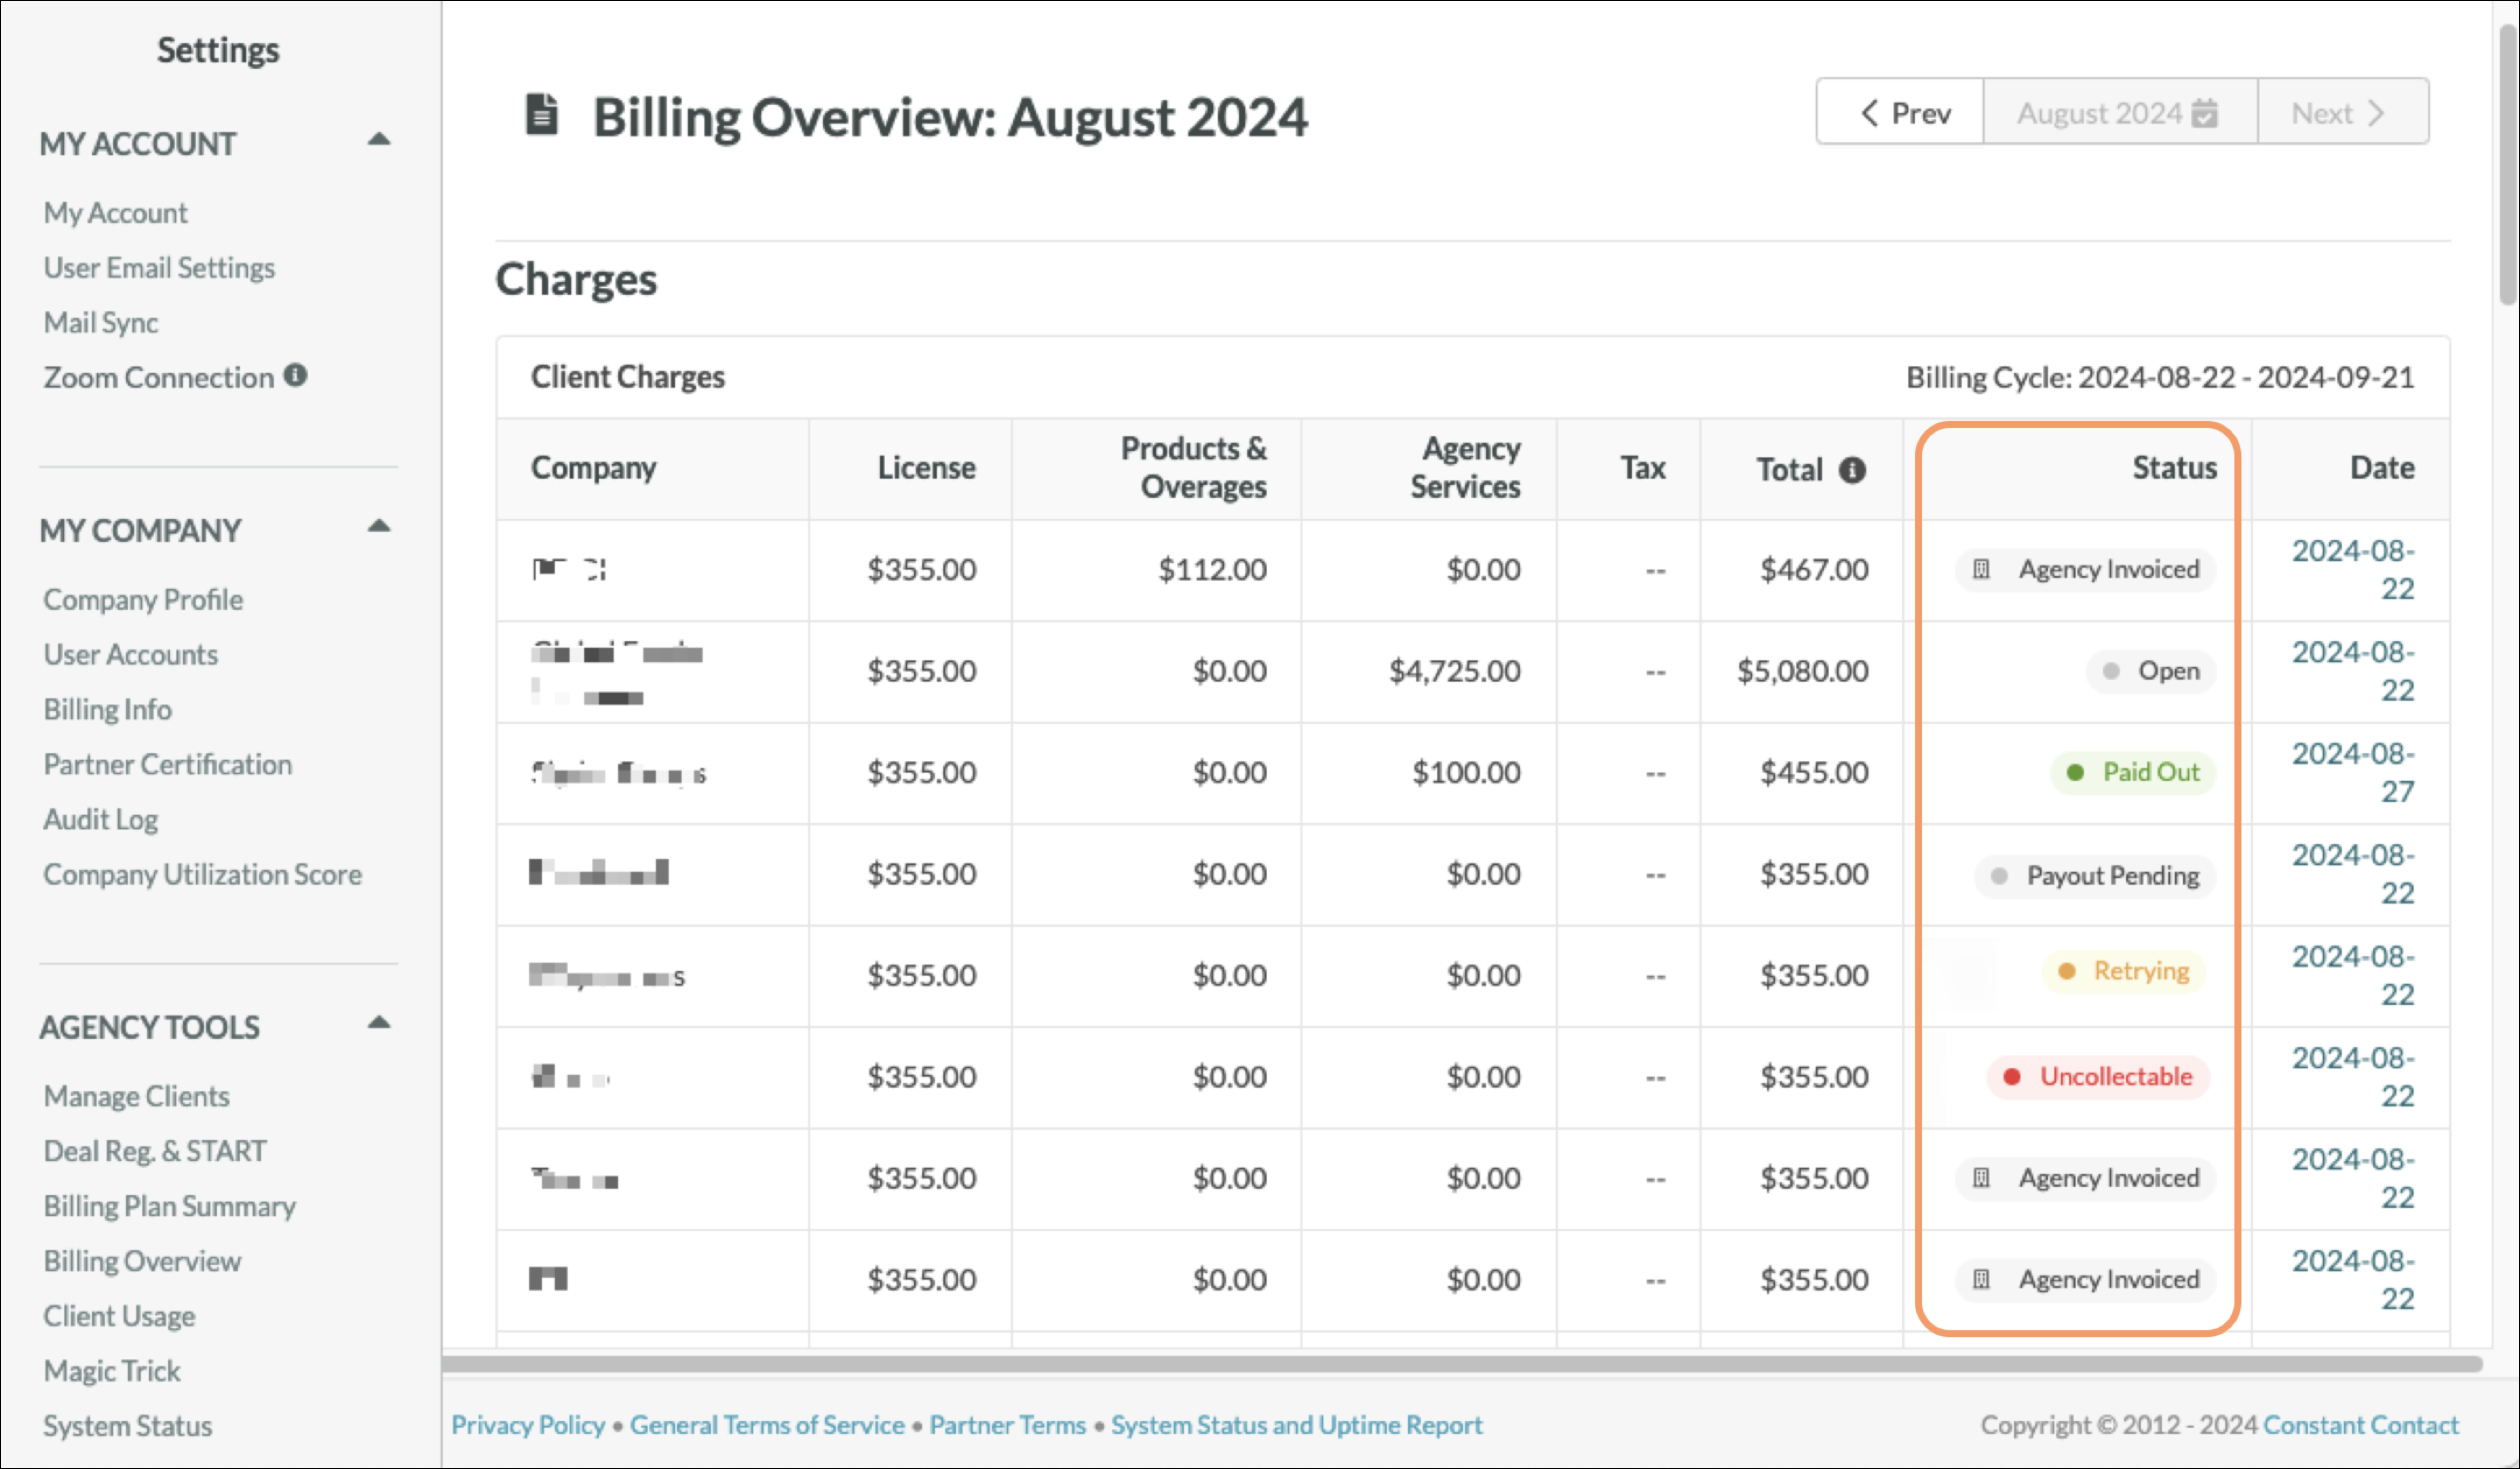
| Status | Description | |||
| Agency-Invoiced | Indicates that a client is being billed or invoiced directly by an agency and is not being billed directly by Lead Gen & CRM. | |||
| Open | Indicates that Lead Gen & CRM is retrying a failed charge. Invoices with this status cannot be edited. | |||
| Paid Out | Indicates that the charge was successful. | |||
| Payout Pending | Indicates that the charge was successful and Lead Gen & CRM is waiting for it to settle. | |||
| Retrying | Indicates that the client failed the initial charge and that Lead Gen & CRM will attempt to retry the charge again in five days. | |||
| Uncollectible | Indicates that the initial charge, as well as all attempts to retry charging, have failed for that particular billing period. | |||
| Void | Indicates that the invoice has been canceled. |
You can export client or agency invoices for record keeping. Exported invoices will be saved as .PDF files.
To export invoices, log into your account and do the following:
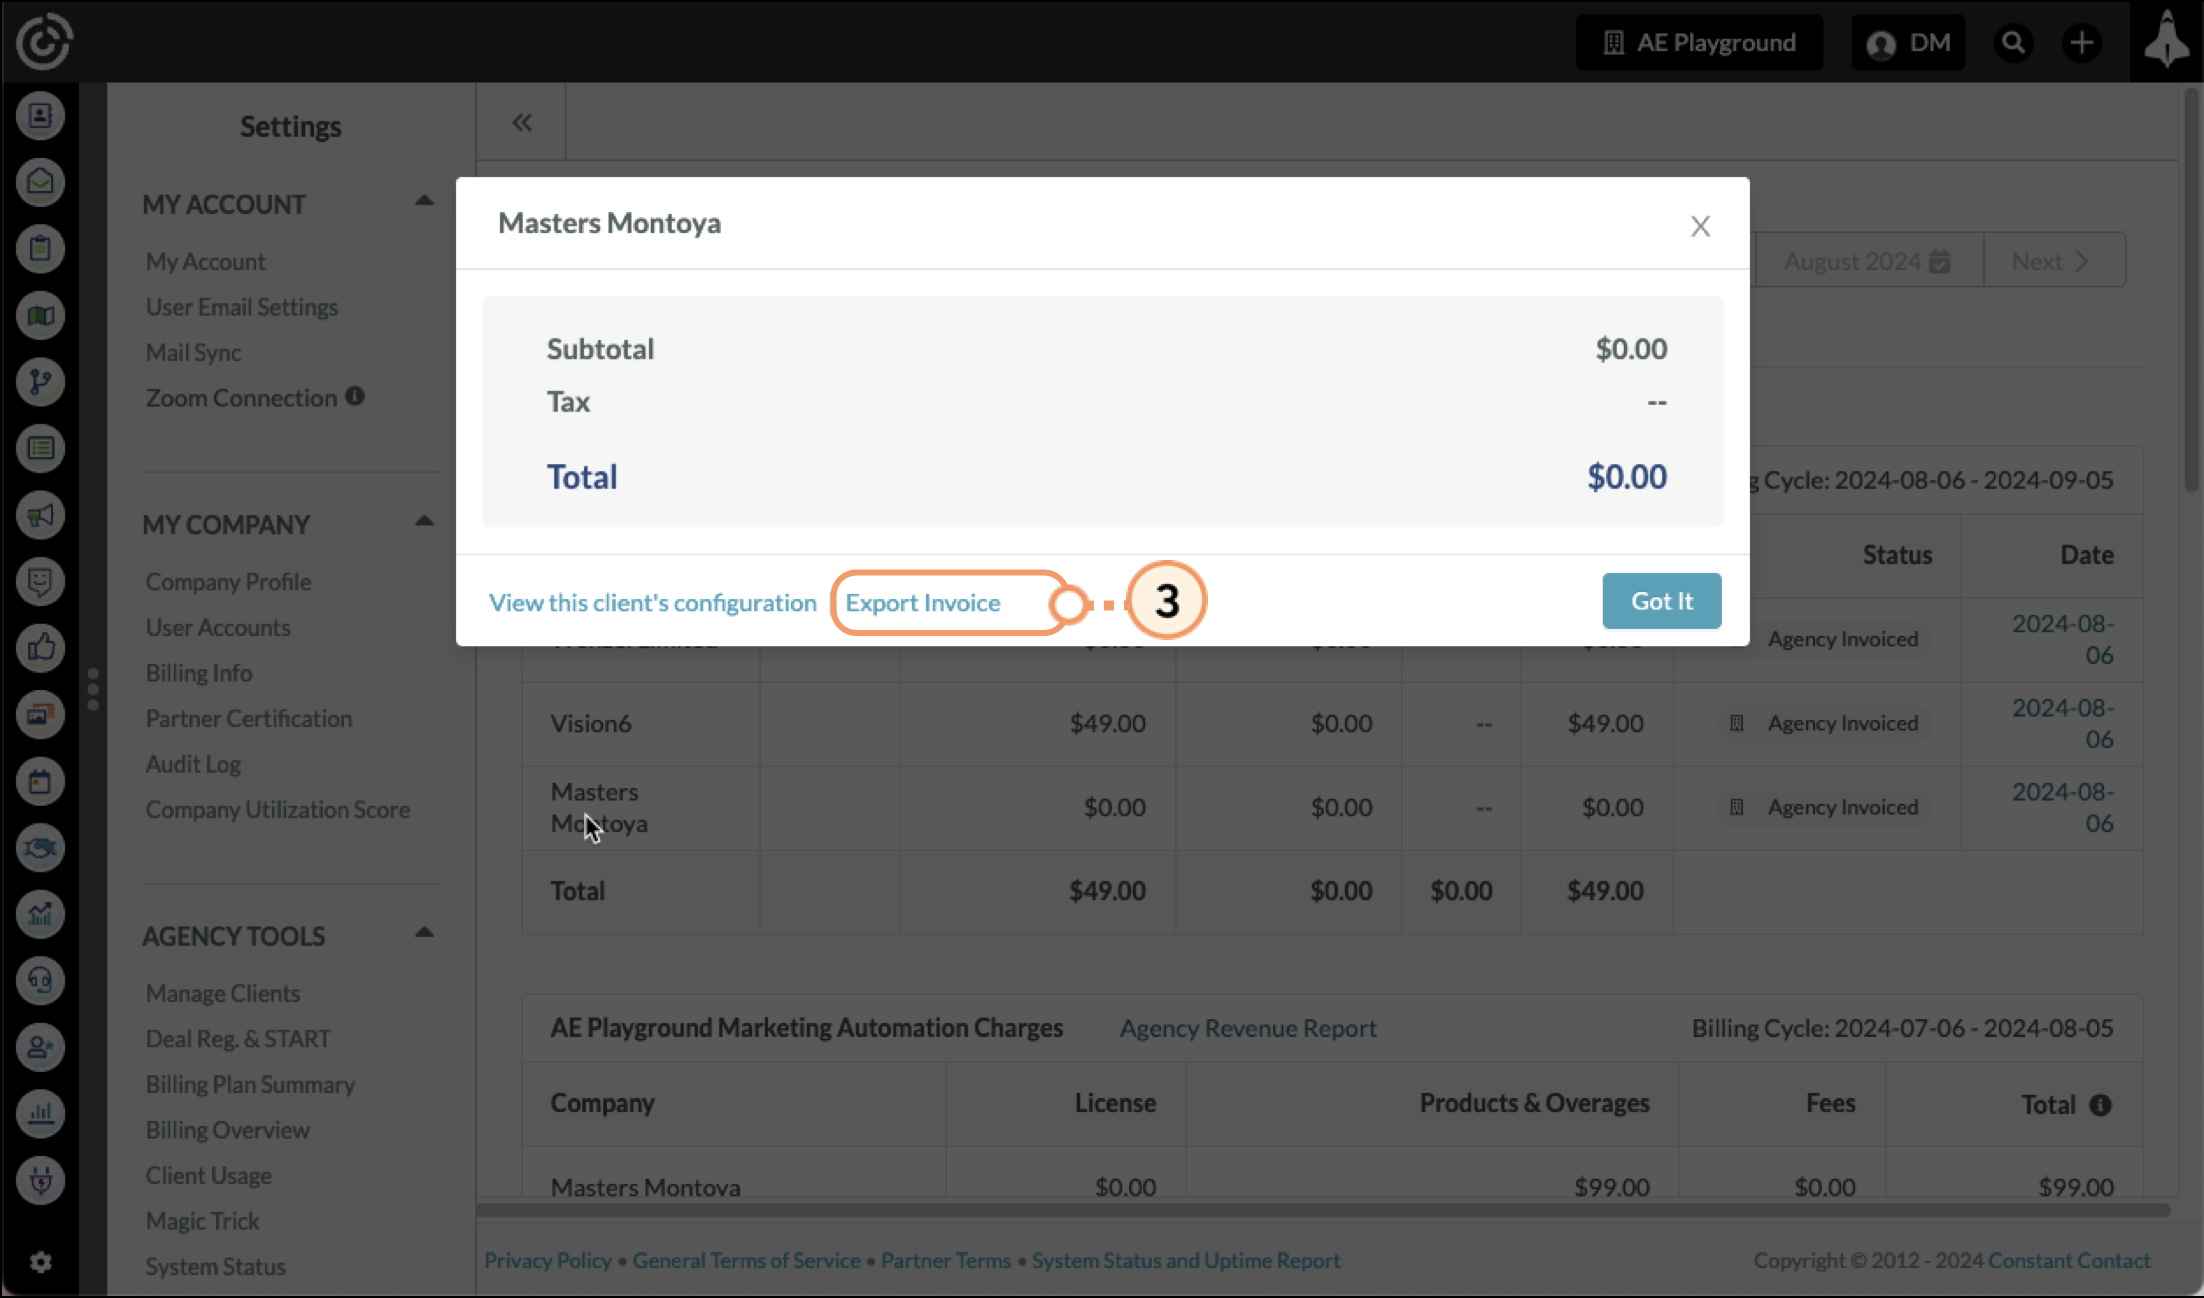
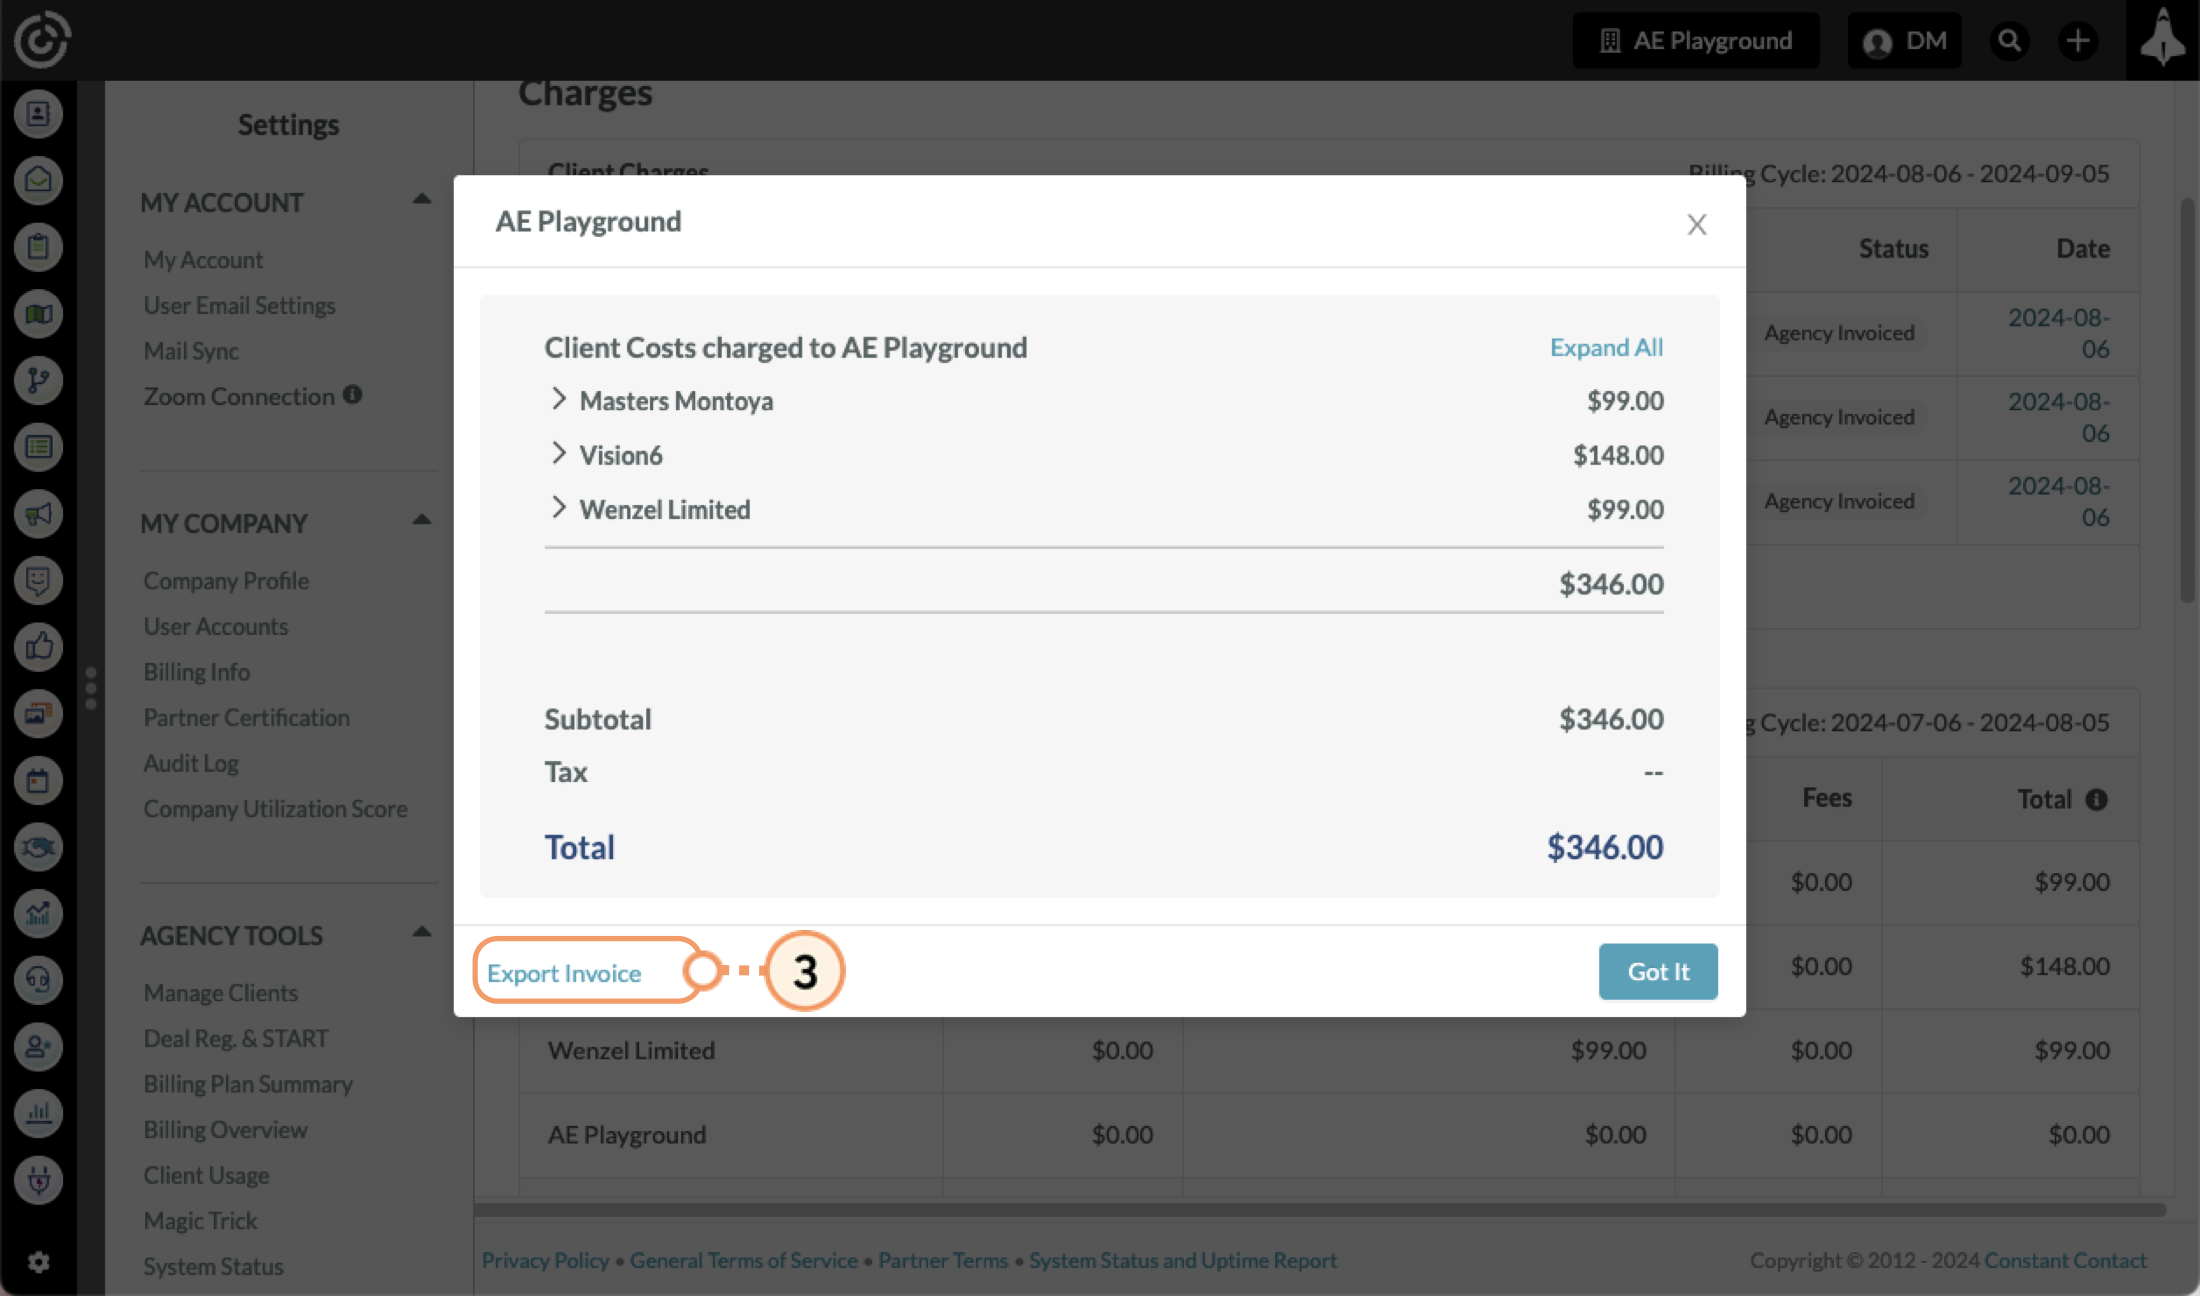
Download the .PDF file that opens in a new window. Downloaded .PDF exports will save automatically to where your computer saves files downloaded from the Internet.
Note: Pop-up blockers will prevent the export window from opening automatically. You will need to allow the pop-ups to open.
The Agency Revenue Report provides agencies with a document to help reconcile revenue generated during a given billing period. The report updates as clients are charged and the agency is paid out.
To export Agency Revenue Reports, do the following:
Download the .PDF file that opens in a new window. Downloaded .PDF exports will save automatically to where your computer saves files downloaded from the Internet.
Note: Pop-up blockers will prevent the export window from opening automatically. You will need to allow the pop-ups to open.
You can access the Client Configuration Settings for individual clients directly from the Billing Overview. This allows you to set the amount and frequency at which you bill them, as well as adjust other client settings.
To access Client Configuration Settings from the Billing Overview page:

Copyright © 2026 · All Rights Reserved · Constant Contact · Privacy Center