| Administrators | ✓ | |
| Company Managers | ✓ | |
| Marketing Managers | ✓ | |
| Sales Managers | ||
| Salespersons | ||
| Jr. Salespersons |
| Tip: Are you looking for information about Constant Contact’s Email and Digital Marketing product? This article is for Constant Contact’s Lead Gen & CRM product. Head on over to the Email and Digital Marketing articles by clicking here. Not sure what the difference is? Read this! |
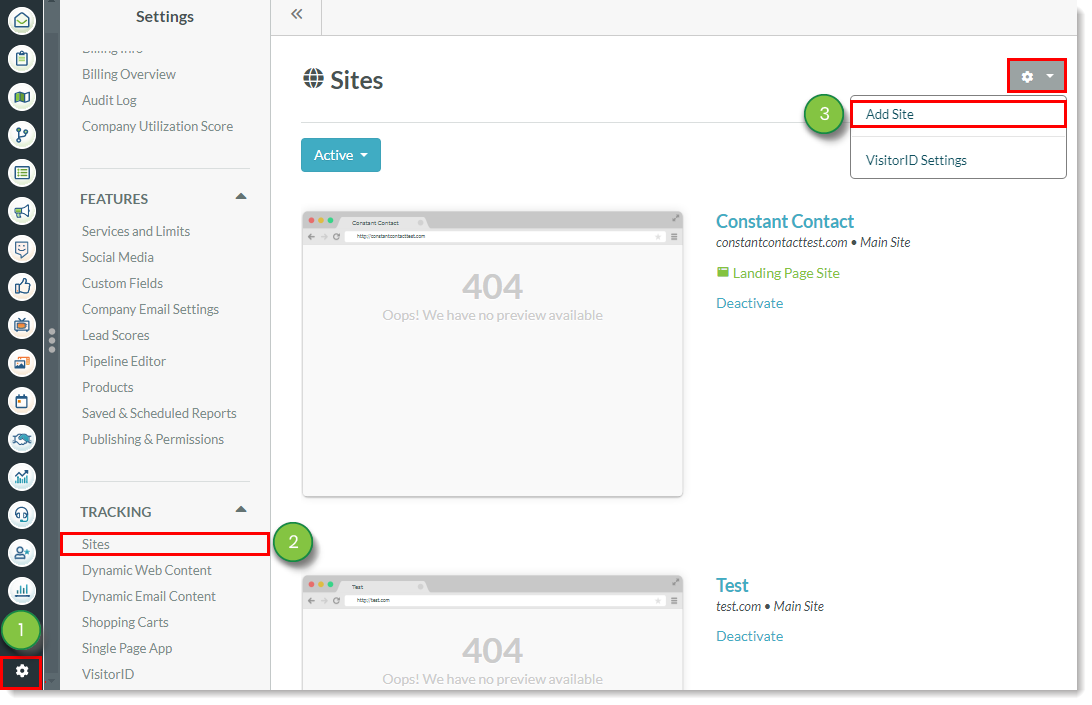
If you attempt to access the Landing Page Designer without creating a landing page site, then you will see a message stating that you currently have no landing sites-enabled.
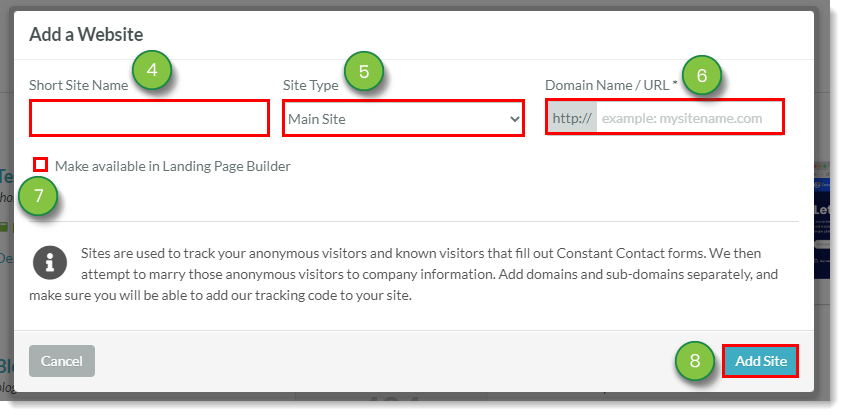
Every landing page will have a default .pages.services attached to the landing page site URL.
Without CNAME records, this is what your URL looks like:
| Link Type | URL Example | |
|
Secure | https://pages.services/subdomain.domain.com | |
|
Not Secure | http://subdomain.domain.com.pages.services |
With CNAME records, this is what your URL looks like:
| Link Type | URL Example | |
|
Secure | https://subdomain.domain.com | |
|
Not Secure | http://subdomain.domain.com |
You will need to add a CNAME record to your tracked site in order to remove the .pages.services within the URL.
To add CNAME records, do the following:

Consider the following example:
| Item | Entry | |
| Host/Alias | subdomain | |
| Value Destination/ Points To | pages.services |
In addition, you will notice a timestamp (domain.com/landingpage?ts=123...) appended to the end of your landing page URL when you click to visit the live page from the editor. This link parameter is not necessary and can be deleted.
This is a timestamp of that publication and is not intended to be used for sharing purposes. You can delete anything after the question mark (?) in your landing page URLs.
Refer to Changing Landing Page URLs for more information on CNAME records and DKIM implementation.
Note: A domain host is where your site’s domain is registered. These domain hosts include such hosts like GoDaddy, NameCheap, and BlueHost. Domain settings are sometimes labeled as Manage Domains or DNS Records and may be under advanced settings.
Lead Gen & CRM landing pages are secure.
To access a secure version of your landing page with the https:// prefix, do the following:
The URL in the Funnel URL–Secure field is the URL of the secure landing page. It will change depending on if you have CNAME records set up.
Your new URL will be as follows:

| Record Type | URL Example | |
|
With CNAME | https://slug.company.com/slug | |
|
Without CNAME | https://pages.services/site.company.com/slug |
By default, landing pages created in Lead Gen & CRM are secure. They will have the https:// URL prefix. In addition, any asset provided by Lead Gen & CRM —media center links, uploaded images, and the like—are, by default, secure. This means that unsecured content is brought in from external sources. As such, you will need to change any unsecured links on your page to secured links.
Refer to Understanding Landing Page Security: HTTP and HTTPS for more information on how to access a page's secure URL and how to attend to unsecured content on landing pages.
When creating landing pages in Lead Gen & CRM, the subdomain is what is used so that you can track your pages and link them to campaigns.
As an example, if you want to set up a campaign to track your promotions the landing page should be set up as something akin to promotions.domain.com. After that, you can set up a campaign to track everything on that subdomain.
Slugs differ from subdomains. The subdomain is defined when you make the site, and it encompasses all pages within the site. The slug is defined when you create the individual landing page.
Copyright © 2026 · All Rights Reserved · Constant Contact · Privacy Center