| Administrators | ✓ | |
| Company Managers | ||
| Marketing Managers | ||
| Sales Managers | ||
| Salespersons | ||
| Jr. Salespersons |
| Tip: Are you looking for information about Constant Contact’s Email and Digital Marketing product? This article is for Constant Contact’s Lead Gen & CRM product. Head on over to the Email and Digital Marketing articles by clicking here. Not sure what the difference is? Read this article. |
Getting Started CNAME records impact what your email looks like in the inbox. The email will show the sending domain as the domain you have configured with DKIM (signed-by), and a return path (mailed-by), including that same domain.
If your emails are authenticated, then more of your emails will get into the inbox instead of the spam folder. Setting up DKIM and SPF is how you authenticate your emails. Doing so means that these ISPs will trust the content that you send. To do so, you must add CNAME records for your domain via your hosting provider (such as GoDaddy, HostGator, or NameCheap).
A DMARC record must be published for your sending domains. DMARC records let a receiving mailbox provider know how email sent from that domain should be authenticated and whether it should be delivered to the spam folder or rejected if it fails that authentication. This protects domains from being the victims of spoofing and phishing.
Recently, Yahoo! and Google announced that starting in February of 2024, they will tighten requirements on inbound email to their users. One of these requirements is that all emails sent to their users must come from a domain that is authenticated and has a published DMARC policy.
Below is a breakdown of what each of these terms mean:
| Acronym | Term | Description | ||||
| CNAME | Canonical Name |
A type of DNS record added to hosting providers that is used to specify that a domain name is an alias for another domain, which is considered the canonical domain. | ||||
| DKIM | DomainKeys Identified Mail |
An important email authentication mechanism for protecting senders and receivers from forged email. | ||||
| SPF | Sender Policy Framework |
A type of DNS (Domain Name System) record used to identify which mail servers are permitted to send email on behalf of a domain. | ||||
|
DMARC | Domain-based Message Authentication, Reporting & Conformance | A type of DNS record that lets a receiving mailbox provider know how email sent from that domain should be authenticated and whether it should be delivered to the spam folder or rejected if it fails that authentication. |
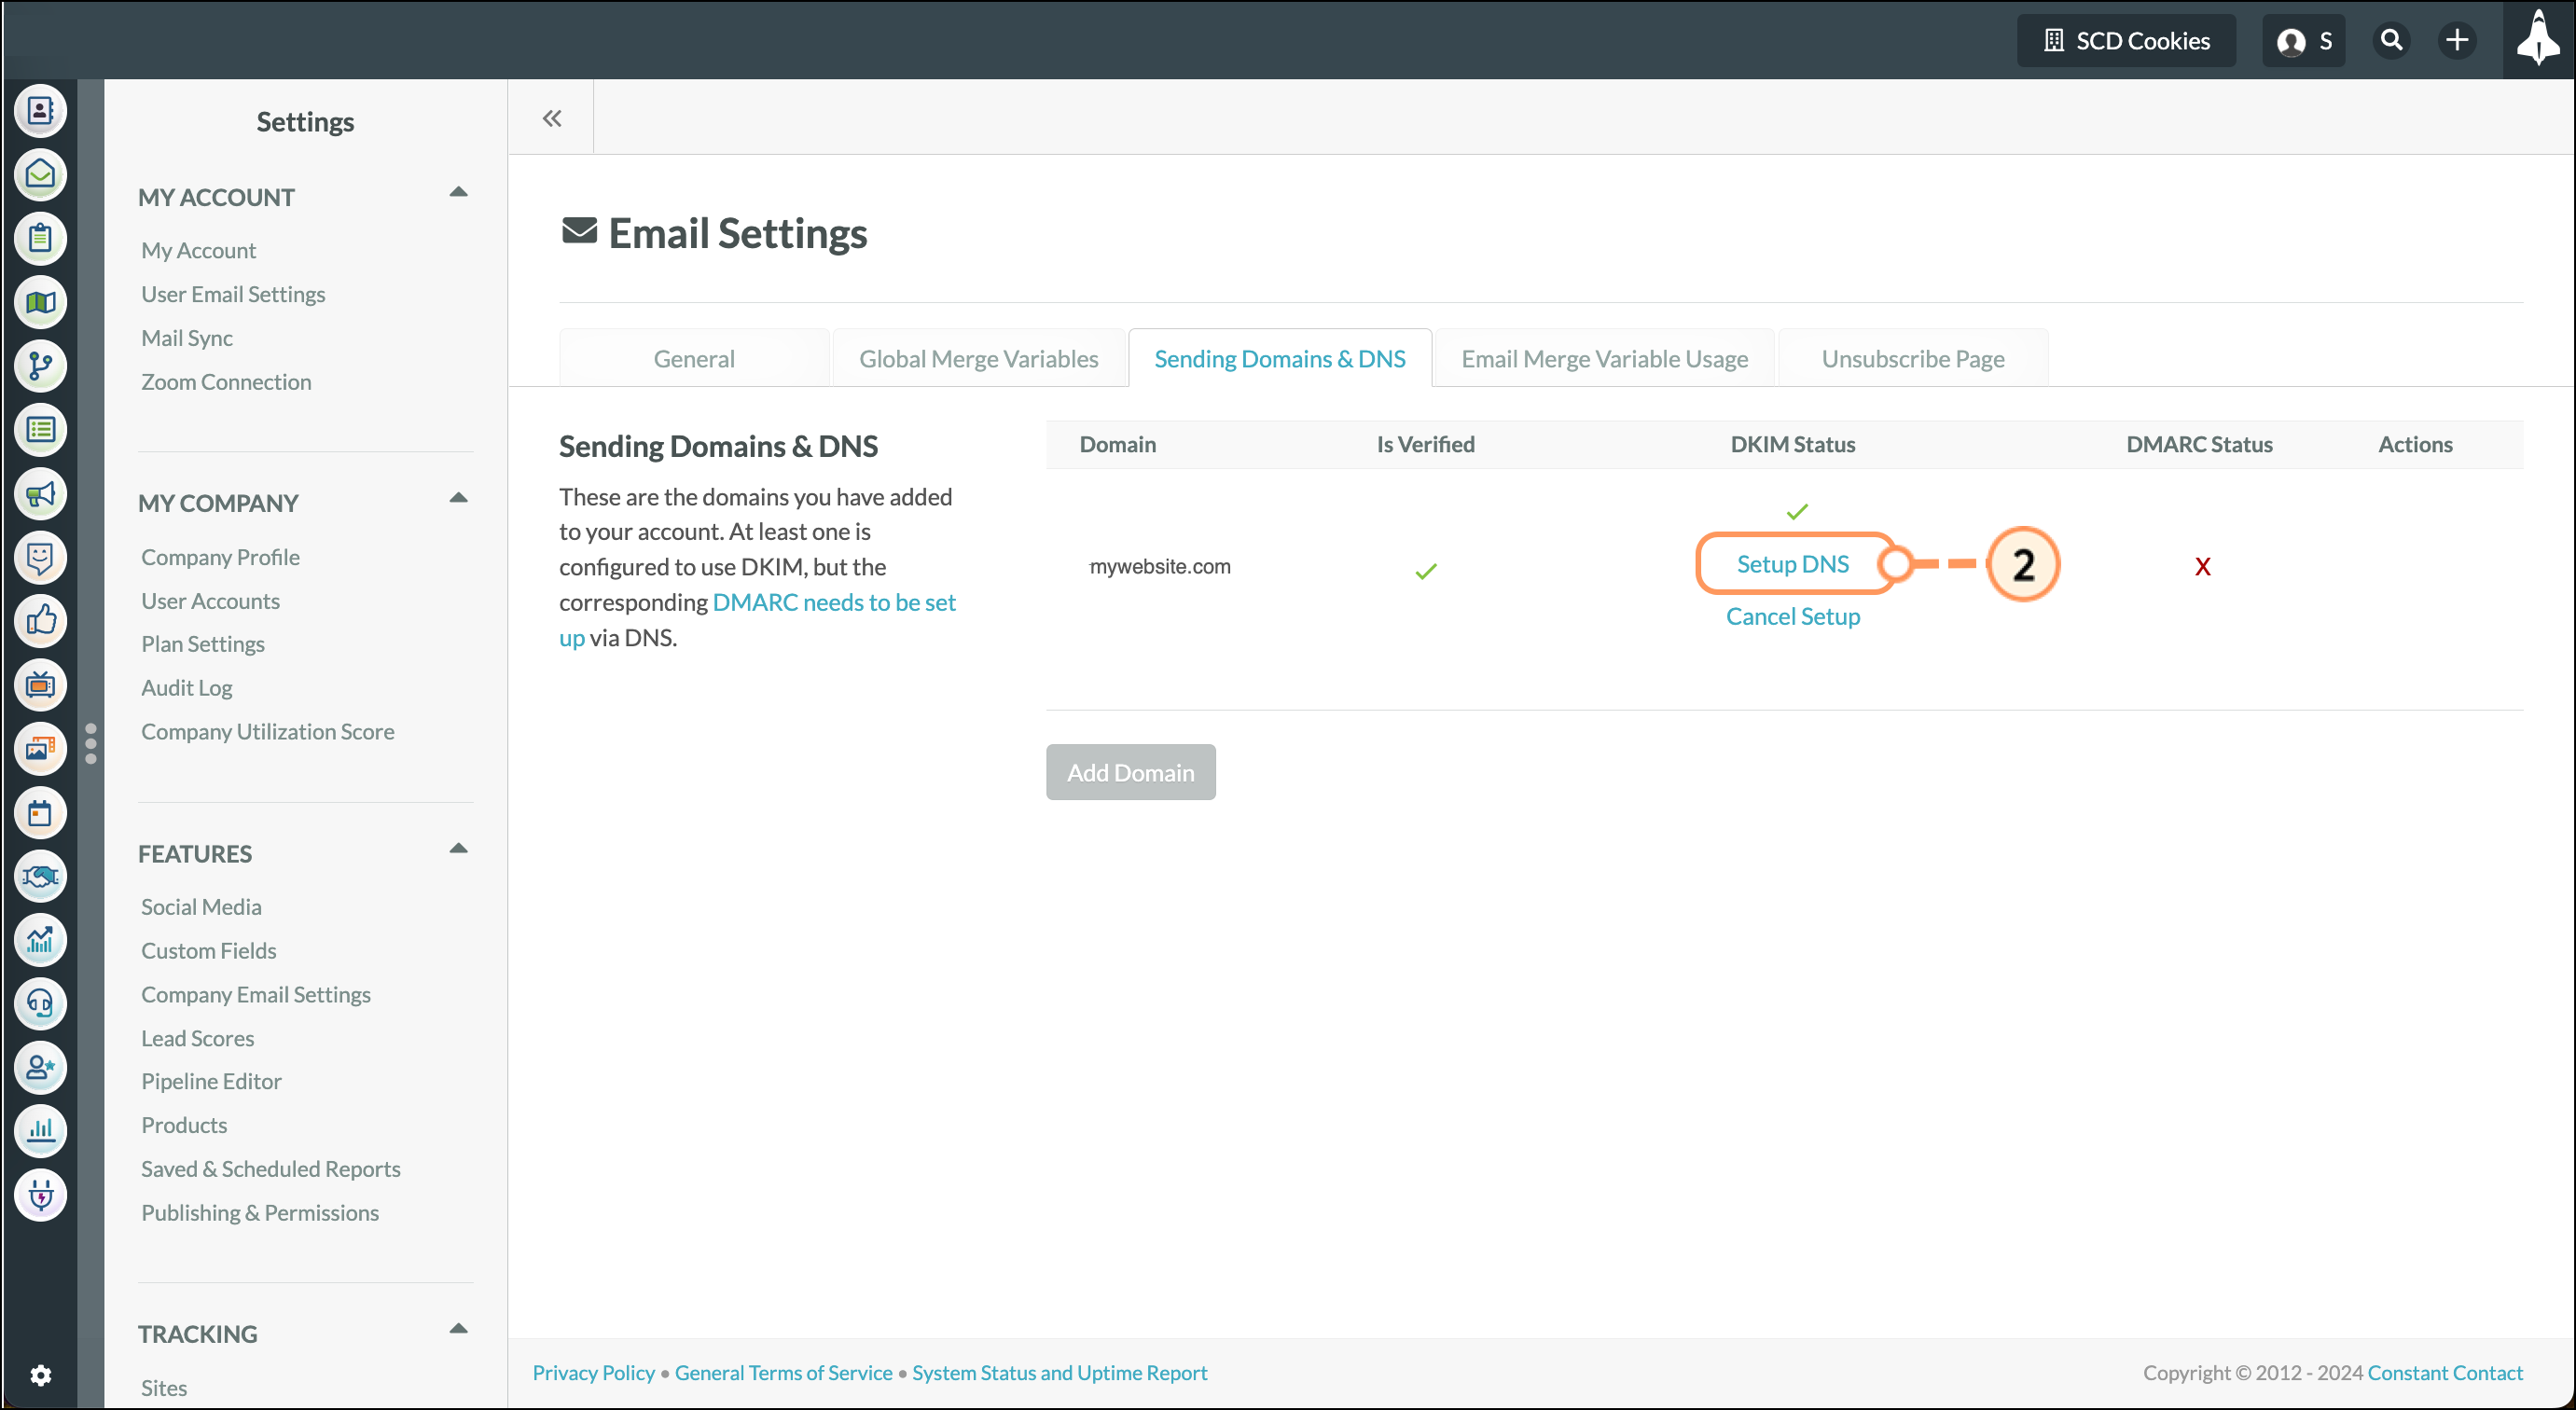
Important: By default, only one domain per Lead Gen & CRM instance can be authenticated with DKIM and SPF.
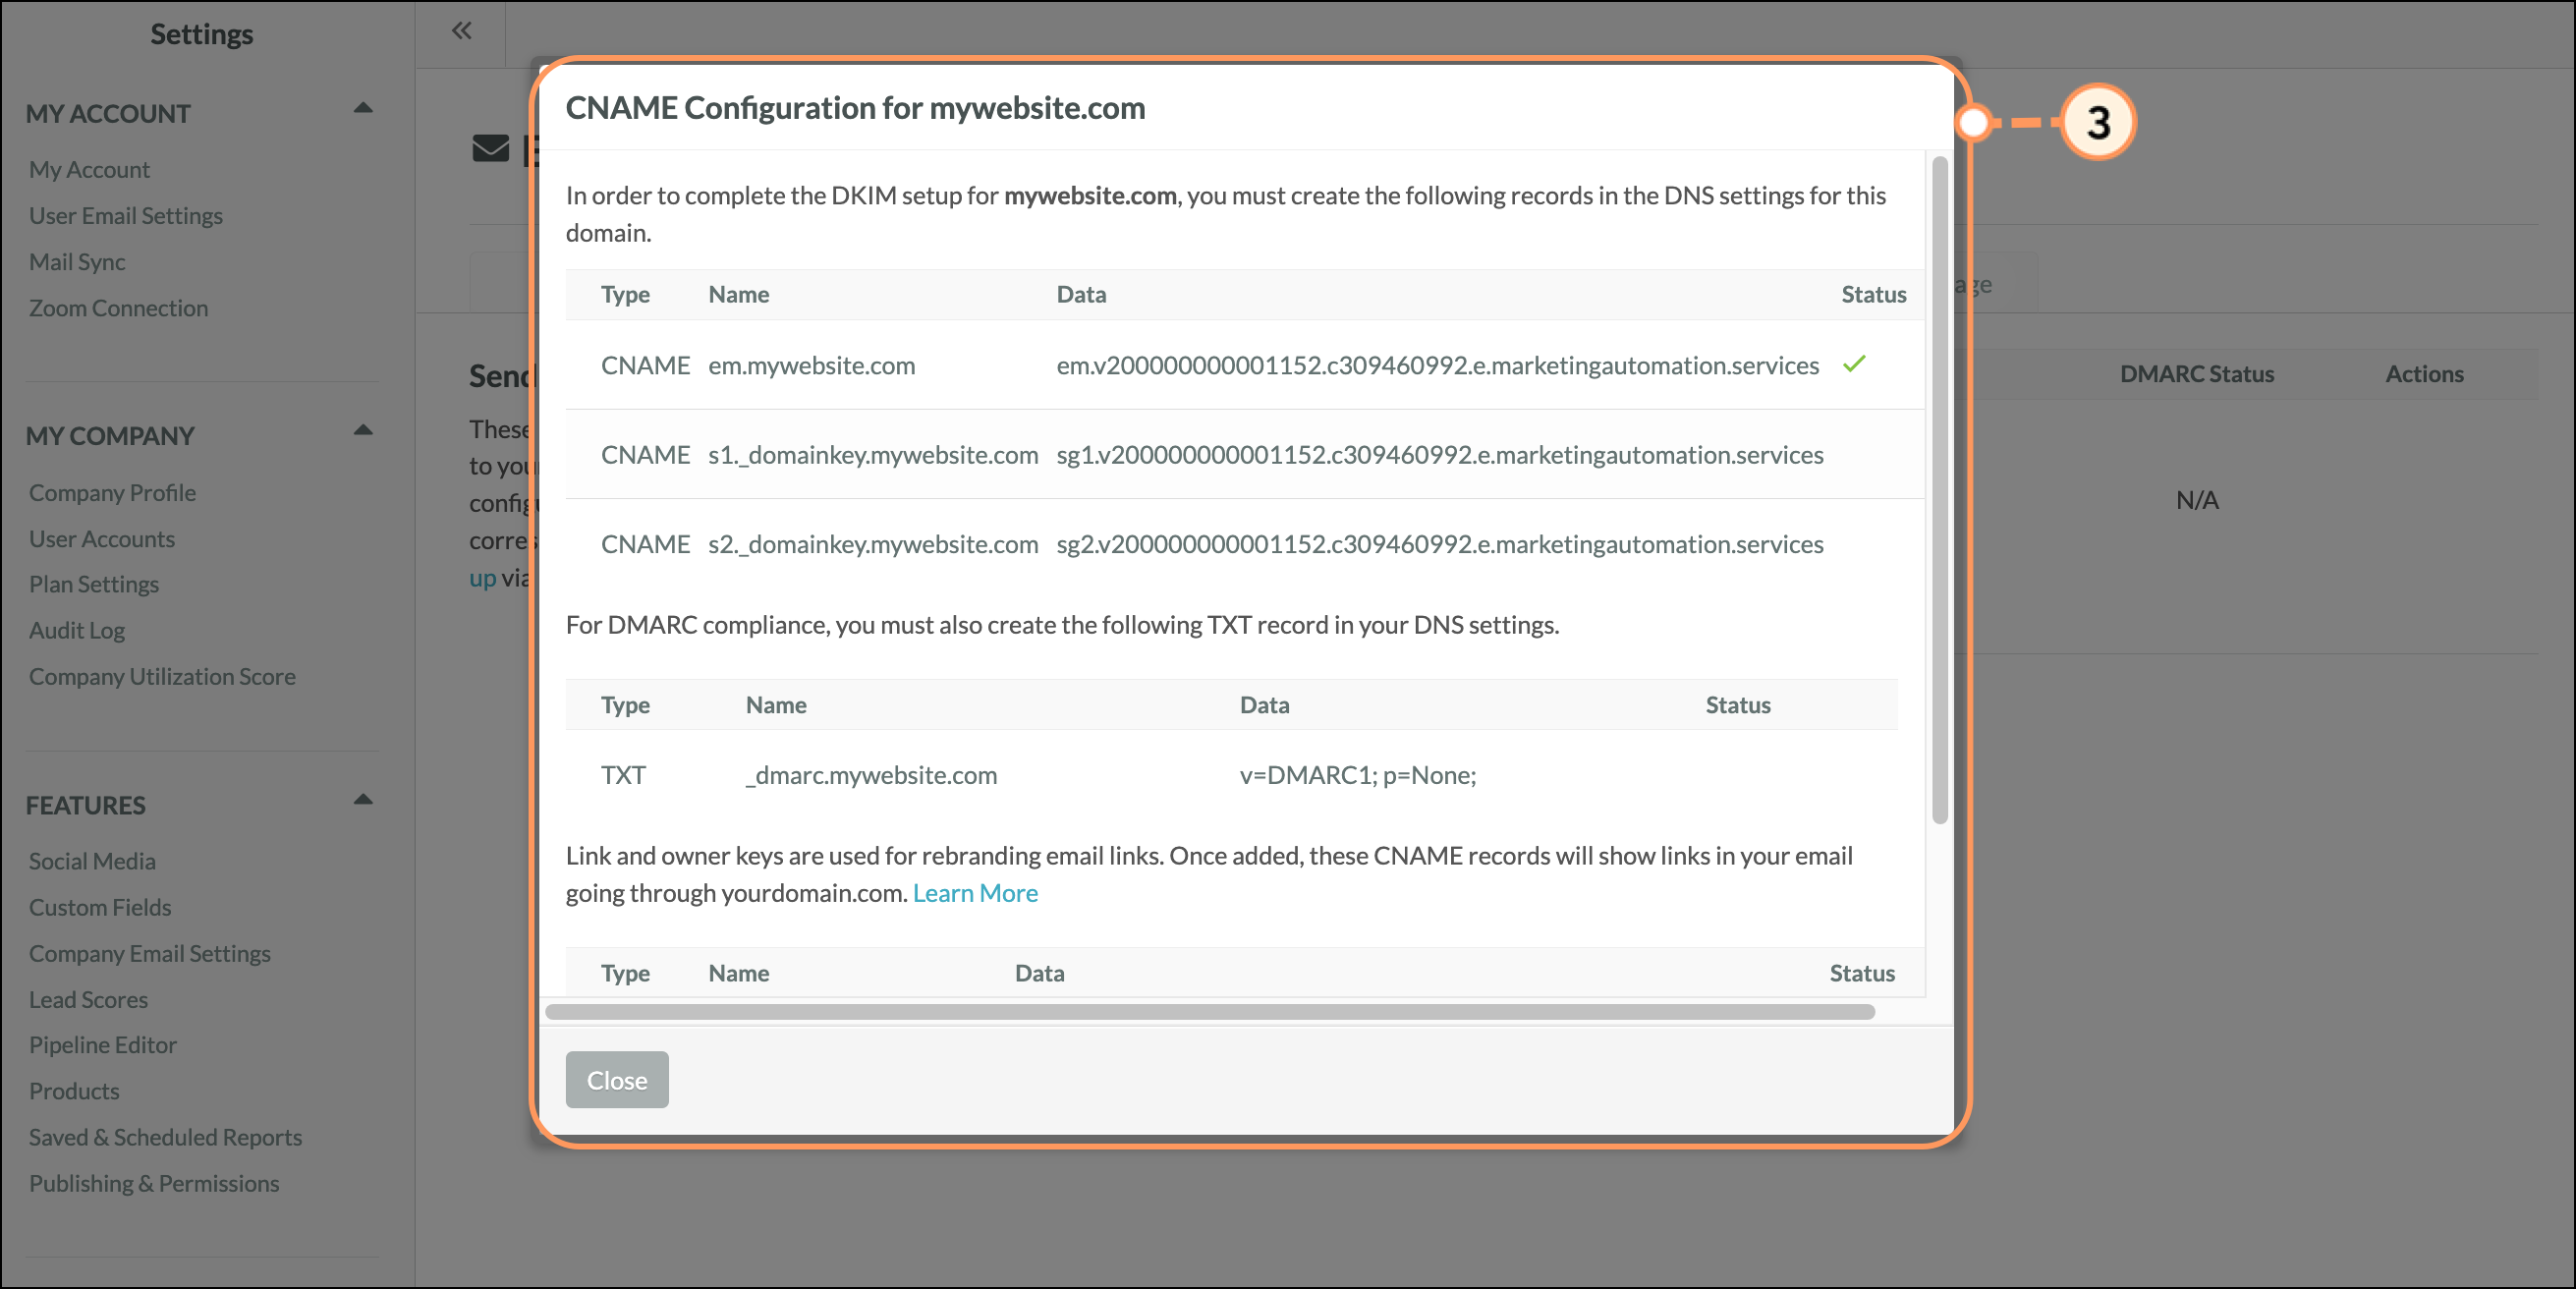
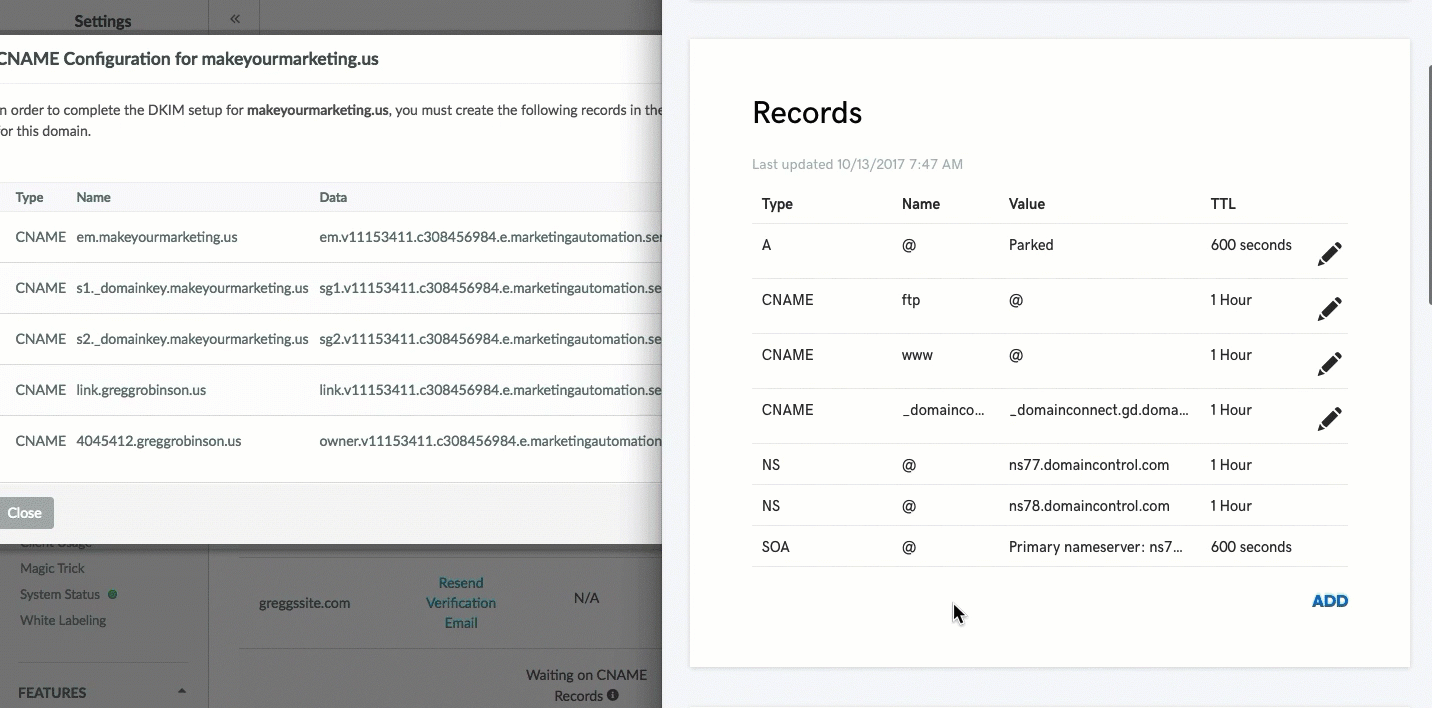
Lead Gen & CRM provides an in-application configuration tool that generates CNAME and DMARC records. When configuring CNAME records, to set up DKIM and SPF, you will need to add CNAME records to your DNS settings.
These settings are often handled by your Domain Name Registrar (such as GoDaddy, HostGator, or NameCheap), or managed by a dedicated DNS service provider (such as DNSimple or EasyDNS).
The DNS settings must be for the domain you are looking to authenticate. The configuration tool will generate these CNAME records, which will point to your unique DKIM keys.
You’ll be able to access the in-application CNAME record generation tool after verifying your domain via email. Once verified, click Setup DNS to open the tool.

Note: If the records do not show as verified, you may need to wait a few minutes before clicking “Verify.” If the records are still not verified, please check your DNS to ensure the records were input correctly and match what appears in the portal.
Note: Lead Gen & CRM Support can assist with configuring CNAME and DKIM.
A CNAME (Canonical Name) record is a type of resource record in the DNS (Domain Name System).
These records are used to specify that a domain name is an alias for another domain, which is considered the canonical domain.
You will need to set up CNAME records, which is located under Email Settings, to rebrand links in your email.
Lead Gen & CRM's CNAME records are as follows:
| Key | Description | |||
| em |
A SPF record. Identifies which mail servers are allowed to send emails from your domain. | |||
| link |
A CNAME record. Used for rebranding email links. Shows links in your email going through yourdomain.com. | |||
| owner |
A CNAME record. Used for safelabeling email links. Shows links in your email going through yourdomain.com. | |||
| s1._domainkey |
Used for DKIM authentication. Authenticates the message in transit as it is being handed off to the recipient server. | |||
| s2._domainkey |
Used for DKIM authentication. Authenticates the message in transit as it is being handed off to the recipient server. |
By itself, the cal record is not related to Lead Gen & CRM's overall DKIM and SPF authentication process. It is, however, integral to setting up custom domain information for the Meetings feature. If you are not using custom domains for the Meetings feature, then you do not need to utilize cal records when setting up authentication.
Refer to For Administrators: Configuring Custom Domain Settings for Meetings for more information on configuring the cal record for Meetings.
To determine whether or not your site is secured and if you will need to refrain from adding the link and owner CNAME record keys, you will need to inspect your page.
To inspect your page and determine secured status, do the following:
Note: Domain entries are normally located at the top of the list of entries.
Authentication with DKIM and SPF is required to send from a domain in Lead Gen & CRM.
To set up DKIM and SPF, do the following:
A green check box means that DKIM has been configured correctly.
Important: If you add the link and owner CNAME records to a secured site and then remove them, you must contact Lead Gen & CRM Support for backend assistance. If you do not, no opens or clicks will be registered. For more information on rebranding links, click here.
Note: Certain DNS providers append the domain to the end of the record. If you are still seeing Waiting on CNAME Records, be aware that it could take as long as 24 hours for the DNS settings to update.
Configuring CNAME records in Lead Gen & CRM is only part of the overall DKIM setup process. To complete configuring CNAME records, you will need to do so outside of Lead Gen & CRM.
While Constant Contact can verify if you have correctly configured the CNAME with a registrar or hosting provider, Constant Contact cannot provide CNAME configuration procedures for individual hosting providers.
Note: CNAME, DKIM, and SPF terminology will change from provider to provider. For example, Network Solutions uses Host Name and Alias. Lead Gen & CRM instead uses Name and Data.
As the CNAME configuration process varies for each hosting provider, you will need to refer to the help documentation provided by the individual providers. You will need to do so for each hosting provider of the website you are adding a CNAME record for. As such, website owners must log in to their hosting provider accounts and configure CNAME records there.
The following external documentation links will redirect to CNAME configuration articles for more popular registrars and hosting providers. However, this is by no means a complete list. If your provider is not listed, refer to their help documentation on CNAME configuration.
Contact your registrar or hosting provider for more information on registrar or hosting provider CNAME configuration.
You can check to see if you correctly set up CNAME records with MxToolBox. This website features a tool that can help. With it, insert the full key name from Lead Gen & CRM, and search as a CNAME Lookup. If successful, you should see the data from Lead Gen & CRM under the Canonical Name column in MxToolBox. In fact, you can use this website to locate your SPF records.
To locate your SPF records, do the following:
Important: When entering your domain name, include the em. prefix.
Be aware that when you add your CNAME records for Lead Gen & CRM, you are adding both SPF and DKIM. No additional steps are necessary for email authentication.
A DMARC policy is also good for your brand, as a strong policy will protect your brand from phishing attacks. If you want to do a quick check to see if your domain already has a DMARC policy in place, you can do a lookup here. You can also check the status by going to the Sending Domain & DNS Settings section in your Lead Gen & CRM instance.
A DMARC policy is also good for your brand, as a strong policy will protect your brand from phishing attacks. If you want to do a quick check to see if your domain already has a DMARC policy in place, you can do a lookup here. You can also check the status by going to the Sending Domain & DNS Settings section in your Lead Gen & CRM instance. 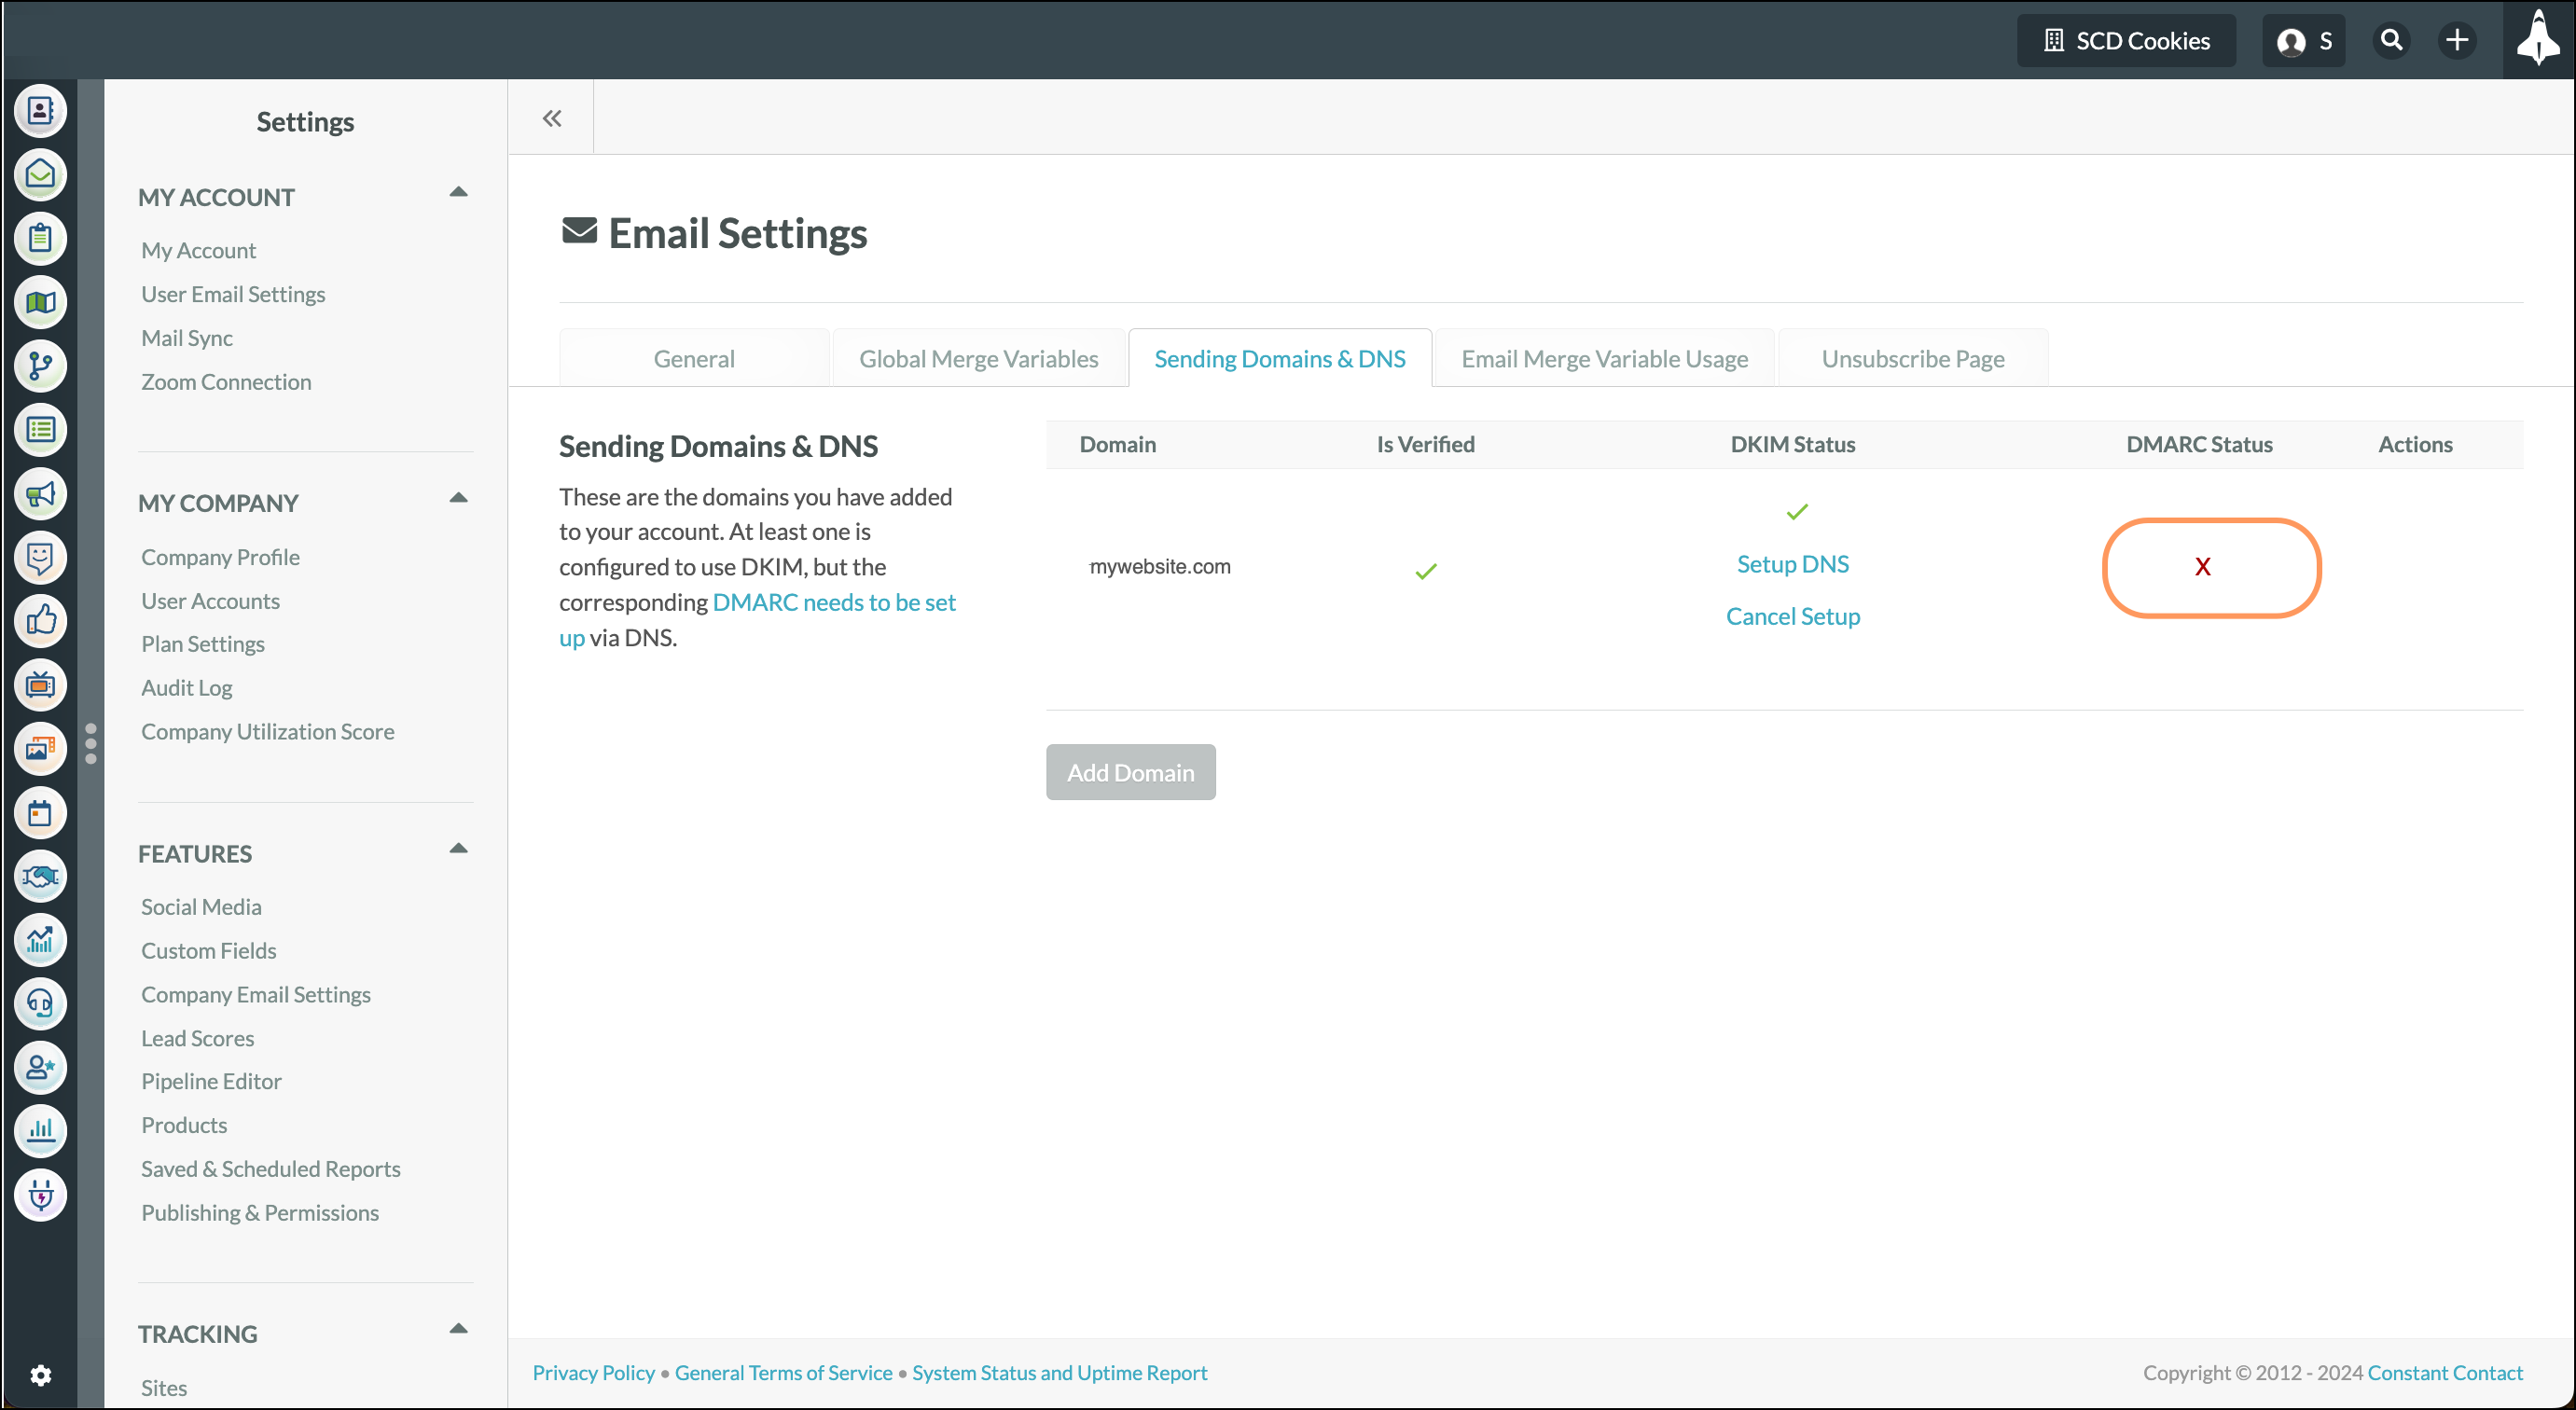
Click Setup DNS to open the configuration tool and get help setting up your DMARC policy. 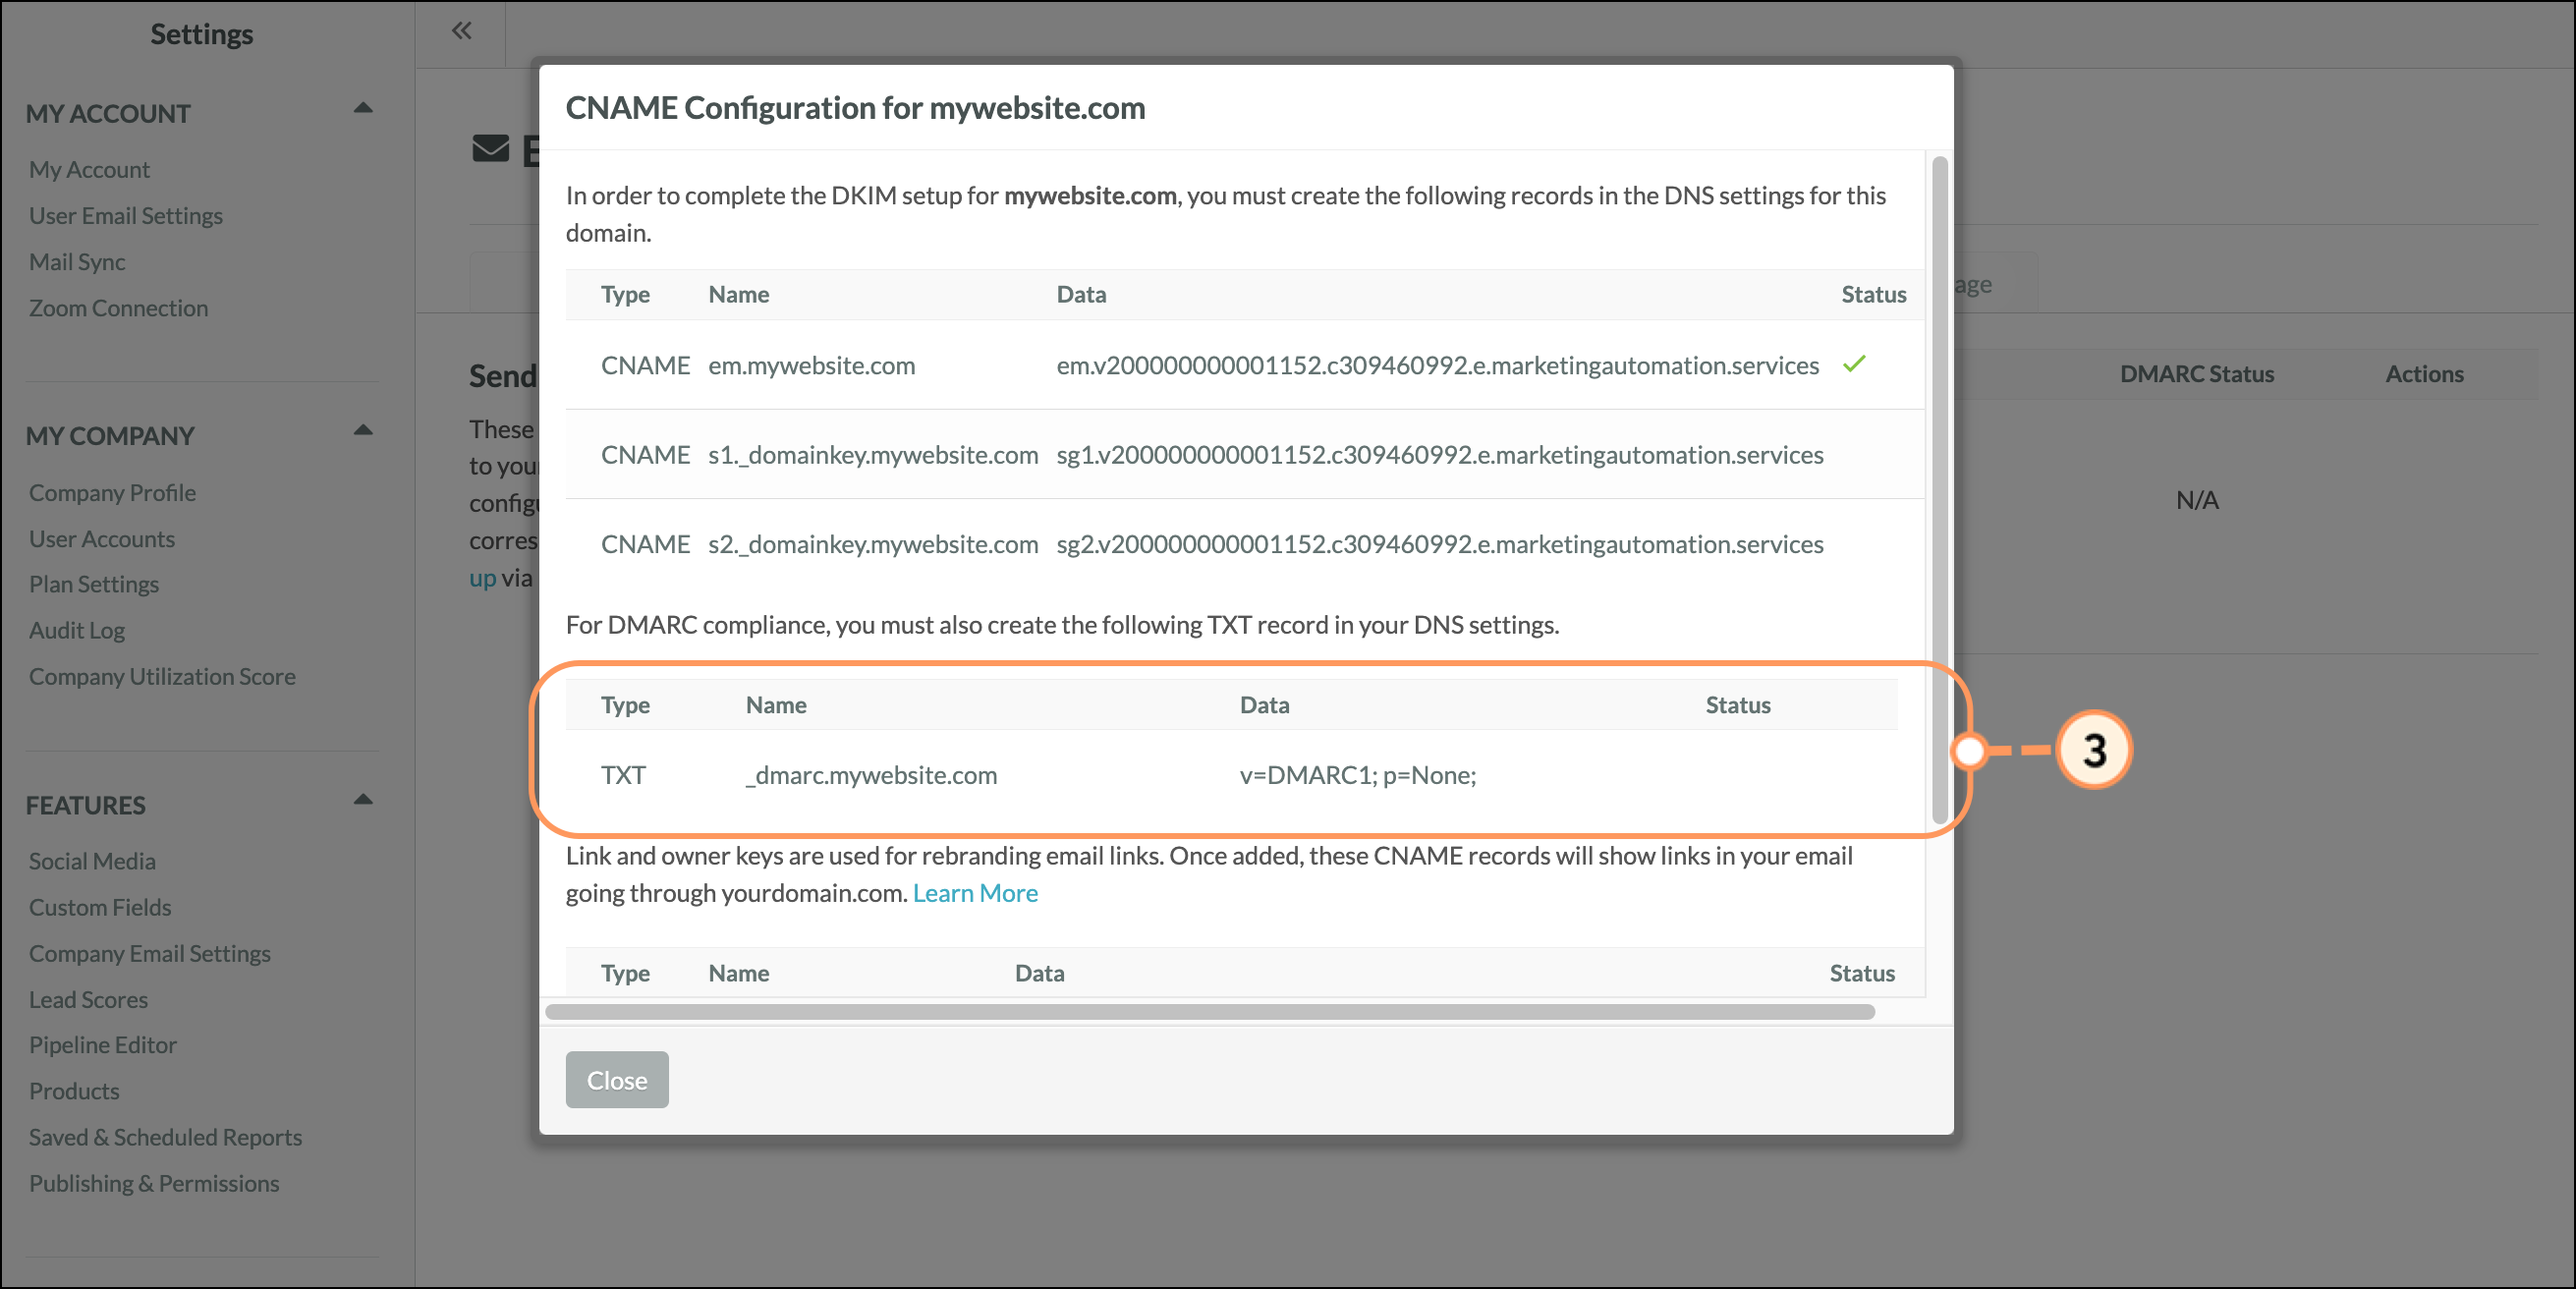
| Key | Description | |||
| _dmarc |
For a DMARC record, the hostname will always start with “_dmarc.” followed by your domain. This is standardized so that the receiving mailbox providers can easily look up if you have a record. | |||
To learn more about DMARC policies and for more information on creating a DMARC record, read What is a DMARC policy and why do I need one?
Safelisting ensures that your own Lead Gen & CRM-sent emails land in the inbox when testing. When an Internet Protocol (IP) address is safelisted, then emails sent from that IP address will not end up in the spam folder.
Refer to Safelisting IP Addresses for Lead Gen & CRM Emails for more information on safelisting.
Copyright © 2026 · All Rights Reserved · Constant Contact · Privacy Center