We're making it easier to get around Constant Contact with a brand new left navigation. Not all accounts have that change yet, so if your navigation looks different from our articles, that's why–but everything from the top can now be found on the left!

Email and Digital Marketing
How can we help you?
Search our help articles, video tutorials, and quickstart guides

You've got this. You've got us. Search our Knowledge Base to quickly find answers to your questions.

Manage your generated marketing campaign

Article: 000053183
Updated: May 29, 2025

Customize your multi-channel campaign, add or remove channels, and schedule the drafts to share with your audience


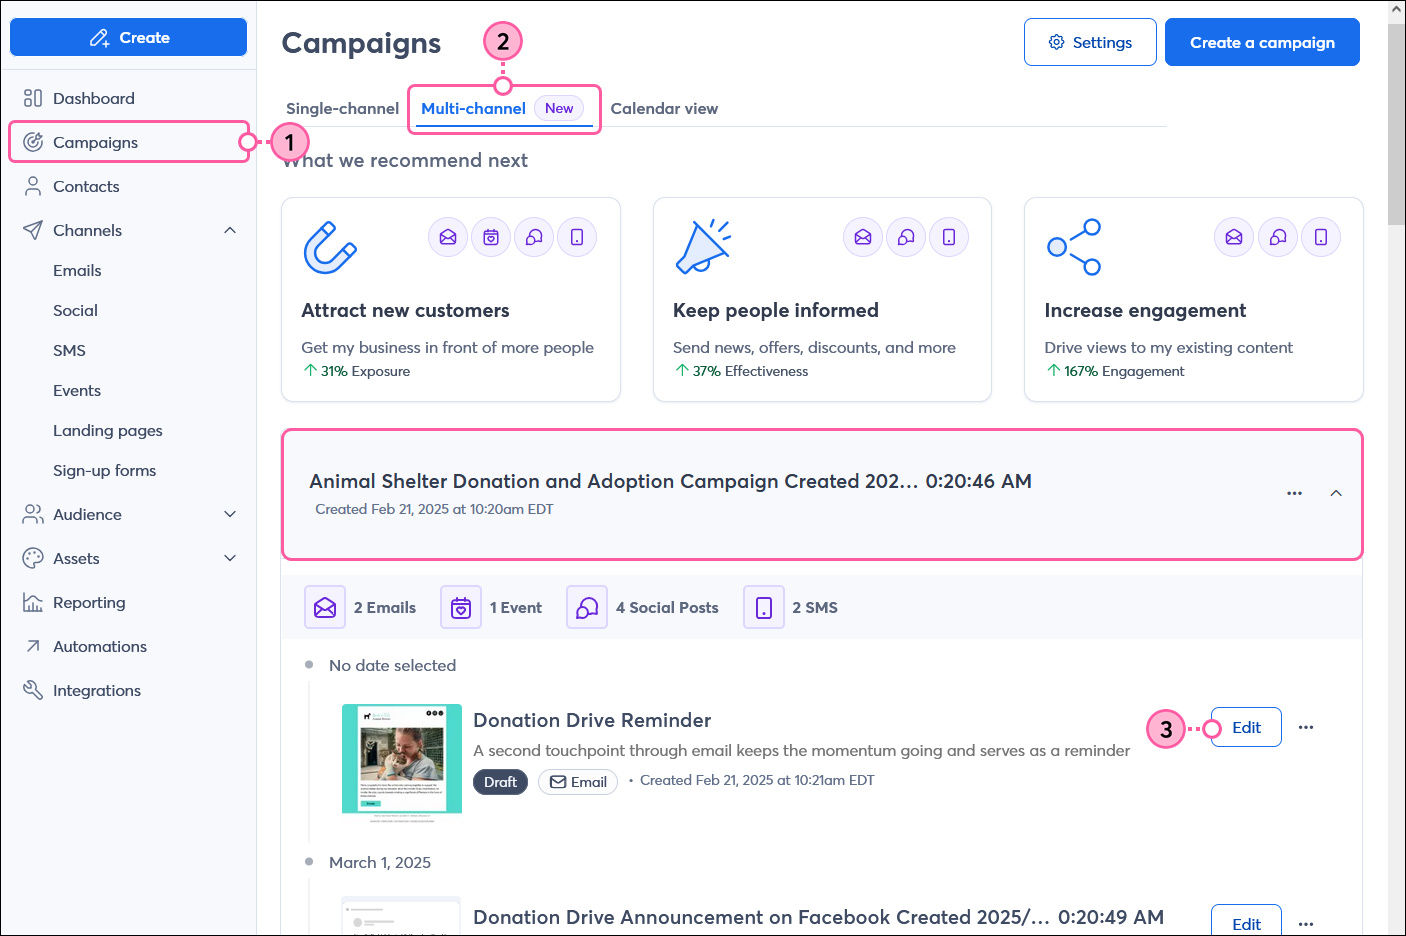
Once your marketing campaign is generated using the Campaign Builder, it’s time to take a look and customize it before sharing it with your audience! You can see the individual channels on the Single-channel and Calendar view tabs, but it’s easy to manage them for a specific campaign from the Multi-channel tab.

Campaign Builder tab


View and rename your generated campaign

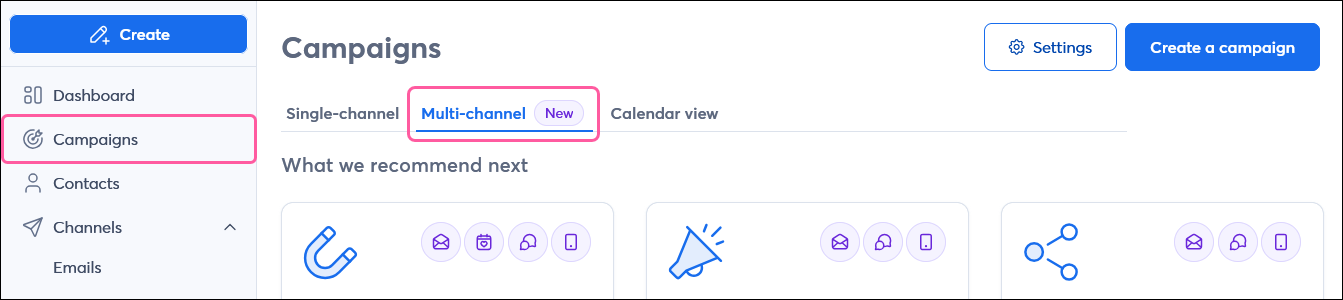
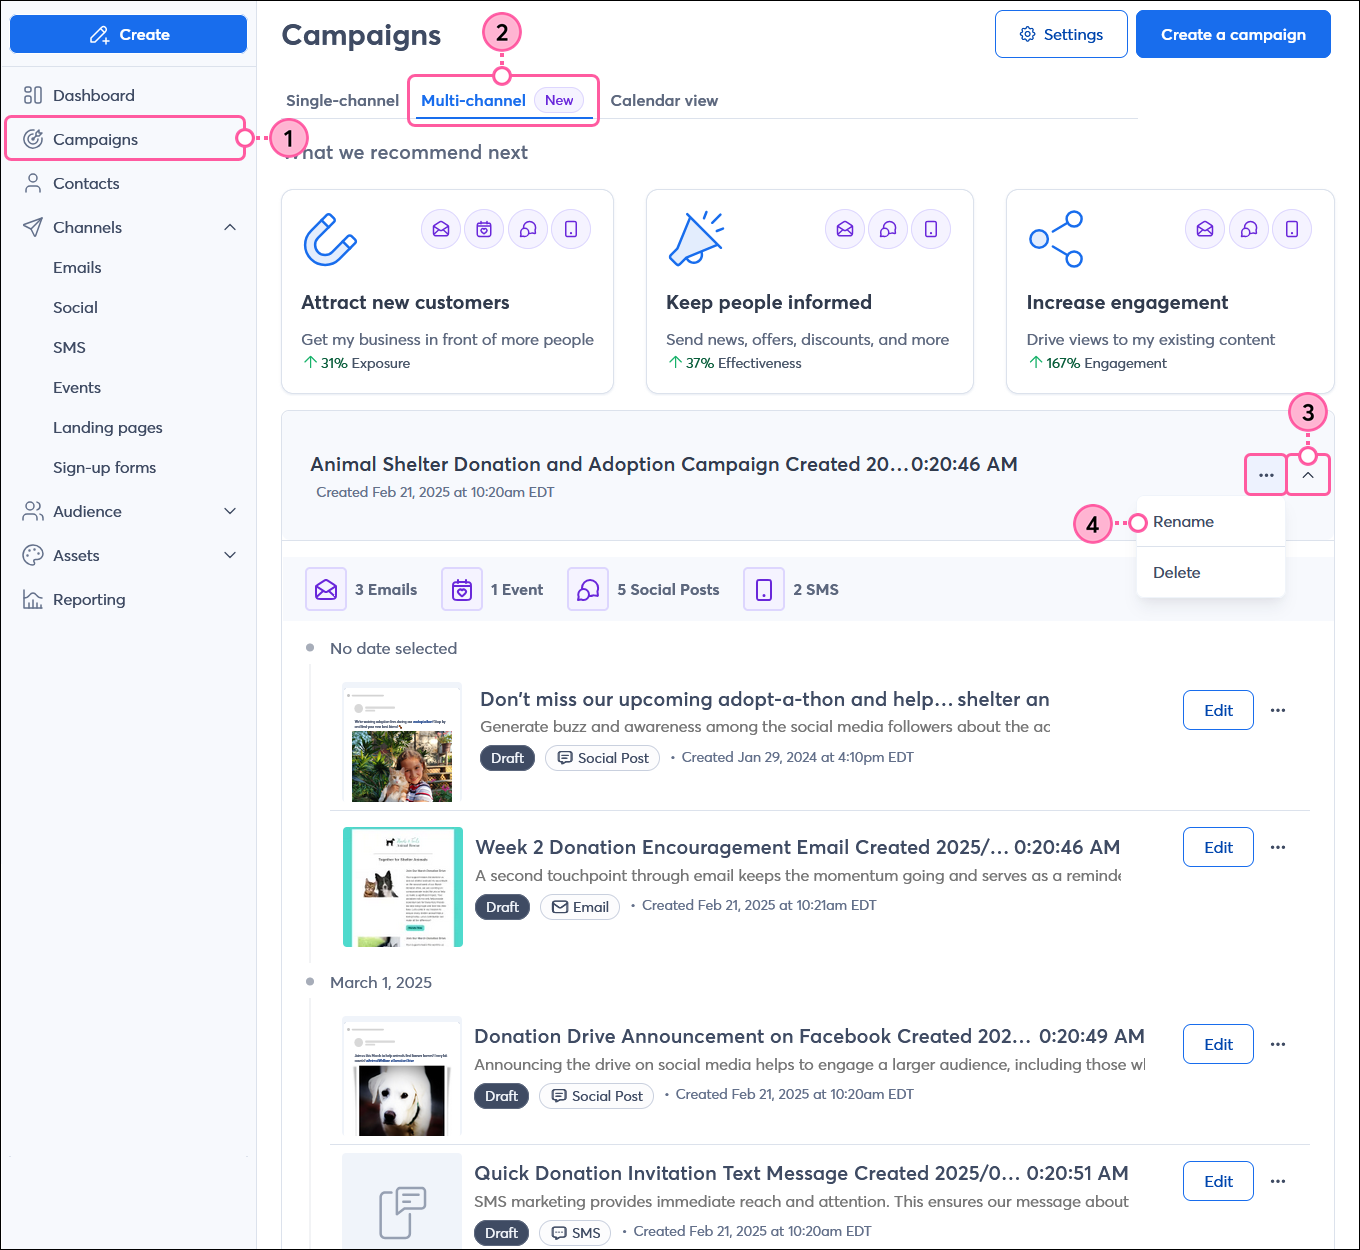
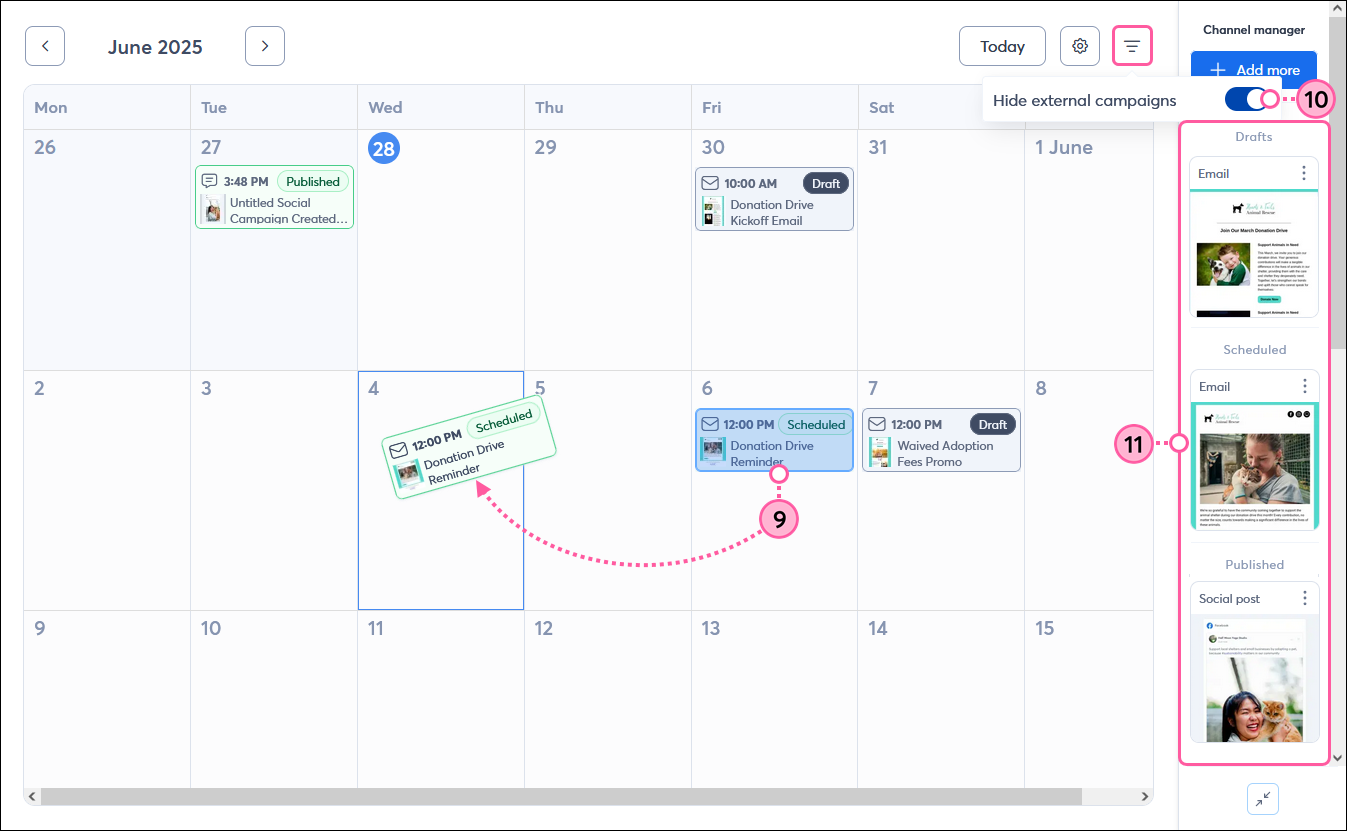
When we generate your multi-channel campaign, we give it a name, create drafts of the recommended campaign channels, and provide a recommended schedule of when to distribute each email, social post, and SMS message. If an Event was created for your campaign, it’ll be listed under the date of the event or the final day of your selected timeframe.

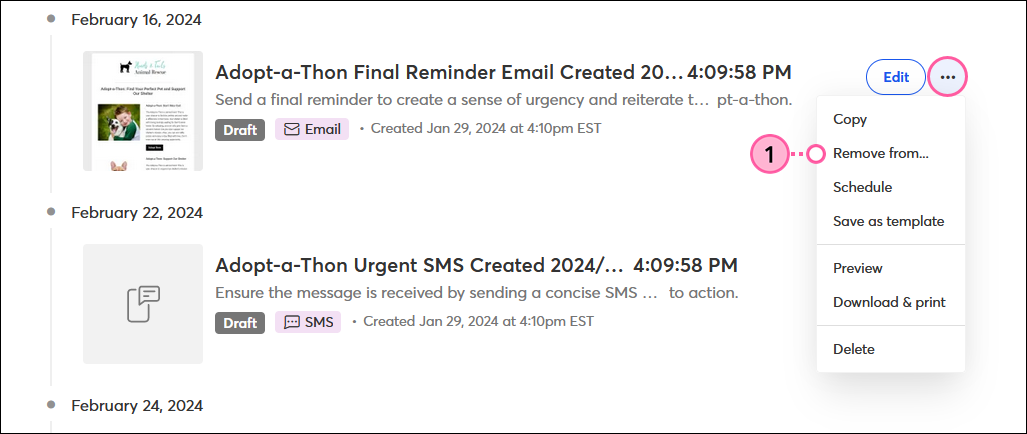
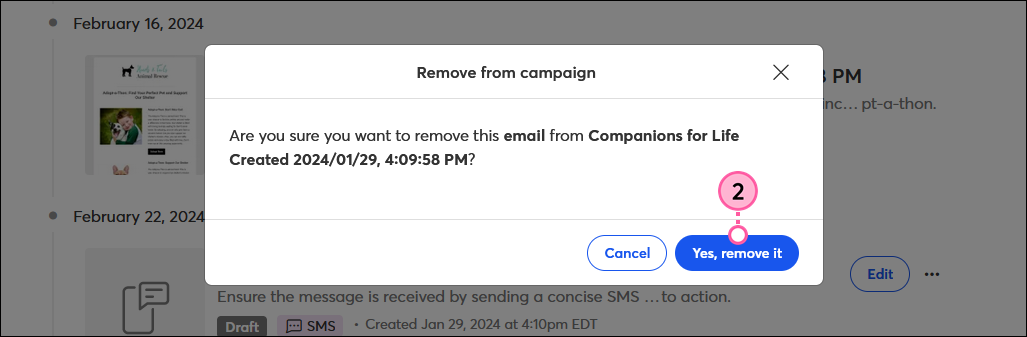
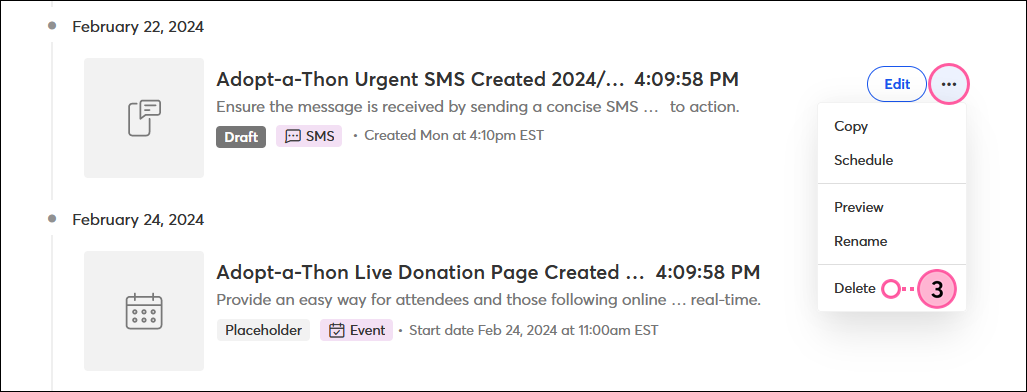
To rearrange any of the generated campaign drafts within your campaign, simply change the send date when scheduling it. You can also choose to remove any campaign channels you don’t want to use, or add channels to extend the reach of your campaign.


To view your marketing campaign:

  1. Click Marketing channels > Multi-channel campaigns
  2. Click to expand the marketing campaign if needed. You’ll see the list of drafts separated out by recommended distribution date, which you can change when you go to schedule them.
  3. (Optional) Click . . . > Rename to edit the generated name for your marketing campaign.

    Campaign Builder tab, generated campaign expanded, More drop-down, and Rename option
     

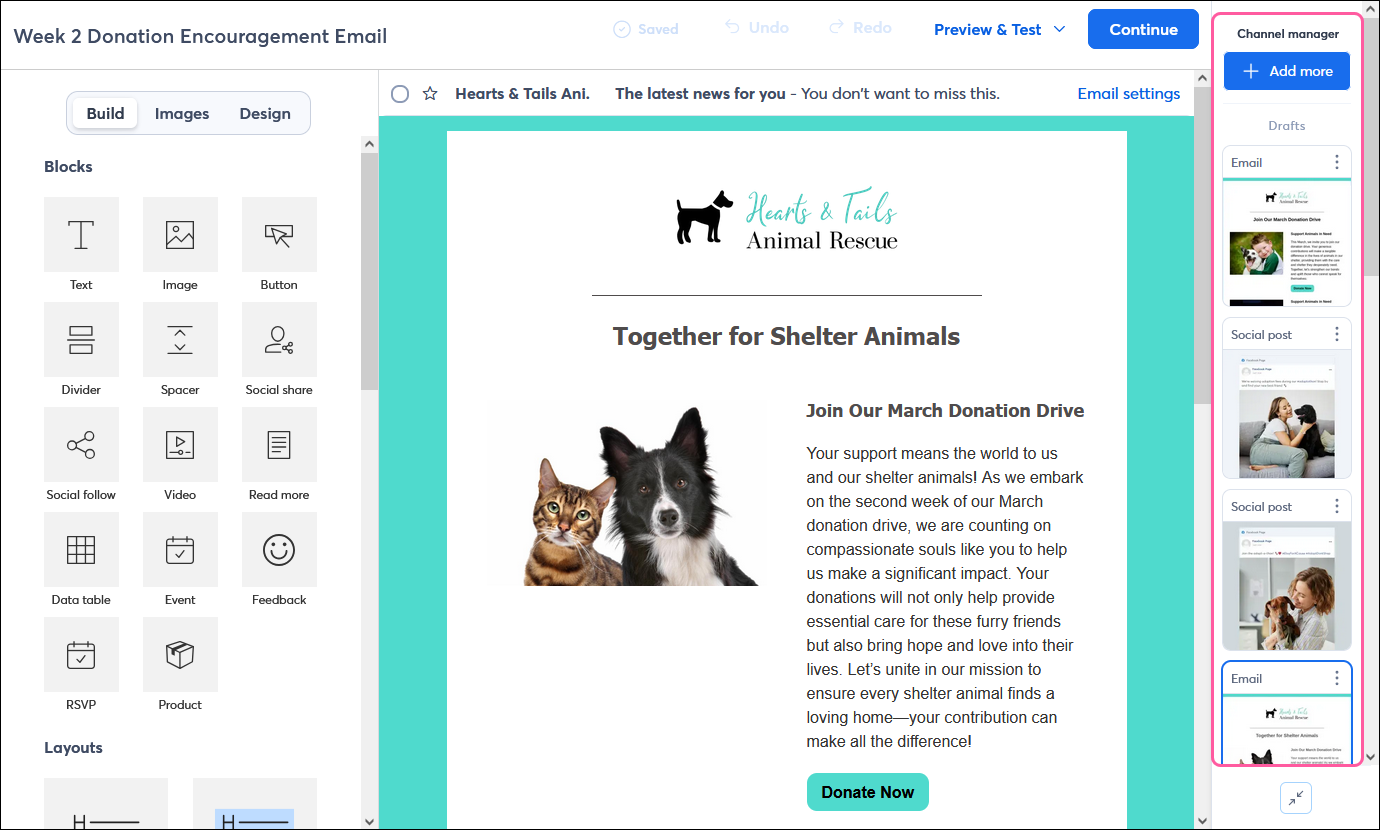
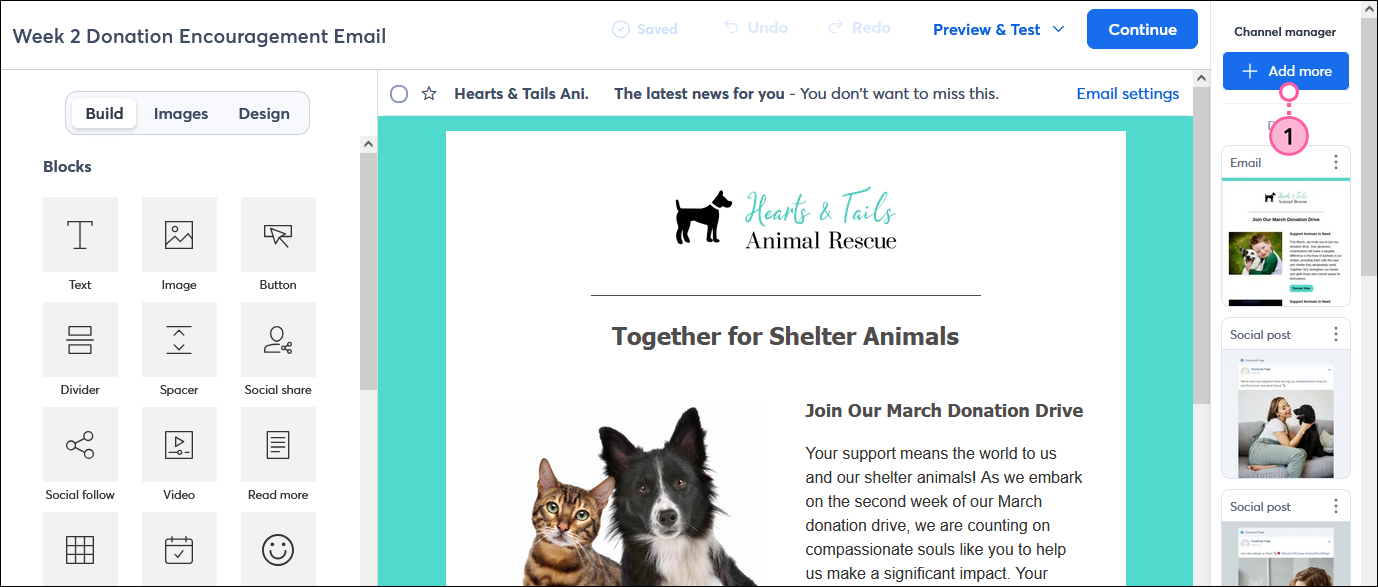
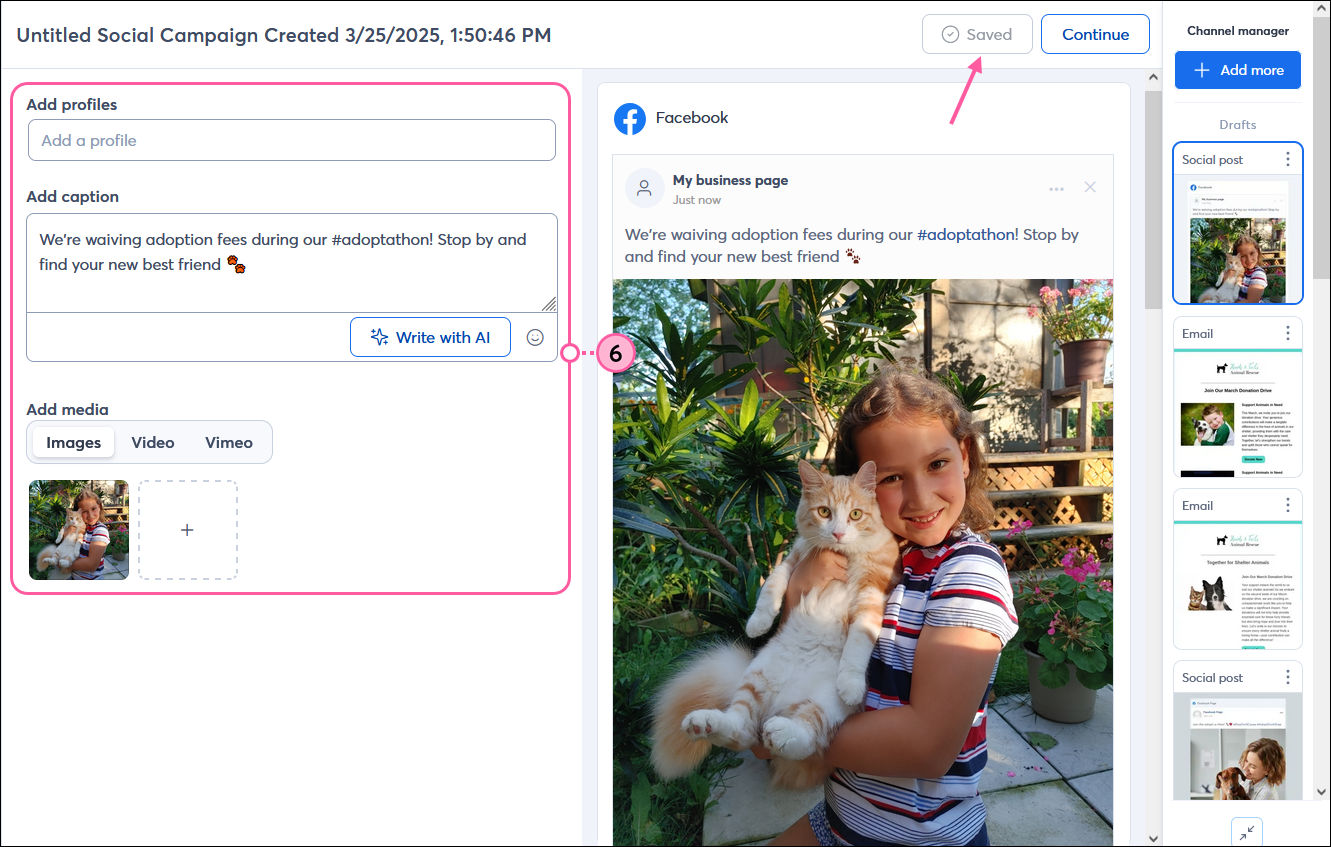
You can also see all of the individual emails, social posts, and SMS messages within your campaign when working on one of them. Within the editor, the panel on the right shows them grouped by draft, scheduled, and published status. To switch between them, simply click on the thumbnail of the one you want to view, edit, or schedule.


Email editor with Channel Manager panel


Add a channel to your campaign

You can add an existing email, social post, or SMS message to your campaign, or effortlessly generate a new one to add to it.


Add a new channel

When working on an existing email, social post, or SMS message, you can automatically generate a new one using AI recommendations to add to your campaign. 

  1. From the panel on the right, click +Add more.

    Email editor with Channel Manager and Add More button
     
  2. We automatically recommend email, social post, and SMS message options with placeholder content. To get more personalized recommendations, enter a bit of information about what you want to share and click Create.
  3. (Optional) Click to deselect any channel type or social post network you don’t need.
  4. Use the arrows to scroll through the generated options.
  5. To add something to your campaign, hover over the thumbnail and click +Add. You can also choose to start from a blank template or use your own custom HTML code.

    Create channel from prompt and generated options

  6. Make any desired edits before scheduling it to send or post. If you’re not ready to schedule it, simply ensure your changes are saved before navigating away from the editor, and your draft will be waiting for you when you are!

    Social post editor with Saved button


Add an existing channel

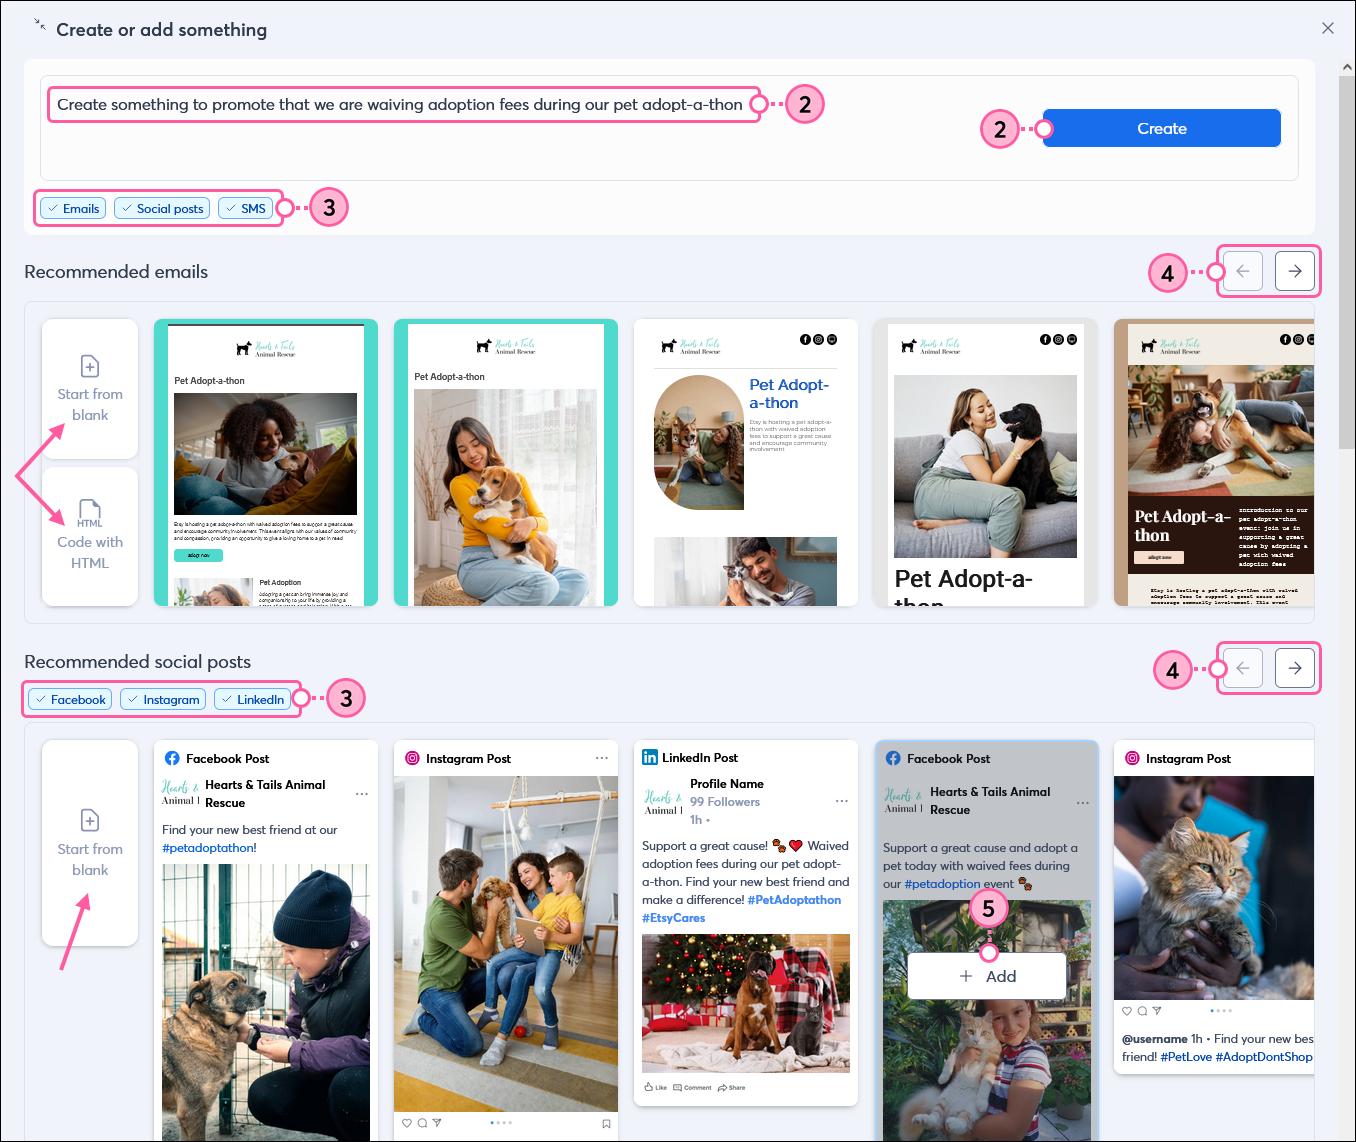
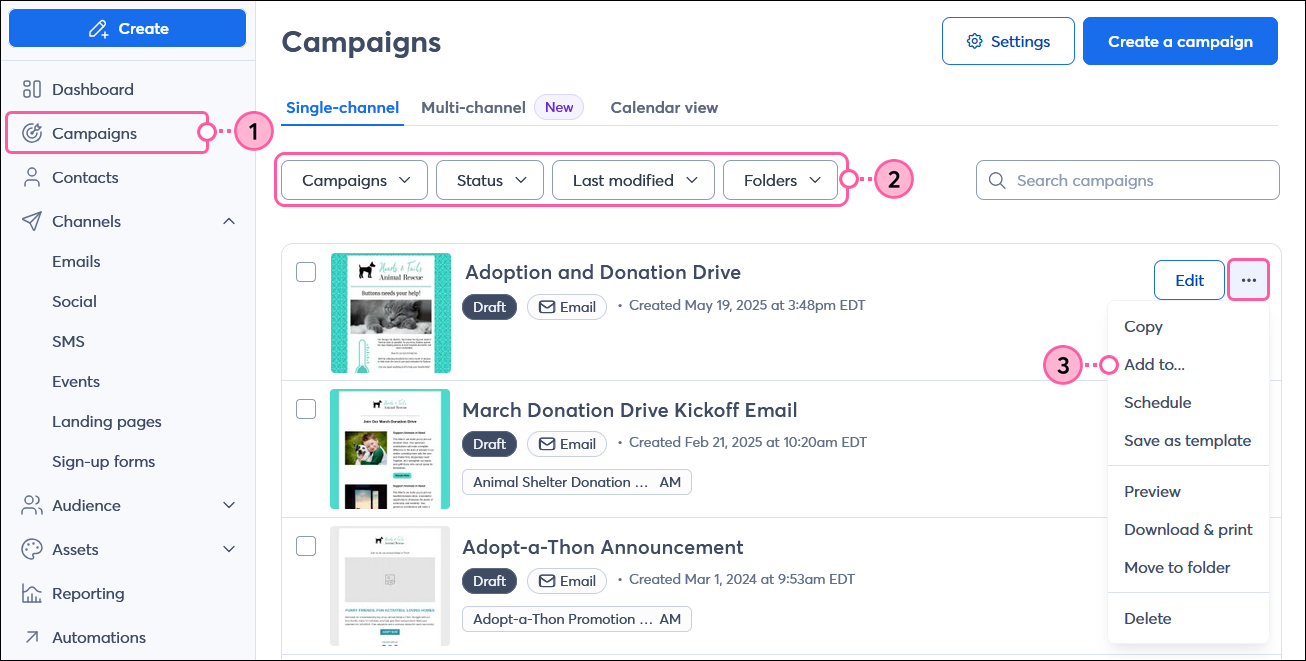
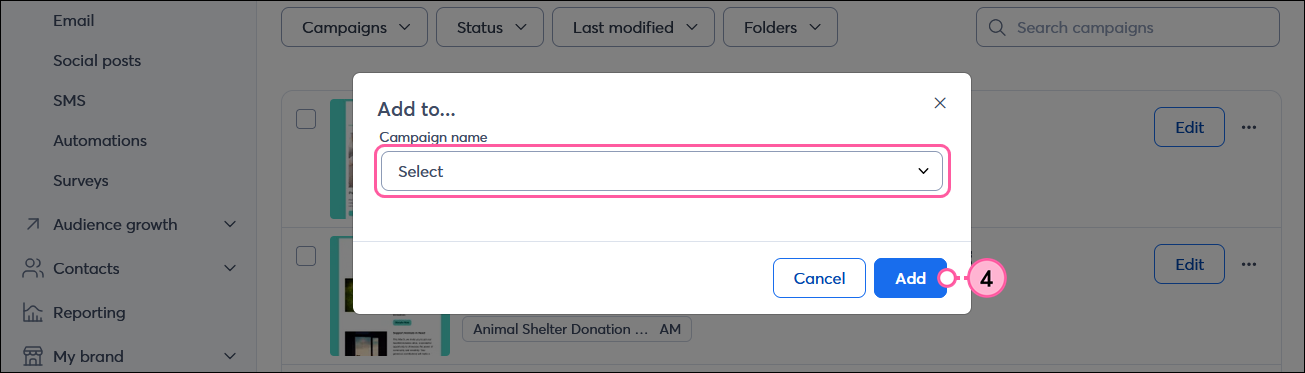
If you already have an email, automated path, social post, social ad, SMS, Event, Survey, or landing page created from the Single-channel tab, you can easily add it to your multi-channel campaign to keep everything related to your marketing goal together.

  1. Click Marketing channels > All campaigns
  2. (Optional) Use the filters to narrow your search.
  3. Next to the activity you want to add to your multi-channel campaign, click . . . > Add to…

    Campaign List View tab, filters, draft email More drop-down with Add To option
     
  4. From the drop-down, choose the multi-channel campaign you want to add it to and then click Add.

    Campaign name dropdown and Add button


Remove a channel from your campaign

While we automatically generate recommended campaign channels for you based on your marketing goal, you don’t need to use them all. For example, if you haven’t added SMS Marketing to your account, you can remove any generated SMS drafts from your campaign or from your account completely.

When viewing your generated campaign on the Multi-channel tab:

  1. Next to the channel you want to remove from the campaign, click . . . > Remove from...

    Campaign activity More drop-down with Remove From option
     
  2. Click Yes, remove it to confirm. It will still be available on the Single-channel tab.

    Remove from Campaign confirmation
     
  3. If you want to remove a channel from your account completely, click . . . > Delete. If you change your mind, you can restore the deleted campaign later from the Single-channel tab.

    Campaign activity More drop-down with Delete option


Customize and schedule your campaign channels

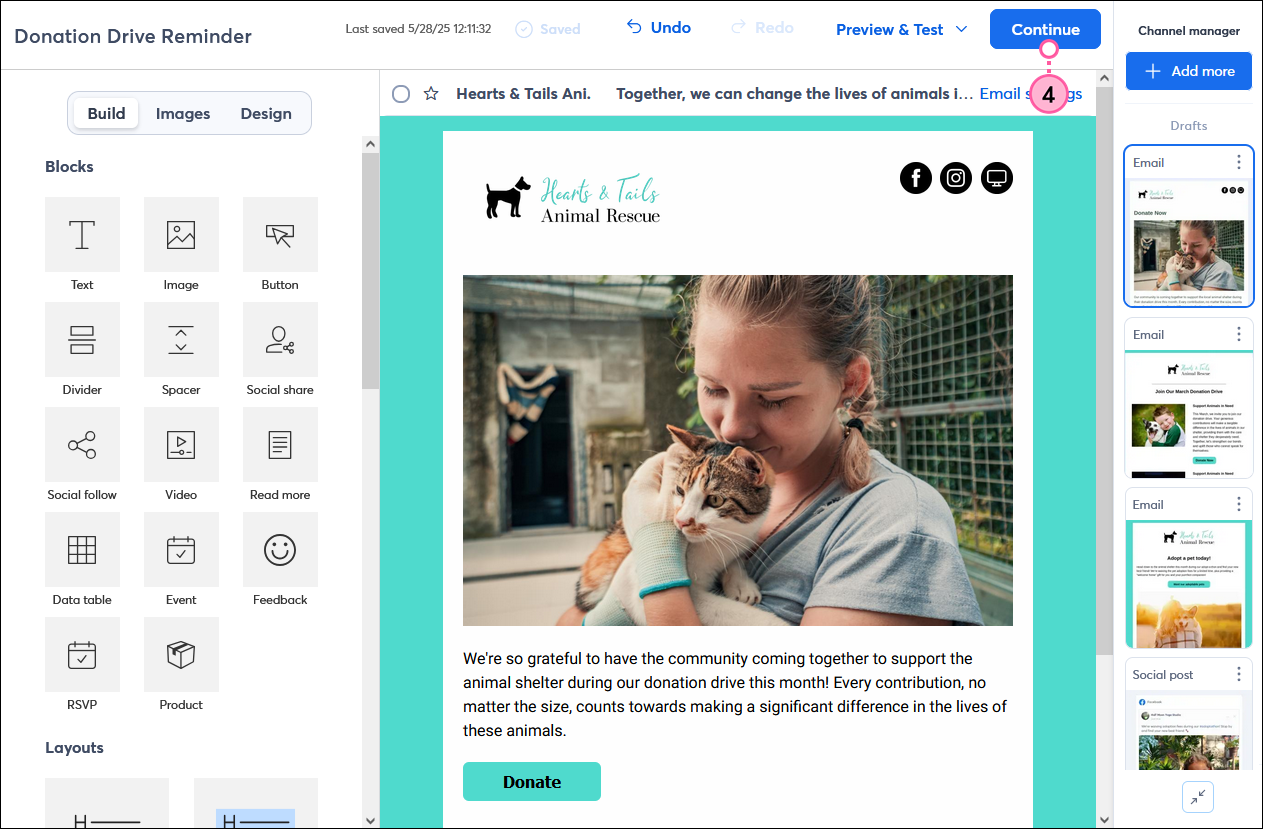
We generate basic content for each campaign channel, but you’ll want to be sure to customize each one to replace any placeholder images, add your links, update any default subject lines, preheaders, or content, and design with your branding as desired before sending, posting, or activating each.

Light Bulb IconTip: If an Event was created for your campaign, be sure to customize it with your specific event details and activate it before sending anything requesting registrations.


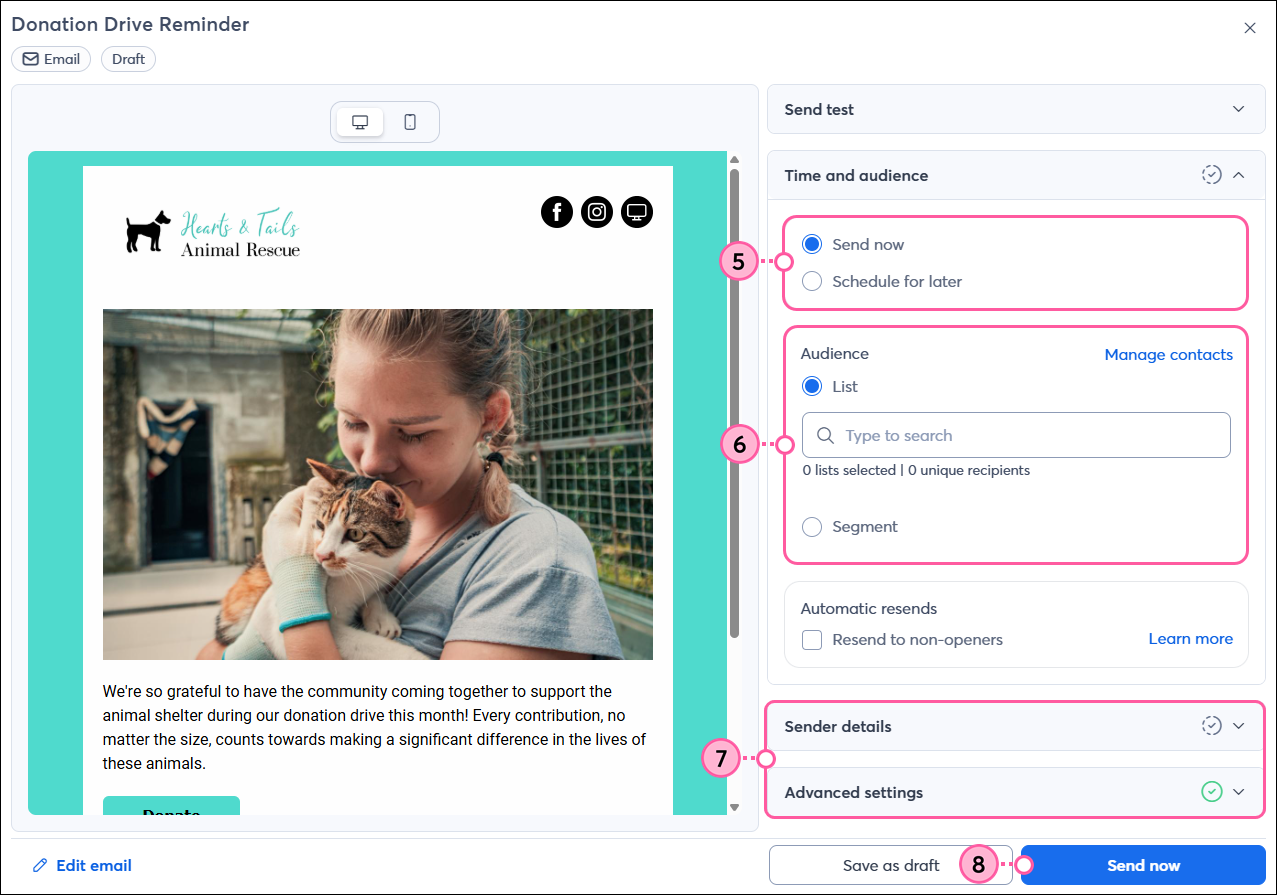
To customize and schedule your campaign channels:

  1. If you’re not already viewing your campaign, click Marketing channels > Multi-channel campaigns.
  2. Click to expand the campaign if needed.
  3. Click Edit next to a draft to customize and schedule it.

    Multi-channel tab, generated campaign expanded, and Edit button next to draft email

  4.  Customize the content and design as needed. When you’re ready to schedule it, click Continue.

    Email editor with Continue button

  5. Choose when you want to send or post.
    Note: The recommended send date will auto-populate on the schedule page, but you can change it as desired. 
  6. If it’s an email or SMS message, select the contact list(s) or segment you want to send to.
  7. If it’s an email, double check the sender details and advanced settings, and send a test for review.
  8. When you’re ready, click Send now or Schedule.

    Email schedule pop-up with Time and Audience, Sender Details, Send Test, Advanced Settings, and Send Now button

  9. It will display on the calendar on the scheduled date. If you want to reschedule it, you can click and drag it to a different date. The rescheduled date will populate in the Time & Audience section of the scheduler (shown in the step above), and you can click Schedule to confirm the change.
  10. (Optional) Click the menu and turn the toggle on to only show the items within your multi-channel campaign.
  11. Repeat the steps for each channel. From the Channel manager on the right, you’ll be able to see all of the individual emails, social posts, and SMS messages within your campaign, grouped by draft, scheduled, and published status. To switch between them, simply click on the thumbnail of the one you want to view, edit, or schedule.

    Calendar with email scheduled, click and drag to reschedule, Hide external campaigns toggle, and Channel manager panel


As your campaign progresses, you can check the performance for the individual channels and overall campaign.


Delete a generated campaign

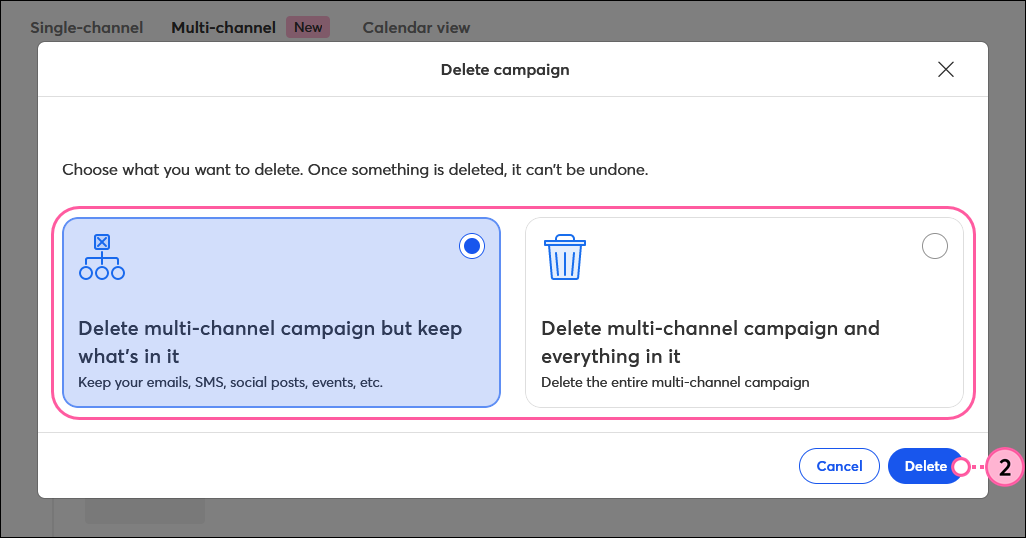
If your marketing goal changes or you just decide not to use a generated campaign, you can remove it from your account. You can choose to delete the multi-channel campaign but keep the individual campaign activities, or delete the entire campaign completely.

  1. From the Multi-channel tab, click . . . > Delete next to the campaign you want to get rid of.

    Campaign Builder tab, Campaign More drop-down with Delete option
     
  2. Choose if you want to delete the campaign but keep the individual activities on your Single-channel tab, or if you want to delete the entire campaign and all activities within it. Then click Delete.
    Exclamation Point Icon
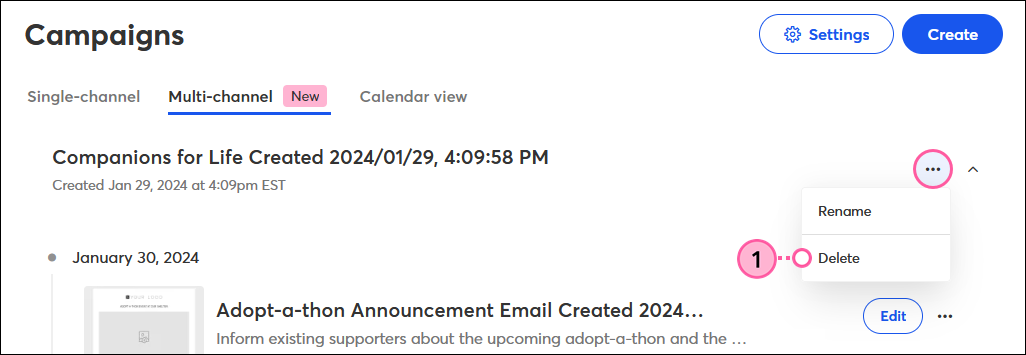
Important: Deleting the entire campaign and everything within it cannot be undone.

    Delete Campaign options and Delete button


Questions?

Ask the Community

Did this article answer your question?


Constant Contact Logo

Copyright © 2025 · All Rights Reserved · Constant Contact · Privacy Center