Congratulations on being Constant Contact Certified! One of your exclusive benefits includes the option to post a listing on our Agency Directory.
Constant Contact’s Agency Directory puts your business in front of a wide range of small businesses and nonprofits who are looking for help with their digital marketing. As you’ve now passed the Certification exam, you should see a new Directory Publishing sub-tab within the Resources tab in your personal Constant Contact account—the one given to you when you became our partner.

Before you start…
This directory is accessed by Constant Contact’s prospects, trialers, and customers—so make sure your listing clearly reflects your experience with Constant Contact, and explains how your company can help prospective clients deliver results with our tools.
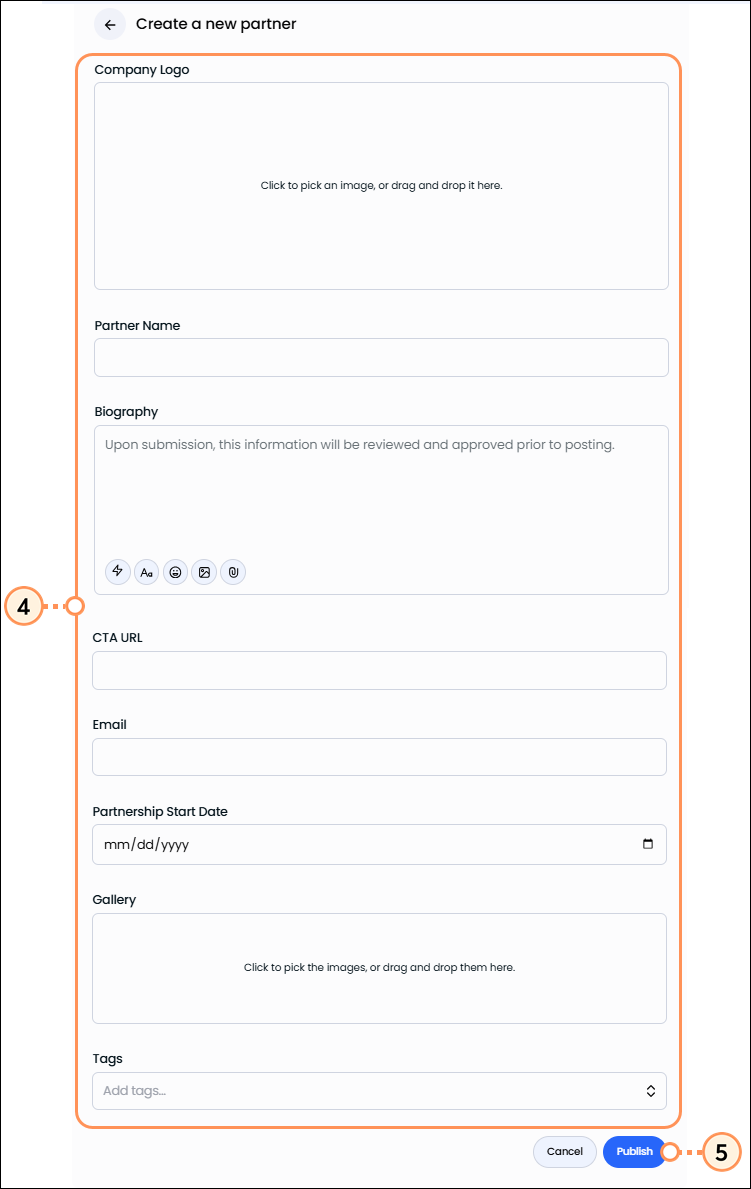
Constant Contact reserves the right to request edits on all submitted directory listings. Please strive to keep the formatting of your listings simple—use the recommended image sizes (details below) and do not add excess text formatting to your photos. Listings should be professional with a focus on small-business needs and not contain any inappropriate content, as determined by Constant Contact in its sole discretion.
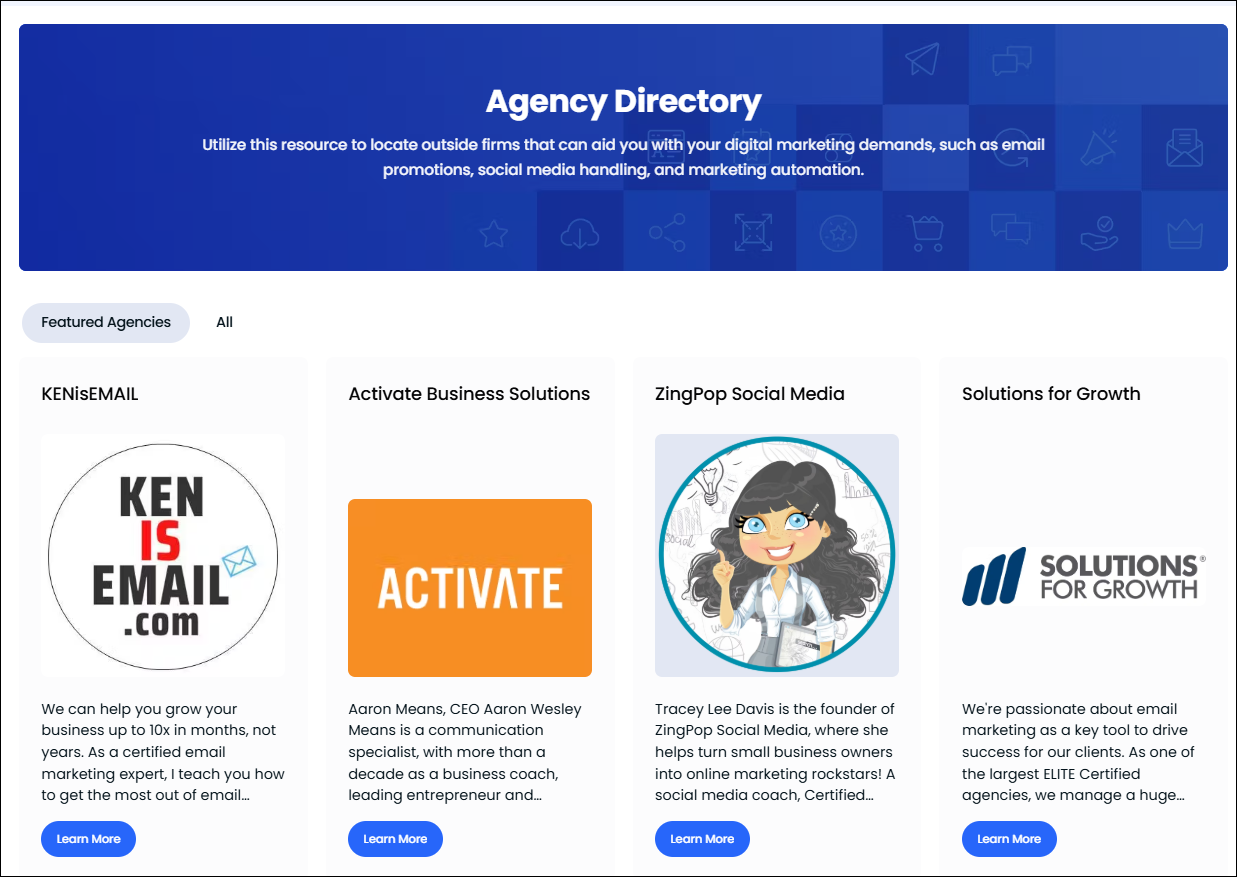
Your first step…
Make sure that you have the following images ready to upload:
- Tile image - This image displays in the Agency Directory where people can find you. The image should be a JPG or PNG that is 280px wide x 205px tall. We recommend that you feature your logo very clearly, on a solid color background, with minimal text (don’t include your web address or phone number in this image). Here’s a good example:
- Banner image - This image displays at the top of your unique listing page within the Agency Directory. The should be a JPG or PNG that is 1200px wide x 300px tall. Again, keep this simple—we encourage you to add your logo or some other image that represents your business. Don’t include your contact information in this image, as there is a section within your directory listing to include that information.

- Company logo - This image displays with your vendor information at the bottom of your unique listing page within the Agency Directory. The image should be a 60px wide x 60 px tall PNG with a transparent background.

Next, set yourself up as a new vendor...
- Click on the Resources tab in the top navigation bar.
- Click the Directory Publishing sub-tab.
- Click New Listing.

- Click the Upload Logo button to select your company logo image (60 px width and height with transparent background).
- Fill out the information for your company. Keep the description short and concise—there is a 500 character limit for the Description field.
- Click the Create button.

Now it’s time to create your listing...
- Click on the Resources tab in the top navigation bar within your Constant Contact account
- Click the Directory Publishing sub-tab.
- Click the New Listing button.

- Enter your organization's name.
- Click the Create button.

- Click the Overview tab and fill out the requested information:
- Name - Enter only your company name here.
- Tagline - Enter a tagline—this should be one short sentence (under 100 characters) to describe your company.
- Summary - In one to two sentences (under 250 characters), give a brief description of what you can offer a potential customer—this should be your company’s elevator pitch. This information is shown in the hover state on your listing tile and at the top of your unique listing page.
- Details - Enter more details about your company, and the services you provide (under 1,000 characters). Include a few sentences about your company, include some bullets on the services you provide to your clients, and any other pertinent information. Keep the formatting simple here—don’t use all caps.
- Display Sales Contacts - Check this option to allow potential clients to contact you If checked, configure the fields with the contact information.
- Display Support Contact - Check this option to allow potential clients to contact your company for support. If checked, configure the fields with the contact information.
- How Do We Contact You - If you have other contact information for specific needs such as marketing or technical support, enter that information here.
- Overview fields - Move over all services that apply, using the > and < arrows as needed. Be sure to select the categories of services that your company provides—this will allow potential clients to find the right match quicker.
- Click the Save Changes button in the lower right-hand corner at the bottom of the form.

- Click the Assets tab an upload the images and videos you want to share on your listing page. See image dimensions above.
Note: You do not need to edit anything on the Details tab.
- Logo - The logo (60 px x 60 px) is used to represent your listing on the directory when it’s browsed on a mobile device.
- Tile Image - The tile image (280 px wide x 205 px tall) is used to represent your listing in the directory gallery. Remember to feature your logo very clearly in this image, on a solid color background.
- Banner Image - The banner image (1200 px wide x 300 px tall) is shown on the detail page of the listing. Again, keep this simple—we encourage you to add your logo or some other image that represents your business. Don’t include your contact information in this image, as there is a section within your directory listing to include that information.
- Screenshots & Videos (optional) - Screenshots and videos are shown on the detail page of the listing. Click Upload Screenshot or Add a Video to upload these assets. Select the asset and then click Open. Enter a caption and then click Save. To reorder the assets, drag and drop as needed. We recommend limiting it to 3 uploads, only if you don’t add resources on the next tab.

- Click the Resources tab and click the Upload File to upload a PDF file up to 10MB, or click the Add a Link button to insert a link for one of the following topics:
- Testimonials
- Whitepapers
- Case Studies
- Data Sheets
- Customization Guides
- Webinars
Note: Your documents and links can be named whatever you want and can be reordered within each section using drag-and-drop.
 | Pro tip: This is a great place to add case studies about how you’ve helped your clients succeed with Constant Contact. Having a good testimonial is key for prospects when searching for someone to assist with their marketing. |

- Click the Lead Generation tab. This is where you configure your call to action for prospects. We recommend creating a specific landing page to gather these leads, or pointing them to a Contact Us form on your site.
- Choose an action for the button that sits below your banner image in your listing.
- Get it now button - When a potential customer clicks this button, they fill out an intake form with their name, email address, phone number, company, and state/province info. Then we email you the lead information. If you choose this option, you can also fill in the Lead Generation Message field and Listing Terms and Conditions field.
- Learn More button - When a potential customer clicks this button, they're brought to a specific URL of your choosing. To enable the button, select the "Forward customers to your website" option and enter a valid website URL.
- Click the Save Changes button in the bottom right-hand corner of the form.
- Click Preview to preview your listing.
- When you're ready, click the Submit button to submit the listing for approval by Constant Contact’s Agency Directory moderators. Once approved, you'll receive an email letting you know that your listing has been published.
Note: If you go back and edit the listing, it will need to go through the approval process again.

Once published, you can go back to the listing in your account to review reporting. You're able to filter by date and see the number of views, requests, and engagement.

Need some inspiration?
Here are a few Constant Contact agency partners that have great directory listings:
Questions?
Email certification@constantcontact.com